
Popular categories
Looking for a yarn?


Comments / Questions (135)
![]() Wik Van Nuland wrote:
Wik Van Nuland wrote:
In welke kleur haak ik de voorpanden? Is dit dan volgens het strepen patroon van het lijf? Dat zou dan betekenen dat alles in de kleur 4088 gehaakt wordt klopt dat? Hoeveel rijen moet ik haken en hoeveel stk moet ik hebben tot ik moet gaan minderen?
26.04.2016 - 14:02DROPS Design answered:
Hoi Wik. Ja, je haakt door volgens de STREPEN-LIJF (de voorpanden komen in "verlenging" van het lijf). Er staat hoeveel toeren je moet haken voor elke kleur en aantal stk, plaatsen van markeerders enzovoort staat allemaal in het patroon onder LINKER VOORPAND - ALLE MATEN.
26.04.2016 - 14:20
![]() Sonita wrote:
Sonita wrote:
The sleeve is confusing to me. I get the first 2 rows but then in the row 3 don't understand. What does the Work 1-1-2-2 more rows as 3rd row mean please?
17.04.2016 - 18:49DROPS Design answered:
Dear Sonita, for the sleeves, you've to work the three rows as indicated and then you have to repeat the third row: for example, if you're crocheting size 9/10 you've to repeat row 3 two more times and so on. Happy crocheting!
18.04.2016 - 10:45
![]() Kristi Kilbride wrote:
Kristi Kilbride wrote:
Hello. For some reason the armhole opening is larger than the top of my sleeve. I checked all of my stitch counts. Can't figure out why this isn't working. I'd appreciate any help. Thanks. Kristi
09.04.2016 - 01:07DROPS Design answered:
Dear Mrs Kilbride, the sleeve is worked top down, with some inc for the sleeve cap - check your number of rows and increase done for the cap before the dec on each side. Happy crocheting!
11.04.2016 - 10:21
![]() Carolyn wrote:
Carolyn wrote:
I have been crocheting the Princess Petal cardigan in the 3-5 yr size and have had no problems until reaching the sleeves. I don't understand what I am doing wrong but I have started over 4 times because the stitch count never comes out right after the first row. And where the diagram shows that the top end is slanted and the other end is straight, both ends of mine are slanted. Can someone please clarify for me?
04.04.2016 - 19:15DROPS Design answered:
Dear Carolyn, you cast on for sleeve 24 ch, then work 1 dc in 4th ch from hook (the first 3 ch = 1st dc), then 1 dc in each of the next 20 ch = 22 dc worked over 24 ch. In other words, work 21 ch, then 3 ch to turn with (= 1st dc), 1 dc in each of the next 21 ch = 22 dc. Inc then 2 dc in each side (row 2), 1 dc in each side (row 3 + row 4), 2 dc in each side (row 5) = 34 dc. Work over these 34 dc until piece measures 7 cm then start dec 1 dc in each side every 8th row a total of 3 times = 28 dc. Happy crocheting!
05.04.2016 - 09:07
![]() Nicole Rantala wrote:
Nicole Rantala wrote:
Behöver hjälp Vänster framst : Ska man virka dem 28m (storlek 5/6år9 ) bland 2 markörer? 1a varv + 1 st i börja och i slutet plus när det återstår 3m göra minskningstips -1 samtidigt ? Hur kan man öka och minska samtidigt? Jag fick en konstigt del fram med 3 hål på varje sida... Jag vill inte ge upp, hoppas du kan hjälpa mig.
20.02.2016 - 20:12DROPS Design answered:
Jo det går att öka vid varje markör samtidigt som du minskar i varje sida enligt MINSKNINGSTIP-1 för att runda kanten.
11.03.2016 - 10:54
![]() Barb Geertz wrote:
Barb Geertz wrote:
Even after reading the comments, I do not understand where to start counting for the side part. Do you start counting where you just fastened off?
13.02.2016 - 15:59DROPS Design answered:
Dear Mrs Geertz, you can fold your piece double so that both armholes match each other, then insert a marker on mid top and on mid bottom, then count the sts that will be left unworked for your size and continue over the 60-83 sts (see your size) on each side. Happy crocheting!
15.02.2016 - 10:24
![]() Jennifer Wingard wrote:
Jennifer Wingard wrote:
I finished this jacket in just three days and my little girl loves it! The instructions are quite different that what I'm used to seeing in the US, but I was able to figure out what to do without trouble. I so enjoy the patterns on this site and wanted to say "thanks" for making crochet such a fun adventure!
08.02.2016 - 16:41
![]() Cheryl Rainey wrote:
Cheryl Rainey wrote:
I am confused with the front piece.Do you count 18 st then mark and start crocheting? Also where do you start, is at the neck. I think that part of the pattern is very confusing. It would be nice if there was a video showing this part
06.02.2016 - 23:31DROPS Design answered:
Dear Mrs Rainey, for 1st size, count 18 sts, insert a marker, count 24 sts, insert a marker, 18 sts remain for front piece after 2nd marker. Happy crocheting!
08.02.2016 - 12:29
![]() Atevi wrote:
Atevi wrote:
I would appreciate some clarification on the front part...I understand the placement of stitch markers while working the base 60 dc...do i start the decrease right at the second row?...also i understand the increases before and after stitch markers, however do i keep moving the stitch markers accordingly so there is always 24 stitches in between the stitch markers in the middle?...thank your for your help on this
30.01.2016 - 22:26DROPS Design answered:
Dear Atevi, you work dec as under "decrease-tip 1 (applies body)" at the beg of written pattern, ie work first row in dc until 3 dc remain (remember incc), then work as explained. Let markers in place and move them upwards when working, inc alternately before and after both markers. Happy crochting!
01.02.2016 - 10:00
![]() Jasmin wrote:
Jasmin wrote:
Hallo ihr lieben! Ich finde diese Anleitung auch super, nur weiß ich nicht wie ich die Ärmel in das Ärmelloch nähen soll. Kann mir da wer vielleicht weiterhelfen. Danke und lg
19.01.2016 - 08:10DROPS Design answered:
Worin genau besteht Ihr Problem?
03.02.2016 - 20:17
|
|
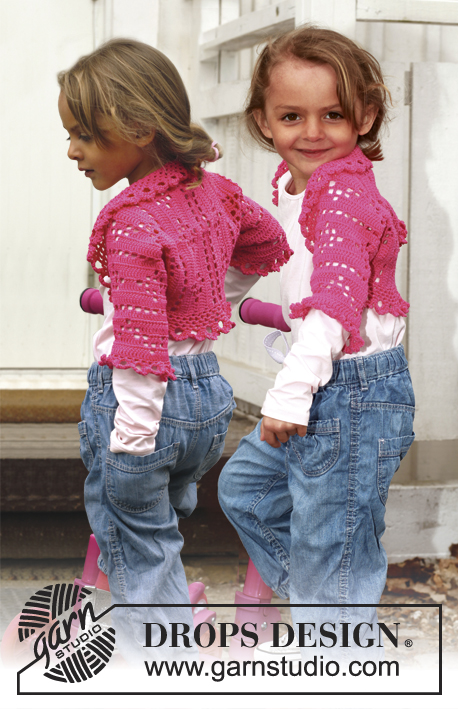
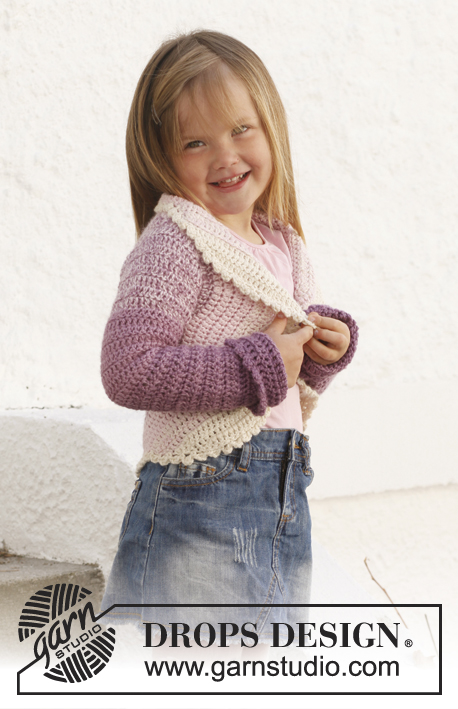
Princess Petal#princesspetalcardigan |
|
 |
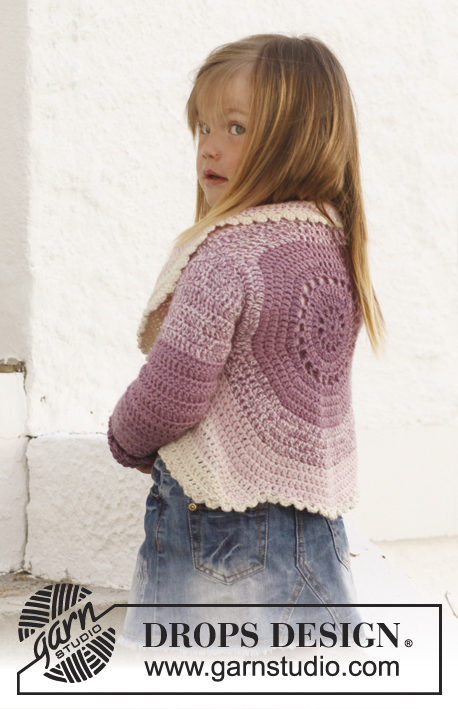 |
Circle jacket crocheted in 2 strands DROPS BabyAlpaca Silk. Size children 3 - 12 years.
DROPS Children 24-1 |
|
|
STRIPES - BODY: Worked in a circle from mid back. Beg with 2 strands of color 4088. Continue as follows: 3-3-4-4 rounds with 2 strands of color 4088. 3-3-4-4 rounds with 1 strand of color 4088 + 1 strand of color 3250. 3-4-4-4 rounds with 2 strands of color 3250. 4-4-4-5 rounds with 1 strand of color 3250 + 1 strand of color 3125. 4-4-4-5 rounds with 2 strands of color 3125. 3-4-4-4 rounds/rows with 1 strand of color 3125 + 1 strand of color 0100. 3-3-5-5 rows with 2 strands of color 0100. STRIPES - SLEEVE: Worked from sleeve cap and down in stripes as follows: Beg with 1 strand of color 3250 + 1 strand of color 3125. Work 9-10-11-12 cm / 3½"-4"-4½"-4 3/4" with this color combination. Continue with 9-10-11-12 cm / 3½"-4"-4½"-4 3/4" with 2 strands of color 3250 and then 10-10-11-12 cm / 4"-4"-4½"-4 3/4" with 1 strand of color 4088 + 1 strand of color 3250. Then finish the sleeve with 2 strands of color 4088 = approx. 10-11-12-12 cm / 4"-4½"-4 3/4"-4 3/4". CROCHET INFO: Replace first dc on every round/row with 3 ch. Finish every round with 1 sl st in 3rd ch from beg of round. DECREASE TIP 1 (applies to body): Dec as follows: Work dc until 3 dc remain, * in the first of these work 1 hdc, in the next 1 sc and in the last 1 sl st, turn with ch 1, skip sl st, work 1 sl st in sc, 1 sc in hdc, 1 hdc in first dc, continue with dc until 3 dc remain at the end of row *, repeat from *-* until 6-7-7-7 rows have been worked in total. DECREASE TIP 2 (applies to sleeves): Dec 1 dc at beg and end of row by working the second and third dc tog and the 2 next to last dc tog, this is done as follows: Work 1 dc in first dc but wait with last pull through, work 1 dc in next dc but on last pull through, pull yarn through all 3 loops on hook. -------------------------------------------------------- BODY: Worked in the round in a circle from mid back with 2 strands and STRIPES – see explanation above. Ch 5 on hook size 5 mm / H/8 and form a ring with 1 sl st in first ch. READ CROCHET INFO! ROUND 1: 12 dc in ch-ring. ROUND 2: 1 dc, * ch 2, 1 dc in next dc *, repeat from *-* the entire round, finish with 2 ch and 1 sl st in 1st dc = 12 dc with 2 ch between each. ROUND 3: 1 dc in every dc and 2 dc in every ch-space the entire round = 36 dc. ROUND 4: * 1 dc in each of the first 2 dc, 2 dc in next dc *, repeat from *-* the entire round = 48 dc. ROUND 5: 1 dc, * ch 2, skip 1 dc, 1 dc in next dc *, repeat from *-* the entire round, finish with 2 ch and 1 sl st in 1st dc = 24 dc with 2 ch between each. ROUND 6: 1 dc in every dc and 2 dc in every ch-space the entire round = 72 dc. ROUND 7: Work 1 dc in every dc but in every 6th dc work 2 dc = 84 dc. ROUND 8: Work 1 dc in every dc but in every 7th dc work 2 dc = 96 dc. ROUND 9: Work 1 dc in every dc but in every 8th dc work 2 dc = 108 dc. ROUND 10: Work 1 dc in every dc but in every 9th dc work 2 dc = 120 dc. ROUND 11: Work 1 dc in every dc but in every 10th dc work 2 dc = 132 dc. Piece measures approx. 14 cm / 5½'' from the middle to edge. SIZE 3/5 YEARS: ROUND 12: Work 1 dc in each of the first 30 dc (= up towards neck), ch 22 loosely, skip the next 20 dc (= armhole), then work 1 dc in each of the next 62 dc (= down towards back), ch 22 loosely, skip the next 20 dc (= armhole) and fasten with 1 sl st in first dc at beg of round. ROUND 13: Work 1 dc in each of the first 30 dc but inc 2 dc evenly (= 32 dc), then work 22 dc in ch-row over armhole, work 1 dc in each of the next 62 dc but inc 2 dc evenly (= 64 dc), work 22 dc in ch-row over armhole, and fasten with 1 sl st in first dc at beg of round = 140 dc. ROUND 14 to 17: Continue with dc – at the same time inc 10 dc evenly on every round. After 17th round there are 180 dc on round and piece measures approx. 21 cm / 8 1/4'' from the middle to edge. Fasten off. Then work only over 60 dc in each side - i.e. the 30 dc at the top by neck and the 30 dc at the bottom of back are no longer worked. Continue with explanation below front piece. SIZE 6/8 YEARS: ROUND 12: Work 1 dc in every dc but in every 11th dc work 2 dc = 144 dc. ROUND 13: Work 1 dc in each of the first 35 dc (= up towards neck), ch 23 loosely, skip the next 21 dc (= armhole), then work 1 dc in each of the next 67 dc (= down towards back), ch 23 loosely, skip the next 21 dc (= armhole) and fasten with 1 sl st in first dc at beg of round. ROUND 14: Work 1 dc in each of the first 35 dc but inc 3 dc evenly (= 38 dc), then work 23 dc in ch-row over armhole, work 1 dc in each of the next 67 dc but inc 3 dc evenly (= 70 dc), work 23 dc in ch-row over armhole, and fasten with 1 sl st in first dc at beg of round = 154 dc. ROUND 15 to 19: Continue with dc – at the same time inc 10 dc evenly on every round. After 19th round there are 204 dc on round and piece measures approx. 23 cm / 9'' from the middle to edge. Fasten off. Then work only over 68 dc in each side - i.e. the 34 dc at the top by neck and the 34 dc at the bottom of back are no longer worked. Continue with explanation below front piece. SIZE 9/10 YEARS: ROUND 12: Work 1 dc in every dc but in every 11th dc work 2 dc = 144 dc. ROUND 13: Work 1 dc in every dc but in every 12th dc work 2 dc = 156 dc. ROUND 14: Work 1 dc in each of the first 38 dc (= up towards neck), ch 25 loosely, skip the next 23 dc (= armhole), then work 1 dc in each of the next 72 dc (= down towards back), ch 25 loosely, skip the next 23 dc (= armhole) and fasten with 1 sl st in first dc at beg of round. ROUND 15: Work 1 dc in each of the first 38 dc but inc 3 dc evenly (= 41 dc), then work 25 dc in ch-row over armhole, work 1 dc in each of the next 72 dc but inc 3 dc evenly (= 75 dc), work 25 dc in ch-row over armhole, and fasten with 1 sl st in first dc at beg of round = 166 dc. ROUND 16 to 21: Continue with dc – at the same time inc 10 dc evenly on every round. After 21st round there are 226 dc on round and piece measures approx. 26 cm / 10 1/4'' from the middle to edge. Fasten off. Then work only over 74 dc in each side - i.e. the 39 dc at the top by neck and the 39 dc at the bottom of back are no longer worked. Continue with explanation below front piece. SIZE 11/12 YEARS: ROUND 12: Work 1 dc in every dc but in every 11th dc work 2 dc = 144 dc. ROUND 13: Work 1 dc in every dc but in every 12th dc work 2 dc = 156 dc. ROUND 14: Work 1 dc in every dc but in every 13th dc work 2 dc = 168 dc. ROUND 15: Work 1 dc in each of the first 42 dc (= up towards neck), ch 27 loosely, skip the next 25 dc (= armhole), then work 1 dc in each of the next 76 dc (= down towards back), ch 27 loosely, skip the next 25 dc (= armhole) and fasten with 1 sl st in first dc at beg of round. ROUND 16: Work 1 dc in each of the first 42 dc but inc 4 dc evenly (= 46 dc), then work 27 dc in ch-row over armhole, work 1 dc in each of the next 76 dc but inc 4 dc evenly (= 80 dc), work 27 dc in ch-row over armhole, and fasten with 1 sl st in first dc at beg of round = 180 dc. ROUND 17 to 23: Continue with dc – at the same time inc 10 dc evenly on every round. After 23rd round there are 250 dc on round and piece measures approx. 28 cm / 11'' from the middle to edge. Fasten off. Then work only over 83 dc in each side - i.e. the 42 dc at the top by neck and the 42 dc at the bottom of back are no longer worked. Continue with explanation below front piece. LEFT FRONT PIECE - ALL SIZES: = 60-68-74-83 dc. Insert 1 marker after 18-20-22-24 sts in from each side (= 24-28-30-35 sts between markers). Then work stripes and dc back and forth while AT THE SAME TIME inc 1 st at each marker on every row (i.e. inc 2 dc on row - inc alternately before and after each marker outwards) until a total of 6-6-8-8 rows have been worked back and forth and AT THE SAME TIME work according to DECREASE TIP 1 Fasten off. RIGHT FRONT PIECE: Work same way as on left front piece over 60-68-74-83 dc in right side. SLEEVE: Worked back and forth from sleeve cap and down - see STRIPES - SLEEVE above. Ch 24-27-28-34 LOOSELY with 1 strand of color 3250 + 1 strand of color 3125. ROW 1: Turn and work 1 dc in 4th ch from hook (the first 3 ch = 1 dc), then work 1 dc in every ch the entire row = 22-25-26-32 dc. Turn piece. ROW 2: ch 3 + 2 dc in first dc, 1 dc in every dc until last dc and 3 dc in last dc = 26-29-30-36 dc. Turn piece. ROW 3: ch 3 + 1 dc in first dc, 1 dc in every dc until 1 dc remains and 2 dc in last dc. Turn piece. Work 1-1-2-2 more rows as 3rd row = 30-33-36-42 dc. NEXT ROW: ch 3 + 2 dc in first dc, 1 dc in every dc until last dc and 3 dc in last dc = 34-37-40-46 dc. Turn piece. Now work 1 dc in every dc until piece measures 7-8-9-10 cm / 2 3/4"-3"-3½"-4". Continue with dc while AT THE SAME TIME dec 1 dc in each side - SEE DECREASE TIP! Repeat dec every 8th-6th-5th-4th row 2-3-4-6 more times = 28-29-30-32 dc. Continue with 1 dc in every dc until sleeve measures 38-41-45-48 cm / 15"-16"-17 3/4"-19". Fasten off. ASSEMBLY: Sew sleeve seams edge to edge to avoid a chunky seam. Work 1 round around the entire body as follows with 2 strands of color 0100: 1 sl st in first st, * ch 3, 1 dc in first ch (= 1 picot), skip 1 dc, fasten with 1 sc in next st *, repeat from *-* the entire round and finish with 1 sl st in first sl st. Sew sleeves in body - make sure that sleeve cap is sewn in at the top of armholes, i.e. where the distance is shortest. Work an edge around the sleeves the same way as around body but with 2 strands of color 4088. |
|
 |
|
Have you finished this pattern?Tag your pictures with #dropspattern #princesspetalcardigan or submit them to the #dropsfan gallery. Do you need help with this pattern?You'll find 8 tutorial videos, a Comments/Questions area and more by visiting the pattern on garnstudio.com. © 1982-2026 DROPS Design A/S. We reserve all rights. This document, including all its sub-sections, has copyrights. Read more about what you can do with our patterns at the bottom of each pattern on our site. |
|


With over 40 years in knitting and crochet design, DROPS Design offers one of the most extensive collections of free patterns on the internet - translated to 17 languages. As of today we count 324 catalogs and 12272 patterns - 12262 of which are translated into English (US/in).
We work hard to bring you the best knitting and crochet have to offer, inspiration and advice as well as great quality yarns at incredible prices! Would you like to use our patterns for other than personal use? You can read what you are allowed to do in the Copyright text at the bottom of all our patterns. Happy crafting!
Post a comment to pattern DROPS Children 24-1
We would love to hear what you have to say about this pattern!
If you want to leave a question, please make sure you select the correct category in the form below, to speed up the answering process. Required fields are marked *.