
Popular categories
Looking for a yarn?


Comments / Questions (135)
![]() Helena wrote:
Helena wrote:
Hej, När man börjar på framstycket, ska man då börja med 3 lm eller ska man göra samma typ av minskning som beskrivs i minskningstips 1 efter vändningen?
07.02.2014 - 12:06DROPS Design answered:
Hej Helena, tanken är att starta med 1 sm i kanten och sedan 3 lm, men det finaste är att göra samma typ av minskn som beskrivs i tipset efter vändningen, alltså starta med 1 sm i kanten, sedan virka 1 sm i 1:a m, 1 fm i nästa m, 1 hst i nästa m, fortsätt med st tills det återstår 3 st, osv.
11.02.2014 - 00:39
![]() S Parcell wrote:
S Parcell wrote:
There are numerous gorgeous patterns on the Drops website and I thank you for them. however, with their being so many patterns is there any way possible that whoever posts the patterns can add an option for a PDF download or an easier way of saving the patterns? right now the only way to get patterns is to print each and every one. we have a crochet group that crochet for numerous charities and its impossible to keep printing the patterns its just too costly. thank you for any help.
13.01.2014 - 09:30DROPS Design answered:
Dear Mrs Parcell, you can download the patterns with the help of a virtual printer so that you will be able to print/ save them as a pdf. Happy crocheting!
13.01.2014 - 10:01
![]() Avril Williams wrote:
Avril Williams wrote:
I am having problems with the sleeves. What width should the top of the sleeve be after the first row in the 6 to 8 size. Mine seem to be too small to fit in armhole which measures 14cm.
05.01.2014 - 15:48DROPS Design answered:
Dear Mrs Williams, sleeve are worked top down, ie you star at the top of sleeve then inc each side until armhole (37 sts in size 6/8), and then dec every 6th row for sleeve border. Happy crocheting!
06.01.2014 - 09:38
![]() Christiane wrote:
Christiane wrote:
Großartige Jacke, sofort nachgearbeitet. Tolle Beschreibung für Anfänger super verständlich und gut geeignet.
03.01.2014 - 22:00
![]() BARBION wrote:
BARBION wrote:
Très beau gilet, fait en taille 3/5 ans pour ma petite, j'en refais un en 9/10 ans pour ma grande. Taille un peu petit (choisir la taille "au-dessus") mais proportions OK!! Je recommande!
19.12.2013 - 09:27
![]() Marja wrote:
Marja wrote:
Hallo lieve mensen,ik ben zo blij met dit vestje,ik heb er al 1 gemaakt in de kleinste maat en ben nu met de 1a grootste bezig. Helemaal precies in dezelfde kleur als in het patroon.
17.12.2013 - 21:29
![]() Mia wrote:
Mia wrote:
Hej, stämmer antalet maskor på ärmen i detta mönster? Armhålor i strl 6/9 är 23+20 maskor men armen ska virkas runt på 27maskor även om jag virkar löst får jag inte armen att passa i armhålan.
17.12.2013 - 21:12
![]() Feijoa wrote:
Feijoa wrote:
Déçue des explications. taille 2/3 ans correspond en réalité à 1 an/ 18 mois. Manches trop longues 10cm de trop même avec un revers. Je précise que mon l'échantillon donnait les mêmes dimensions que celles le modèle.
09.12.2013 - 15:56DROPS Design answered:
Bonjour Mme Feijoa, nous utilisons les normes européennes standard pour nos modèles et vous retrouvez toutes les mesures dans les schémas. Certains enfants sont plus grands ou plus petits pour leur âge, ainsi, on peut vérifier les mesures dans le schéma pour choisir sa taille, et ajuster en fonction de chacun. Bon crochet!
10.12.2013 - 10:01
![]() Brigitte Wolfrum wrote:
Brigitte Wolfrum wrote:
Hallo liebes Drops-Team, Kompliment zu diesem schönen Modell. Habe es bereits nachgehäkelt aber: bei genauer Übereinstimmung mit Maschenprobe/Maschenanzahl für 5/6 Jahre habe ich von den Farben erika und hell altrosa je ein Knäuel übrig. 150 g sind hierfür zu reichlich bemessen. Beim Arbeiten mit doppeltem Faden muss man ja auch nicht 2 Knäuel anfangen. Ich arbeite mit dem Fadenende von innen und dem Fadenanfang von außen. Mit Grüßen eure ansonsten begeisterte Handarbeiterin Brigitte
10.09.2013 - 12:09
![]() Steffi Bär wrote:
Steffi Bär wrote:
Die anleitung ist soweit in ordnung, aber wo ist seite 5 -- umrandung/kragen. lg steffi
27.08.2013 - 11:31DROPS Design answered:
Liebe Steffi, was meinten Sie mit Seite 5? Gibt es evtl. ein Problem beim Ausdrucken? Die Anleitung ist vollständig online.
27.08.2013 - 12:22
|
|
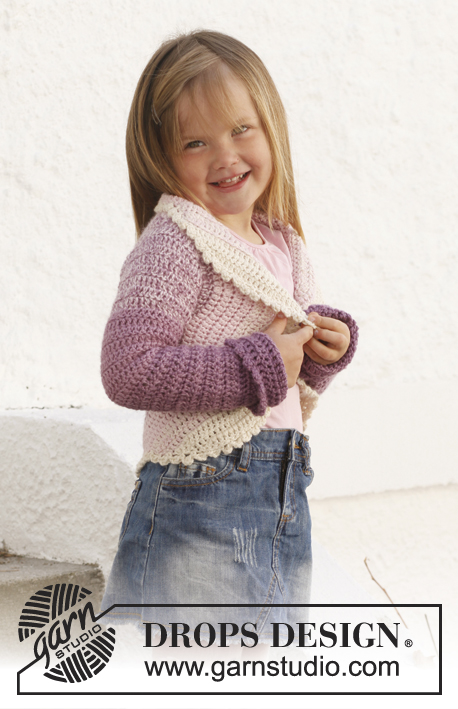
Princess Petal#princesspetalcardigan |
|
 |
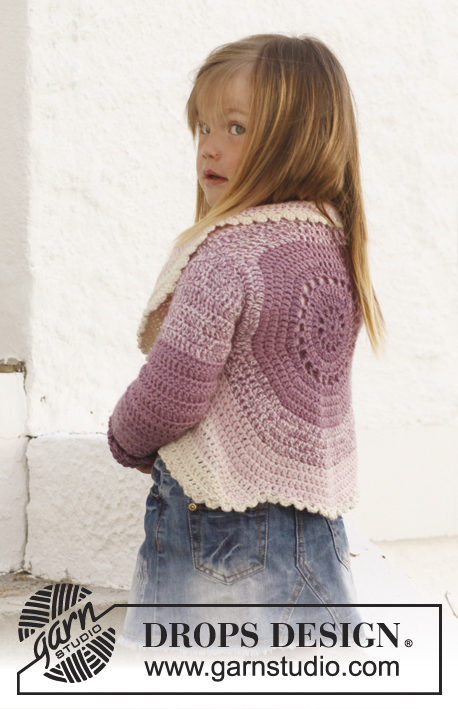 |
Circle jacket crocheted in 2 strands DROPS BabyAlpaca Silk. Size children 3 - 12 years.
DROPS Children 24-1 |
|
|
STRIPES - BODY: Worked in a circle from mid back. Beg with 2 strands of color 4088. Continue as follows: 3-3-4-4 rounds with 2 strands of color 4088. 3-3-4-4 rounds with 1 strand of color 4088 + 1 strand of color 3250. 3-4-4-4 rounds with 2 strands of color 3250. 4-4-4-5 rounds with 1 strand of color 3250 + 1 strand of color 3125. 4-4-4-5 rounds with 2 strands of color 3125. 3-4-4-4 rounds/rows with 1 strand of color 3125 + 1 strand of color 0100. 3-3-5-5 rows with 2 strands of color 0100. STRIPES - SLEEVE: Worked from sleeve cap and down in stripes as follows: Beg with 1 strand of color 3250 + 1 strand of color 3125. Work 9-10-11-12 cm / 3½"-4"-4½"-4 3/4" with this color combination. Continue with 9-10-11-12 cm / 3½"-4"-4½"-4 3/4" with 2 strands of color 3250 and then 10-10-11-12 cm / 4"-4"-4½"-4 3/4" with 1 strand of color 4088 + 1 strand of color 3250. Then finish the sleeve with 2 strands of color 4088 = approx. 10-11-12-12 cm / 4"-4½"-4 3/4"-4 3/4". CROCHET INFO: Replace first dc on every round/row with 3 ch. Finish every round with 1 sl st in 3rd ch from beg of round. DECREASE TIP 1 (applies to body): Dec as follows: Work dc until 3 dc remain, * in the first of these work 1 hdc, in the next 1 sc and in the last 1 sl st, turn with ch 1, skip sl st, work 1 sl st in sc, 1 sc in hdc, 1 hdc in first dc, continue with dc until 3 dc remain at the end of row *, repeat from *-* until 6-7-7-7 rows have been worked in total. DECREASE TIP 2 (applies to sleeves): Dec 1 dc at beg and end of row by working the second and third dc tog and the 2 next to last dc tog, this is done as follows: Work 1 dc in first dc but wait with last pull through, work 1 dc in next dc but on last pull through, pull yarn through all 3 loops on hook. -------------------------------------------------------- BODY: Worked in the round in a circle from mid back with 2 strands and STRIPES – see explanation above. Ch 5 on hook size 5 mm / H/8 and form a ring with 1 sl st in first ch. READ CROCHET INFO! ROUND 1: 12 dc in ch-ring. ROUND 2: 1 dc, * ch 2, 1 dc in next dc *, repeat from *-* the entire round, finish with 2 ch and 1 sl st in 1st dc = 12 dc with 2 ch between each. ROUND 3: 1 dc in every dc and 2 dc in every ch-space the entire round = 36 dc. ROUND 4: * 1 dc in each of the first 2 dc, 2 dc in next dc *, repeat from *-* the entire round = 48 dc. ROUND 5: 1 dc, * ch 2, skip 1 dc, 1 dc in next dc *, repeat from *-* the entire round, finish with 2 ch and 1 sl st in 1st dc = 24 dc with 2 ch between each. ROUND 6: 1 dc in every dc and 2 dc in every ch-space the entire round = 72 dc. ROUND 7: Work 1 dc in every dc but in every 6th dc work 2 dc = 84 dc. ROUND 8: Work 1 dc in every dc but in every 7th dc work 2 dc = 96 dc. ROUND 9: Work 1 dc in every dc but in every 8th dc work 2 dc = 108 dc. ROUND 10: Work 1 dc in every dc but in every 9th dc work 2 dc = 120 dc. ROUND 11: Work 1 dc in every dc but in every 10th dc work 2 dc = 132 dc. Piece measures approx. 14 cm / 5½'' from the middle to edge. SIZE 3/5 YEARS: ROUND 12: Work 1 dc in each of the first 30 dc (= up towards neck), ch 22 loosely, skip the next 20 dc (= armhole), then work 1 dc in each of the next 62 dc (= down towards back), ch 22 loosely, skip the next 20 dc (= armhole) and fasten with 1 sl st in first dc at beg of round. ROUND 13: Work 1 dc in each of the first 30 dc but inc 2 dc evenly (= 32 dc), then work 22 dc in ch-row over armhole, work 1 dc in each of the next 62 dc but inc 2 dc evenly (= 64 dc), work 22 dc in ch-row over armhole, and fasten with 1 sl st in first dc at beg of round = 140 dc. ROUND 14 to 17: Continue with dc – at the same time inc 10 dc evenly on every round. After 17th round there are 180 dc on round and piece measures approx. 21 cm / 8 1/4'' from the middle to edge. Fasten off. Then work only over 60 dc in each side - i.e. the 30 dc at the top by neck and the 30 dc at the bottom of back are no longer worked. Continue with explanation below front piece. SIZE 6/8 YEARS: ROUND 12: Work 1 dc in every dc but in every 11th dc work 2 dc = 144 dc. ROUND 13: Work 1 dc in each of the first 35 dc (= up towards neck), ch 23 loosely, skip the next 21 dc (= armhole), then work 1 dc in each of the next 67 dc (= down towards back), ch 23 loosely, skip the next 21 dc (= armhole) and fasten with 1 sl st in first dc at beg of round. ROUND 14: Work 1 dc in each of the first 35 dc but inc 3 dc evenly (= 38 dc), then work 23 dc in ch-row over armhole, work 1 dc in each of the next 67 dc but inc 3 dc evenly (= 70 dc), work 23 dc in ch-row over armhole, and fasten with 1 sl st in first dc at beg of round = 154 dc. ROUND 15 to 19: Continue with dc – at the same time inc 10 dc evenly on every round. After 19th round there are 204 dc on round and piece measures approx. 23 cm / 9'' from the middle to edge. Fasten off. Then work only over 68 dc in each side - i.e. the 34 dc at the top by neck and the 34 dc at the bottom of back are no longer worked. Continue with explanation below front piece. SIZE 9/10 YEARS: ROUND 12: Work 1 dc in every dc but in every 11th dc work 2 dc = 144 dc. ROUND 13: Work 1 dc in every dc but in every 12th dc work 2 dc = 156 dc. ROUND 14: Work 1 dc in each of the first 38 dc (= up towards neck), ch 25 loosely, skip the next 23 dc (= armhole), then work 1 dc in each of the next 72 dc (= down towards back), ch 25 loosely, skip the next 23 dc (= armhole) and fasten with 1 sl st in first dc at beg of round. ROUND 15: Work 1 dc in each of the first 38 dc but inc 3 dc evenly (= 41 dc), then work 25 dc in ch-row over armhole, work 1 dc in each of the next 72 dc but inc 3 dc evenly (= 75 dc), work 25 dc in ch-row over armhole, and fasten with 1 sl st in first dc at beg of round = 166 dc. ROUND 16 to 21: Continue with dc – at the same time inc 10 dc evenly on every round. After 21st round there are 226 dc on round and piece measures approx. 26 cm / 10 1/4'' from the middle to edge. Fasten off. Then work only over 74 dc in each side - i.e. the 39 dc at the top by neck and the 39 dc at the bottom of back are no longer worked. Continue with explanation below front piece. SIZE 11/12 YEARS: ROUND 12: Work 1 dc in every dc but in every 11th dc work 2 dc = 144 dc. ROUND 13: Work 1 dc in every dc but in every 12th dc work 2 dc = 156 dc. ROUND 14: Work 1 dc in every dc but in every 13th dc work 2 dc = 168 dc. ROUND 15: Work 1 dc in each of the first 42 dc (= up towards neck), ch 27 loosely, skip the next 25 dc (= armhole), then work 1 dc in each of the next 76 dc (= down towards back), ch 27 loosely, skip the next 25 dc (= armhole) and fasten with 1 sl st in first dc at beg of round. ROUND 16: Work 1 dc in each of the first 42 dc but inc 4 dc evenly (= 46 dc), then work 27 dc in ch-row over armhole, work 1 dc in each of the next 76 dc but inc 4 dc evenly (= 80 dc), work 27 dc in ch-row over armhole, and fasten with 1 sl st in first dc at beg of round = 180 dc. ROUND 17 to 23: Continue with dc – at the same time inc 10 dc evenly on every round. After 23rd round there are 250 dc on round and piece measures approx. 28 cm / 11'' from the middle to edge. Fasten off. Then work only over 83 dc in each side - i.e. the 42 dc at the top by neck and the 42 dc at the bottom of back are no longer worked. Continue with explanation below front piece. LEFT FRONT PIECE - ALL SIZES: = 60-68-74-83 dc. Insert 1 marker after 18-20-22-24 sts in from each side (= 24-28-30-35 sts between markers). Then work stripes and dc back and forth while AT THE SAME TIME inc 1 st at each marker on every row (i.e. inc 2 dc on row - inc alternately before and after each marker outwards) until a total of 6-6-8-8 rows have been worked back and forth and AT THE SAME TIME work according to DECREASE TIP 1 Fasten off. RIGHT FRONT PIECE: Work same way as on left front piece over 60-68-74-83 dc in right side. SLEEVE: Worked back and forth from sleeve cap and down - see STRIPES - SLEEVE above. Ch 24-27-28-34 LOOSELY with 1 strand of color 3250 + 1 strand of color 3125. ROW 1: Turn and work 1 dc in 4th ch from hook (the first 3 ch = 1 dc), then work 1 dc in every ch the entire row = 22-25-26-32 dc. Turn piece. ROW 2: ch 3 + 2 dc in first dc, 1 dc in every dc until last dc and 3 dc in last dc = 26-29-30-36 dc. Turn piece. ROW 3: ch 3 + 1 dc in first dc, 1 dc in every dc until 1 dc remains and 2 dc in last dc. Turn piece. Work 1-1-2-2 more rows as 3rd row = 30-33-36-42 dc. NEXT ROW: ch 3 + 2 dc in first dc, 1 dc in every dc until last dc and 3 dc in last dc = 34-37-40-46 dc. Turn piece. Now work 1 dc in every dc until piece measures 7-8-9-10 cm / 2 3/4"-3"-3½"-4". Continue with dc while AT THE SAME TIME dec 1 dc in each side - SEE DECREASE TIP! Repeat dec every 8th-6th-5th-4th row 2-3-4-6 more times = 28-29-30-32 dc. Continue with 1 dc in every dc until sleeve measures 38-41-45-48 cm / 15"-16"-17 3/4"-19". Fasten off. ASSEMBLY: Sew sleeve seams edge to edge to avoid a chunky seam. Work 1 round around the entire body as follows with 2 strands of color 0100: 1 sl st in first st, * ch 3, 1 dc in first ch (= 1 picot), skip 1 dc, fasten with 1 sc in next st *, repeat from *-* the entire round and finish with 1 sl st in first sl st. Sew sleeves in body - make sure that sleeve cap is sewn in at the top of armholes, i.e. where the distance is shortest. Work an edge around the sleeves the same way as around body but with 2 strands of color 4088. |
|
 |
|
Have you finished this pattern?Tag your pictures with #dropspattern #princesspetalcardigan or submit them to the #dropsfan gallery. Do you need help with this pattern?You'll find 8 tutorial videos, a Comments/Questions area and more by visiting the pattern on garnstudio.com. © 1982-2026 DROPS Design A/S. We reserve all rights. This document, including all its sub-sections, has copyrights. Read more about what you can do with our patterns at the bottom of each pattern on our site. |
|


With over 40 years in knitting and crochet design, DROPS Design offers one of the most extensive collections of free patterns on the internet - translated to 17 languages. As of today we count 324 catalogs and 12272 patterns - 12262 of which are translated into English (US/in).
We work hard to bring you the best knitting and crochet have to offer, inspiration and advice as well as great quality yarns at incredible prices! Would you like to use our patterns for other than personal use? You can read what you are allowed to do in the Copyright text at the bottom of all our patterns. Happy crafting!
Post a comment to pattern DROPS Children 24-1
We would love to hear what you have to say about this pattern!
If you want to leave a question, please make sure you select the correct category in the form below, to speed up the answering process. Required fields are marked *.