
Popular categories
Looking for a yarn?


Comments / Questions (135)
![]() Anneke wrote:
Anneke wrote:
Hallo ik snap niks van het voorpand ik moet er meerdere en gelijktijdig minderen help wie kan mij helpen
04.09.2014 - 20:59
![]() Brigitte wrote:
Brigitte wrote:
Guten Morgen, ich habe das Rumpfteil und die Vorseite fertig. Super Jacke, allerdings die Ärmel mit 22 Laufmaschen von der Achsel aus gehäkelt ist viel zu eng. Kann sein, dass ich da irgendetwas falsch verstanden habe.
23.06.2014 - 07:50DROPS Design answered:
Liebe Brigitte, haben Sie die Maße in der Maßskizze unter dem Diagramm beachtet? Dort können Sie sehen, wie weit der Armausschnitt in den verschiedenen Größen wird. Außerdem müssen Sie beachten, dass die Luftmaschen locker gehäkelt werden müssen, auch das wirkt sich sonst auf die Weite des Armausschnitts aus.
23.06.2014 - 18:00
![]() Nadine Peters wrote:
Nadine Peters wrote:
Ich finde die jacke klasse. Ich verstehe in der Anleitung die linke vorderseite nicht. Ich habe schon probiert. Es sieht aber komisch aus.
21.05.2014 - 14:02DROPS Design answered:
Liebe Frau Peters, was genau sieht denn komisch aus, an welcher Stelle? Sind Sie sicher, dass Sie die Markierungen richtig angebracht haben und somit an den richtigen Stellen zugenommen haben? Die beiden Markierungen setzen Sie ja nach den ersten 18-20-22-24 M des Vorderteils und vor den letzten 18-20-22-24 M des Vorderteils.
22.05.2014 - 22:15
![]() Jana Heine wrote:
Jana Heine wrote:
Danke für die schnelle Antwort. Es geht mir aber um das Vorderteil. Ich soll dort in jeder Reihe 2 Zunahmen machen, wie passt da der Tipp zur Abnahme rein, den man doch beachten soll, oder? Vielen Dank für Ihre Mühe!
17.05.2014 - 17:47DROPS Design answered:
Liebe Jana, ich hatte Ihre Frage erst missverstanden, obwohl Sie ja vom Vorderteil schrieben, Entschuldigung. Die Zunahmen und Abnahmen am Vorderteil widersprechen sich ja nicht. Die Zunahmen machen Sie ja weiter "innen" in der R, die Abnahmen am Rand. Sie sorgen für die richtige, abgerundete Formgebung an den Vorderteilen. Ich hoffe, ich habe Sie nun richtig verstanden...
18.05.2014 - 01:37
![]() Jana Heine wrote:
Jana Heine wrote:
Ich finde die Jacke klasse. Habe leider Probleme die Anleitung zu verstehen. Ich bin beim linken Vorderteil und verstehe die Zunahmen aber nicht wie der Tipp zur Abnahme 1 da mit rein passt! Haben Sie einen Tipp für mich!
14.05.2014 - 13:31DROPS Design answered:
Liebe Jana, Sie häkeln die Zunahmen und die Abnahmen nacheinander. Zuerst häkeln Sie die Zunahmen, bis Sie 34-37-40-46 Stb haben. Dann häkeln Sie in jeder R 1 Stb in jedes Stb, d.h. die Maschenzahl verändert sich nicht. Bei einer Gesamthöhe von 7-8-9-10 cm fangen Sie dann mit den Abnahmen an beiden Seite des Ärmels an.
14.05.2014 - 14:13
![]() Yvonne wrote:
Yvonne wrote:
Jag fattar inte hur jag ska virka ärmen. Står att man ska lägga upp 24 lm men var???
05.05.2014 - 14:54DROPS Design answered:
Du virkar ärmen först och syr den i bolen sen. Lycka till!
07.05.2014 - 09:51
![]() Julie GROS wrote:
Julie GROS wrote:
Bonjour, Ma question concerne le paragraphe des manches. Les rangs 3 et 4 où l'on doit obtenir 33 brides à la fin du rang 4. Si je compare avec les rangs 2 et 5 ça ne colle plus au niveau du nombre de bride. Au secours!! Merci Salutations,
28.04.2014 - 14:56DROPS Design answered:
Bonjour Mme Gros, après le rang 3, vous devez répéter encore 1 fois ce même rang (2ème taille), c'est-à-dire augmenter encore 2 B au rang suivant. À la fin du rang 2, vous avez 29 B, puis 31 B à la fin du rang 3 et 33 B à la fin du rang 4. Bon crochet!
28.04.2014 - 16:00
![]() Mirjana Könnecke wrote:
Mirjana Könnecke wrote:
Hi, ich finde diese Jacke auch wunderschön und will sofort loslegen. Allerdings verstehe ich die Anleitung nicht zu 100%. Wie man die einzelnen Stäbchen und Maschen häkelt ist mir klar. Aber der Anfang mit den zwei Fäden und die Zahlen dazu verstehe ich nicht (3-3-4-4 usw) kann man das auch nachlesen, erklärt bekommen? Hab in den Tutorials nichts gefunden. Danke für eure Hilfe.
27.04.2014 - 22:16DROPS Design answered:
Liebe Mirjana, Sie legen 2 Fäden zusammen und stricken mit doppeltem Faden, also mit 2 Knäulen Alpaca gleichzeitig, wie unter Streifen beschrieben. Die Zahlen stehen für die verschiedenen Größen, diese sind durch die Spiegelstriche getrennt: 98/110-116/128-134/140-146/152 cm, Sie müssen sich also immer die Zahl heraussuchen, die zu der Größe passt, die Sie stricken. Wenn Sie Größe 116/128 stricken, dann müssen Sie also immer die 2. Zahl benutzen.
28.04.2014 - 00:33
![]() Mormor wrote:
Mormor wrote:
Hej. Jag får inte ihop det med armens mått (mönster år 3-5)...får inte in den i ärmöppningen trots att jag har följt mönstret. Vad gör jag för fel, eller är det fel i mönstret? Nån som vet? Tacksam för svar!
21.04.2014 - 12:32DROPS Design answered:
Ökar du enligt beskrivningen (till ärmkulle) så du har = 34-37-40-46 st innan du börjar minska igen ?
07.05.2014 - 13:42
![]() Elke wrote:
Elke wrote:
Hei, jeg trenger hjelp.Kan ikke ferstår det skal bare brukes 28 maske i mitten av begge merkene, skal det ikke verre masker helt opp til mitten ab bolen? Er det ment man skal tar opp og av i samme rad? Jeg haåper du kan hjelpe meg. Jeg har dårlig tid, da barnebarnet fylle snart år. Takk får hjelpen. Hilsen Elke
19.04.2014 - 16:45DROPS Design answered:
Hei Elke. Det er korrekt. Du har 68 st i alt til forstk og to merker med 28 m mellom: 20 m, merke, 28 m, merke, 20 m. Du öker paa hver side af disse merkene.
25.04.2014 - 13:55
|
|
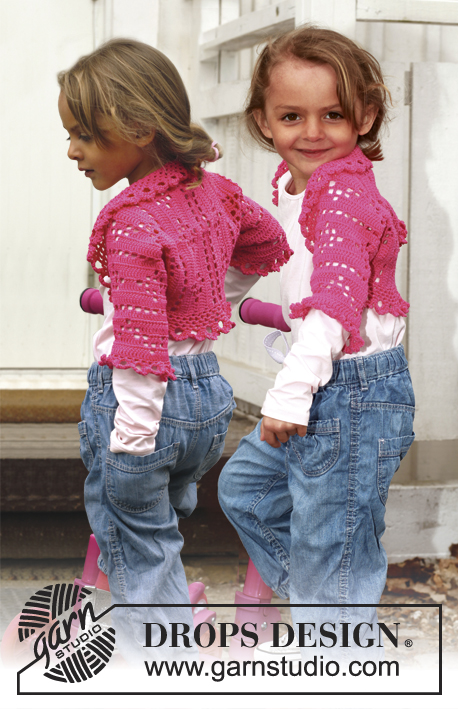
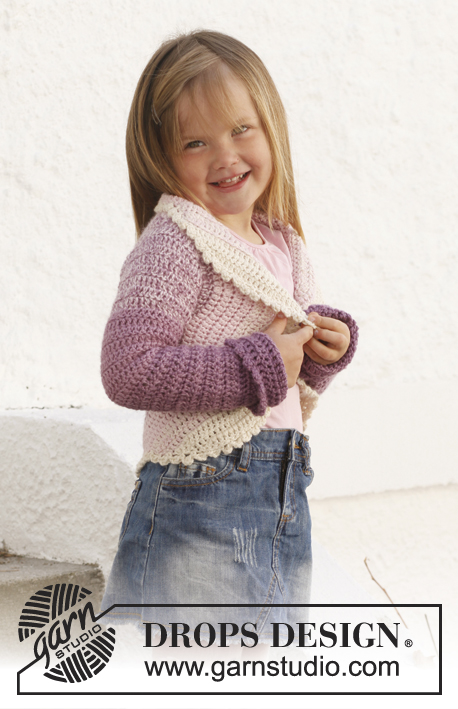
Princess Petal#princesspetalcardigan |
|
 |
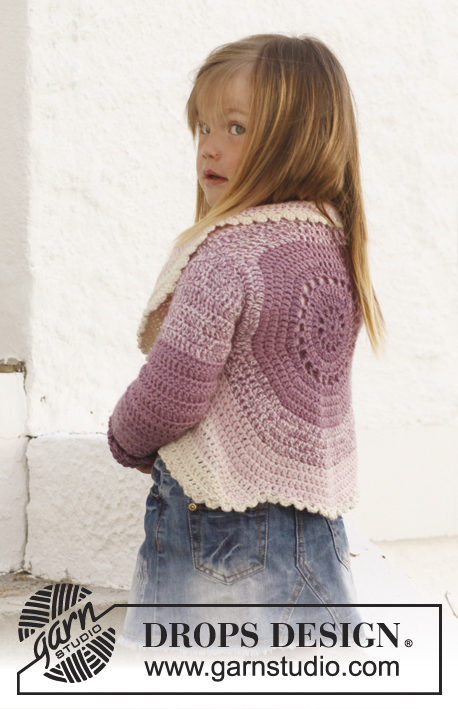 |
Circle jacket crocheted in 2 strands DROPS BabyAlpaca Silk. Size children 3 - 12 years.
DROPS Children 24-1 |
|
|
STRIPES - BODY: Worked in a circle from mid back. Beg with 2 strands of color 4088. Continue as follows: 3-3-4-4 rounds with 2 strands of color 4088. 3-3-4-4 rounds with 1 strand of color 4088 + 1 strand of color 3250. 3-4-4-4 rounds with 2 strands of color 3250. 4-4-4-5 rounds with 1 strand of color 3250 + 1 strand of color 3125. 4-4-4-5 rounds with 2 strands of color 3125. 3-4-4-4 rounds/rows with 1 strand of color 3125 + 1 strand of color 0100. 3-3-5-5 rows with 2 strands of color 0100. STRIPES - SLEEVE: Worked from sleeve cap and down in stripes as follows: Beg with 1 strand of color 3250 + 1 strand of color 3125. Work 9-10-11-12 cm / 3½"-4"-4½"-4 3/4" with this color combination. Continue with 9-10-11-12 cm / 3½"-4"-4½"-4 3/4" with 2 strands of color 3250 and then 10-10-11-12 cm / 4"-4"-4½"-4 3/4" with 1 strand of color 4088 + 1 strand of color 3250. Then finish the sleeve with 2 strands of color 4088 = approx. 10-11-12-12 cm / 4"-4½"-4 3/4"-4 3/4". CROCHET INFO: Replace first dc on every round/row with 3 ch. Finish every round with 1 sl st in 3rd ch from beg of round. DECREASE TIP 1 (applies to body): Dec as follows: Work dc until 3 dc remain, * in the first of these work 1 hdc, in the next 1 sc and in the last 1 sl st, turn with ch 1, skip sl st, work 1 sl st in sc, 1 sc in hdc, 1 hdc in first dc, continue with dc until 3 dc remain at the end of row *, repeat from *-* until 6-7-7-7 rows have been worked in total. DECREASE TIP 2 (applies to sleeves): Dec 1 dc at beg and end of row by working the second and third dc tog and the 2 next to last dc tog, this is done as follows: Work 1 dc in first dc but wait with last pull through, work 1 dc in next dc but on last pull through, pull yarn through all 3 loops on hook. -------------------------------------------------------- BODY: Worked in the round in a circle from mid back with 2 strands and STRIPES – see explanation above. Ch 5 on hook size 5 mm / H/8 and form a ring with 1 sl st in first ch. READ CROCHET INFO! ROUND 1: 12 dc in ch-ring. ROUND 2: 1 dc, * ch 2, 1 dc in next dc *, repeat from *-* the entire round, finish with 2 ch and 1 sl st in 1st dc = 12 dc with 2 ch between each. ROUND 3: 1 dc in every dc and 2 dc in every ch-space the entire round = 36 dc. ROUND 4: * 1 dc in each of the first 2 dc, 2 dc in next dc *, repeat from *-* the entire round = 48 dc. ROUND 5: 1 dc, * ch 2, skip 1 dc, 1 dc in next dc *, repeat from *-* the entire round, finish with 2 ch and 1 sl st in 1st dc = 24 dc with 2 ch between each. ROUND 6: 1 dc in every dc and 2 dc in every ch-space the entire round = 72 dc. ROUND 7: Work 1 dc in every dc but in every 6th dc work 2 dc = 84 dc. ROUND 8: Work 1 dc in every dc but in every 7th dc work 2 dc = 96 dc. ROUND 9: Work 1 dc in every dc but in every 8th dc work 2 dc = 108 dc. ROUND 10: Work 1 dc in every dc but in every 9th dc work 2 dc = 120 dc. ROUND 11: Work 1 dc in every dc but in every 10th dc work 2 dc = 132 dc. Piece measures approx. 14 cm / 5½'' from the middle to edge. SIZE 3/5 YEARS: ROUND 12: Work 1 dc in each of the first 30 dc (= up towards neck), ch 22 loosely, skip the next 20 dc (= armhole), then work 1 dc in each of the next 62 dc (= down towards back), ch 22 loosely, skip the next 20 dc (= armhole) and fasten with 1 sl st in first dc at beg of round. ROUND 13: Work 1 dc in each of the first 30 dc but inc 2 dc evenly (= 32 dc), then work 22 dc in ch-row over armhole, work 1 dc in each of the next 62 dc but inc 2 dc evenly (= 64 dc), work 22 dc in ch-row over armhole, and fasten with 1 sl st in first dc at beg of round = 140 dc. ROUND 14 to 17: Continue with dc – at the same time inc 10 dc evenly on every round. After 17th round there are 180 dc on round and piece measures approx. 21 cm / 8 1/4'' from the middle to edge. Fasten off. Then work only over 60 dc in each side - i.e. the 30 dc at the top by neck and the 30 dc at the bottom of back are no longer worked. Continue with explanation below front piece. SIZE 6/8 YEARS: ROUND 12: Work 1 dc in every dc but in every 11th dc work 2 dc = 144 dc. ROUND 13: Work 1 dc in each of the first 35 dc (= up towards neck), ch 23 loosely, skip the next 21 dc (= armhole), then work 1 dc in each of the next 67 dc (= down towards back), ch 23 loosely, skip the next 21 dc (= armhole) and fasten with 1 sl st in first dc at beg of round. ROUND 14: Work 1 dc in each of the first 35 dc but inc 3 dc evenly (= 38 dc), then work 23 dc in ch-row over armhole, work 1 dc in each of the next 67 dc but inc 3 dc evenly (= 70 dc), work 23 dc in ch-row over armhole, and fasten with 1 sl st in first dc at beg of round = 154 dc. ROUND 15 to 19: Continue with dc – at the same time inc 10 dc evenly on every round. After 19th round there are 204 dc on round and piece measures approx. 23 cm / 9'' from the middle to edge. Fasten off. Then work only over 68 dc in each side - i.e. the 34 dc at the top by neck and the 34 dc at the bottom of back are no longer worked. Continue with explanation below front piece. SIZE 9/10 YEARS: ROUND 12: Work 1 dc in every dc but in every 11th dc work 2 dc = 144 dc. ROUND 13: Work 1 dc in every dc but in every 12th dc work 2 dc = 156 dc. ROUND 14: Work 1 dc in each of the first 38 dc (= up towards neck), ch 25 loosely, skip the next 23 dc (= armhole), then work 1 dc in each of the next 72 dc (= down towards back), ch 25 loosely, skip the next 23 dc (= armhole) and fasten with 1 sl st in first dc at beg of round. ROUND 15: Work 1 dc in each of the first 38 dc but inc 3 dc evenly (= 41 dc), then work 25 dc in ch-row over armhole, work 1 dc in each of the next 72 dc but inc 3 dc evenly (= 75 dc), work 25 dc in ch-row over armhole, and fasten with 1 sl st in first dc at beg of round = 166 dc. ROUND 16 to 21: Continue with dc – at the same time inc 10 dc evenly on every round. After 21st round there are 226 dc on round and piece measures approx. 26 cm / 10 1/4'' from the middle to edge. Fasten off. Then work only over 74 dc in each side - i.e. the 39 dc at the top by neck and the 39 dc at the bottom of back are no longer worked. Continue with explanation below front piece. SIZE 11/12 YEARS: ROUND 12: Work 1 dc in every dc but in every 11th dc work 2 dc = 144 dc. ROUND 13: Work 1 dc in every dc but in every 12th dc work 2 dc = 156 dc. ROUND 14: Work 1 dc in every dc but in every 13th dc work 2 dc = 168 dc. ROUND 15: Work 1 dc in each of the first 42 dc (= up towards neck), ch 27 loosely, skip the next 25 dc (= armhole), then work 1 dc in each of the next 76 dc (= down towards back), ch 27 loosely, skip the next 25 dc (= armhole) and fasten with 1 sl st in first dc at beg of round. ROUND 16: Work 1 dc in each of the first 42 dc but inc 4 dc evenly (= 46 dc), then work 27 dc in ch-row over armhole, work 1 dc in each of the next 76 dc but inc 4 dc evenly (= 80 dc), work 27 dc in ch-row over armhole, and fasten with 1 sl st in first dc at beg of round = 180 dc. ROUND 17 to 23: Continue with dc – at the same time inc 10 dc evenly on every round. After 23rd round there are 250 dc on round and piece measures approx. 28 cm / 11'' from the middle to edge. Fasten off. Then work only over 83 dc in each side - i.e. the 42 dc at the top by neck and the 42 dc at the bottom of back are no longer worked. Continue with explanation below front piece. LEFT FRONT PIECE - ALL SIZES: = 60-68-74-83 dc. Insert 1 marker after 18-20-22-24 sts in from each side (= 24-28-30-35 sts between markers). Then work stripes and dc back and forth while AT THE SAME TIME inc 1 st at each marker on every row (i.e. inc 2 dc on row - inc alternately before and after each marker outwards) until a total of 6-6-8-8 rows have been worked back and forth and AT THE SAME TIME work according to DECREASE TIP 1 Fasten off. RIGHT FRONT PIECE: Work same way as on left front piece over 60-68-74-83 dc in right side. SLEEVE: Worked back and forth from sleeve cap and down - see STRIPES - SLEEVE above. Ch 24-27-28-34 LOOSELY with 1 strand of color 3250 + 1 strand of color 3125. ROW 1: Turn and work 1 dc in 4th ch from hook (the first 3 ch = 1 dc), then work 1 dc in every ch the entire row = 22-25-26-32 dc. Turn piece. ROW 2: ch 3 + 2 dc in first dc, 1 dc in every dc until last dc and 3 dc in last dc = 26-29-30-36 dc. Turn piece. ROW 3: ch 3 + 1 dc in first dc, 1 dc in every dc until 1 dc remains and 2 dc in last dc. Turn piece. Work 1-1-2-2 more rows as 3rd row = 30-33-36-42 dc. NEXT ROW: ch 3 + 2 dc in first dc, 1 dc in every dc until last dc and 3 dc in last dc = 34-37-40-46 dc. Turn piece. Now work 1 dc in every dc until piece measures 7-8-9-10 cm / 2 3/4"-3"-3½"-4". Continue with dc while AT THE SAME TIME dec 1 dc in each side - SEE DECREASE TIP! Repeat dec every 8th-6th-5th-4th row 2-3-4-6 more times = 28-29-30-32 dc. Continue with 1 dc in every dc until sleeve measures 38-41-45-48 cm / 15"-16"-17 3/4"-19". Fasten off. ASSEMBLY: Sew sleeve seams edge to edge to avoid a chunky seam. Work 1 round around the entire body as follows with 2 strands of color 0100: 1 sl st in first st, * ch 3, 1 dc in first ch (= 1 picot), skip 1 dc, fasten with 1 sc in next st *, repeat from *-* the entire round and finish with 1 sl st in first sl st. Sew sleeves in body - make sure that sleeve cap is sewn in at the top of armholes, i.e. where the distance is shortest. Work an edge around the sleeves the same way as around body but with 2 strands of color 4088. |
|
 |
|
Have you finished this pattern?Tag your pictures with #dropspattern #princesspetalcardigan or submit them to the #dropsfan gallery. Do you need help with this pattern?You'll find 8 tutorial videos, a Comments/Questions area and more by visiting the pattern on garnstudio.com. © 1982-2026 DROPS Design A/S. We reserve all rights. This document, including all its sub-sections, has copyrights. Read more about what you can do with our patterns at the bottom of each pattern on our site. |
|


With over 40 years in knitting and crochet design, DROPS Design offers one of the most extensive collections of free patterns on the internet - translated to 17 languages. As of today we count 324 catalogs and 12272 patterns - 12262 of which are translated into English (US/in).
We work hard to bring you the best knitting and crochet have to offer, inspiration and advice as well as great quality yarns at incredible prices! Would you like to use our patterns for other than personal use? You can read what you are allowed to do in the Copyright text at the bottom of all our patterns. Happy crafting!
Post a comment to pattern DROPS Children 24-1
We would love to hear what you have to say about this pattern!
If you want to leave a question, please make sure you select the correct category in the form below, to speed up the answering process. Required fields are marked *.