
Popular categories
Looking for a yarn?


Comments / Questions (75)
![]() Dirassen Hélène wrote:
Dirassen Hélène wrote:
Bonjour,merci beaucoup pour vos explications et bravo pour votre site qui est formidable!
29.02.2012 - 10:10
![]() Dirassen Hélène wrote:
Dirassen Hélène wrote:
Pouvez vous m'aider à décrypter le diagramme.je commence en bas à droite je fais 3m endroit,puis 3 m à l'avant ,3m endroit et je reprends mes mailles en attente,puis 3 m endroit. je tricote 5 tours et là????. merci de votre patience.
28.02.2012 - 19:36DROPS Design answered:
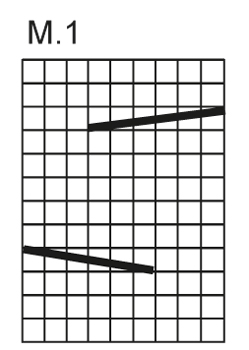
Bonjour Hélène. Pour tricoter M.1 vous faites d'abord 3 tours end, puis 3 m end, une torsade avec 3 m devant, 5 tours end, 1 torsade avec 3 m derrière, 3 m end puis 2 tours end. Pensez à regarder la vidéo proposée pour savoir comment faire une torsade en mettant les mailles devant ou derrière. Bon tricot !
29.02.2012 - 09:25
![]() Dirassen Hélène wrote:
Dirassen Hélène wrote:
Bonsoir, j'ai un petit problème de mise en pratique du deuxième paragraphe.si je fais 1m endroit et un jeté 4fois je n'ai pas 178 mailles à la fin du rang mais 170.pouvez vous m'aider s'il vous plait?
23.02.2012 - 21:30DROPS Design answered:
Bonjour Hélène, Vous répétez 2 fois la séquence de ** à **, et à l'intérieur de cette séquence, vous devez répéter 2 fois (*1m end, 1 jeté*, répéter de *-* 4 fois au total). Vous avez ainsi un total de 89 m pour chaque motif de ** à ** et 178 m au total. Bon tricot !
24.02.2012 - 11:35
![]() Lia Langstraat wrote:
Lia Langstraat wrote:
Volgens de telpatronen moeten de kabels aan de verkeerdekant worden gebreid, middenin een serie averechtse steken. Het patroon begint de kabel in naald vier. Moet dat niet naald 3 of 5 zijn?
11.02.2012 - 22:02DROPS Design answered:
Hoi Lia. Je hebt helemaal gelijk. Wij hebben de teltekening nu gewijzigd. Bedankt!
14.02.2012 - 20:52
![]() Maria Luisa wrote:
Maria Luisa wrote:
Dove trovo i ferri circolari
31.01.2012 - 08:34
![]() MONIQUE wrote:
MONIQUE wrote:
Tricoté orange/rose 19P, super le coloris. suite au commentaire paru je l'ai tricoté en 8 comme indiqué mais en ne faisant qu'une torsade dans le dos. Génial....
19.01.2012 - 21:17
![]() Drops Design France wrote:
Drops Design France wrote:
Nos tests d'impressions se sont bien déroulés, je vous contacte par mail pour plus d'information merci.
23.11.2011 - 14:33
![]() CANTIN wrote:
CANTIN wrote:
Je crois qu il y a un soucis pour sortir les explications. Merci de verifier
23.11.2011 - 09:47
![]() Gibert wrote:
Gibert wrote:
Vraiment super ce modele facile a realise mais cependant heureusement que je l'ai tricoter en 7au lieu de 8pourtant je tricote tres serre la laine andes jeans est une pure merveille milles merci
24.10.2011 - 18:14
![]() Gibert wrote:
Gibert wrote:
Vraiment super ce modele facile a realise mais cependant heureusement que je l'ai tricoter en 7au lieu de 8pourtant je tricote tres serre la laine andes jeans est une pure merveille milles merci
24.10.2011 - 18:14
|
|||||||||||||
Ice Princess#iceprincessset |
|||||||||||||
|
|
|||||||||||||
Knitted DROPS head band and shoulder warmer with cables and rib in ”Andes” or ”Snow”.
DROPS 134-24 |
|||||||||||||
|
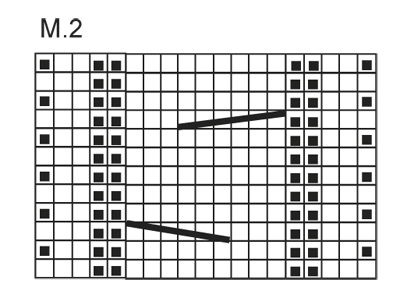
PATTERN: See diagram M.1 for shoulder warmer and diagram M.2 for head band. The diagrams show all rows in pattern seen from RS and 1 repetition of pattern. DECREASE TIP (applies to shoulder warmer): Dec on each side of P 3, K 2, P 3. Dec as follows BEFORE P 3: K 2 tog. Dec as follows AFTER P 3: Slip 1 st as if to K, K 1, psso. -------------------------------------------------------- -------------------------------------------------------- SHOULDER WARMER: Worked in the round on circular needle from bottom up. Cast on 162 sts on circular needle size 7 mm / US 10½ with Andes. Work as follows (round beg in one side): K 1, * P 3, K 2 *, repeat from *-* a total of 6 times (i.e. over 30 sts), P 3, K 5, P 3, K 5, repeat from *-* 13 times (i.e. over 65 sts), P 3, K 5, P 3, K 5, repeat from *-* 6 times (= 30 sts), P 3, K 1. Continue like this for 6 rounds. Work next round as follows: ** 11 sts in stockinette st, P 3, K 2, P 3, 12 sts in stockinette st, P 3, * K 1, 1 YO *, repeat from *-* a total of 4 times, K 1, P 3, repeat from *-* 4 times, K 1, P 3, 12 sts in stockinette st, P 3, K 2, P 3, 11 sts in stockinette st **, all sts on front piece have been worked, repeat from **-** on back piece = 178 sts. Switch to circular needle size 8 mm / US 11. Work next round K over K and P over P - K YOs twisted (i.e. work in back loop of st instead of front) to avoid holes. Continue to work as follows: ** 11 sts in stockinette st, P 3, K 2, P 3, 12 sts in stockinette st, P 3, diagram M.1, P 3, diagram M.1, P 3, 12 sts in stockinette st, P 3, K 2, P 3, 11 sts in stockinette st **, repeat from **-** 1 more time. Continue like this upwards. REMEMBER THE GAUGE! When piece measures 15 cm / 6", dec 1 st on each side of all (P 3, K 2, P 3) - SEE DECREASE TIP = 8 sts dec. Repeat dec every 3rd round a total of 10 times = 98 sts. When piece measures 35 cm / 13¾", switch to circular needle size 7 mm / US 10½. Then continue as before until piece measures 45 cm / 17¾". Bind off with K over K and P over P. HEAD BAND: Worked sideways back and forth on needle. Cast on 19 sts on needle size 6 mm / US 10 with Andes. Work diagram M.2 until piece measures approx. 48 cm / 19" - finish after 1 whole repetition. Bind off and sew head band tog edge to edge mid back to avoid a chunky seam. |
|||||||||||||
Diagram explanations |
|||||||||||||
|
|||||||||||||
 |
|||||||||||||
 |
|||||||||||||
Have you finished this pattern?Tag your pictures with #dropspattern #iceprincessset or submit them to the #dropsfan gallery. Do you need help with this pattern?You'll find 6 tutorial videos, a Comments/Questions area and more by visiting the pattern on garnstudio.com. © 1982-2026 DROPS Design A/S. We reserve all rights. This document, including all its sub-sections, has copyrights. Read more about what you can do with our patterns at the bottom of each pattern on our site. |
|||||||||||||


With over 40 years in knitting and crochet design, DROPS Design offers one of the most extensive collections of free patterns on the internet - translated to 17 languages. As of today we count 324 catalogs and 12290 patterns - 12280 of which are translated into English (US/in).
We work hard to bring you the best knitting and crochet have to offer, inspiration and advice as well as great quality yarns at incredible prices! Would you like to use our patterns for other than personal use? You can read what you are allowed to do in the Copyright text at the bottom of all our patterns. Happy crafting!
Post a comment to pattern DROPS 134-24
We would love to hear what you have to say about this pattern!
If you want to leave a question, please make sure you select the correct category in the form below, to speed up the answering process. Required fields are marked *.