
Popular categories
Looking for a yarn?


Comments / Questions (23)
![]() Rebecca wrote:
Rebecca wrote:
Hi, After looking at the pattern I am concerned that the placement of the stitch-marker for "middle back" will really be on the side of the leg as per the pattern in the photo. Has anyone found this to be true ?
26.07.2017 - 18:05DROPS Design answered:
Dear Rebecca, the expression middle back doesn't mean that it is exactly in the middle, but that it is in the back side that it is located and not in the front side of the leg.
23.08.2017 - 18:23
![]() Liz Gray wrote:
Liz Gray wrote:
Hi thanks for the reply, I have the correct amount of stitches after round 1, its on round 2 that I come unstuck and end up wrong going to sit down with a cuppa and try to figure out what it is I am not doing. I am going to persevere as cables have never been a problem before and I love this pattern.
19.01.2014 - 09:39
![]() Liz Gray wrote:
Liz Gray wrote:
I have knitted M.1 and it is as it should be and looks good but I am having trouble when I go to do M.2 part of the chart the diagram instructions do not seem to match up and the cables dont show. Is this a problem with the diagram explanations or just that I usually follow written instructions and not a chart. I love the design and could probably work it out given a bit of time. Thanks
17.01.2014 - 23:12DROPS Design answered:
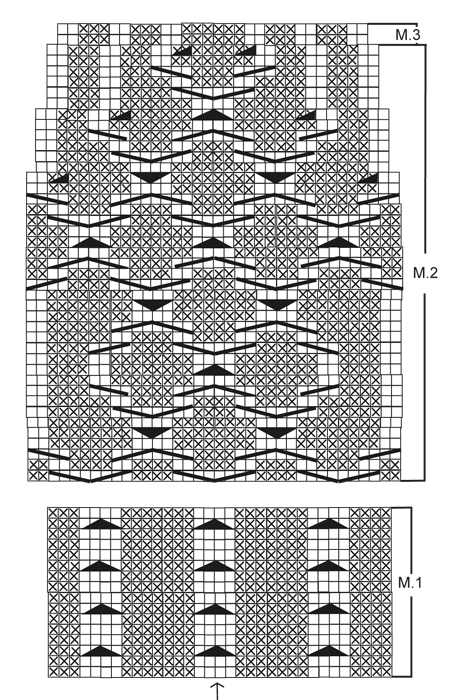
Dear Mrs Gray, on last round in M.1, you inc 1 st in every P section, and in first round in M.2, work *M.2 over the first 36 sts, P the next 12 sts at the same time dec over cable sts from M.1*, repeat one more time from *-*. YOu will get 92 sts. Happy knitting!
18.01.2014 - 09:37
![]() Ramon wrote:
Ramon wrote:
In Ordnung, vielen Dank für die Antworten!
06.03.2012 - 00:06
![]() Ramon wrote:
Ramon wrote:
Wie lang ist dann die Arbeit vom Anschlag bis zum Ende von M1?
01.03.2012 - 16:54DROPS Design answered:
M1 geht über 16 Reihen. Die Arbeit misst also am Schluss von M1 ca. 4 cm.
05.03.2012 - 10:51
![]() Ramon wrote:
Ramon wrote:
Laut Anleitung soll nach M1 nur einmal M2 gestrickt werden, insegsamt soll die Arbeit dann 20cm haben. Auf dem Bild und in meiner Arbeit sind es aber eher 12cm. Kommt das hin? Wenn ja, an welchen Höhen sollen dann die Maschen in den Links-Partien abgenommen werden?
29.02.2012 - 23:00DROPS Design answered:
Nein, nach M1 und M2 misst die Arbeit ca 19-20 cm (M1+M2 = 56 reiehen = 18,6 cm pluss Anschlag und 1 R. re.
01.03.2012 - 08:59
![]() Nina wrote:
Nina wrote:
Forstår simpelhen ikke det mønster, nu har jeg prøvet i en uge! Kom endelig med med gode råd, eller et hint til hvor jeg kan få lidt hjælp :-)
27.09.2011 - 16:50
![]() Sonja wrote:
Sonja wrote:
Die worden lichtblauw, voor mijn dochter tijdens het roeien deze winter
10.06.2011 - 07:26
![]() BOISSEE Pascale wrote:
BOISSEE Pascale wrote:
Hum !!! J'aime beaucoup ces chaussettes ! Je tenterai bien l'expérience de m'en tricoter une paire...
07.06.2011 - 17:33
![]() Stephanie wrote:
Stephanie wrote:
Oh I do like these. I love knitting socks and these look just right for a cold winter
30.05.2011 - 21:14
|
||||||||||||||||||||||
Riverdance#riverdancesocks |
||||||||||||||||||||||
 |
 |
|||||||||||||||||||||
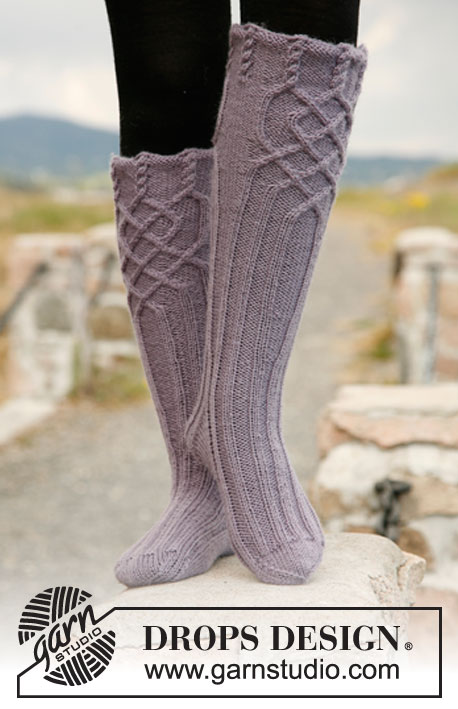
Knitted DROPS socks with cables in ”Karisma”.
DROPS 132-8 |
||||||||||||||||||||||
|
PATTERN: See diagram M.1, M.2 and M.3 - diagrams are shown from RS and show 1 repetition of pattern in width and height. HEEL DECREASE: 1st row (= RS): Work until 8 sts remain, slip 1 st as if to K, K 1, psso, turn piece. 2nd row (= WS): Work until 8 sts remain, slip 1 st as if to P, P 1, psso, turn piece. 3rd row (= RS): Work until 7 sts remain, slip 1 st as if to K, K 1, psso, turn piece. 4th row (= WS): Work until 7 sts remain, slip 1 st as if to P, P 1, psso, turn piece. Continue dec like this with 1 less st before each dec until there are 12 sts on needle. ---------------------------------------------------------- SOCK: Worked in the round on double pointed needles. Cast on 88 sts in all sizes on double pointed needles size 3 mm / US 2or3 with Karisma. K 1 round, then work diagram M.1, insert a marker at beg of round (= mid back). AT THE SAME TIME on last round in diagram M.1, inc 1 st in every P section by working 2 P sts in the first P st in all P sections (for P section mid back make the inc at end of round) = 96 sts. Switch to double pointed needles size 3.5 mm / US 4 and continue as follows: Work diagram M.2 over the first 36 sts, P the next 12 sts – at the same time K the 4 sts over cable tog 2 by 2 (i.e. dec 2 sts), work diagram M.2 over the next 36 sts and P the last 12 sts - at the same time K the 4 sts over cable tog 2 by 2 (i.e. dec 2 sts) = 92 sts. Continue like this upwards with diagram M.2 and P sts in each side. REMEMBER THE GAUGE! When piece measures 12 cm / 4¾", dec 2 sts in each of the large P sections (= 10 sts) in each side – i.e. that the first 2 and last 2 P sts are worked tog. Repeat dec every 4 cm / 1½" a total of 3 times. When diagram M.2 has been worked, piece measures approx. 20 cm / 8" and there are 68 sts on needle. Continue with diagram M.3 over diagram M.2 and 4 P sts in each side. When piece measures 28-29-30 cm / 11"-11⅜"-11¾", dec 2 sts in the large P section at the front and the back (i.e. 6 P sts becomes 4 P sts) = 64 sts. When piece measures 33-34-35 cm / 13"-13⅜"-13¾", dec all P 4 sts to P 2 sts (i.e. dec 8 sts) = 56 sts. When piece measures 38-40-42 cm / 15"-15¾"-16½" keep the first 26 sts (from beg of round) on needle for heel (see arrow in diagram, this marks mid back and mid front). Slip the remaining 30 sts on a stitch holder (= mid upper foot). Continue with pattern as before over the 26 heel sts for 5-5½-6 cm / 2"-2¼"-2⅜". Insert a marker, measure foot from here. Then work HEEL DECREASE in stockinette st over all sts - see explanation above! After heel dec, knit up 11-12-13 sts on each side of heel and slip the 30 sts from stitch holder back on needle = 64-66-68 sts. Insert a marker on each side of the middle 30 sts on upper foot. Continue pattern as before over these sts and stockinette st over the remaining sts – At the same time K the last 2 sts BEFORE first marker on upper foot twisted tog (i.e. work in back loop of st instead of front) and K the first 2 sts AFTER marker on upper foot tog. Repeat dec every other round a total of 8-9-8 times = 48-48-52 sts. Continue until piece measures 18-20-22 cm / 7"-8"-8¾" from marker on heel (= approx. 4-4-5 cm / 1½"-1½"-2" remain). Insert a marker in each side so that there are 24-24-26 sts on upper foot and 24-24-26 sts under foot. K all sts while AT THE SAME TIME dec for toes on each side of both markers as follows: Work until 3 sts remain before marker, K 2 tog, K 2 (marker is between these 2 sts), K 2 twisted tog. Repeat dec every other round a total of 4-4-5 times and then on every round a total of 6 times = 8 sts remain on needle. Cut the yarn and pull it through the remaining sts, tighten tog and fasten. |
||||||||||||||||||||||
Diagram explanations |
||||||||||||||||||||||
|
||||||||||||||||||||||
 |
||||||||||||||||||||||
Have you finished this pattern?Tag your pictures with #dropspattern #riverdancesocks or submit them to the #dropsfan gallery. Do you need help with this pattern?You'll find 10 tutorial videos, a Comments/Questions area and more by visiting the pattern on garnstudio.com. © 1982-2026 DROPS Design A/S. We reserve all rights. This document, including all its sub-sections, has copyrights. Read more about what you can do with our patterns at the bottom of each pattern on our site. |
||||||||||||||||||||||


With over 40 years in knitting and crochet design, DROPS Design offers one of the most extensive collections of free patterns on the internet - translated to 17 languages. As of today we count 324 catalogs and 12290 patterns - 12280 of which are translated into English (US/in).
We work hard to bring you the best knitting and crochet have to offer, inspiration and advice as well as great quality yarns at incredible prices! Would you like to use our patterns for other than personal use? You can read what you are allowed to do in the Copyright text at the bottom of all our patterns. Happy crafting!
Post a comment to pattern DROPS 132-8
We would love to hear what you have to say about this pattern!
If you want to leave a question, please make sure you select the correct category in the form below, to speed up the answering process. Required fields are marked *.