
Popular categories
Looking for a yarn?


Comments / Questions (83)
![]() Enilde wrote:
Enilde wrote:
Jag undrar över ökningen på armarna. Ska den göras på var sida om radbytet så att det blir ca 2 stolpar emellan?
26.11.2015 - 16:39DROPS Design answered:
Hej Enilde, Ja du ökar på var sida om 2 stolpar (under ärmen) Lycka till!
27.11.2015 - 10:13Diana wrote:
I like it a lot i made two pieces one for me and one for my friend
15.10.2015 - 01:59
![]() Zipporah wrote:
Zipporah wrote:
Hello DROPS, I was wondering about the sizing for this pattern. My gauge is exactly what it should be: 22 dc x 14 rows in 4 x 4 in. I chose to work size extra large (to fit a 41 in bust), but after working up the first 12 rows, I noticed that the length was excessively large: about 50 in total! My question is, is this length correct for this size? Also, is the first part of the pattern the bottom of the sweater, or is it actually a vertical part?? Thanks for the help! Zipporah
25.08.2015 - 18:10DROPS Design answered:
Dear Zipporah, remember to keep the gauge when working, you should have 239 dc at the end of 1st row, ie approx 108 cm (= approx. 42 "). Happy crocheting!
26.08.2015 - 10:13
![]() Marimar wrote:
Marimar wrote:
Voilà je termine ce beau gilet et tiens à vous remercier pour tous vos précieux conseils !! très bon site . Bravo
17.06.2015 - 19:28
![]() Marimar wrote:
Marimar wrote:
Bonsoir, sauf erreur de ma part vous n'indiquez pas de crocheter la bordure M2 au niveau des manches (cf photo). Vu que les manches sont montées en rond y a t il une particularité à observer pour crocheter le motif M2 ? Merci
17.06.2015 - 19:25DROPS Design answered:
Bonjour Mme Marimar, la question a été transmise à notre équipe de stylistes. Vous pouvez crocheter effectivement M2 en bas des manches, ajustez le nbe de ms au 1er rang pour tomber juste avec le motif et veillez à bien avoir le même nombre en bas de chaque manche. Bon crochet!
18.06.2015 - 08:48
![]() Marimar wrote:
Marimar wrote:
Bonsoir, Concernant la rehausse encolure ,je ne comprends pas bien par où je dois commencer. Doit on couper le fil après avoir fait toutes les diminutions de l'empiecement ? Mon fil se situe à gauche quand je porte la veste. merci
15.06.2015 - 23:00DROPS Design answered:
Bonjour Mme Marimar, les rangs raccourcis se commencent sur l'endroit, en haut du devant droit, terminez l'empiècement par 1 rang sur l'envers ou coupez le fil si nécessaire pour reprendre sur l'endroit, et crochetez ensuite des rangs raccourcis tout le long de l'encolure. Bon crochet!
16.06.2015 - 08:36
![]() Marimar wrote:
Marimar wrote:
Concernant l emplacement : Quand vous dites de diminuer une bride alternativement avant et après chaque marqueur 9 fois [pour ma taille] tous les 3 rangs. voulez vous dire une fois avant le marqueur, après, avant ,après ,avant,après,avant,après,avant
12.06.2015 - 23:26DROPS Design answered:
Bonjour Mme Marimar, pour la 1ère diminution de l'empiècement, vous diminuez 1 B avant chaque marqueur, pour la 2ème diminution, vous diminuez 1 B après chaque marqueur, et répétez ainsi alternativement avant puis la fois suivante après chaque marqueur. Bon crochet!
13.06.2015 - 10:26
![]() Marimar wrote:
Marimar wrote:
Bonsoir, A nouveau merci pour votre aide précieuse. J'ai à nouveau besoin d'éclaircissement pour l premièrement :
12.06.2015 - 23:16
![]() Marimar wrote:
Marimar wrote:
Pour les manches : Je me suis donc trompée, car j'ai commencé les augmentations 11 cm après avoir terminé M1 A votre avis dois je recommencer ?...la largeur des manches me semble bonne pourtant... Merci
05.06.2015 - 12:32DROPS Design answered:
Bonjour Mme Marimar, vérifiez les mesures de votre manche sur un vêtement analogue, vous pouvez ensuite ajuster les augmentations en les faisant moins souvent (plus de rangs entre) pour avoir la bonne largeur (le bon nombre de mailles) avant l'empiècement. Bon crochet!
05.06.2015 - 13:23
![]() Marimar wrote:
Marimar wrote:
Désolé j ai un soucis avec mon ordinateur:-) toujours pour les manches : Est ce après le tout début que l on doit faire les augmentations ou 11 cm après avoir crochetés M1. ? merci mdrci
04.06.2015 - 16:56DROPS Design answered:
Les 11 cm doivent bien être mesurés depuis le début, M1 doit être terminé (M1 = 13 rangs dont 1 de ms + le 1er rang avant M1, l'échantillon doit être de 14 rangs de B = 10 cm). Bon crochet!
05.06.2015 - 09:53
|
|||||||||||||
Hint of Spring#hintofspringcardigan |
|||||||||||||
 |
 |
||||||||||||
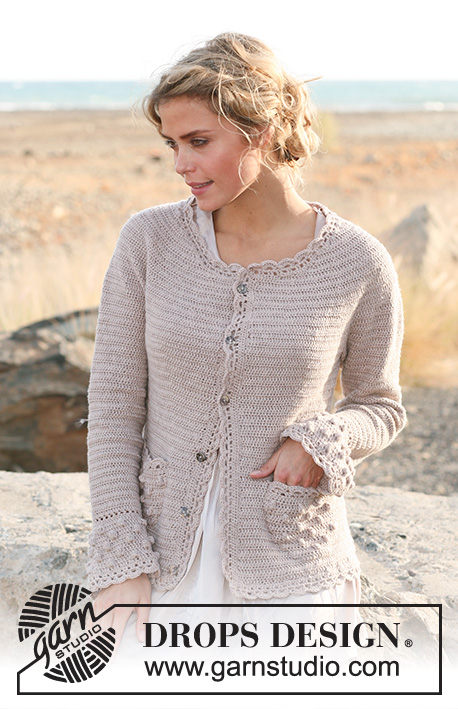
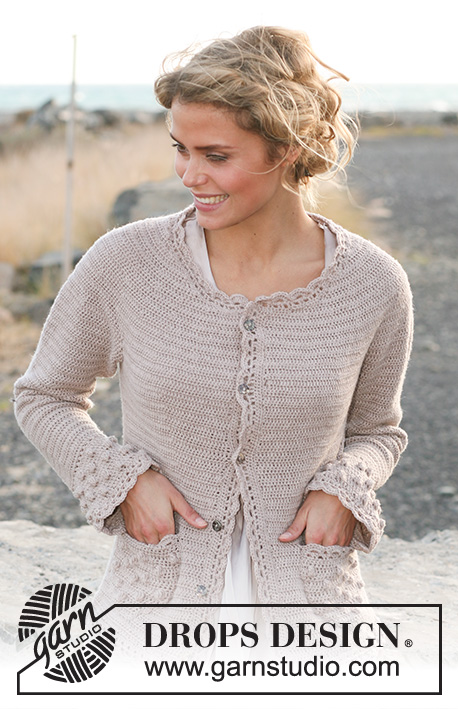
Crochet DROPS jacket with bobbles and lace edges in ”BabyMerino” or ”BabyAlpaca Silk”. Size S - XXXL
DROPS 130-14 |
|||||||||||||
|
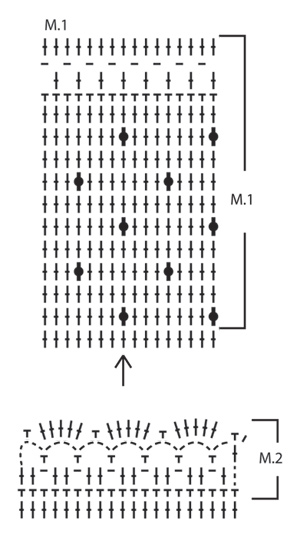
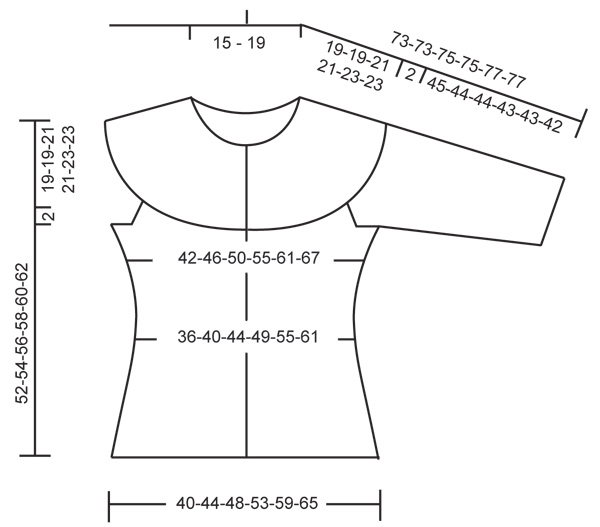
PATTERN: See diagram M.1 and M.2. CROCHET INFO: Replace first dc at beg of every dc row with ch 3, finish the row with 1 dc in 3rd ch from beg of previous row. Replace first dc at beg of every dc round with ch 3, finish the round with 1 sl st in 3rd ch from beg of round. CROCHET TIP (applies to round yoke): If crochet gauge is not correct in height the yoke will be too short or too long. This can be adjusted by working 1 extra row with dc or one row less with dc evenly between dec. DECREASE TIP 1 (applies to waist and yoke): Dec 1 dc by working 2 dc tog, i.e. work 1 dc but wait with last pull through (= 2 sts on hook), work 1 more dc and pull last YO through all 3 sts on hook. DECREASE TIP 2 (applies to armholes and neck): When dec several dc at the same time at the armhole and neck, dec as follows: At beg of row: Replace no of dc to be dec with 1 sl st in every dc. At end of row: Turn piece when no of dc to be dec remains and continue working as before. INCREASE TIP: Inc 1 dc by working 2 dc in same dc. -------------------------------------------------------- BODY: Worked back and forth from mid front. READ CROCHET INFO! Ch 243-267-291-320-355-389 on hook size 3.5 mm/E/4 with Baby Merino. WORK 1ST ROW AS FOLLOWS: 1 dc in 4th ch from hook, 1 dc in next ch, skip ch 1, * 1 dc in each of the next ch 3, skip 1 ch *, repeat from *-* until 1-1-1-2-1-3 ch remain, finish with 1 dc in each of the last ch = 181-199-217-239-265-291 dc on row, turn piece. 2ND ROW: Work 1 dc in every dc. Insert 4 markers in the piece as follows: 1st marker after 19-21-23-25-28-31 dc from mid front, 2nd marker after another 54-60-64-72-78-86 dc, 3rd marker after another 35-37-43-45-53-57 dc, 4th marker after yet another 54-60-64-72-78-86 dc (19-21-23-25-28-31 dc remain on row after last marker). Work back and forth with 1 dc in every dc and move the markers upwards. REMEMBER THE CROCHET GAUGE! AT THE SAME TIME when piece measures 3 cm / 1", dec 1 dc before 1st and 3rd marker and after 2nd and 4th marker (= 4 dc dec on row) - READ DECREASE TIP 1. Repeat dec approx. every 4 cm / 1½" a total of 5 times = 161-179-197-219-245-271 dc on row. When piece measures 22 cm / 8¾", inc 1 dc before 1st and 3rd marker and after 2nd and 4th marker (= 4 dc inc) - READ INCREASE TIP. Repeat inc approx. every 1-1-1-1½-1½-1½ cm / ⅜"-⅜"-⅜"-½"-½"-½" a total of 7 times = 189-207-225-247-273-299 dc on row. When piece measures 31-33-33-35-35-37 cm / 12¼"-13"-13"-13¾"-13¾"-14½" (finish with one row from WS), divide for armholes and work each part separately. RIGHT FRONT PIECE: Start from RS and work 43-48-52-58-64-71 dc from mid front, turn piece, work the first 2 dc tog and work the rest of row. Turn piece, work the first 40-45-49-55-61-68 dc and work the next 2 dc tog, turn piece, work the first 2 dc tog and work the rest of row (last row is from WS) = 40-45-49-55-61-68 dc on row, cut the yarn. BACK PIECE: Start from RS in 11th dc after right front piece (i.e. there is an opening in the side of 10 dc for armhole), and work 83-91-101-111-125-137 dc, turn piece, work 3 rows with dc over back piece while AT THE SAME TIME working the first 2 and the last 2 dc on every row tog (last row is from WS) = 77-85-95-105-119-131 dc on row, cut the yarn. LEFT FRONT PIECE: Start from RS in 11th dc after back piece (there is now an opening of 10 dc for armhole in both left and right side) and work over the remaining 43-48-52-58-64-71 dc as on right front piece but reversed (last row is from WS) = 40-45-49-55-61-68 dc on row, cut the yarn. SLEEVE: Ch 73 in all sizes on hook size 3.5 mm/E/4 with Baby Merino and form a ring with 1 sl st in first ch. READ CROCHET INFO! WORK 1ST ROUND AS FOLLOWS: ch 3 (= 1 dc), 1 dc in each of the next 2 ch , skip ch 1, * 1 dc in each of the next ch 3, skip 1 ch *, repeat from *-* until 2 ch remain, 1 dc in each of the last ch and finish with 1 sl st in 3rd ch from beg of round = 56 dc. Now work diagram M.1 in the round - see explanation above! After M.1 continue back and forth (worked back and forth to make the crochet texture the same on body and sleeves). Work 1st row as follows: 1 dc in every dc while AT THE SAME TIME inc 0-0-2-2-6-6 dc evenly = 56-56-58-58-62-62 dc. Continue with 1 dc in every dc. AT THE SAME TIME when piece measures 13-11-11-11-11-11 cm / 5⅛"-4⅜"-4⅜"-4⅜"-4⅜"-4⅜", inc 1 dc in each side - READ INCREASE TIP! Repeat inc approx. every 3-2½-2½-2-2-2 cm / 1⅛"-⅞"-⅞"-¾"-¾"-¾" a total of 10-12-13-15-15-18 times = 76-80-84-88-92-98 dc. When piece measures 45-44-44-43-43-42 cm / 17¾"-17¼"-17¼"-17"-17"-16½" (NOTE! Shorter measurements in the larger sizes because of longer sleeve cap and broader shoulder width), work 1 sl st in each of the first 5 dc at beg of row from RS, work 66-70-74-78-82-88 dc and turn piece (there is now an opening of 5 dc in each side (= mid under sleeve). Work 3 rows with dc back and forth over sleeve while AT THE SAME TIME working the first 2 and the last 2 dc on every row tog - READ DECREASE TIP 1 (last row is from WS) = 60-64-68-72-76-82 dc on row. Cut the yarn and work another sleeve. YOKE: READ CROCHET TIP! Now work the parts tog as follows - start from RS: Work 1 dc in each of the 40-45-49-55-61-68 dc on right front piece, work 1 dc in each of the 60-64-68-72-76-82 dc from one sleeve, work 1 dc in each of the 77-85-95-105-119-131 dc from back piece, work 1 dc in each of the 60-64-68-72-76-82 dc from the other sleeve and work 1 dc in each of the 40-45-49-55-61-68 dc from left front piece = 277-303-329-359-393-431 dc on row. Insert a marker after 12-14-15-17-21-12 dc, then insert 21-23-23-25-25-29 markers with 12-12-13-13-14-14 dc between each, i.e. 13-13-15-17-22-13 dc remain after last marker. Now work dc back and forth on yoke while AT THE SAME TIME on 1st row dec 1 dc - READ DECREASE TIP 1 - before every marker = 255-279-305-333-367-401 dc. Repeat dec alternately before and after markers (seen from RS) every 3rd row a total of 9-9-10-10-11-11 times. AT THE SAME TIME when piece measures 47-49-51-52-54-56 cm / 18½"-19¼"-20"-20½"-21¼"-22" (measured straight down along mid front), dec for neck in each side towards mid front on every row as follows – READ DECREASE TIP 2: 7 dc 1 time, 3 dc 3 times. Continue to dec 1 dc towards mid front on every row until all dec on yoke are done. ELEVATION IN BACK OF NECK: Start mid front, at top of corner on right front piece. Crochet on hook size 3.5 mm/E/4 around the neck as follows: Start with 1 sc in first dc, * ch 1, skip 1 dc, 1 sc in next dc *, repeat from *-* around the neck and finish with 1 sc at the front of neck at top of corner on left front piece. Turn piece. Work 1 sc in every ch and ch 1 over every sc around the neck until 8 sts remain (= 4 sc + 4 ch) on right front piece. Turn piece. Work 1 sc in every ch and 1 ch over every sc until 8 sts remain on left front piece. Turn piece. Work 1 sc in every ch and 1 ch in every sc around the neck until 16 sts remain before edge on right front piece (= 8 sc and 8 ch). Turn piece. Work 1 sc in every ch and 1 ch over every sc around the neck until 16 sts remain before edge on left front piece. Turn piece. Work 1 sc in every ch and 1 ch over every sc around the neck until 24 sts remain before edge on right front piece (= 12 sc and 12 ch). Turn piece. Work 1 sc in every ch and 1 ch over every sc until 24 sts remain before edge on left front piece. Cut the yarn. LACE EDGES: Work on hook size 3.5 mm/E/4 with Baby Merino as follows: Along mid front: Start from RS and work 1 row sc up along right front piece - there should be approx. 23 sc on 10 cm / 4" up along mid front. Adjust so that no of sts can be divided by 6 + 2 sts. Then work 1 row from WS with 1 dc in every sc. Then work M.2 but skip 1st row in M.2 (= sc row). Repeat along left front piece. Around the neck: Work M.2 along the neckline (start with sc row and adjust no of sts on row so that it can be divided by 6 + 2 sts). Bottom edge: Work M.2 along the bottom edge of jacket (start with sc row and adjust no of sts on row so that it can be divided by 6 + 2 sts). Sleeves: Work M.2 along the bottom edge of each sleeve (start with dc row and adjust no of sts on row so that it can be divided by 6 + 2 sts). POCKETS: Ch 15 on hook size 3.5 mm/E/4 with Baby Merino. Work 1st row as follows: Work 1 dc in 4th ch from hook, then work 1 dc in each of the remaining ch = 13 dc. Work M.1 back and forth, arrow in diagram marks middle dc on pocket, count outwards from there. AT THE SAME TIME work new dc at end of every row in each side: 3 dc 1 time, 2 dc 1 time and 1 dc 4 times = a total of 31 dc (make new dc by working same no of ch at end of row as no of dc to be inc + ch 2, turn piece, work 1 dc in 4th ch from hook and 1 dc in the each of the remaining ch (if any) before continuing). Continue with bobbles and dc vertically until pocket measures approx. 11 cm / 4½" vertically - after last row with bobbles work one row with dc while AT THE SAME TIME inc 1 dc = 32 dc. Then work M.2 at top of pocket (start with sc row), cut and fasten the thread. Crochet another pocket. Sew pockets on to front piece, approx. 5 cm / 2" from bottom edge and approx. 8 cm / 3" in from mid front on each front piece. Sew 6 buttons on to left front piece, 2 cm / ¾" below first dec for neck and then evenly spaced with approx. 8 cm / 3" between each. Button the jacket in the lace edge. |
|||||||||||||
Diagram explanations |
|||||||||||||
|
|||||||||||||
 |
|||||||||||||
 |
|||||||||||||
Have you finished this pattern?Tag your pictures with #dropspattern #hintofspringcardigan or submit them to the #dropsfan gallery. Do you need help with this pattern?You'll find 11 tutorial videos, a Comments/Questions area and more by visiting the pattern on garnstudio.com. © 1982-2026 DROPS Design A/S. We reserve all rights. This document, including all its sub-sections, has copyrights. Read more about what you can do with our patterns at the bottom of each pattern on our site. |
|||||||||||||


With over 40 years in knitting and crochet design, DROPS Design offers one of the most extensive collections of free patterns on the internet - translated to 17 languages. As of today we count 324 catalogs and 12272 patterns - 12262 of which are translated into English (US/in).
We work hard to bring you the best knitting and crochet have to offer, inspiration and advice as well as great quality yarns at incredible prices! Would you like to use our patterns for other than personal use? You can read what you are allowed to do in the Copyright text at the bottom of all our patterns. Happy crafting!
Post a comment to pattern DROPS 130-14
We would love to hear what you have to say about this pattern!
If you want to leave a question, please make sure you select the correct category in the form below, to speed up the answering process. Required fields are marked *.