
Popular categories
Looking for a yarn?


Comments / Questions (83)
![]() Lone wrote:
Lone wrote:
Hvordan udvælger jeg den rigtige størrelse, når bryst mål svarer til en str L og resten af målene er str M
07.02.2019 - 10:59DROPS Design answered:
Hej Lone, hvis du ikke selv kan justere lidt med udtagningerne omkring brystmålet, så er du nødt til at vælge en str L. God fornøjelse!
07.02.2019 - 15:51
![]() Maggie wrote:
Maggie wrote:
Which row is right side
25.12.2018 - 00:18DROPS Design answered:
Dear Maggie, the right side of piece is the side where you crocheted the first row at the very beginning of the pattern. Happy crocheting!
02.01.2019 - 09:32Maggie wrote:
Which row is right side
25.12.2018 - 00:17
![]() Ginette Himbeault wrote:
Ginette Himbeault wrote:
Bonjour, pour l'empiècement dois je diminuer le 1er rang avant les marqueurs le 2e rang après et faire 1rang ou 3 rangs sans diminution. merci
03.11.2018 - 13:32DROPS Design answered:
Bonjour Mme Himbeault, pour l'empiècement, vous diminuez tous les 3 rangs (alternativement sur l'endroit et sur l'envers), la 1ère fois avant chacun des marqueurs, la fois suivante après chacun des marqueurs et ainsi de suite, autrement dit, vous diminuez alternativement avant et après chaque marqueur à chaque rang de diminutions. Bon crochet!
05.11.2018 - 09:07Ivana wrote:
Hello! I have a question. Is it possible to use Muskat instead of Merino? Or you wouldn't recommend such an exchange? Thank you! Ivana
13.08.2018 - 13:03DROPS Design answered:
Dear Ivana, this pattern is worked with BabyMerino (= yarn group A) while DROPS Muskat belongs to yarn group B so that you cannot use it as an alternative. Click on our yarn converter to check all possible alternatives - remember that yarn with different texture will gives a different result. Happy crocheting!
13.08.2018 - 15:40
![]() Robin wrote:
Robin wrote:
What does the abbreviation rdc mean? Also in the first row the instructions read “1 dc in each of the next ch 3, skip 1 ch” do I chain 1 and skip a stitch or just skip a stitch?
07.12.2017 - 02:48DROPS Design answered:
Dear Robin, it looks to be just a typo, it should be here "dc". To avoid the fundation edge being tighter than the first row, you will crochet more chains than you need dc, work 1 dc in each of the next 3 ch and skip next chain, repeat to the end of row to get the correct number of dc at the end of 1st row. Happy crocheting!
07.12.2017 - 10:01Kim wrote:
I'm running into some problems with this pattern. So just to check I'd like to know how many times you actually decrease at the end of the yoke. For my size it says to decrease a total of 9 times, but then I end up with too few stitches. So am I interpreting this wrong?
01.06.2017 - 04:22DROPS Design answered:
Dear Kim, you will dec 1 st alternately before/after each marker, you will dec a total of 22-24 sts per row in size S-M. On first dec row you dec 1 st before each marker, on next row you will dec 1 st after each marker, and continue like this alternately before/after each marker. Happy crocheting!
01.06.2017 - 09:01Marina wrote:
Hello :) The picture shows lace edging to the sleeves. I can't find the instructions how to work M2 diagram at the very end of the sleeves (do i begin to work M2 in 72 ch or 56 ch?). Help please? Thanks Marina Petrovic
22.09.2016 - 12:30DROPS Design answered:
Dear Marina, rather work in the 56 ch worked on 1st row in sleeve to avoid the edge being too wavy. Happy crocheting!
22.09.2016 - 13:45
![]() Camilla Velle wrote:
Camilla Velle wrote:
Jeg blir usikker hver gang uttrykket "Når arb måler", hekler nå ermet og skal armen bli 45 cm lang i S? Mine armer er virkelig mye lengre enn det..?
22.08.2016 - 19:44DROPS Design answered:
Hej Camilla. Laengden paa ermet er 45 cm maalt op til begyndelsen af ermtoppen (dvs, ca fra haandled op til armhule). Du kan evt pröve ermet paa og se om det passer dig, ellers lav det lidt laengere.
23.08.2016 - 14:24
![]() Anneli wrote:
Anneli wrote:
Ska man sy ihop under armarna eller virkas dom ihop. Fattar inte riktigt på mönstret när jag ska virka ihop delarna?
29.06.2016 - 15:42DROPS Design answered:
Hej Anneli. Du syr aabningen under aermet sammen.
10.11.2016 - 16:19
|
|||||||||||||
Hint of Spring#hintofspringcardigan |
|||||||||||||
 |
 |
||||||||||||
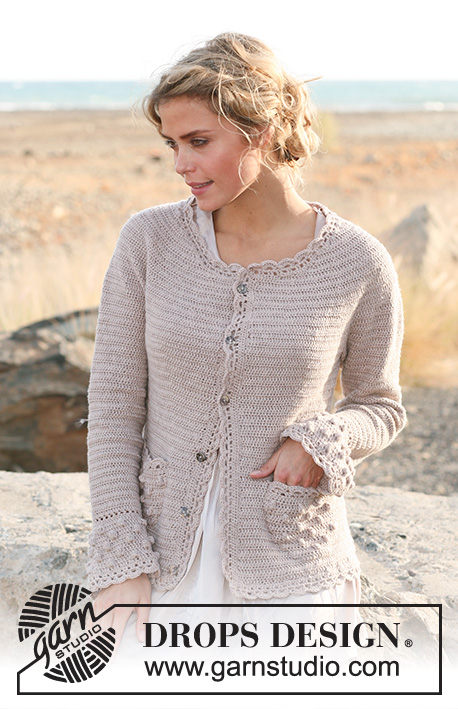
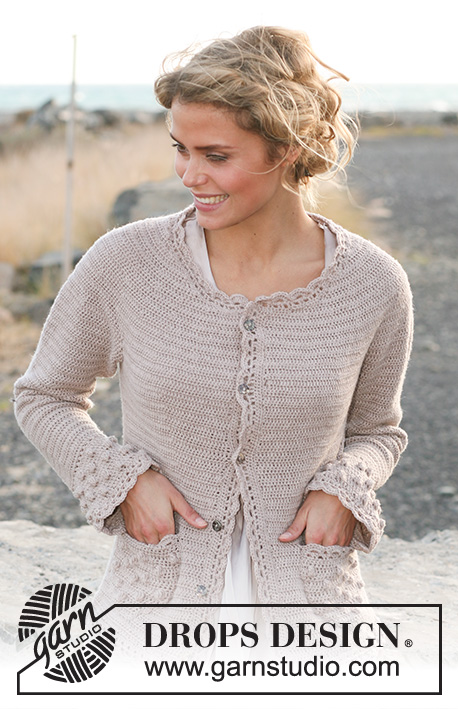
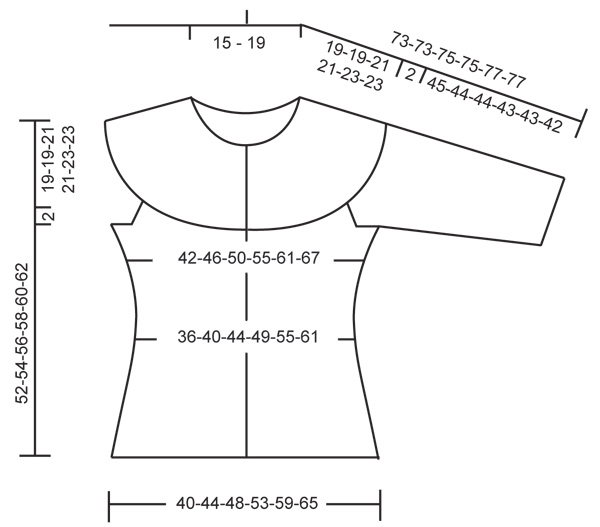
Crochet DROPS jacket with bobbles and lace edges in ”BabyMerino” or ”BabyAlpaca Silk”. Size S - XXXL
DROPS 130-14 |
|||||||||||||
|
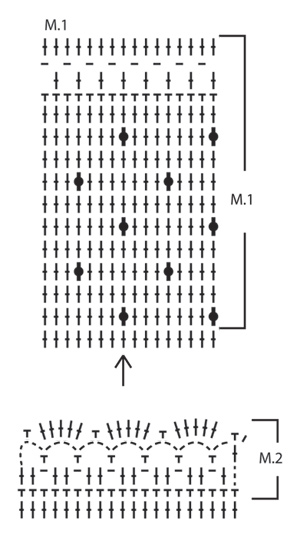
PATTERN: See diagram M.1 and M.2. CROCHET INFO: Replace first dc at beg of every dc row with ch 3, finish the row with 1 dc in 3rd ch from beg of previous row. Replace first dc at beg of every dc round with ch 3, finish the round with 1 sl st in 3rd ch from beg of round. CROCHET TIP (applies to round yoke): If crochet gauge is not correct in height the yoke will be too short or too long. This can be adjusted by working 1 extra row with dc or one row less with dc evenly between dec. DECREASE TIP 1 (applies to waist and yoke): Dec 1 dc by working 2 dc tog, i.e. work 1 dc but wait with last pull through (= 2 sts on hook), work 1 more dc and pull last YO through all 3 sts on hook. DECREASE TIP 2 (applies to armholes and neck): When dec several dc at the same time at the armhole and neck, dec as follows: At beg of row: Replace no of dc to be dec with 1 sl st in every dc. At end of row: Turn piece when no of dc to be dec remains and continue working as before. INCREASE TIP: Inc 1 dc by working 2 dc in same dc. -------------------------------------------------------- BODY: Worked back and forth from mid front. READ CROCHET INFO! Ch 243-267-291-320-355-389 on hook size 3.5 mm/E/4 with Baby Merino. WORK 1ST ROW AS FOLLOWS: 1 dc in 4th ch from hook, 1 dc in next ch, skip ch 1, * 1 dc in each of the next ch 3, skip 1 ch *, repeat from *-* until 1-1-1-2-1-3 ch remain, finish with 1 dc in each of the last ch = 181-199-217-239-265-291 dc on row, turn piece. 2ND ROW: Work 1 dc in every dc. Insert 4 markers in the piece as follows: 1st marker after 19-21-23-25-28-31 dc from mid front, 2nd marker after another 54-60-64-72-78-86 dc, 3rd marker after another 35-37-43-45-53-57 dc, 4th marker after yet another 54-60-64-72-78-86 dc (19-21-23-25-28-31 dc remain on row after last marker). Work back and forth with 1 dc in every dc and move the markers upwards. REMEMBER THE CROCHET GAUGE! AT THE SAME TIME when piece measures 3 cm / 1", dec 1 dc before 1st and 3rd marker and after 2nd and 4th marker (= 4 dc dec on row) - READ DECREASE TIP 1. Repeat dec approx. every 4 cm / 1½" a total of 5 times = 161-179-197-219-245-271 dc on row. When piece measures 22 cm / 8¾", inc 1 dc before 1st and 3rd marker and after 2nd and 4th marker (= 4 dc inc) - READ INCREASE TIP. Repeat inc approx. every 1-1-1-1½-1½-1½ cm / ⅜"-⅜"-⅜"-½"-½"-½" a total of 7 times = 189-207-225-247-273-299 dc on row. When piece measures 31-33-33-35-35-37 cm / 12¼"-13"-13"-13¾"-13¾"-14½" (finish with one row from WS), divide for armholes and work each part separately. RIGHT FRONT PIECE: Start from RS and work 43-48-52-58-64-71 dc from mid front, turn piece, work the first 2 dc tog and work the rest of row. Turn piece, work the first 40-45-49-55-61-68 dc and work the next 2 dc tog, turn piece, work the first 2 dc tog and work the rest of row (last row is from WS) = 40-45-49-55-61-68 dc on row, cut the yarn. BACK PIECE: Start from RS in 11th dc after right front piece (i.e. there is an opening in the side of 10 dc for armhole), and work 83-91-101-111-125-137 dc, turn piece, work 3 rows with dc over back piece while AT THE SAME TIME working the first 2 and the last 2 dc on every row tog (last row is from WS) = 77-85-95-105-119-131 dc on row, cut the yarn. LEFT FRONT PIECE: Start from RS in 11th dc after back piece (there is now an opening of 10 dc for armhole in both left and right side) and work over the remaining 43-48-52-58-64-71 dc as on right front piece but reversed (last row is from WS) = 40-45-49-55-61-68 dc on row, cut the yarn. SLEEVE: Ch 73 in all sizes on hook size 3.5 mm/E/4 with Baby Merino and form a ring with 1 sl st in first ch. READ CROCHET INFO! WORK 1ST ROUND AS FOLLOWS: ch 3 (= 1 dc), 1 dc in each of the next 2 ch , skip ch 1, * 1 dc in each of the next ch 3, skip 1 ch *, repeat from *-* until 2 ch remain, 1 dc in each of the last ch and finish with 1 sl st in 3rd ch from beg of round = 56 dc. Now work diagram M.1 in the round - see explanation above! After M.1 continue back and forth (worked back and forth to make the crochet texture the same on body and sleeves). Work 1st row as follows: 1 dc in every dc while AT THE SAME TIME inc 0-0-2-2-6-6 dc evenly = 56-56-58-58-62-62 dc. Continue with 1 dc in every dc. AT THE SAME TIME when piece measures 13-11-11-11-11-11 cm / 5⅛"-4⅜"-4⅜"-4⅜"-4⅜"-4⅜", inc 1 dc in each side - READ INCREASE TIP! Repeat inc approx. every 3-2½-2½-2-2-2 cm / 1⅛"-⅞"-⅞"-¾"-¾"-¾" a total of 10-12-13-15-15-18 times = 76-80-84-88-92-98 dc. When piece measures 45-44-44-43-43-42 cm / 17¾"-17¼"-17¼"-17"-17"-16½" (NOTE! Shorter measurements in the larger sizes because of longer sleeve cap and broader shoulder width), work 1 sl st in each of the first 5 dc at beg of row from RS, work 66-70-74-78-82-88 dc and turn piece (there is now an opening of 5 dc in each side (= mid under sleeve). Work 3 rows with dc back and forth over sleeve while AT THE SAME TIME working the first 2 and the last 2 dc on every row tog - READ DECREASE TIP 1 (last row is from WS) = 60-64-68-72-76-82 dc on row. Cut the yarn and work another sleeve. YOKE: READ CROCHET TIP! Now work the parts tog as follows - start from RS: Work 1 dc in each of the 40-45-49-55-61-68 dc on right front piece, work 1 dc in each of the 60-64-68-72-76-82 dc from one sleeve, work 1 dc in each of the 77-85-95-105-119-131 dc from back piece, work 1 dc in each of the 60-64-68-72-76-82 dc from the other sleeve and work 1 dc in each of the 40-45-49-55-61-68 dc from left front piece = 277-303-329-359-393-431 dc on row. Insert a marker after 12-14-15-17-21-12 dc, then insert 21-23-23-25-25-29 markers with 12-12-13-13-14-14 dc between each, i.e. 13-13-15-17-22-13 dc remain after last marker. Now work dc back and forth on yoke while AT THE SAME TIME on 1st row dec 1 dc - READ DECREASE TIP 1 - before every marker = 255-279-305-333-367-401 dc. Repeat dec alternately before and after markers (seen from RS) every 3rd row a total of 9-9-10-10-11-11 times. AT THE SAME TIME when piece measures 47-49-51-52-54-56 cm / 18½"-19¼"-20"-20½"-21¼"-22" (measured straight down along mid front), dec for neck in each side towards mid front on every row as follows – READ DECREASE TIP 2: 7 dc 1 time, 3 dc 3 times. Continue to dec 1 dc towards mid front on every row until all dec on yoke are done. ELEVATION IN BACK OF NECK: Start mid front, at top of corner on right front piece. Crochet on hook size 3.5 mm/E/4 around the neck as follows: Start with 1 sc in first dc, * ch 1, skip 1 dc, 1 sc in next dc *, repeat from *-* around the neck and finish with 1 sc at the front of neck at top of corner on left front piece. Turn piece. Work 1 sc in every ch and ch 1 over every sc around the neck until 8 sts remain (= 4 sc + 4 ch) on right front piece. Turn piece. Work 1 sc in every ch and 1 ch over every sc until 8 sts remain on left front piece. Turn piece. Work 1 sc in every ch and 1 ch in every sc around the neck until 16 sts remain before edge on right front piece (= 8 sc and 8 ch). Turn piece. Work 1 sc in every ch and 1 ch over every sc around the neck until 16 sts remain before edge on left front piece. Turn piece. Work 1 sc in every ch and 1 ch over every sc around the neck until 24 sts remain before edge on right front piece (= 12 sc and 12 ch). Turn piece. Work 1 sc in every ch and 1 ch over every sc until 24 sts remain before edge on left front piece. Cut the yarn. LACE EDGES: Work on hook size 3.5 mm/E/4 with Baby Merino as follows: Along mid front: Start from RS and work 1 row sc up along right front piece - there should be approx. 23 sc on 10 cm / 4" up along mid front. Adjust so that no of sts can be divided by 6 + 2 sts. Then work 1 row from WS with 1 dc in every sc. Then work M.2 but skip 1st row in M.2 (= sc row). Repeat along left front piece. Around the neck: Work M.2 along the neckline (start with sc row and adjust no of sts on row so that it can be divided by 6 + 2 sts). Bottom edge: Work M.2 along the bottom edge of jacket (start with sc row and adjust no of sts on row so that it can be divided by 6 + 2 sts). Sleeves: Work M.2 along the bottom edge of each sleeve (start with dc row and adjust no of sts on row so that it can be divided by 6 + 2 sts). POCKETS: Ch 15 on hook size 3.5 mm/E/4 with Baby Merino. Work 1st row as follows: Work 1 dc in 4th ch from hook, then work 1 dc in each of the remaining ch = 13 dc. Work M.1 back and forth, arrow in diagram marks middle dc on pocket, count outwards from there. AT THE SAME TIME work new dc at end of every row in each side: 3 dc 1 time, 2 dc 1 time and 1 dc 4 times = a total of 31 dc (make new dc by working same no of ch at end of row as no of dc to be inc + ch 2, turn piece, work 1 dc in 4th ch from hook and 1 dc in the each of the remaining ch (if any) before continuing). Continue with bobbles and dc vertically until pocket measures approx. 11 cm / 4½" vertically - after last row with bobbles work one row with dc while AT THE SAME TIME inc 1 dc = 32 dc. Then work M.2 at top of pocket (start with sc row), cut and fasten the thread. Crochet another pocket. Sew pockets on to front piece, approx. 5 cm / 2" from bottom edge and approx. 8 cm / 3" in from mid front on each front piece. Sew 6 buttons on to left front piece, 2 cm / ¾" below first dec for neck and then evenly spaced with approx. 8 cm / 3" between each. Button the jacket in the lace edge. |
|||||||||||||
Diagram explanations |
|||||||||||||
|
|||||||||||||
 |
|||||||||||||
 |
|||||||||||||
Have you finished this pattern?Tag your pictures with #dropspattern #hintofspringcardigan or submit them to the #dropsfan gallery. Do you need help with this pattern?You'll find 11 tutorial videos, a Comments/Questions area and more by visiting the pattern on garnstudio.com. © 1982-2026 DROPS Design A/S. We reserve all rights. This document, including all its sub-sections, has copyrights. Read more about what you can do with our patterns at the bottom of each pattern on our site. |
|||||||||||||


With over 40 years in knitting and crochet design, DROPS Design offers one of the most extensive collections of free patterns on the internet - translated to 17 languages. As of today we count 324 catalogs and 12272 patterns - 12262 of which are translated into English (US/in).
We work hard to bring you the best knitting and crochet have to offer, inspiration and advice as well as great quality yarns at incredible prices! Would you like to use our patterns for other than personal use? You can read what you are allowed to do in the Copyright text at the bottom of all our patterns. Happy crafting!
Post a comment to pattern DROPS 130-14
We would love to hear what you have to say about this pattern!
If you want to leave a question, please make sure you select the correct category in the form below, to speed up the answering process. Required fields are marked *.