
Popular categories
Looking for a yarn?


Comments / Questions (58)
![]() Geneviève wrote:
Geneviève wrote:
I don't crochet; would it be possible to do the neck edge with knitting ribs or garter stitch. If it is, how many stitches do I need to pick up around the neck? Thank you ! G.
03.04.2026 - 21:14
![]() Geneviève wrote:
Geneviève wrote:
Bonjour, J'ai un petit problème quand j'arrive au niveau de l'épaule où le marker est placé; l'aller-retour se fait-il entre les mailles du col et l'épaule ? Si cela est le cas, j'ai a trou qui se fait entre coté manche et le marker de l'épaule. Merci de clarifier cet étape du tricot. G.
20.03.2026 - 21:39DROPS Design answered:
Bonjour Geneviève, à la fin du dos, vous rabattez les 18 à 24 (cf taille) mailles centrales en attente pour l'encolure et vous terminez chaque épaule/manche séparément en allers et retours. En commençant par le devant droit (= les mailles à droite des mailles rabattues pour l'encolure, vu sur l'endroit. Vous tricotez 1 cm sur ces mailles et placez un marqueur pour repérer le haut de l'épaule (c'est là que vous plierez votre gilet en double). Toutes les mesures suivantes sont faites à partir de ce marqueur. Vous tricotez encore 11 cm et vous montez ensuite les mailles de l'encolure devant en fin de rang sur l'endroit, et, en même temps, vous rabattez les mailles de la manche en début de rang sur l'endroit. Vous reprendrez ensuite les mailles du côté gauche, et vous tricoterez de la même façon (en sens inverse). Bon tricot!
23.03.2026 - 07:48
![]() Karina wrote:
Karina wrote:
Kan man få en størrelsesguide ift, hvor stor en small er. Jeg skal bruge den til en 12 årig pige på ca 150 cm høj.
09.11.2025 - 21:46DROPS Design answered:
Hei Karina. Du finner målskissen til plagget nederst på siden. mvh DROPS Design
17.11.2025 - 19:04
![]() Claudia wrote:
Claudia wrote:
Ich verstehe die Ärmelmaße nicht: auf dem Foto sieht es nach langen Ärmeln aus. Wenn ich nach Anleitung arbeite habe ich aber eine Gesamtbreite von 93 cm (Größe S), das ergibt bei mir maximal 3/4-Ärmel. Habe ich einen Denkfehler, stimmt da in der Anleitung etwas nicht oder dehnt sich das Strickstück so stark, dass aus 93 cm lange Ärmel werden? Aber dann würde der Fest ja auch nicht stimmen. Danke für eure Hilfe! Claudi
27.09.2025 - 13:42DROPS Design answered:
Hi Claudia, the garter stitch worked from side to side is particularly stretchy. If you are a tall person, it may be necesaary to add more stitches for arms. Happy knitting!
03.10.2025 - 11:52
![]() Annette wrote:
Annette wrote:
What is the gauge? I can't find it
04.09.2025 - 11:12DROPS Design answered:
Hi Annette! Gauge is given under Materials with needle size: DROPS CIRCULAR NEEDLE (60 or 80 cm / 24" or 32") SIZE 5.5 mm / US 9 - or size needed to get 17 sts x 34 rows in garter st with 1 strand = 4" x 4" (10 x 10 cm). Happy knitting!
04.09.2025 - 11:33
![]() Therese wrote:
Therese wrote:
Hello, how many balls of wool do I need for size large? Thanks, Theresa
08.06.2025 - 03:38DROPS Design answered:
Dear Therese, you need 75 gr of DROPS Kid-Silk. Since each ball is 25gr, you will need 3 balls of DROPS Kid-Silk. Happy knitting!
08.06.2025 - 15:33
![]() Uschi wrote:
Uschi wrote:
Hallo, ich denke,ich habe die gleiche Frage wie Martina. Nur nochmal um sicher zu gehen Nach 19-20-21-22-23-24 cm am Ende jeder R auf jeder Seite neue M aufnehmen: 1x 1 M, 2 x 2 M, 2x 4 M, Ist das so gemeint? Ich stricke S . Liebe Grüße Uschi
19.05.2025 - 19:27DROPS Design answered:
Liebe Uschi, in S schlagen Sie die neuen Maschen für die Ärmel am Ende jeder Reihe (Hin- sowie Rückreihe) so an: 1 Masche am Ende jeder der nächsten 2 Reihe (1 Masche 1 Mal beidseitig), dann 2 Maschen am Ende jeder der 4 nächsten Reihe (2 Maschen 2 Mal beidseitig), 4 Maschen am Ende der 4 nächsten Reihe (4 Maschen 2 Mal beidseitig), 6 Maschen am Ende der 2 nächsten Reihen (6 Maschen 1 Mal beidseitig), 8 Maschen am Ende der 2 nächsten Reihen (8 Maschen 1 Mal beidseitig) und endlich 17 Maschen am Ende der 2 nächsten Reihen (17 Maschen 1 Mal beidseitig) = 70+(1x1x2)+(2x2x2)+(4x2x2)+(6x1x2)+(8x1x2)+(17x1x2)=158 Maschen. Viel Spaß beim Stricken!
20.05.2025 - 09:19
![]() Geneviève Esquivié wrote:
Geneviève Esquivié wrote:
Hi, I'm at the point of "Continue back and forth until 11 cm / 4½'' have been worked from marker mid on top of shoulder." If I understand correctly, I knit back and forth from the neck to the marker. I have 2 questions: 1- by doing so (the back & forth) , would this create a space or whole between the marker and the end of the sleeve? And, 2- would the rest of the sleeve be long enough, if not knitted during the 11 cm? Thank you!
01.02.2025 - 23:12DROPS Design answered:
Dear Mrs Esquivié, when starting right front piece you insert a marker on the row, this marker will be used to measure front piece from; so when it measures 11 cm / 4" from this marker you now cast on for neck new stitches af the end of every row from RS (towards neck), then after 14-19 cm from marker you start cast off for sleeve at the beg of row from RS (from sleeve). Happy knitting!
03.02.2025 - 13:59
![]() Bouvard Evelyn wrote:
Bouvard Evelyn wrote:
Guten Tag leider verstehe ich nicht wieso man Rundstricknadeln nehmen muss 🤷🏼♀️ ist wird doch nicht rund gestrickt?nVielen Dank Lg E Bouvard
28.08.2024 - 13:14
![]() Livia wrote:
Livia wrote:
Ho un dubbio sulle maniche, vengono fatte lavorando in cerchio oppure in piano e poi cucite longitudinalmente alla fine? Grazie
23.03.2024 - 17:59DROPS Design answered:
Buonasera Livia, il modello è lavorato in piano. Buon lavoro!
28.03.2024 - 19:24
|
|
Paloma#palomabolero |
|
 |
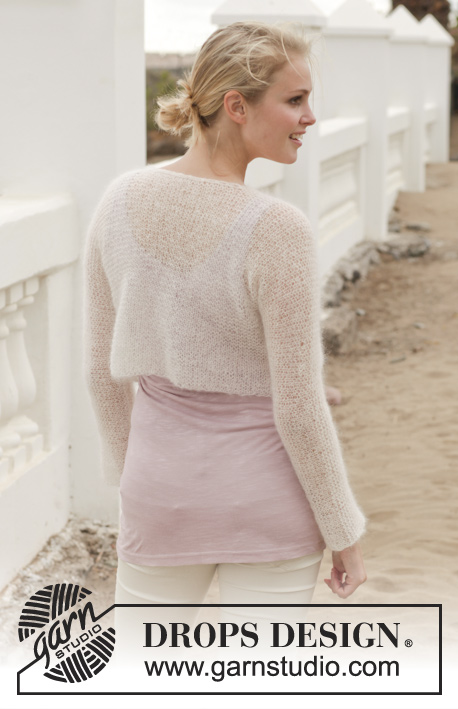 |
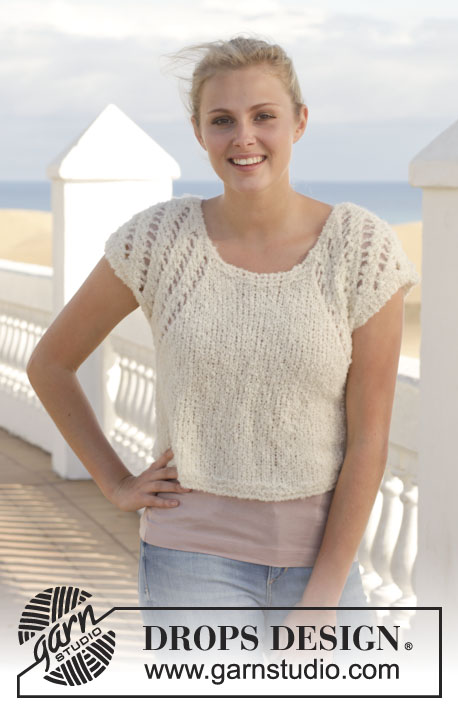
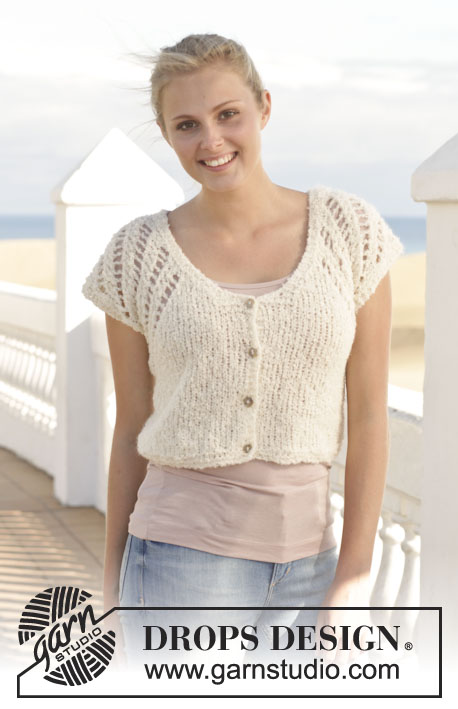
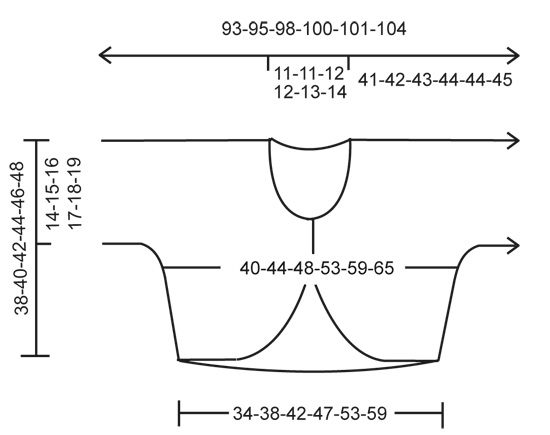
Knitted DROPS bolero in garter st in ”Kid-Silk”. Size: S - XXXL.
DROPS 155-23 |
|
|
GARTER ST (back and forth on needle): K all rows. 1 ridge = K2 rows. INCREASE TIP: Inc 1 st by getting yarn between 2 sts from previous row - K this st twisted, i.e. work in back loop of st instead of front to avoid holes. DECREASE TIP: Dec inside outermost st by K the second and third sts tog and the third last and next to last st. BUTTONHOLES: Dec for buttonholes on right band. 1 buttonhole = K tog second and third st from edge mid front and make 1 YO. Measure from last st cast on towards mid front and dec for buttonholes when piece measures: SIZE S: 1 and 4 cm / ½" and 1½". SIZE M: 1 and 4 cm / ½" and 1½". SIZE L: 1 and 4 cm / ½" and 1½". SIZE XL: 1 and 5 cm / ½" and 2". SIZE XXL: 1 and 5 cm / ½" and 2". SIZE XXXL: 1 and 5 cm / ½" and 2". ---------------------------------------------------------- BOLERO: The entire bolero is worked in one piece. Work from the bottom of the back piece, inc for sleeves, dec for neck, at the same time bind off the sleeves and work down the front piece. Worked back and forth on a circular needle to make room for all the sts. BACK PIECE: Cast on 60-66-74-82-92-102 sts (includes 1 edge st in each side) on circular needle size 5.5 mm / US 9 with Kid-Silk. Work in GARTER ST - see explanation above. REMEMBER THE GAUGE! When piece measures 4 cm / 1½", inc 1 st in each side - READ INCREASE TIP! Repeat inc every 3-3-3½-3½-4-4 cm / 1"-1"-1¼"-1¼"-1½"-1½" 4 more times (5 times in total) = 70-76-84-92-102-112 sts. When piece measures 19-20-21-22-23-24 cm / 7½"-8"-8¼"-8¾"-9"-9½", cast on new sts at the end of every row in each side as follows: 1 st 1-1-2-2-3-4 times, 2 sts 2-3-2-2-1-1 time, 4 sts 2-1-1-1-1-0 times, 6 sts 1 time, 8 sts 1 time and 17-18-17-14-12-12 sts 1 time = 158-162-166-168-172-176 sts in total on needle. Continue to work until piece measures 37-39-41-43-45-47 cm / 14½"-15¼"-16⅛"-17"-17¾"-18½". Now bind off the middle 18-18-20-20-22-24 sts for neck = 70-72-73-74-75-76 sts remaining on each shoulder/sleeve. Slip sts for left front piece on 1 stitch holder. RIGHT FRONT PIECE: = 70-72-73-74-75-76 sts. Work 1 cm / ½", insert 1 marker = mid on top shoulder. NOW MEASURE PIECE FROM HERE! Continue back and forth until 11 cm / 4½" have been worked from marker mid on top of shoulder. Then cast on new sts at the end of every row in towards neck as follows: 1 st 2 times, 2 sts 2 times, and 6-6-7-7-8-9 sts 1 time = 82-84-86-87-89-91 sts (includes 3 band sts in garter st), AT THE SAME TIME when piece measures 14-15-16-17-18-19 cm / 5½"-6"-6¼"-6¾"-7"-7½" bind off sleeve sts. REMEMBER BUTTONHOLES! Loosely bind off at the beg of every row from edge of sleeve: 17-18-17-14-12-12 sts 1 time, 8 sts 1 time, 6 sts 1 time, 4 sts 2-1-1-1-1-0 times, 2 sts 2-3-2-2-1-1 time, 1 st 1-1-2-2-3-4 times = 38-41-45-49-54-59 sts remain on needle. Continue to work. When piece measures 22-24-24-26-26-28 cm / 8¾"-9½"-9½"-10¼"-10¼"-11", dec 1 st in the side - SEE DECREASE TIP. Repeat the dec every 3-3-3½-3½-4-4 cm / 1"-1"-1¼"-1¼"-1½"-1½" 4 more times (5 times in total) - AT THE SAME TIME when piece measures 25-27-29-31-33-35 cm / 9¾"-10½"-11½"-12¼"-13"-13¾", dec 1 st on next row towards mid front (to curve the front piece) - SEE DECREASE TIP, repeat dec on every 4th row a total of 4-3-3-2-2-2 times, then on every other row a total of 6-7-6-8-7-5 times and lastly on every row a total of 11-13-15-15-17-21 times = 12-13-16-19-23-26 sts remain on needle, bind off these sts on next row. LEFT FRONT PIECE: Slip the stitches on the stitch holder back on needle and work as right front piece but reversed. ASSEMBLY: Fold the bolero double at the shoulder = where the marker is. Sew side and sleeve seams in outer loops of edge sts. Cut and fasten the yarn. NECK EDGE: Work an edge around the neck on hook size 4.5 mm/US 7 as follows: Fasten yarn with 1 sc on right front piece towards mid front, ch 2, skip 1.5 cm / ½", * 1 sc, ch 2, skip 1.5 cm / ½" *, repeat from *-* around the entire neck edge, finish with 1 sc. Cut and fasten the yarn. |
|
 |
|
Have you finished this pattern?Tag your pictures with #dropspattern #palomabolero or submit them to the #dropsfan gallery. Do you need help with this pattern?You'll find 15 tutorial videos, a Comments/Questions area and more by visiting the pattern on garnstudio.com. © 1982-2026 DROPS Design A/S. We reserve all rights. This document, including all its sub-sections, has copyrights. Read more about what you can do with our patterns at the bottom of each pattern on our site. |
|


With over 40 years in knitting and crochet design, DROPS Design offers one of the most extensive collections of free patterns on the internet - translated to 17 languages. As of today we count 324 catalogs and 12290 patterns - 12280 of which are translated into English (US/in).
We work hard to bring you the best knitting and crochet have to offer, inspiration and advice as well as great quality yarns at incredible prices! Would you like to use our patterns for other than personal use? You can read what you are allowed to do in the Copyright text at the bottom of all our patterns. Happy crafting!
Post a comment to pattern DROPS 155-23
We would love to hear what you have to say about this pattern!
If you want to leave a question, please make sure you select the correct category in the form below, to speed up the answering process. Required fields are marked *.