
Popular categories
Looking for a yarn?


Comments / Questions (39)
![]() Godeau wrote:
Godeau wrote:
Bonjour, je suis partie sur une taille M qui est trop large mais bien dans la longueur. est-il possible que je travail trop large (mon échantillon était pourtant bon) et dans ce cas est-il possible de travailler avec un crochet n°3? et pas assez de laine pourtant prévu pour une taille L. dans l'attente de votre réponse. Cordialement PS: merci pour vos super modèles
27.01.2016 - 10:07DROPS Design answered:
Bonjour Mme Godeau, pensez à bien crocheter avec la même tension que celle de votre échantillon, il est facile de relâcher sa tension en cours d'ouvrage - ajustez la taille de votre crochet si nécessaire pour bien avoir le même échantillon, et vérifiez bien votre taille à partir des mesures du schéma. Bon crochet!
27.01.2016 - 10:41
![]() Heather Keener wrote:
Heather Keener wrote:
I'm working on the front-left neckline. My piece (is a Med.) DECREASE's: Do they occur on the RS only or is it every row? *dec 2 dc on WS, dec 2 dc on RS; at the neck. = 2 rows leaves me with 37 dc. *dec 1 dc on each of next 4 rows at the neckline. = 33 dc repeat 33 dc until piece measures 64 cm.
12.01.2016 - 23:46DROPS Design answered:
Dear Mrss Keener, that's correct, you dec every row towards neckline, ie both from WS and from RS. Happy crocheting!
13.01.2016 - 10:08
![]() Caitlan wrote:
Caitlan wrote:
I'm a little confused by the size chart for this pattern. As it seems that the bust size is listed as the same for both large and xl. the 38" small medium would definitely be too small, but 47" seems huge for my 41 inch bust. I am about a size fourteen petite in regular clothing, what size would you recommend?
19.10.2014 - 21:21DROPS Design answered:
Dear Caitlan, this tunic is worked a bit loose, if you want something fitter, you will have to adjust to your size. Your DROPS Store may help you if required. Happy crocheting!
20.10.2014 - 10:31
![]() Thea wrote:
Thea wrote:
Ik snap de beschrijving van de hals niet helemaal. Na het telpatroon ( dus na de vaste toer) staat er: haak tot er 8 st over zijn op de toer, hoe bedoelen jullie dat?
25.05.2014 - 21:18DROPS Design answered:
Hoi Thea. Je hebt 49 v op de toer en haakt dan de volgende toer van de goede kant tot er nog 8 st over zijn (= dus je hebt 41 v gehaakt). Keer het werk.
27.05.2014 - 12:06
![]() Mil Chimley wrote:
Mil Chimley wrote:
Is there a size chart available to show what sizes S,M,L,XL,XXL,XXL refer to please?
21.12.2013 - 18:36DROPS Design answered:
Dear Mrs Chimley, you will find at the bottom of the page (end of written pattern) a measurement chart with all measurements in cm. Happy crocheting!
27.12.2013 - 13:08
![]() Sarah wrote:
Sarah wrote:
Ich komme jetzt an der Stelle nicht weiter, in der es am Halsauschnitt wie folgt gehen soll: 2 mal 2M., 3 mal 1 M. Soll ich da 4 Maschen zusammenfassen oder übrig lassen und wie ist die Verteilung auf die Reihen? Das verstehe ich nicht ganz. Liebe Dank für die Rückmeldung!
01.10.2013 - 18:38DROPS Design answered:
Liebe Sarah, die Maschen werden durch Zusammenhäkeln abgenommen, damit keine "Treppe" entsteht, also über 4 M je 2 zusammenhäkeln = 2 M abgenommen. Es wird in jeder R abgenommen (siehe Anleitung).
02.10.2013 - 09:54
![]() Willy Van Bommel-Drissen wrote:
Willy Van Bommel-Drissen wrote:
Wat is die uitleg van jullie supergoed, zelfs ik snap het!!! Met vriendelijke groeten
11.09.2013 - 15:17
![]() Hordijk wrote:
Hordijk wrote:
Geachte mevrouw, Is er geen omschrijving voor een V-hals? Zoals duidelijk te zien is op het voorbeeld? Een V-hals bij het M1-patroon is veel mooier dan een split. Kunt u mij hiervoor een instructie leveren? Met vriendelijke groet en dank.
08.04.2013 - 00:14DROPS Design answered:
In het patroon staat hoe u de hals moet haken. Door de beschrijving te volgen vormt u een v-hals. Bij het afwerken haakt u ook een rand om de hals om deze helemaal af te maken.
08.04.2013 - 19:16
![]() Kati wrote:
Kati wrote:
Kiitos selvennyksestä. Eli kavennukset vaativat 10 kerrosta yhteensä. Ongelmana on myös se, että minulla tuon kuvion ja olkapään väliin jää vain 9 kerrosta, täytynee kaventaa vähän nopeammin.
23.01.2013 - 12:57
![]() Kati wrote:
Kati wrote:
Mitä tarkoittaa etukappaleen kavennus kaula-aukon kohdalla? 'Kavenna sitten pääntien reunassa joka 2. krs: 2 x 2 s ja 3-4-4-5-5-6 x 1 s' Eli kavennanko yhdellä kerroksella 4 silmukkaa? Seuraavalla 3 silmukkaa? En ymmärrä tuota 2 kertaa 2s?
18.01.2013 - 11:35DROPS Design answered:
Päätät 2 x 2 s joka 2. krs näin: Päätä pääntien reunasta 2 s. Neulo 1 välikerros. Päätä sitten seuraavalla krs:lla uudestaan 2 s. Tee samalla tavalla myös jatkossa, eli päätä 1 s, neulo välikerros jne.
21.01.2013 - 16:40
|
|||||||||||||
Country Dream#countrydreamsweater |
|||||||||||||
 |
 |
||||||||||||
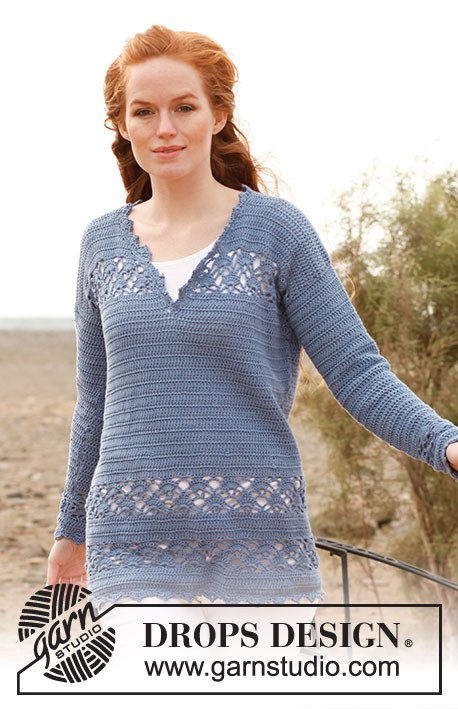
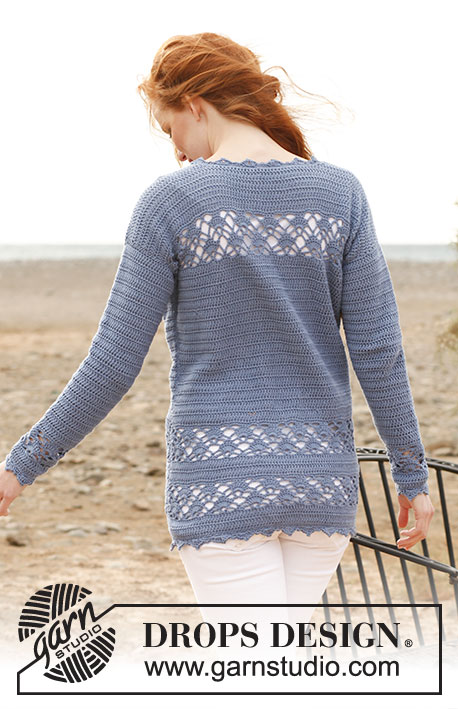
Crochet DROPS tunic in ”Safran”. Size: S - XXXL.
DROPS 136-25 |
|||||||||||||
|
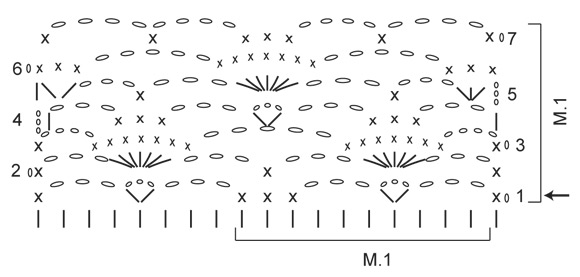
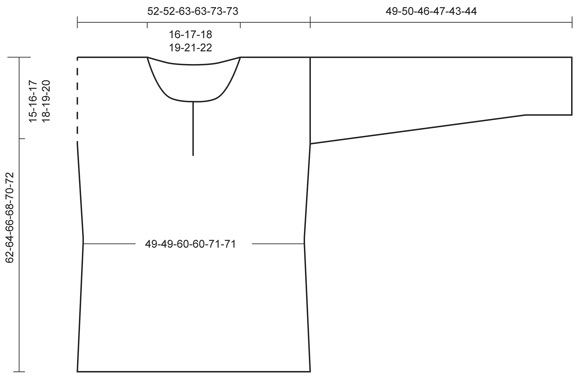
DC ROWS: Beg every dc row with ch 3 (not counted as 1st dc), work 1 dc in 1st st, then 1 dc in every st, turn. PATTERN: See diagram M.1. 1 repetition of diagram M.1 = 10 dc in width and 7 rows vertically. DECREASE TIP: Work 1 dc but wait with last pull through (= 2 sts on hook), then work next dc but on last pull through, pull thread through all sts on hook = 1 st dec. INCREASE TIP: Inc 1 st in each side of piece by working 2 dc in 1st and last st on row. --------------------------------------------------------- BACK PIECE: Read US/UK above! Worked back and forth. Loosely work 102-102-122-122-142-142 ch on hook size 3.5 mm/E/4 with Safran. Work 1st row (= RS) as follows: Work 1 dc in 4th ch from hook, then 1 dc in every ch, turn = 99-99-119-119-139-139 dc (= 9-9-11-11-13-13 repetitions of diagram M.1 + 9 sts). REMEMBER THE CROCHET GAUGE! Then work 3-3-4-4-5-5 dc ROWS - Read explanation above = 4-4-5-5-6-6 dc rows vertically. Continue to work diagram M.1 as follows: ROW 1: ch 1, 1 sc in 1st dc, * ch 3, skip the next 3 dc, in next dc work as follows: 1 dc, ch 3, 1 dc, then ch 3, skip the next 3 dc, 1 sc in each of the next 3 dc (= 3 sc) *, repeat from *-* the rest of row. When repeating from *-* the last time work ch 3, skip the next 3 dc and work 1 sc in last dc, turn. ROW 2: ch 1, 1 sc in 1st sc, * ch 3, skip next ch-space, 7 dc in next ch-space (between 2 dc), ch 3, 1 sc in the middle sc from 1ST ROW *, repeat from *-* the rest of row. When repeating from *-* the last time work 3 ch and 1 sc in last sc, turn. ROW 3: ch 1, 1 sc in 1st sc, ch 4, * 1 sc in each of the next 7 dc (= 7 sc), ch 5 *, repeat from *-* the rest of row, finish with ch 4 and 1 sc in last sc, turn. ROW 4: ch 3, 1 dc in 1st ch-space, * ch 3, 1 sc in the middle of the 3 sc from 3RD ROW (= 3 sc), ch 3, [1 dc, ch 3, 1 dc] in next ch-space *, repeat from *-* the rest of row. When repeating from *-* the last time work ch 3 and 1 dc in last ch-space, turn. ROW 5: ch 3, 3 dc in 1st ch-space, * ch 3, 1 sc in the middle sc from 4TH ROW, ch 3, skip next ch-space, 7 dc in next ch-space (between 2 dc) *, repeat from *-* the rest of row. When repeating from *-* the last time work ch 3, 2 dc in last ch-space and 1 dc in 3rd ch from 4TH ROW, turn. ROW 6: ch 1, 1 sc in each of the next 3 dc (= 3 sc), * ch 5, 1 sc in each of the next 7 dc (= 7 sc) *, repeat from *-* the rest of row. When repeating from *-* the last time work 1 sc in each of the last 3 dc (= 3 sc), turn. ROW 7: ch 1, 1 sc in 1st sc, * ch 4, 1 sc in next ch-space, ch 4, 1 sc in each of the middle 3 sc from 6TH ROW (= 3 sc) *, repeat from *-* the rest of row. When repeating from *-* the last time work ch 4 and 1 sc in last sc, turn. Then work 1 sc row as follows: ch 1, 1 sc in 1st sc, * 4 sc in next ch-space, 3 sc in next ch-space, 1 sc in each of the next 3 sc *, repeat from *-* the rest of row. When repeating from *-* the last time, work 1 sc in last sc = 99-99-119-119-139-139 sc. Work another 4-4-5-5-6-6 dc rows, then diagram M.1 1 time vertically, and then 1 sc row the same way - while AT THE SAME TIME dec 1 st at the end of row - Read DECREASE TIP above = 98-98-118-118-138-138 sts. Piece now measures approx. 20-20-22-22-24-24 cm / 8"-8"-8¾"-8¾"-9½"-9½". Then work 2-3-2-3-2-3 dc rows (piece measures approx. 22-23-24-25-26-27 cm / 8¾"-9"-9½"-9¾"-10¼"-10⅝"). On next row dec 4 sts evenly on row = 94-94-114-114-134-134 dc. Continue with dc rows until piece measures 27-28-29-31-32-33 cm / 10⅝"-11"-11⅜"-12¼"-12½"-13". On next row, inc 1 st in each side of piece - Read INCREASE TIP above. Repeat inc one more time when piece measures 34-35-36-37-38-39 cm / 13⅜"-13¾"-14¼"-14½"-15"-15¼". When piece measures 40-41-42-44-45-46 cm / 15¾"-16⅛"-16½"-17¼"-17¾"-18", inc 1 st at end of row = 99-99-119-119-139-139 dc. When piece measures 47-48-49-50-51-52 cm / 18½"-19"-19¼"-19¾"-20"-20½", work from RS as follows: Diagram M.1 1 time and 1 sc row as before. NOTE: Insert a marker in each side of piece on 1st row in diagram M.1 (armhole beg here). Continue with dc rows until piece measures 60-62-64-66-68-70 cm / 23⅝"-24⅜"-25¼"-26"-26¾"-27½". Then work 1 dc row over the outermost 35-34-43-42-51-50 sts in each side (i.e. do not work over the middle 29-31-33-35-37-39 sts (= neck), then dec 1 st on next row towards the neck = 34-33-42-41-50-49 sts remain on shoulder. Cut and fasten the thread, piece measures approx. 62-64-66-68-70-72 cm / 24⅜"-25¼"-26"-26¾"-27½"-28⅜". FRONT PIECE: Work as back piece until piece measures 42-44-45-47-48-50 cm / 16½"-17¼"-17¾"-18½"-19"-19¾". LEFT FRONT PIECE: On next row from RS work vent as follows: Work 49-49-59-59-69-69 dc (= 4-4-5-5-6-6 repetitions of diagram + 9 sts), turn. Continue with dc rows. When piece measures 47-48-49-50-51-52 cm / 18½"-19"-19¼"-19¾"-20"-20½", work diagram M.1 (beg from RS) 1 time vertically. NOTE: Insert a marker in the left side of piece (seen from RS) on 1st row in diagram M.1 (armhole beg here). Then work 1 sc row as before = 49-49-59-59-69-69 sc. On next row from RS work neck as follows: Work until 8-8-9-9-10-10 sts remain on row, turn. Then dec on every row towards the neck as follows: Dec 2 sts 2 times - Read DECREASE TIP above, 1 st 3-4-4-5-5-6 times = 34-33-42-41-50-49 sts remain on shoulder. Continue until piece measures 62-64-66-68-70-72 cm / 24⅜"-25¼"-26"-26¾"-27½"-28⅜", fasten off. RIGHT FRONT PIECE: = 50-50-60-60-70-70 dc. On next row dec 1 st at beg of row = 49-49-59-59-69-69 dc. Work as left front piece but reversed. SLEEVE: Worked back and forth. Ch 42-42-42-52-52-52 on hook size 3.5 mm/E/4 . Work 1st row (= RS) as follows: Work 1 dc in 4th ch from hook, then 1 dc in every ch, turn = 39-39-39-49-49-49 dc (= 3-3-3-4-4-4 repetitions of diagram M.1 + 9 sts), turn. Then work 2 dc rows = 3 dc rows vertically. Then work diagram M.1 1 time and 1 sc row = 39-39-39-49-49-49 sc. On next row work dc - while AT THE SAME TIME inc 1 st in each side of piece. Continue with dc rows and repeat inc every 4½-3½-2½-3½-2½-2½ cm / 1¾"-1¼"-⅞"-1¼"-⅞"-⅞" a total of 9-11-13-10-12-13 times = 57-61-65-69-73-75 sts. Continue until piece measures 49-50-46-47-43-44 cm / 19¼"-19¾"-18"-18½"-17"-17¼" (shorter measurements in the larger sizes because of wider shoulders), fasten off. ASSEMBLY: Sew the shoulder seams. Sew in sleeves between markers in each side. Sew sleeve and side seams in one. CROCHET EDGE - BODY: Work along the bottom edge of tunic as follows: ROUND 1: Beg in left side seam, work ch 1, 1 sc in every dc - AT THE SAME TIME inc 2 sc evenly on round = 200-200-240-240-280-280 sc (no of sts divisible by 8), finish with 1 sl st in 1st sc. ROUND 2: ch 1, 1 sc in 1st sc, * ch 3, skip 3 sc, 1 sc in next sc *, repeat from *-* the entire round, finish with ch 3, skip the last 3 sc and work 1 sl st in 1st sc. ROUND 3: ch 1, in 1st ch-space work as follows: 1 sc, ch 3, 1 sc, * in next ch-space work as follows: 3 dc, ch 3, 1 sl st in 1st ch, 3 dc, in next ch-space work as follows: 1 sc, ch 3, 1 sc *, repeat from *-* the entire round, finish with 1 sl st in 1st sc, cut and fasten the thread. CROCHET EDGE - SLEEVE: Work an edge around bottom edge of sleeve as follows: Size S - L ROUND 1: Beg in sleeve seam, work ch 1, 1 sc in every dc - AT THE SAME TIME inc 1 st at end of round = 40-40-40 sc (no of sts divisible by 8), finish with 1 sl st in 1st sc. ROUND 2: ch 1, 1 sc in 1st sc, * ch 3, skip 3 sc, 1 sc in next sc *, repeat from *-* the entire round, finish with ch 3, skip the last 3 sc and work 1 sl st in 1st sc. ROUND 3: ch 1, in 1st ch-space work as follows: 1 sc, ch 3, 1 sc, * in next ch-space work as follows: 3 dc, ch 3, 1 sl st in 1st ch, 3 dc, in next ch-space work as follows: 1 sc, ch 3, 1 sc *, repeat from *-* the entire round, finish with 1 sl st in 1st sc, fasten off. Size XL - XXXL: ROUND 1: Beg in sleeve seam, ch 1, 1 sc in every dc - AT THE SAME TIME dec 1 st at end of round = 48-48-48 sc (no of sts divisible by 8), finish with 1 sl st in 1st sc. Work 2ND and 3RD round as size S - L. Repeat on the edge of the other sleeve. CROCHET EDGE - NECK: Work an edge back and forth along the vent and neck edge as follows: ROW 1: Beg at the bottom of vent mid front, ch 1, 21-21-21-17-17-17 sc along vent on right front piece (no of sts divisible by 4 + 1), then 83-83-91-91-99-99 sc along neck edge, finish with 21-21-21-17-17-17 sc along vent on left front piece = 125-125-133-125-133-133 sc in total, turn. ROW 2: ch 1, 1 sc in 1st sc, * ch 3, skip 3 sc, 1 sc in next sc *, repeat from *-* the rest of row, turn. ROW 3: ch 1, in 1st ch-space work as follows: 1 sc, ch 3, 1 sc, * in next ch-space work as follows: 3 dc, ch 3, 1 sl st in 1st ch, 3 dc, in next ch-space work as follows: 1 sc, ch 3, 1 sc *, repeat from *-* the rest of row, fasten off. |
|||||||||||||
Diagram explanations |
|||||||||||||
|
|||||||||||||
 |
|||||||||||||
 |
|||||||||||||
Have you finished this pattern?Tag your pictures with #dropspattern #countrydreamsweater or submit them to the #dropsfan gallery. Do you need help with this pattern?You'll find 5 tutorial videos, a Comments/Questions area and more by visiting the pattern on garnstudio.com. © 1982-2026 DROPS Design A/S. We reserve all rights. This document, including all its sub-sections, has copyrights. Read more about what you can do with our patterns at the bottom of each pattern on our site. |
|||||||||||||


With over 40 years in knitting and crochet design, DROPS Design offers one of the most extensive collections of free patterns on the internet - translated to 17 languages. As of today we count 325 catalogs and 12298 patterns - 12288 of which are translated into English (US/in).
We work hard to bring you the best knitting and crochet have to offer, inspiration and advice as well as great quality yarns at incredible prices! Would you like to use our patterns for other than personal use? You can read what you are allowed to do in the Copyright text at the bottom of all our patterns. Happy crafting!
Post a comment to pattern DROPS 136-25
We would love to hear what you have to say about this pattern!
If you want to leave a question, please make sure you select the correct category in the form below, to speed up the answering process. Required fields are marked *.