
Popular categories
Looking for a yarn?


Comments / Questions (60)
![]() Ann Robertson wrote:
Ann Robertson wrote:
Please translate questions
24.06.2016 - 04:45
![]() Brigitte wrote:
Brigitte wrote:
Ich komme leider garnicht mit der Anleitung klar. Zuviele "Gleichzeitig" die ich nicht einordnen kann, wo kann ich Hilfe zu dem Modell bekommen?
29.07.2014 - 22:36DROPS Design answered:
Liebe Brigitte, am besten wenden Sie sich an das Geschäft, in dem Sie die Wolle gekauft haben. Das geht normalerweise auch telefonisch. Oder Sie versuchen, sich die einzelnen Schritte untereinander auf einem Zettel zu notieren, das hilft manchmal auch, um einen besseren Überblick zu bekommen, was man alles zu beachten hat.
31.07.2014 - 11:55
![]() M.verbaan wrote:
M.verbaan wrote:
Ik wil graag weten, hoe ik voor de ronding netjes steken bij maak.Er staat 1 steek aan het einde van de naald en herhaal dat elke naald, Dit betekent dan 2 steken, 1 naald heen en 1 naald terug.Hoe krijg je dit netjes. 2e vraag: Er staat in het patroon en dan om de ??nld. 5 keer elke 4e naald. Maar in welke naald????
27.02.2013 - 19:29DROPS Design answered:
Je kan een nieuwe st opzetten op verschillende manieren. Kijk eventueel bij onze instructievideo's onder Opzetten. Kies de manier je het leukste en mooiste vindt. Je moet opzetten aan het middenvoor eerst in elke nld, daarna om de nld (= elke 2e nld = brei 1 nld zonder op te zetten, 1 met opzetten, etc) en uiteindelijk in elke 4e nld (3 nld breien zonder opzetten, 1 nld met opzetten etc).
28.02.2013 - 21:59
![]() DROPS Deutsch wrote:
DROPS Deutsch wrote:
Da Muster ist angepasst. Danke für den Tipp.
17.11.2010 - 08:57Monika Krueger wrote:
In der deutschen Anleitung für die Rüschenkante des Boleros fehlen die ersten 5 Reihen in kraus rechts bevor man den 2. Faden abschneiden soll. Ansonsten wurde es ein sehr schickes Bolero!
16.11.2010 - 13:36
![]() DROPS Design wrote:
DROPS Design wrote:
2. pinnen er retten og da øker du på slutten (mot mitten, 1. pinnen er fra vrangen). Deretter øker du i på hver pinne (i slutten og i starten av 2./3. pinne). Etterpå økes de igjen på hver 2. pinne i slutten av retten.
21.05.2010 - 09:30
![]() Liva wrote:
Liva wrote:
Paa hoegre framstykke skal du auka paa slutten av andre pinne,men det blir i siden .og deretter hver 2 pinne.Her er det noko som ikkje stemmer
19.05.2010 - 16:48
![]() DROPS Design NL wrote:
DROPS Design NL wrote:
Mevrouw. Als u doorgeeft wat voor u moeilijk is, dan kunnen wij proberen om u verder te helpen. Gr. Tine
19.02.2010 - 08:54
![]() A.smit-bos wrote:
A.smit-bos wrote:
De beschijving van het patroon is onduidelijk, kunt U mij helpen?
18.02.2010 - 20:47
![]() Kyra wrote:
Kyra wrote:
Erg leuk en hip. Hoop het op tijd af te hebben voor de zomer. Ideaal voor over een jurkje of hemdje.
14.02.2010 - 18:49
|
|
Meringue Perfection#meringueperfectionbolero |
|
 |
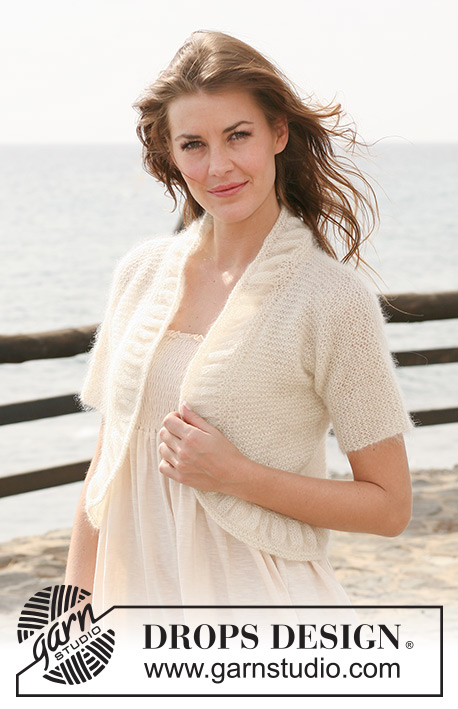 |
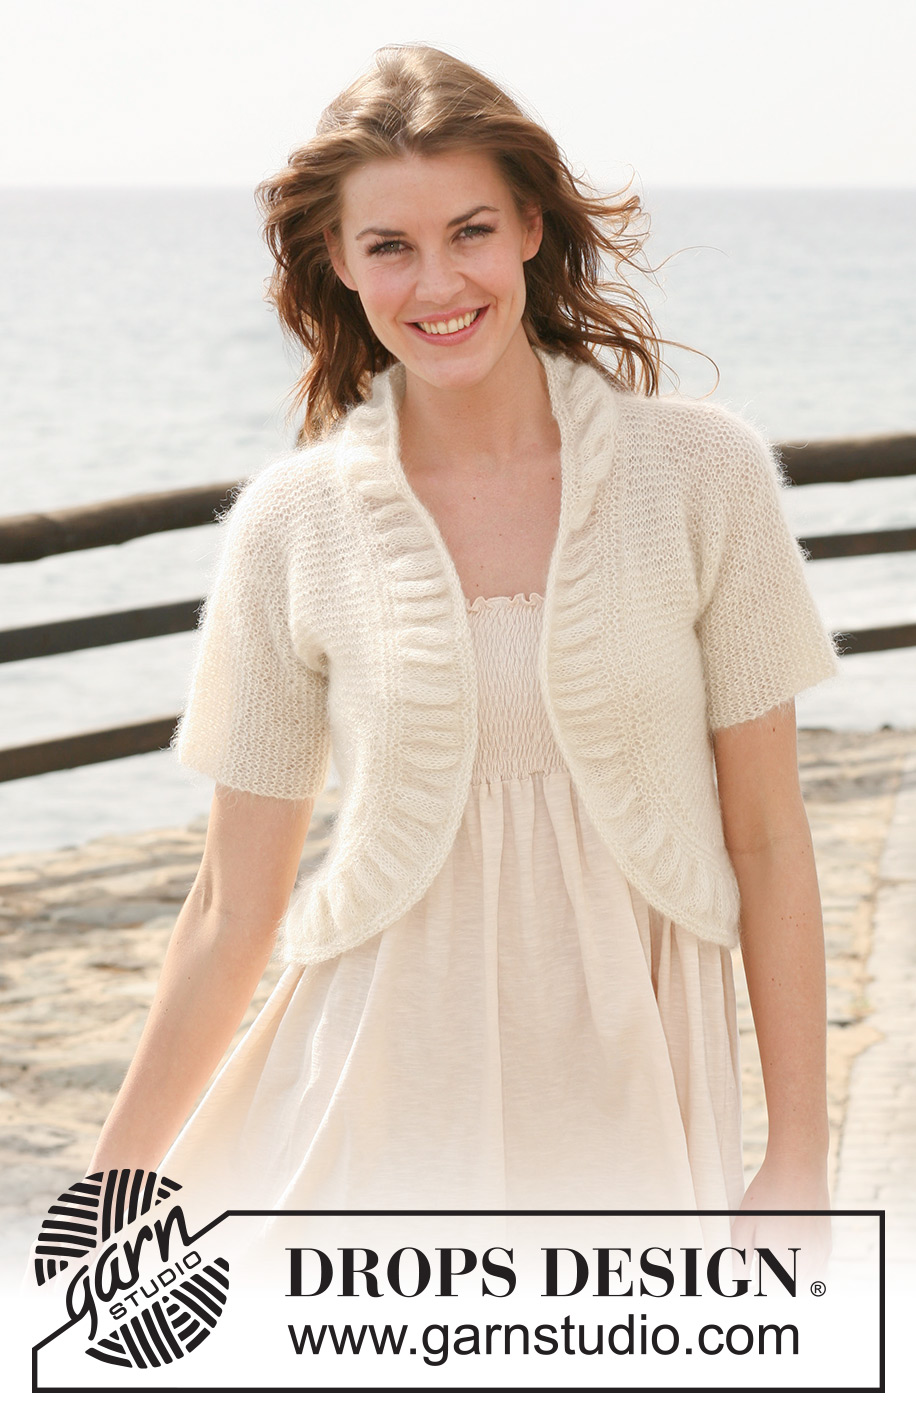
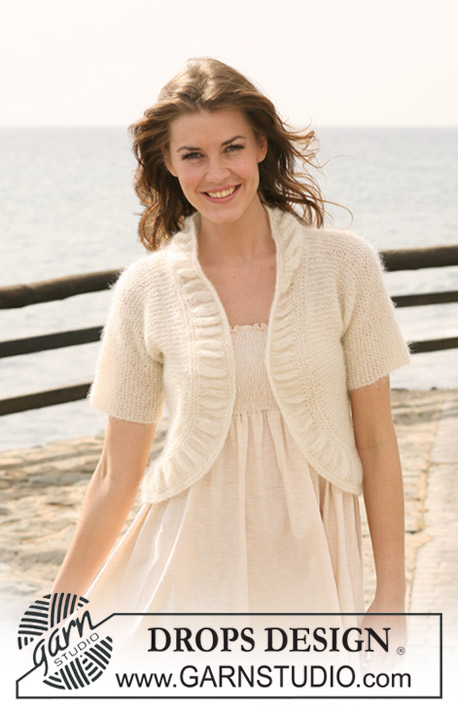
DROPS Bolero in 2 threads ”Kid-Silk” with shirred pattern round the opening. Size S - XXXL.
DROPS 119-18 |
|
|
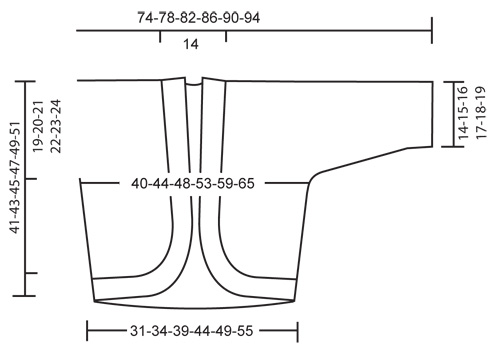
GARTER ST (back and forth on needle): K all rows. DECREASING TIP: Dec 1 st by K2 tog before/after edge st. -------------------------------------------------------- -------------------------------------------------------- BOLERO: Work each front piece separately, inc sts for sleeves, slip both front pieces on the same circular needle, at the same time cast on new sts for neckline on back piece and work back piece from neck down. RIGHT FRONT PIECE: Worked back and forth on pointed needles. Cast on 4-5-6-9-13-16 sts (includes 1 edge st at the side) with 2 threads Kid-Silk on needle size 5 mm / US 8. READ ALL OF THE FOLLOWING SECTION BEFORE CONTINUING! INC AT FRONT: Work GARTER ST - see above – AT THE SAME TIME on row 2 cast on 1 new st at the end of row towards mid front (= shaped front piece), and repeat on every row a total of 6-8-12-13-15-15 times, then on every other row: 5-6-5-5-4-6 times and then on every 4th row: 4-3-3-3-3-3 times – after the last inc insert a marker in piece (to be used when working the border). REMEMBER THE GAUGE! INC AT THE SIDE: at the same time when piece measures 2 cm / ¾" inc 1 st towards the side by K2 sts in the last but one st. Repeat the inc on every 1.5-1.5-1.5-2-2-2 cm / ½"-½"-½"-¾"-¾"-¾" a total of 8 times. When all inc are complete there are 27-30-34-38-43-48 sts on needle. INC FOR SLEEVE: When piece measures 15-16-17-18-19-20 cm / 6"-6¼"-6¾"-7"-7½"-8" cast on new sts for sleeve at the end of every row towards the side: 1 st 2-2-2-3-3-4 times, 2 sts 2-2-2-1-2-1 times, 4 sts 2-2-2-2-1-1 times, 6 sts 1 time for all sizes and 8 sts 1 time for all sizes (now make sure to tighten st on sleeve edge on every row). DEC FOR NECK: at the same time when piece measures 16-17-18-19-20-21 cm / 6¼"-6¾"-7"-7½"-8"-8¼" dec 1 st on neckline - SEE DECREASING TIP, and repeat the dec on every 3rd cm / 1⅛" a total of 4 times. When all inc for sleeve and dec for neck are complete there are 51-54-58-61-64-68 sts on needle. Continue until piece measures 34-36-38-40-42-44 cm / 13⅜"-14¼"-15"-15¾"-16½"-17¼", insert a marker (= mid shoulder) and now MEASURE PIECE FROM HERE! Continue for 1 cm / ⅜" and put piece aside (make sure last row is worked from WS). LEFT FRONT PIECE: Like right front piece, but mirrored. BACK PIECE: In order to fit in all sts work piece back and forth on circular needle. Work sts from left front piece in on circular needle size 5 mm / US 8, cast on 24 new sts (= neckline on back piece) and work in sts from right front piece = 126-132-140-146-152-160 sts. Work garter st back and forth on circular needle until piece measures 14-15-16-17-18-19 cm / 5½"-6"-6¼"-6¾"-7"-7½" (from marker on shoulder), now bind off sleeve sts - bind off loosely at the beg of every row each side: 8 sts 1 time for all sizes, 6 sts 1 time for all sizes, 4 sts 2-2-2-2-1-1 times, 2 sts 2-2-2-1-2-1 times and 1 st 2-2-2-3-3-4 times = 70-76-84-92-102-112 sts. When piece measures 21-23-25-24-26-28 cm / 8¼"-9"-9¾"-9½"-10¼"-11" dec 1 st each side – SEE DECREASING TIP, and repeat the dec on every 1.5-1.5-1.5-2-2-2 cm / ½"-½"-½"-¾"-¾"-¾" a total of 8 times = 54-60-68-76-86-96 sts. Continue until piece measures approx 34-36-38-40-42-44 cm / 13⅜"-14¼"-15"-15¾"-16½"-17 ¼" (last row worked from WS) – fold piece double by shoulder and adjust length to front pieces. Work 6 rows garter st, remove 1 thread and work next rows as follows from RS: K 1 edge st, inc 2 sts in next st (i.e. 1 st becomes 3 sts) as follows: * K1, 1 YO, K1 *, repeat from *-* in sts across the row, K 1 edge st = 158-176-200-230-254-284 sts. Work 7 rows stockinette st and work next row as follows from RS with 2 threads: K 1 edge st, then K3 tog across the row, K 1 edge st = 54-60-68-76-86-96 sts. K 3 rows and bind off. BORDER: Worked back and forth on circular needle size 5 mm / US 8 with 2 threads. Beg at bottom of side on right front piece and pick up sts along front piece, round neckline and down along left front piece = approx 200 to 270 sts – make sure to pick up enough sts along front pieces from the side and up to markers. K 5 rows back and forth on needle. Remove 1 thread and work next row as follows: K 1 edge st, inc 2 sts in next st (i.e. 1 st becomes 3 sts) as follows: * K1, 1 YO, K1 *, repeat from *-* in sts across the row, K 1 edge st = approx 596 to 806 sts. Work 7 rows stockinette st and work next row as follows from RS with 2 threads: K 1 edge st, then K2 tog across the row to after the marker on right front piece, now K3 tog across the row to marker on left front piece, then K2 tog across the row, K 1 edge st. K 3 rows on all sts and bind off LOOSELY. ASSEMBLY: Fold the bolero double by shoulder = by markers. Sew side and sleeve seams inside 1 edge st. |
|
 |
|
Have you finished this pattern?Tag your pictures with #dropspattern #meringueperfectionbolero or submit them to the #dropsfan gallery. Do you need help with this pattern?You'll find 17 tutorial videos, a Comments/Questions area and more by visiting the pattern on garnstudio.com. © 1982-2026 DROPS Design A/S. We reserve all rights. This document, including all its sub-sections, has copyrights. Read more about what you can do with our patterns at the bottom of each pattern on our site. |
|


With over 40 years in knitting and crochet design, DROPS Design offers one of the most extensive collections of free patterns on the internet - translated to 17 languages. As of today we count 324 catalogs and 12290 patterns - 12280 of which are translated into English (US/in).
We work hard to bring you the best knitting and crochet have to offer, inspiration and advice as well as great quality yarns at incredible prices! Would you like to use our patterns for other than personal use? You can read what you are allowed to do in the Copyright text at the bottom of all our patterns. Happy crafting!
Post a comment to pattern DROPS 119-18
We would love to hear what you have to say about this pattern!
If you want to leave a question, please make sure you select the correct category in the form below, to speed up the answering process. Required fields are marked *.