
Popular categories
Looking for a yarn?


Comments / Questions (62)
![]() Daniela wrote:
Daniela wrote:
How many granny square do I need in total for a size M?
30.05.2023 - 22:26DROPS Design answered:
Dear Daniela, you need a total of 6 squares in each of the 6 colours - 36 squares in total. See under GRANNY SQUARE. Happy crocheting!
31.05.2023 - 08:19
![]() Evi Desair wrote:
Evi Desair wrote:
Hallo , Zou het kunnen dat er een foutje in het patroon zit ? => als je voor de maat L : 1 klein vierkant in elke kleurcombinatie haakt + 2 extra (vierkant 1+2) , kom je maar aan 8 vierkantjes en je zou er 5 moeten hebben per bandje (samen 10) Groetjes Evi
20.05.2023 - 16:17DROPS Design answered:
Dag Evi,
Vermoedelijk zit er een foutje in het patroon en ik denk dat het of 8 of 10 vierkantjes moeten zijn. Ik heb het aan de ontwerpafdeling doorgegeven om te checken. Om verder te kunnen zou je voor jezelf kunnen kijken welk aantal het beste in jouw geval past door het kledingstuk te passen.
23.05.2023 - 10:23
![]() Laura wrote:
Laura wrote:
Woodstock weekend edging Is it chain 3 over the treble stitches or 3 single crochet? I have gaps. I could send a picture to show you. Please help. Can you show me close up picture?
04.05.2023 - 06:47DROPS Design answered:
Dear Laura, in this video, we show how to crochet such a square (with just one color, but you then just have to change color, the technique will be the same). It should help you to understand how to work diagram. Happy crocheting!
04.05.2023 - 08:25
![]() Anita Vogler wrote:
Anita Vogler wrote:
Wie nähe ich die Träger fest?
27.04.2023 - 08:09DROPS Design answered:
Liebe Frau Vogler, die Quadraten von den Trägern häkeln Sie wie beim Topp zusammen und dann häkeln Sie die Träger am Vorder- bzw Rückenteil zusammen, wie Sie die Quadrate davor zusammengehäkelt haben. Viel Spaß beim häkeln!
27.04.2023 - 08:30
![]() Lucia wrote:
Lucia wrote:
Nella taglia M, quanti quadrati di 3 giri per ogni spallina? Grazie tanto lucia
21.04.2023 - 15:45DROPS Design answered:
Buonasera Lucia, come indicato nelle spiegaziono, per la spallina della taglia M deve lavorare 1 quadrato per ogni combinazione di colore e poi ancora 1 quadrato per le combinazioni 1 e 2, per un totale di 8 quadrati per le 2 spalline. Buon lavoro!
26.04.2023 - 17:06
![]() Axelle wrote:
Axelle wrote:
Bonjour, Le top sur la photo est-il crocheté en suivant les instructions écrites (1 maille serrée entre chaque groupe de brides, correspondant au tutoriel vidéo "Comment crocheter 2 carrés ensemble"), ou bien en suivant les instructions du tutoriel vidéo "Comment crocheter des carrés ensemble avec des mailles coulées" ? J'hésite entre ces deux méthodes pour assembler tous mes carrés entre eux. Une méthode est-elle plus adaptée à cet ouvrage ? Merci !
21.04.2023 - 15:12DROPS Design answered:
Bonjour Axelle, on assemble les carrés en suivant la technique de cette vidéo, autrement dit, on crochète 1 maille serrée dans les 2 carrés et 3 ml entre chaque maille serrée - mais vous pouvez également utiliser l'autre technique, au choix. Bonnes finitions!
24.04.2023 - 09:19
![]() Lucia wrote:
Lucia wrote:
Buonasera, avete un video dove posso vedere come attaccare i quadrati di questo modello “ Woodstock Weekend” come descritto nello schema. Grazie di tutto lucia
19.04.2023 - 19:58DROPS Design answered:
Buonasera Lucia, un video specifico per questo modello non c'è, ma se scorre la pagina del modello può trovare dei video consigliati per la confezione di modelli simili a questo. Buon lavoro!
26.04.2023 - 17:09
![]() Marie wrote:
Marie wrote:
Hi, and very beautiful top! Do you think there will be a recipe for a shorts or skirt that could go with the top?
17.04.2023 - 13:34
![]() Laura wrote:
Laura wrote:
Where is the actual pattern??? It tells you the color to use and how to assemble them. Please help p
03.04.2023 - 07:52DROPS Design answered:
Hi Laura, The diagram for the pattern is at the bottom of the page, under the measurements chart. Happy Easter!
04.04.2023 - 06:46
![]() Lesley Naylor wrote:
Lesley Naylor wrote:
The video link appears to be broken. I can’t access the one for joining squares together
27.03.2023 - 22:13
|
||||||||||||||||
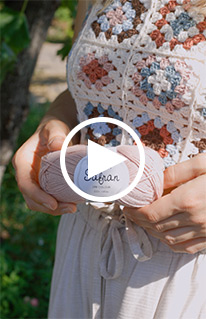
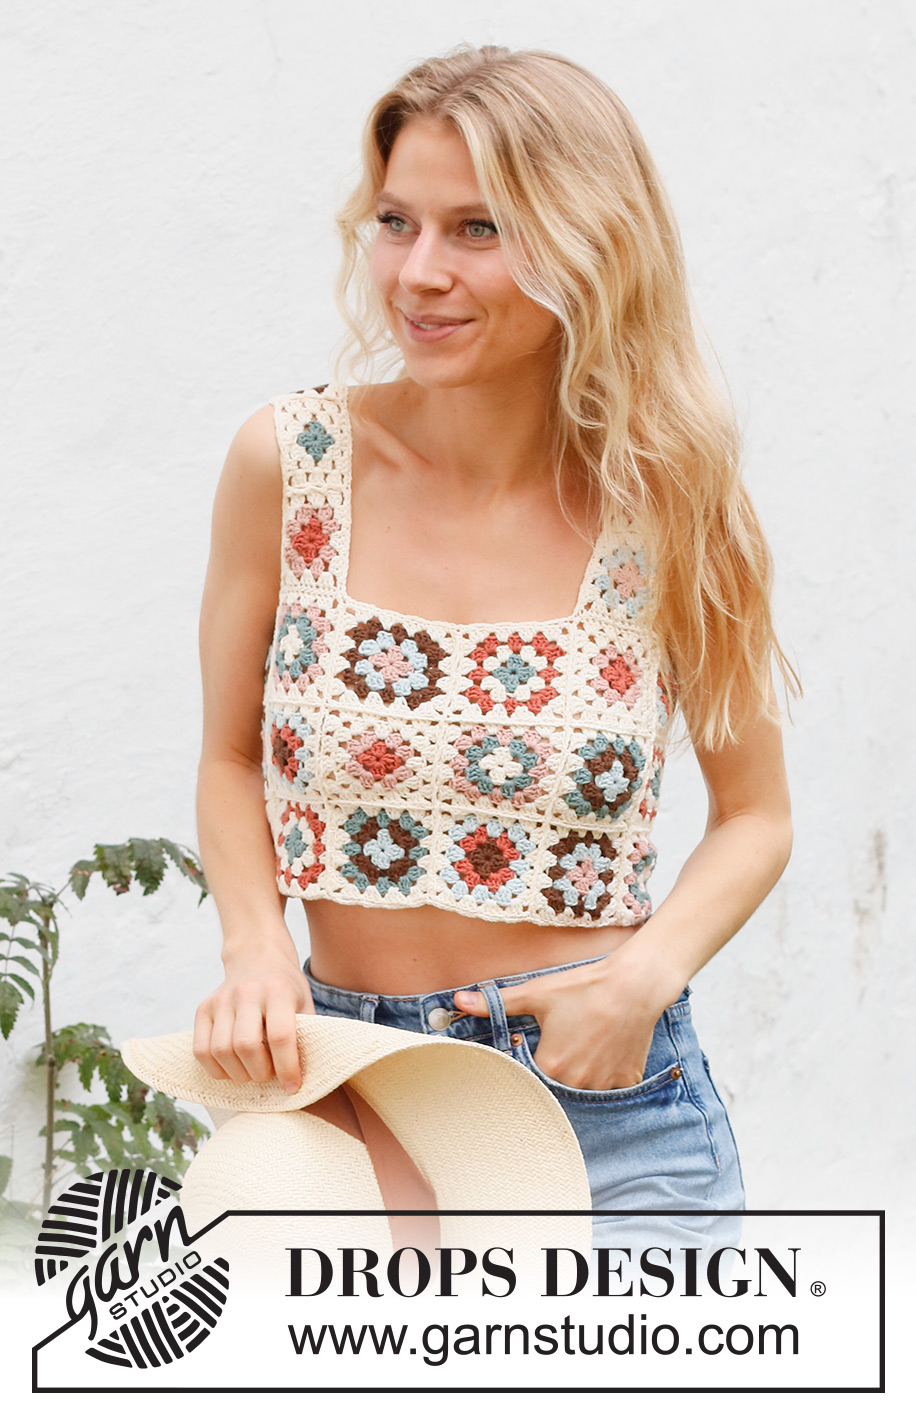
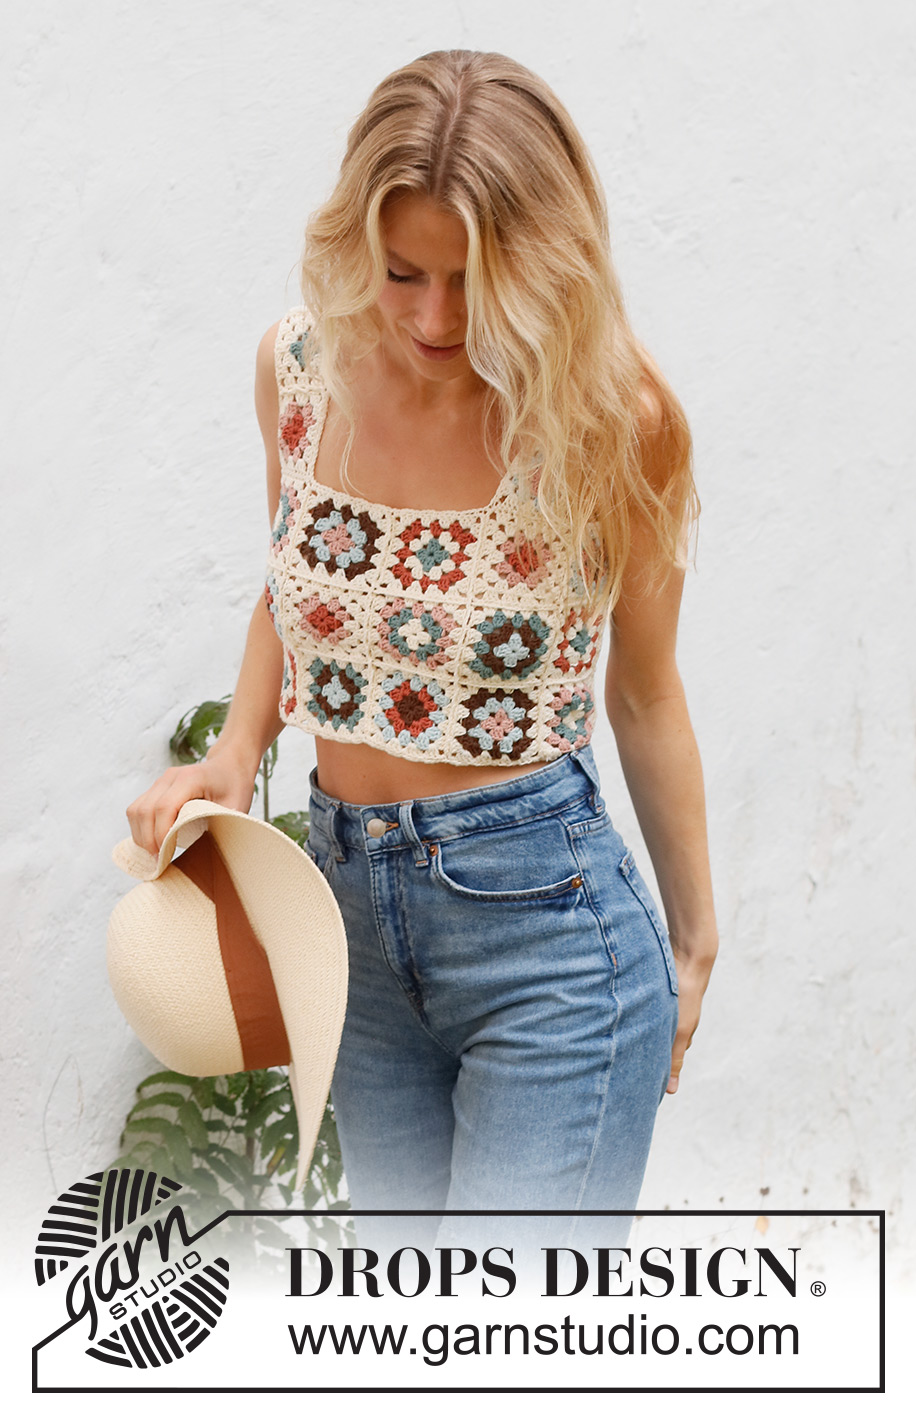
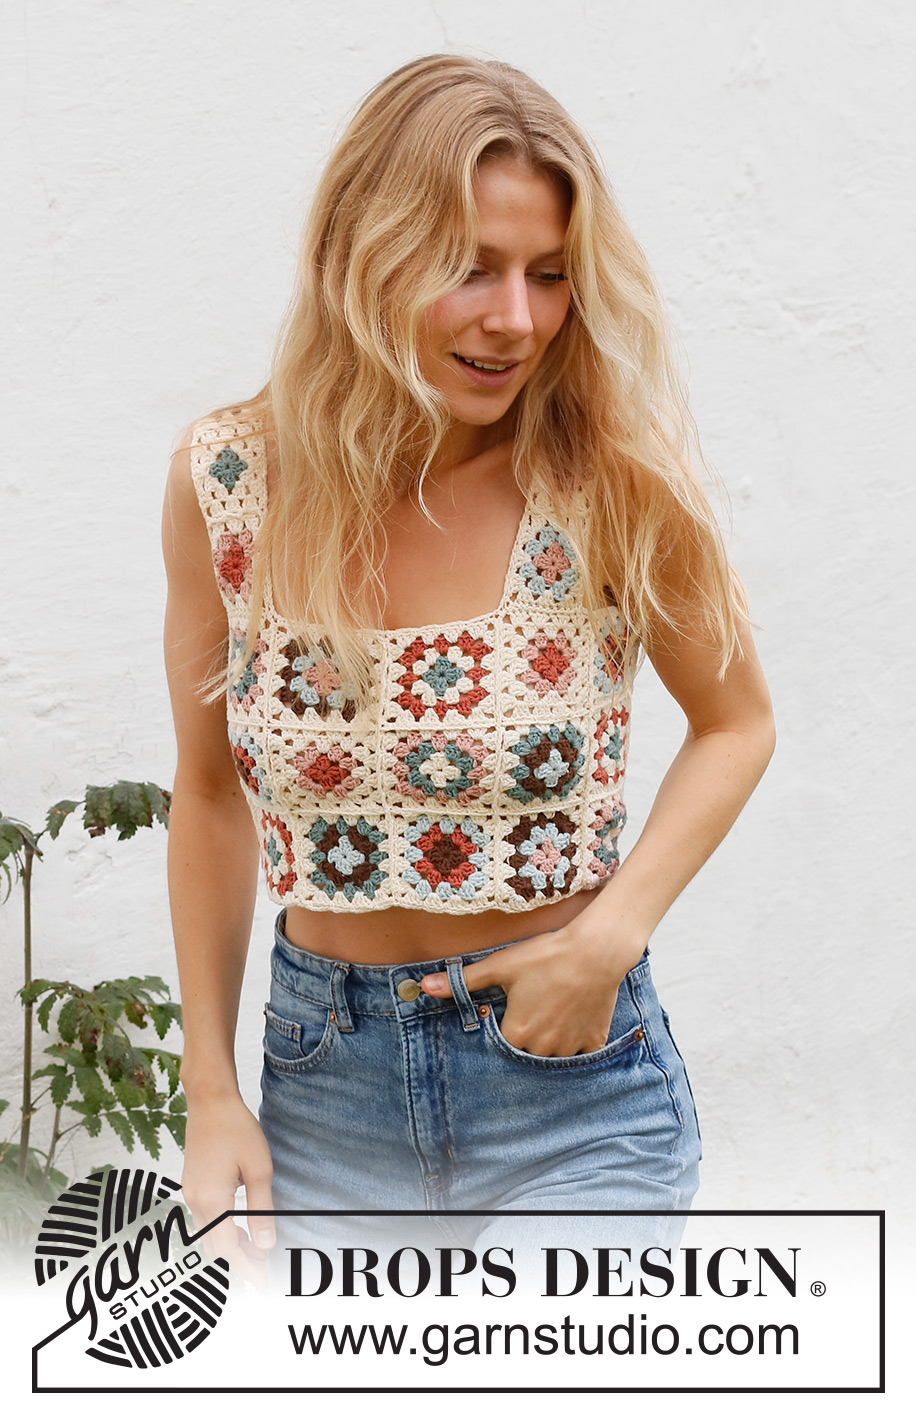
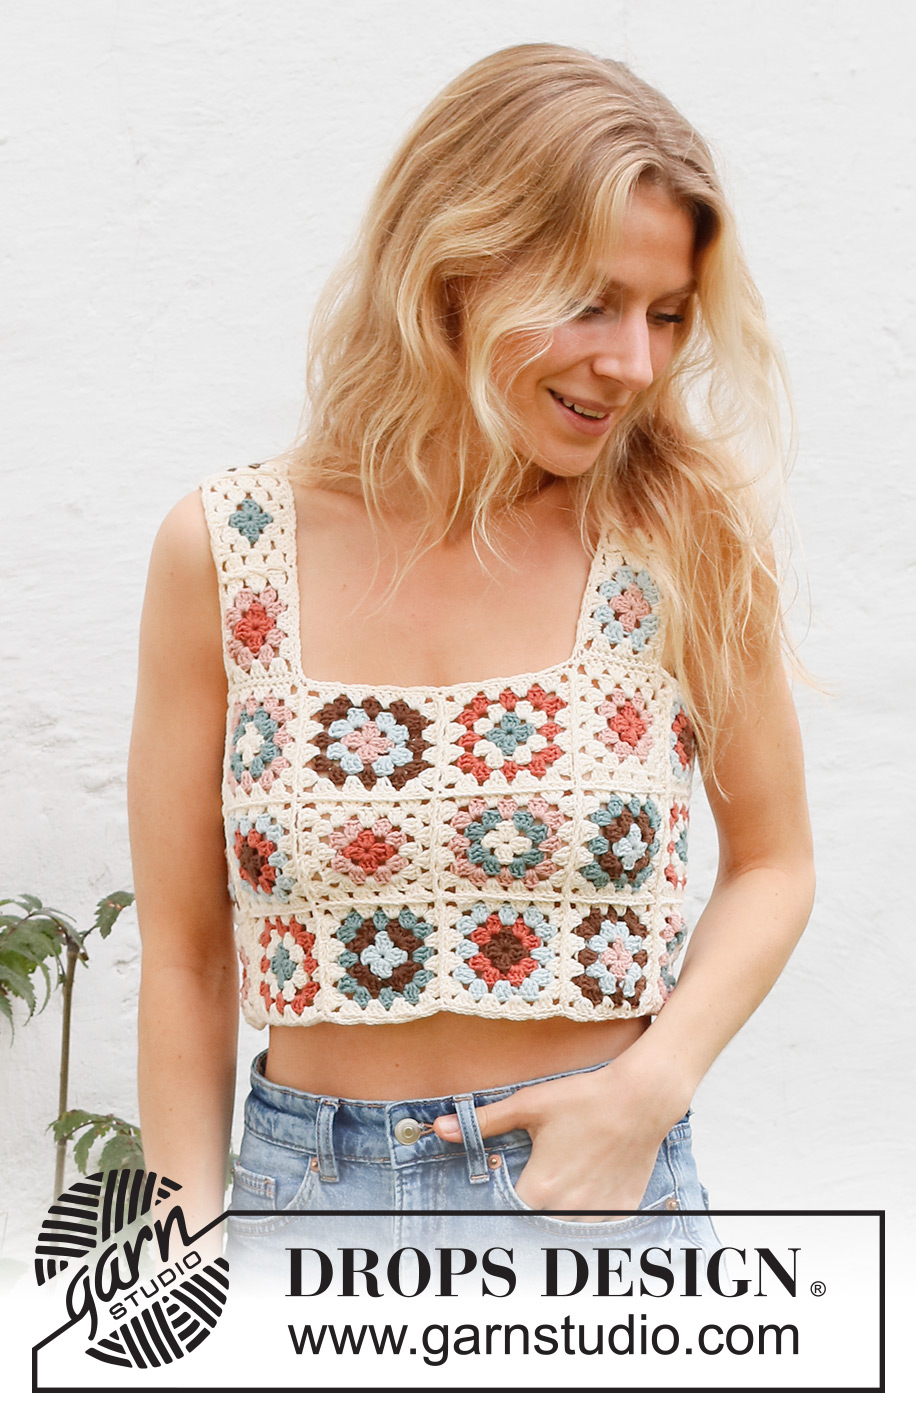
Woodstock Weekend#woodstockweekendtop |
||||||||||||||||
 |
 |
|||||||||||||||
Crocheted top with granny squares in DROPS Safran. Sizes S - XXXL.
DROPS 231-31 |
||||||||||||||||
|
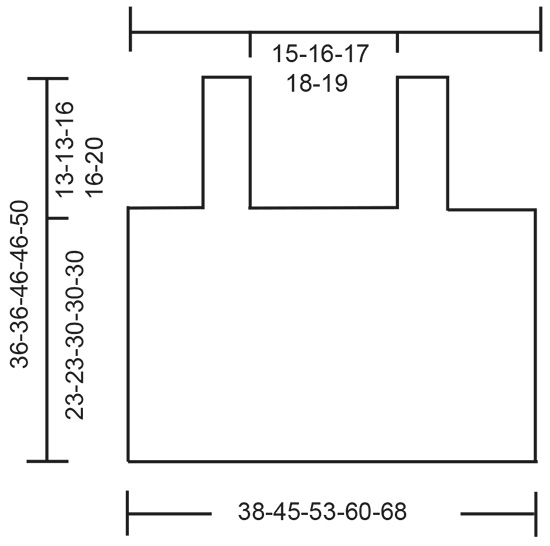
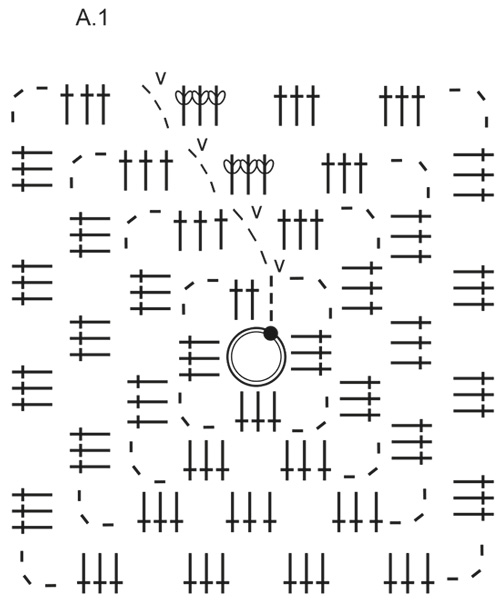
------------------------------------------------------- EXPLANATIONS FOR THE PATTERN: ------------------------------------------------------- COLOR COMBINATIONS: SQUARE 1: Round 1 color mint, Round 2 color coffee, Round 3 color sea green, Round 4 color off white. SQUARE 2: Round 1 color sea green, Round 2 color off white, Round 3 color red clay, Round 4 color off white. SQUARE 3: Round 1 color coffee, Round 2 color red clay, Round 3 color mint, Round 4 color off white. SQUARE 4: Round 1 color powder pink, Round 2 color mint, Round 3 color coffee, Round 4 color off white. SQUARE 5: Round 1 color red clay, Round 2 color powder pink, Round 3 color off white, Round 4 color off white. SQUARE 6: Round 1 color off white, Round 2 color sea green, Round 3 color powder pink, Round 4 color off white. PATTERN: See diagram A.1. COLOR-CHANGE: To get a neat transition when changing colors at the beginning of a round, work the last slip stitch on the round with the new color. CHAIN STITCH: If you work outermost on the hook the chain stitch will often be too tight; 1 chain stitch should be as long as 1 double crochet is wide. ------------------------------------------------------- START THE PIECE HERE: ------------------------------------------------------- TOP – SHORT OVERVIEW OF THE PIECE: The piece consists of granny squares, which are crocheted together to finish. GRANNY SQUARE: Work squares in different COLOR COMBINATIONS – read description above. Fasten or work in the strands as you go. The squares are worked according to diagram A.1 with hook size 3.5 MM = US E/4 - read COLOR-CHANGE in explanations above. Work 5-6-9-10-12 squares in each color combination, in size L work 2 extra squares (squares 1 and 2), in size XL/XXL work 4 extra squares (squares 1, 2, 3 and 4) = 30-36-56-64-72 squares on the front and back pieces. Then work smaller squares for the straps, just working the first 3 rounds in A.1 (round 4 is not worked). Work 1-1-1-1-2 squares in each color combination, but always working round 3 with color off white. Sizes XS/S - M : Work 2 extra squares (squares 1 and 2) Size L-XL/XXL: Work 4 extra squares (squares 1, 2, 3 and 4) = 8-8-10-10-12 small squares. ASSEMBLY: The large squares are crocheted together into a rectangle for the front and back pieces. Lay the squares out in your chosen order, with 3-3-4-4-4 squares in height and 10-12-14-16-18 squares in width – see photo for inspiration. Crochet the squares together width-wise, then upwards. Start on the right side, with the first square on the top and second row. Lay the squares wrong side to wrong side. Work through both layers with color off white, from the right side as follows: 1 single crochet around the 3 chain stitches in the corner, * 3 chain stitches, skip 1 double crochet group, 1 single crochet between the next 2 double crochet groups *, work from *-* 3 times, finish with 3 chain stitches, skip a double crochet group, work 1 single crochet around the corner and 3 chain stitches. Lay the next 2 squares from the top and second row wrong side to wrong side. Crochet them together in the same way as the first 2 squares. Continue until all the squares in the top 2 rows have been worked together. Sizes XS/S - M: Crochet the bottom row together to the 2 top rows in the same way. Sizes L - XL/XXL and XXXL: Work the next 2 rows to the 2 top rows in the same way. Crochet the squares together in height, in the same way. When all the squares have been crocheted together, crochet the sides together. Cut and fasten the strands. Crochet 4-4-5-5-6 small squares together in a row in the same way. Repeat for the second strap. Lay the top flat, with either a half or whole square on each side, the rectangle has been crocheted together mid-back. Place the 2 straps at the top, 5 ½-8½-12-15-19 cm = 2⅛"-3¼"-4¾"-6"-7½" in from each side, with 15-16-17-18-19 cm = 6"-6¼"-6¾"-7"-7½" between the 2 straps mid-front. Sew the straps to the top front and back. Try on the top and adjust the number of small squares if necessary. CROCHET EDGES: Work an edge around the bottom with color off white as follows: 1 single crochet around the 3 chain stitches in a corner of a square, * 3 chain stitches, skip 1 double crochet group, 1 single crochet between the next 2 double crochet groups *, work from *-* 3 times, finish with 3 chain stitches, skip a double crochet group and 1 single crochet around the corner, work 2 chain stitches, 1 single crochet around the 3 chain stitches in the corner of the next square. Continue like this around the bottom edge. Work a similar edge around each armhole and the neck. |
||||||||||||||||
Diagram explanations |
||||||||||||||||
|
||||||||||||||||
 |
||||||||||||||||
 |
||||||||||||||||
Have you finished this pattern?Tag your pictures with #dropspattern #woodstockweekendtop or submit them to the #dropsfan gallery. Do you need help with this pattern?You'll find 11 tutorial videos, a Comments/Questions area and more by visiting the pattern on garnstudio.com. © 1982-2026 DROPS Design A/S. We reserve all rights. This document, including all its sub-sections, has copyrights. Read more about what you can do with our patterns at the bottom of each pattern on our site. |
||||||||||||||||


With over 40 years in knitting and crochet design, DROPS Design offers one of the most extensive collections of free patterns on the internet - translated to 17 languages. As of today we count 324 catalogs and 12290 patterns - 12280 of which are translated into English (US/in).
We work hard to bring you the best knitting and crochet have to offer, inspiration and advice as well as great quality yarns at incredible prices! Would you like to use our patterns for other than personal use? You can read what you are allowed to do in the Copyright text at the bottom of all our patterns. Happy crafting!
Post a comment to pattern DROPS 231-31
We would love to hear what you have to say about this pattern!
If you want to leave a question, please make sure you select the correct category in the form below, to speed up the answering process. Required fields are marked *.