
Looking for a yarn?


Comments / Questions (140)
![]() Anne wrote:
Anne wrote:
Ik wil graag beginnen met dit breiwerkje alleen begrijp ik het patroon nog niet helemaal. Ik dacht dat je de telpatronen naast elkaar kon leggen dus van de eerste naald van a1 > naar eerste naald van a2 gaat. Maar als ik de uitleg erbij lees, lijkt het alsof ik eerst alle naalden van a1 moet breien voordat ik naar naald a2 kan gaan. Klopt dit? Daarna snap ik niet dat ik in de ronde gaan breinen maar daarna los nog de achterkant moet breien. Kunt u dit toelichten?
22.04.2021 - 13:43DROPS Design answered:
Dag Anne,
Het lijf wordt van onder naar boven gebreid. Eerst brei je in de rondte en je herhaalt eerst steeds A.1 in de breedte en in de hoogte, waardoor je dus een soort boordsteek breit. Als je bij de armsgaten bent wordt het werk verdeeld en brei je de panden apart van elkaar heen en weer.
26.04.2021 - 09:00
![]() Mendy wrote:
Mendy wrote:
Ben nu bezig met de achterkant vanaf het te delen stuk. Maatxl/xxl Maar als ik 5 x a.4 en a.5 in de hoogte brei kom ik nooit aan de ongeveer 14 cm.. (A.4 is 16 naalden hoog, x 5 is 80 naalden! 32 naalden is 10 cm dus 80 nld is dan 25 cm...) Reken ik het niet goed?
08.04.2021 - 12:13DROPS Design answered:
Dag Mendy,
A.4 en A.5 bestaat uit 8 naalden. Als je deze 5 keer in de hoogte breit, heb je 40 naalden. Daarnaast haak je 1 naald boorsteek voordat je begint met A.4 en A.5 en 3 ribbels als je daarmee klaar bent. In totaal 46 naalden wat overeenkomt met ongeveer 14 cm.
11.04.2021 - 13:50
![]() Susana wrote:
Susana wrote:
Se puede tener con 2 agujas en vez de con circulares? Como tendría que hacerlo?
02.04.2021 - 21:25DROPS Design answered:
Hola Susana, si, es possible. Mira la leccion drops AQUI. Buen trabajo!
06.04.2021 - 20:10
![]() Lykke wrote:
Lykke wrote:
Jeg strikket str M Jeg er nået til forstykket, har strikket A6 tre gange og ifølge opskriften skal det være 34 masker på pinden, men der er 36? Ifølge opskriften starter jeg med 60 masker. Når der er strikket A6 tre gange, er der taget 24 masker ind=36m tilbage og ikke 34??? Pft
28.03.2021 - 09:23DROPS Design answered:
Hei Lykke. I oppskriften står de at du skal gjenta A.6 til du har 34 masker på pinnen. Du må da strikke A.6 3 ganger i høyden + 1. og 2. rad av A.6 1 gang til (for å avslutt etter 1 pinne fra vrangen). mvh DROPS design
12.04.2021 - 15:06
![]() Léa wrote:
Léa wrote:
Bonjour le diagrame A.1 cest bien une côte 2-2? merci de votre réponse
09.03.2021 - 14:02DROPS Design answered:
Bonjour Léa, le diagramme A.2 consiste en 3 côtes mousse (= au 1er tour de A.2 tricotez les mailles à l'endroit, au 2ème tour, à l'envers et répétez ces 2 tours 3 fois au total (= 3 côtes mousse). Bon tricot!
09.03.2021 - 14:30
![]() Emilia Theorin wrote:
Emilia Theorin wrote:
Hi, I’m knitting in size small, but I’m having some issues with getting the ribbing to line up. After knitting A2 over the first 9 stitches (starting with the purled one after the marker) my A1 sections don’t line up with my previous ribbing? I get 1 purled followed by two knitted stitches on top of two knitted followed by one purled stitch. The reference picture doesn’t look as if this is supposed to be happening? Can you please help me figure out what is wrong?
05.02.2021 - 23:10DROPS Design answered:
Dear Mrs Theorin, after you work 9 sts as in A.2 you continue A.1 over the next stitches, ie if the next stitch is a knit stitch in A.1 just continue A.1 starting with a knit stitch (= the stitches in A.1 should be now worked K over K and P over P so that they fit the previous rounds). Hope this helps. Happy knitting!
08.02.2021 - 07:55
![]() Maritza wrote:
Maritza wrote:
Surge el problema luego de la sisa hacia arriba comenzando los digramas ! Ya no va en circular. Se teje individualmente. Pero el diagrama no coincide con el resultado!!!!!
02.01.2021 - 05:21DROPS Design answered:
Ver la respuesta abajo
02.01.2021 - 16:50
![]() Maritza wrote:
Maritza wrote:
Hola en el diagrama de las disminuciones no dan los puntos! Es solo la lectura por el derecho?? Como se teje la fila del revés??
02.01.2021 - 05:03DROPS Design answered:
Hola Maritza. Lee nuestra lección: Cómo leer los diagramas de punto <
![]() Maritza wrote:
Maritza wrote:
Hola necesito que me digan si el patrón se teje por ambos lados comenzando en fila derecha. O solo se va ejecutando el diseño por el derecho, y corridas revés como se presente en punto??? Gracias
22.12.2020 - 21:32DROPS Design answered:
Hola Maritza. La prenda se trabaja en redondo (siempre por el lado derecho) hasta la sisa. A partir de la sisa se trabajan la espalda y el delantero por separado de ida y vuelta.
26.12.2020 - 18:23
![]() Pia Berglund wrote:
Pia Berglund wrote:
Ska nu sticka A7 men då kommer dom 2 mittersta maskorna på aviga maskorna ?
09.11.2020 - 10:04DROPS Design answered:
Hej Pia, De 2 midterste masker i selve DEL-1 skal være ret, det er dem som fortsætter hele vejen op. God fornøjelse!
17.11.2020 - 09:29
|
||||||||||||||||||||||
Strawberry Summer#strawberrysummertop |
||||||||||||||||||||||
 |
 |
|||||||||||||||||||||
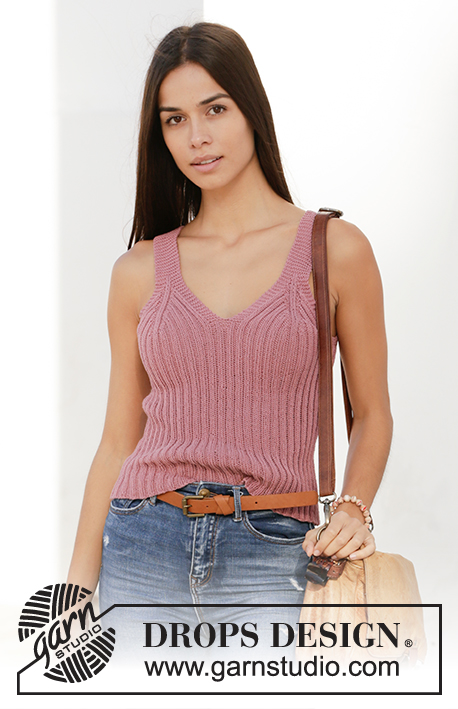
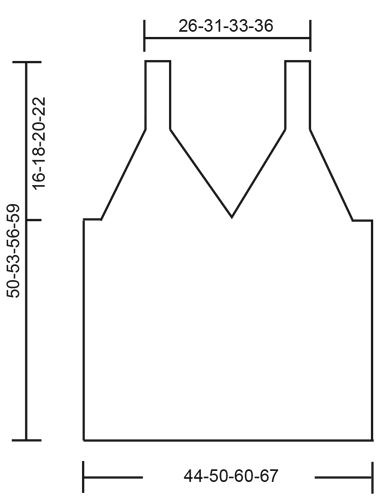
Knitted top in DROPS Safran. Piece is knitted bottom up with rib. Size: S - XXXL
DROPS 211-18 |
||||||||||||||||||||||
|
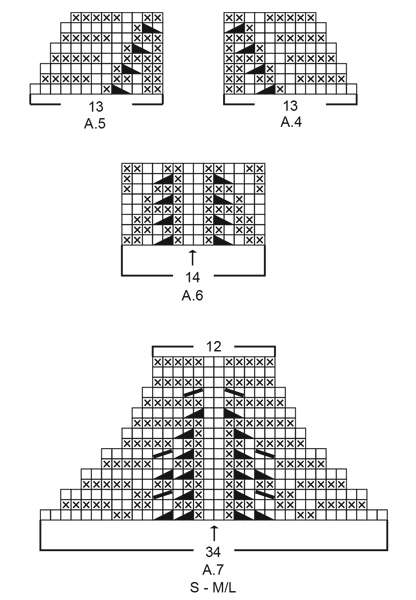
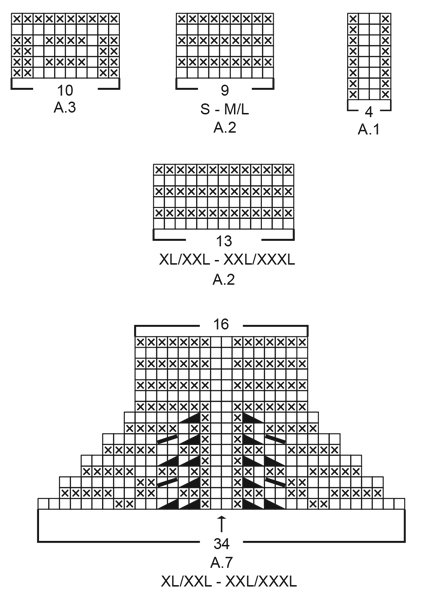
---------------------------------------------------------- EXPLANATION FOR THE PATTERN: ---------------------------------------------------------- GARTER STITCH (back and forth): Knit all rows. 1 ridge vertically = knit 2 rows. PATTERN: See diagrams A.1 to A.7. Choose diagram for your size (applies to A.2 and A.7). Diagrams show all rows in pattern seen from the right side. ---------------------------------------------------------- START THE PIECE HERE: ---------------------------------------------------------- TOP - SHORT OVERVIEW OF THE PIECE: Work body in the round on circular needle, from the bottom and up to armholes. Then work back piece and the 2 front pieces separately, back and forth on circular needle until finished measurements. Straps on front piece are fastened to back piece. BODY: Cast on 224-256-304-336 stitches on circular needle size 3 mm with Safran. Work A.1 in the round – insert at the same time 1 marker thread at the beginning of round (= left side when garments is worn), and 1 marker thread after 112-128-152-168 stitches (= right side when garment is worn). Both marker threads is between 2 purl stitches. Move the marker thread upwards when working. REMEMBER THE KNITTING TENSION! When piece measures 33-34-35-36 cm, work next round as follows (approx. 1 cm remains until piece is divided mid front, and decrease for armholes): Work A.2 (= 9-9-13-13 stitches), continue A.1 over the next 42-50-58-66 stitches, work A.3 (= 10 stitches mid front), continue A.1 over the next 42-50-58-66 stitches), work A.2 over the next 18-18-26-26 stitches (= 2 repetitions of 9-9-13-13 stitches – marker thread is between these 2 repetitions), continue A.1 over the next 94-110-126-142 stitches (= back piece), and work A.2 over the remaining 9-9-13-13 stitches. Continue pattern like this until A.2 and A.3 have been worked vertically. On next round cast off for armholes, i.e. work next round as follows: Cast off 4-4-8-8 stitches for armhole, work 5 stitches in GARTER STITCH – read explanation above, continue A.1 over the next 42-50-58-66 stitches, work 10 stitches in garter stitch (= mid front), continue A.1 over the next 42-50-58-66 stitches, work 5 stitches in garter stitch, cast off 8-8-16-16 stitches for armhole, work 5 stitches in garter stitch, continue A.1 over the next 94-110-126-142 stitches, work 5 stitches in garter stitch, and cast off the remaining 4-4-8-8 stitches for armhole. Cut the yarn. Finish back piece and front pieces separately. BACK PIECE: = 104-120-136-152 stitches. Begin from wrong side and work 1 row in rib as before with 5 edge stitches in garter stitch in each side. Continue to work in rib with 5 edge stitches in garter stitch in each side while AT THE SAME TIME decreasing for armholes on every row from right side as explained below. I.e. work first row from right side as follows: Work A.4 (= 13 stitches), continue rib as before until 13 stitches remain on row, finish with A.5 (= 13 stitches). Continue pattern like this until A.4 and A.5 have been worked 4-4-5-6 times in total vertically (= 16-16-20-24 stitches decreased in each side) = 72-88-96-104 stitches remain. Work 3 ridges back and forth over all stitches. Cast off - make sure that the cast-off edge is not too tight. Back piece measures approx. 11-11-14-16 cm from where piece was divided for front piece and bac piece. FRONT PIECE: = 104-120-136-152 stitches. Divide the piece mid front and slip half the stitches on 1 stitch holder or extra needle. Then work first part as explained below. PART-1: = 52-60-68-76 stitches. Begin from wrong side and work 1 row in rib as before with 5 edge stitches in garter stitch in each side. Insert 1 marker between the 2 middle stitches on row (= between 2 knit stitch seen from right side). Marker indicates the middle. Continue to work in rib with 5 edge stitches in garter stitch in each side while at the same time decreasing on each side of the middle as explained below. I.e. work first row from right side as follows: 5 edge stitches in garter stitch, work rib as before until 7 stitches remain before marker, work A.6 (= 14 stitches), work rib as before until 5 stitches remain on row, and finish with 5 edge stitches in garter stitch. Continue pattern like this, and repeat A.6 vertically until 34 stitches remain on row – finish after 1 row from wrong side. Now work A.7 over these 34 stitches. When A.7 has been worked, 12-12-16-16 stitches remain on needle for strap, and front piece measures approx. 11-13-16-18 cm from where piece was divided for front and back piece. Work strap as explained below. STRAP: = 12-12-16-16 stitches. Work in garter stitch back and forth until the strap measures approx. 10-12-10-10 cm – try the top on and work to desired length, strap should continue over the shoulder and down to back piece. Cast off. PART-2: Slip the 52-60-68-76 stitches from stitch holder or extra needle back on circular needle size 3 mm, and work part-2 the same way as part-1. Then work strap the same way as on part-1. Cast off. ASSEMBLY: Fasten straps to back piece - begin at the edge in each side and sew stitch to stitch. Cut and fasten the thread. |
||||||||||||||||||||||
Diagram explanations |
||||||||||||||||||||||
|
||||||||||||||||||||||
 |
||||||||||||||||||||||
 |
||||||||||||||||||||||
 |
||||||||||||||||||||||
Have you finished this pattern?Tag your pictures with #dropspattern #strawberrysummertop or submit them to the #dropsfan gallery. Do you need help with this pattern?You'll find 16 tutorial videos, a Comments/Questions area and more by visiting the pattern on garnstudio.com. © 1982-2025 DROPS Design A/S. We reserve all rights. This document, including all its sub-sections, has copyrights. Read more about what you can do with our patterns at the bottom of each pattern on our site. |
||||||||||||||||||||||


With over 40 years in knitting and crochet design, DROPS Design offers one of the most extensive collections of free patterns on the internet - translated to 17 languages. As of today we count 320 catalogues and 12092 patterns translated into English (UK/cm). 12092
We work hard to bring you the best knitting and crochet have to offer, inspiration and advice as well as great quality yarns at incredible prices! Would you like to use our patterns for other than personal use? You can read what you are allowed to do in the Copyright text at the bottom of all our patterns. Happy crafting!
Post a comment to pattern DROPS 211-18
We would love to hear what you have to say about this pattern!
If you want to leave a question, please make sure you select the correct category in the form below, to speed up the answering process. Required fields are marked *.