
Popular categories
Looking for a yarn?


Comments / Questions (27)
![]() Anna wrote:
Anna wrote:
Hi Drops Design, thank you so much. It's very helpful
03.05.2021 - 08:26
![]() Anna wrote:
Anna wrote:
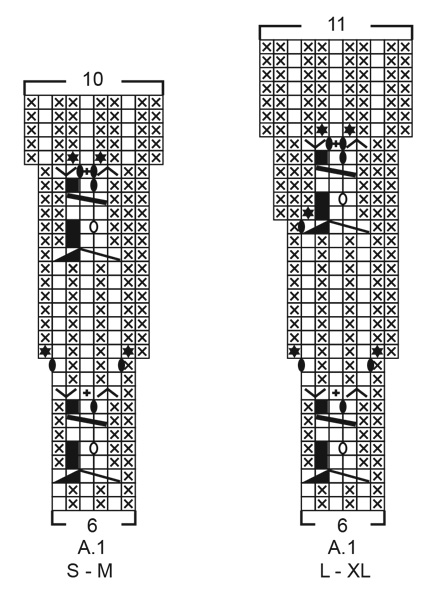
Hi, i have problem with A.1 ,row n.3:" lift the innermost of the 3 knit stitches at the edge of right needle over the 2 outermost knit stitches so that stitch is around the other two". I don't understand how to do that, do you have a tutorial video for explain about this? Thanks
02.05.2021 - 22:43DROPS Design answered:
Hi Anna, The 3 last stitches you have worked are now on the right needle. You pass the first of these 3 stitches (furthest from the end of the needle) over the other 2 (closest to the end of the needle) so it lies around them and is decreased from the needle. I hope this helps and happy knitting!
03.05.2021 - 07:33
![]() Nicole Miller wrote:
Nicole Miller wrote:
Could you please clarify knitting gauge: Is 21 sts knitted in stockinette with larger needles or smaller (ie 4 mm or 3 mm)
26.04.2021 - 05:56DROPS Design answered:
Hi Nicole, The knitting guage is measured with the larger size needles. Happy crafting!
26.04.2021 - 08:11
![]() Evelyne Lienhardt wrote:
Evelyne Lienhardt wrote:
Danke für die Hilfe, der Knoten im Hirn hat sich gelöst. :D
22.04.2021 - 10:26
![]() Evelyne Lienhardt wrote:
Evelyne Lienhardt wrote:
Bei 210-32 kapier ich bei A1 nicht die Verzopfung. 1 Masche auf 1 Zopfnadel legen vorne, 1 links 1 rechts von Zopfnadel 1 rechts. Bis dahin kapier ich es noch 1 Masche auf Zopfnadel hintre Arbeit. Die Innerste der nächsten 3 Rechtsmaschen (wo kommen die her?) über die 2 äußeren Maschen ziehen ??? 1 links von der Zopfnadel . habe doch für das innere nur 5 Maschen.
21.04.2021 - 14:36DROPS Design answered:
Liebe Frau Lienhardt, diese 3. Masche zählen Sie von der rechten Nadelspitze, dh diese ist die 1. Masche die früher vor der Arbeit gelegt war. 1 Masche wird hier abgenommen und so eine kleinen Zopf gestrickt. Also zuerst stricken Sie 1 Zopf über 2 M, dann 1 M recht, dann legen Sie 1 M hinter die Arbeit und stricken die nächste rechts, die 3. M auf der rechten Nadel von der Spitze gezählt (= die Masche die Sie bei dem 1. Zopf rechts gestrickt haben) über die 2 ersten Maschen überziehen (wie hier z.B.) und die letzte M auf der Hilfsnadel links stricken. Viel Spaß beim stricken!
21.04.2021 - 15:43
![]() Marie wrote:
Marie wrote:
I made the model and this is a new favourite, rellay pretty. I made it more simple and did not make the ornaments in the side, this make it a quicker model to make.
30.07.2020 - 09:13
![]() Hilda Slot wrote:
Hilda Slot wrote:
Ik brei het patroon voor maat L. Ik ben nu bij de PAS, inmiddels heb ik 180 steken op de rondbreinaald. Nu staat er:brei nu A.1 in de rondte(=30 herhalingen van 6 steken) Als A.1 in hoogte is gebreid, zijn er 330 steken op de naald. Ik snap niet hoe ik aan die 150 steken meer kom. Hopelijk begrijpt u het, en is het simpel om me dat uit te leggen. Alvast mijn hartelijke dank, Hilda
07.07.2020 - 16:35DROPS Design answered:
Dag Hilda,
Heb je het juiste telpatroon van A.1 voor jouw maat gekozen? Het patroon klopt namelijk wel. A.1 begint met 6 steken in de breedte en eindigt met 11 steken in de breedte voor maat L. 30 herhalingen van 11 steken is 330 en 30 herhalingen van 6 steken is 180, dus dat zou moeten kloppen.
04.08.2020 - 13:14
![]() Shirley Eagle wrote:
Shirley Eagle wrote:
Is there a real reason this is only available to print in small size pale grey? Impossible to sit in front of the computer with this page up long enough to knit a whole sweater!
02.07.2020 - 19:25DROPS Design answered:
Dear Mrs Eagle, please check the settings your printer, so that pattern will be printed with colours (not only black and white). Happy knitting!
03.07.2020 - 08:28
![]() MJ Pepper wrote:
MJ Pepper wrote:
Why is it that Drops never includes EASE measurements in patterns? It would be helpful knowledge to have when knitting close fitting garments such as THIS pattern. It would also be helpful in patterns with lots of ease. Would you be kind enough to bring this to the attention of your pattern designers? I know we all would appreciate the information. Thank you for your time and attention to my query.
05.05.2020 - 23:51DROPS Design answered:
Dear Mrs Pepper, to choose your size, measure a similar garment you have and like the shape, and compare the measurements to those in the chart - if you like to get something tighter or looser, choose the appropriate size. Read more about measurement chart here Happy knitting!
06.05.2020 - 10:35
![]() Marie wrote:
Marie wrote:
Which size is the knitted model in the picture?
29.04.2020 - 07:12DROPS Design answered:
Hej Marie, det er størrelse S eller M men du finder tøjets mål i måleskitsen nederst i opskriften, vælg den størrelse som har de mål som passer dig :)
29.04.2020 - 08:30
|
||||||||||||||||||||||||||||||||||
Wild Mint#wildminttop |
||||||||||||||||||||||||||||||||||
 |
 |
|||||||||||||||||||||||||||||||||
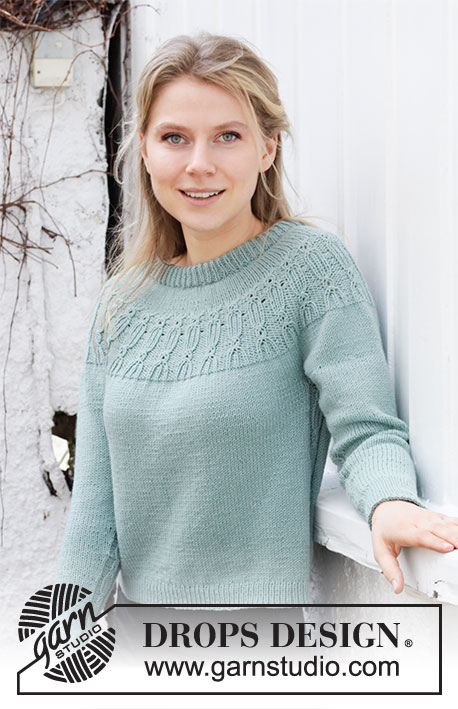
Knitted jumper with short sleeves in DROPS Merino Extra Fine. Piece is knitted top down with textured pattern on yoke and in the sides. Size: S - XXXL
DROPS 210-32 |
||||||||||||||||||||||||||||||||||
|
---------------------------------------------------------- EXPLANATION FOR THE PATTERN: ---------------------------------------------------------- PATTERN: See diagrams A.1 and A.2. Choose diagram for your size (applies to A.1). INCREASE TIP-1 (evenly): To calculate how to increase evenly, use the total number of stitches on row (e.g. 94 stitches) and divide stitches by number of increases to be done (e.g. 32) = 2.9. In this example increase by making 1 yarn over after approx. every 3rd stitch. On next round knit yarns over twisted to avoid holes. INCREASE TIP-2 (applies to sides of body): Increase 1 stitch on each side of A.2 in each side on body, i.e. increase as follows: Work until 1 stitch remains before A.2, make 1 yarn over, work 1 stitch in stocking stitch, work A.2 (= 9 stitches), work 1 stitch in stocking stitch, and make 1 yarn over (= 2 stitches increased in the side and 4 stitches increased in total on round.) On next round knit yarn overs twisted to avoid holes. Then work the new stitches in stocking stitch. DECREASE TIP (applies to mid under sleeves): Decrease 1 stitch on each side of A.2 mid under sleeve, i.e. work as follows: Work A.2 as before over the first 9 stitches, slip 1 stitch knitwise, knit 1, pass slipped stitch over stitch worked, work in stocking stitch until 2 stitches remain before A.2, knit 2 together (= 2 stitches decreased). CAST-OFF TIP: To avoid a tight cast-off edge you may use a larger needle size. If this also is too tight, work a 1 yarn over after approx. every 6th stitch while casting off (cast off yarn overs as regular stitches). ---------------------------------------------------------- START THE PIECE HERE: ---------------------------------------------------------- JUMPER - SHORT OVERVIEW OF THE PIECE: Work neck edge and yoke in the round on circular needle from mid back, top down. Now divide yoke for body and sleeves. Body is worked in the round on circular needle, top down. Work sleeves in the round on double pointed needles/short circular needle, top down. NECK EDGE: Cast on 94-98-102-108-112-116 stitches on a short circular needle size 3 mm with Merino Extra Fine. Knit 1 round. Then work rib in the round (= knit 1/purl 1) for 3 cm. Knit 1 round while increasing 32-32-34-36-38-38 stitches evenly - read INCREASE TIP-1 = 126-130-136-144-150-154 stitches. Insert 1 marker in the middle of round (= mid front). Measure yoke from this marker. Then work yoke as explained below. YOKE: Switch to circular needle size 4 mm and work in stocking stitch in the round. REMEMBER THE KNITTING TENSION! When piece measures 4 cm from marker in all sizes, increase 42-32-34-36-50-52 stitches evenly – remember INCREASE TIP-1 = 168-162-170-180-200-206 stitches. Continue until piece measures 4-5-6-7-7-8 cm - increase at the same time 0-18-10-18-31-39 stitches evenly on last round = 168-180-180-198-231-245 stitches. Now work A.1 in the round (= 28-30-30-33-33-35 repetitions of 6-6-6-6-7-7 stitches). When A.1 has been worked vertically, there are 280-300-330-363-396-420 stitches on row and piece measures approx. 15-16-18-19-21-22 cm from marker by the neck. Continue in stocking stitch - increase at the same time 4-8-2-9-0-8 stitches evenly on first round = 284-308-332-372-396-428 stitches. When piece measures 18-20-22-24-26-28 cm from marker at the neck, divide yoke for body and sleeves. I.e. work next round as follows from mid back: Work 41-45-48-53-59-65 stitches in stocking stitch (= ½ back piece), slip the next 60-64-70-80-80-84 stitches on 1 stitch holder for sleeve, cast on 7-7-9-9-11-11 new stitches on needle (= in the side under sleeve), work 82-90-96-106-118-130 stitches in stocking stitch (= front piece), slip the next 60-64-70-80-80-84 stitches on 1 stitch holder for sleeve, cast on 7-7-9-9-11-11 new stitches on needle (= in the side under sleeve), and work the remaining 41-45-48-53-59-65 stitches in stocking stitch as before (= ½ back piece). Cut the yarn. Finish body and sleeves separately! NOW MEASURE PIECE FROM HERE! BODY: = 178-194-210-230-258-282 stitches. Insert 1 marker in each side on body - in the middle of the 7-7-9-9-11-11 stitches cast on under each sleeve. Begin round 4 stitches before stitch with marker, in one side of body, work A.2 (= 9 stitches – marker is in the middle of these 9 stitches), work 80-88-96-106-120-132 stitches in stocking stitch, work A.2 (= 9 stitches – marker is in the middle of these 9 stitches), work 80-88-96-106-120-132 stitches in stocking stitch. Continue pattern like this. When piece measures 7 cm from division in all sizes, increase 2 stitches in each side on body - read INCREASE TIP (= 4 stitches increased). Repeat increase when piece measures 14 cm from division = 186-202-218-238-266-290 stitches. Work until piece measures 22 cm from division (approx. 3 cm remain until finished measurements, try the jumper on and work to desired length). On next round increase stitches evenly, i.e. work next round as follows: Work A.2 as before, work 84-92-100-110-124-136 stitches in stocking stitch and increase at the same time 17-19-21-23-25-27 stitches evenly over these stitches in stocking stitch, work A.2 as before, work 84-92-100-110-124-136 stitches in stocking stitch and increase at the same time 17-19-21-23-25-27 stitches evenly over these stitches in stocking stitch = 220-240-260-284-316-344 stitches. NOTE! Increase to avoid the rib to be worked from contracting the piece. Switch to circular needle size 3 mm. Work next round as follows: Work A.2 as before over the first 9 stitches, * knit 1, purl 1 *, work from *-* until 1 stitch remains before A.2 in the other side of piece, knit 1, work A.2 as before over the next 9 stitches, * knit 1, purl 1 *, work from *-* until 1 stitch remains on round, and finish with knit 1. Continue rib like this for 3 cm. Cast off with knit over knit and purl over purl - read CAST-OFF TIP. Jumper measures approx. 46-48-50-52-54-56 cm from shoulder and down. SLEEVES: Slip the 60-64-70-80-80-84 stitches from stitch holder in one side of piece on double pointed needles or a short circular needle size 4 mm and pick in addition up 1 stitch in each of the 7-7-9-9-11-11 new stitches cast on under sleeve = 67-71-79-89-91-95 stitches. Insert 1 marker in the middle of the 7-7-9-9-11-11 stitches. Begin round 4 stitches before stitch with marker, work A.2 (= 9 stitches – marker is in the middle of these 9 stitches), work the remaining stitches in stocking stitch. Continue pattern like this. When sleeve measures 2-2-2-1-1-1 cm from division, decrease 1 stitch on each side of A.2- read DECREASE TIP (= 2 stitches decreased). Decrease like this every 2-1½-1½-1-1-1 cm 4-4-4-4-3-1 times in total = 59-63-71-81-85-93 stitches. Work until sleeve measures 10-8-7-5-4-2 cm from division (approx. 3 cm remain until finished measurements, try the jumper on and work to desired length). Knit 1 round and decrease at the same time 3 stitches evenly – continue A.2 as before and do not decrease over stitches in A.2 = 56-60-68-78-82-90 stitches. Switch to double pointed needles or short circular needle size 3 mm. Work next round as follows: Work A.2 over the first 9 stitches, * knit 1, purl 1 *, work from *-* until 1 stitch remains before A.2 and finish with knit 1. Continue rib like this for 3 cm. Cast off with knit over knit and purl over purl - read CAST-OFF TIP. Work the other sleeve the same way. |
||||||||||||||||||||||||||||||||||
Diagram explanations |
||||||||||||||||||||||||||||||||||
|
||||||||||||||||||||||||||||||||||
|
||||||||||||||||||||||||||||||||||

|
||||||||||||||||||||||||||||||||||

|
||||||||||||||||||||||||||||||||||
Have you finished this pattern?Tag your pictures with #dropspattern #wildminttop or submit them to the #dropsfan gallery. Do you need help with this pattern?You'll find 27 tutorial videos, a Comments/Questions area and more by visiting the pattern on garnstudio.com. © 1982-2025 DROPS Design A/S. We reserve all rights. This document, including all its sub-sections, has copyrights. Read more about what you can do with our patterns at the bottom of each pattern on our site. |
||||||||||||||||||||||||||||||||||


With over 40 years in knitting and crochet design, DROPS Design offers one of the most extensive collections of free patterns on the internet - translated to 17 languages. As of today we count 314 catalogues and 11820 patterns translated into English (UK/cm). 11820
We work hard to bring you the best knitting and crochet have to offer, inspiration and advice as well as great quality yarns at incredible prices! Would you like to use our patterns for other than personal use? You can read what you are allowed to do in the Copyright text at the bottom of all our patterns. Happy crafting!
Post a comment to pattern DROPS 210-32
We would love to hear what you have to say about this pattern!
If you want to leave a question, please make sure you select the correct category in the form below, to speed up the answering process. Required fields are marked *.