
Popular categories
Looking for a yarn?


Comments / Questions (37)
![]() Joly wrote:
Joly wrote:
Merci beaucoup vous c est pour continuer les jour s le long des raglans a 1 a chaque transition cela eux dire quoi j ai du ma a comprendre merci de votre reponce
06.05.2019 - 14:27DROPS Design answered:
Bonjour Mme Joly, les transitions entre le dos/le devant et les manches correspondent aux augmentations pour le raglan et aux marqueurs que vous aviez placés (et augmenté ensuite de part et d'autre). A.1 va se tricoter au-dessus des mailles des raglans, la flèche dans le diagramme indique où votre marqueur se trouve, commencez à tricoter A.1 3 mailles avant le marqueur, tricotez A.1 (= 6 mailles) soit 3 m avant + 3 m après chaque marqueur. Ainsi, les diagonales de trous (comme pour le raglan) vont continuer, mais vous n'allez plus augmenter. Bon tricot!
06.05.2019 - 15:19
![]() JOLY wrote:
JOLY wrote:
Pour l empiècement pour. Augmentée c est un tour ou deux tous a endroit merci pour la répond vous avec des nouveau. Modèle. Très jolie merci je me reg
06.05.2019 - 06:51DROPS Design answered:
Bonjour Mme Joly, pour les augmentations du raglan, on augmente tous les 2 tours: 1 tour en augmentant comme indiqué sous RAGLAN, 1 tour sans augmenter - répétez ces 2 tours le nombre de fois indiqué pour votre taille. Bon tricot!
06.05.2019 - 10:51
![]() Joly wrote:
Joly wrote:
Comment faire pour faire un diagramme c est sur 4rangs merci de votre reponse
05.05.2019 - 18:05DROPS Design answered:
Bonjour Mme Joly, je ne suis pas bien sûre de comprendre votre question, le diagramme A.1 se tricote sur 5 mailles et 2 rangs. Quand ces 2 rangs ont été tricotés, répétez les en recommençant au 1er rang. Bon tricot!
06.05.2019 - 10:07
![]() Hanne wrote:
Hanne wrote:
Warte ungeduldig auf die Fertigstellung der Anleitung, da ich inzwischen ein Sommerkleid der letzten Saison fertig habe
25.02.2019 - 20:25
![]() Inger wrote:
Inger wrote:
Denne har jeg lyst til å strikke.
23.02.2019 - 12:57
![]() HYVÄ wrote:
HYVÄ wrote:
HYVÄ MALLI
22.02.2019 - 17:56
![]() Hanne wrote:
Hanne wrote:
Hoffentlich ist die Anleitung bald fertig. Perfekt für den Sommer. Farben machen gute Laune
12.02.2019 - 10:47
![]() Karin wrote:
Karin wrote:
Superschönes Kleid! Perfekt für den Sommer am See oder Strand. Da kann ich die Anleitung schon gar nicht mehr erwarten!
10.02.2019 - 14:23
![]() Anne wrote:
Anne wrote:
Schönes Kleid, hoffentlich gibts die Anleitung bald
21.01.2019 - 21:12
![]() Marita wrote:
Marita wrote:
Das wäre ein Kleid für mich. Freue mich schon auf die Anleitung
12.01.2019 - 11:28
|
|||||||||||||
Evening Out#eveningoutdress |
|||||||||||||
 |
 |
||||||||||||
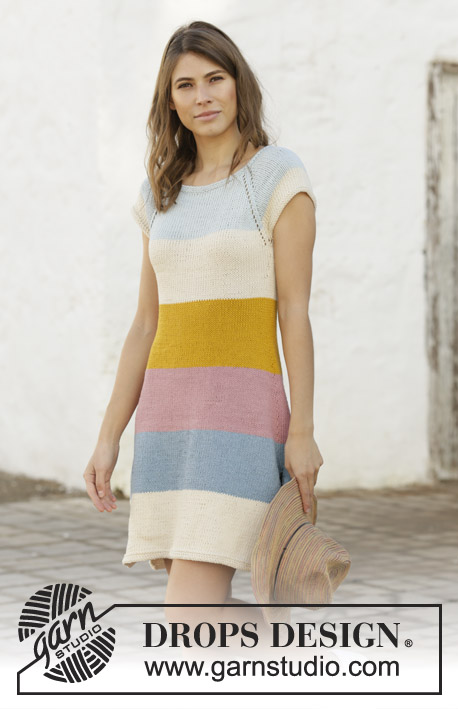
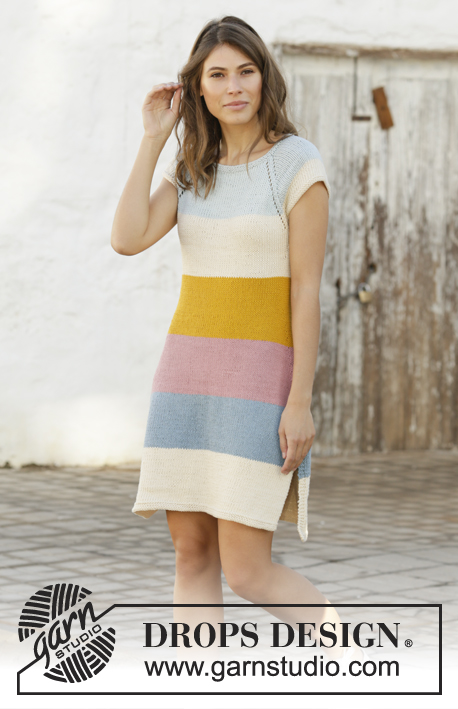
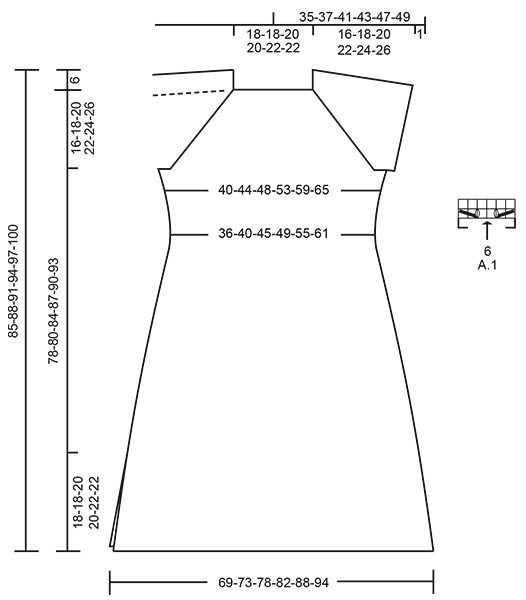
Knitted dress in DROPS Paris with stripes, raglan and split in sides, worked top down. Sizes S - XXXL.
DROPS 200-24 |
|||||||||||||
|
------------------------------------------------------- EXPLANATIONS FOR THE PATTERN: ------------------------------------------------------- RIDGE/GARTER STITCH (worked in the round): 1 ridge = 2 rounds. Knit 1 round and purl 1 round. RIDGE/GARTER STITCH (worked back and forth): 1 ridge = Knit 2 rows. INCREASE TIP-1 (for yoke): To work out how to increase evenly, count the total number of stitches on needle (e.g. 88 stitches) and divide by the number of increases to be made (e.g. 12) = 7.3. In this example, increase by making 1 yarn over after approx. each 7th stitch. On the next round knit the yarn overs twisted to avoid holes. PATTERN (for raglan): See diagram A.1. STRIPES: The whole body is worked in stocking stitch and with 6 stripes; each stripe is worked to a height of 13-13.5-14-14.5-15-15.5 cm in the following colours: First ice blue, then off white, mustard, old pink, light blue and off white. RAGLAN: Increase to raglan on each side of the 4 marker threads as follows: Start 1 stitch before the marker thread, 1 yarn over, knit 2 (marker thread sits in middle of these 2 stitches), 1 yarn over (= 8 stitches increased on round). On the next round knit the yarn overs to leave holes. DECREASE TIP (for sides of dress): Start 5 stitches before marker thread, knit 2 together, knit 6 (marker thread sits in middle of these 6 stitches), slip 1 stitch as if to knit, knit 1 and pass slipped stitch over the knitted stitch (= 2 stitches decreased). INCREASE TIP-2 (for sides of dress): Start 3 stitches before marker thread, 1 yarn over, knit 6 (marker thread sits in middle of these 6 stitches) 1 yarn over (= 2 stitches increased). On the next round work yarn overs twisted to avoid holes. ------------------------------------------------------- START THE PIECE HERE: ------------------------------------------------------- DRESS: The piece is worked in the round with circular needle, top down to where the split begins. Then front and back pieces are finished separately, back and forth. The sleeve-edges are worked in the round with double pointed needles. NECK: Cast on 88-88-96-96-102-102 stitches with short circular needle size 4 mm and ice blue. Work 2 RIDGES in the round – see description above. Change to circular needle size 5 mm. Knit 1 round where you increase 12-12-12-12-14-14 stitches evenly spaced – read INCREASE TIP-1 = 100-100-108-108-116-116 stitches. Insert 4 marker threads for raglan in the piece as follows, without working the stitches: First marker thread is inserted after the first 15-15-17-17-19-19 stitches (= ½ back piece), 2nd marker thread after the next 20 stitches (= sleeve), 3rd after the next 30-30-34-34-38-38 stitches (= front piece) and 4th marker thread is inserted after the next 20 stitches (= sleeve). There are 15-15-17-17-19-19 stitches left on round after the last marker thread. Then work yoke as described below. YOKE: Work the colours as described in STRIPES – see description above. AT THE SAME TIME on the first round increase to RAGLAN – see description above, on each side of the 4 marker threads (= 8 stitches increased). Increase like this every 2nd round a total of 14-17-18-22-23-26 times. REMEMBER THE KNITTING TENSION! After the last increase there are 212-236-252-284-300-324 stitches on needle. Continue with stripes without further increases to raglan, but to avoid the rows of holes along the raglan lines being broken, work A.1 in each transition between body and sleeves (arrow in A.1 marks the marker thread in raglan line). When the piece measures 16-18-20-22-24-26 cm from the cast-on edge mid front, divide the piece for body and sleeves as follows: Work the first 31-34-37-41-45-49 stitches (= ½ back piece), place the next 44-50-52-60-60-64 stitches on 1 thread for sleeve, cast on 6-6-8-8-10-12 stitches on needle (= in side under sleeve), work the next 62-68-74-82-90-98 stitches (= front piece), place the next 44-50-52-60-60-64 stitches on 1 thread for sleeve, cast on 6-6-8-8-10-12 stitches on needle (= in side under sleeve) and work the remaining 31-34-37-41-45-49 stitches (= ½ back piece). Cut the strand. Body and sleeves are finished separately. THE PIECE IS NOW MEASURED FROM HERE! BODY: = 136-148-164-180-200-220 stitches. Insert 1 marker thread in the middle of the 6-6-8-8-10-12 stitches cast on in each side = 68-74-82-90-100-110 stitches between the 2 marker threads. Start the round at the marker thread on the right side (when garment is worn). AT THE SAME TIME when the piece measures 2 cm from the division, decrease 2 stitches in each side – read DECREASE TIP (= 4 stitches decreased). Decrease like this every 2 cm a total of 3 times in each side = 124-136-152-168-188-208 stitches. When the piece measures 16 cm from the division increase 2 stitches in each side – read INCREASE TIP-2 (= 4 stitches increased). Increase like this every 1½ cm a total of 28 times in each side. AT THE SAME TIME when the piece measures 43-44-43-44-43-43 cm divide for split in sides at both marker threads and front and back pieces are finished separately. Leave the stitches for the back piece on needle or place on 1 thread. Continue with stocking stitch back and forth, but the 3 outermost stitches on each side are worked in GARTER STITCH – see description above - but NOTE: After the split on each side you continue to increase in each side, but you now increase inside the 3 edge stitches in garter stitch on each side. After the last increase there are 118-124-132-140-150-160 stitches on needle. After the last stripe, the piece measures 78-81-84-87-90-93 cm mid front (the full length of the dress will be 6 cm longer at the shoulder) – if you want a longer dress then add the length here. Then change to needle size 4 mm and work 3 ridges back and forth over all stitches. Cast off with knit from the right side. Work back piece in the same way. SLEEVE EDGE: Place the 44-50-52-60-60-64 stitches from the thread on the one side of the piece on double pointed needle size 4 mm and knit up 1 stitch in each of the 6-6-8-8-10-12 stitches cast on under the sleeve = 50-56-60-68-70-76 stitches. Work 2 ridges using the same colour as the thread-stitches, and then cast off with knit. Work the other sleeve-edge in the same way. |
|||||||||||||
Diagram explanations |
|||||||||||||
|
|||||||||||||
|
|||||||||||||
Have you finished this pattern?Tag your pictures with #dropspattern #eveningoutdress or submit them to the #dropsfan gallery. Do you need help with this pattern?You'll find 27 tutorial videos, a Comments/Questions area and more by visiting the pattern on garnstudio.com. © 1982-2025 DROPS Design A/S. We reserve all rights. This document, including all its sub-sections, has copyrights. Read more about what you can do with our patterns at the bottom of each pattern on our site. |
|||||||||||||


With over 40 years in knitting and crochet design, DROPS Design offers one of the most extensive collections of free patterns on the internet - translated to 17 languages. As of today we count 314 catalogues and 11820 patterns translated into English (UK/cm). 11820
We work hard to bring you the best knitting and crochet have to offer, inspiration and advice as well as great quality yarns at incredible prices! Would you like to use our patterns for other than personal use? You can read what you are allowed to do in the Copyright text at the bottom of all our patterns. Happy crafting!
Post a comment to pattern DROPS 200-24
We would love to hear what you have to say about this pattern!
If you want to leave a question, please make sure you select the correct category in the form below, to speed up the answering process. Required fields are marked *.