
Popular categories
Looking for a yarn?


Comments / Questions (38)
![]() Liudmila wrote:
Liudmila wrote:
Hello, would this pattern still work with 100% cotton yarn?
27.02.2019 - 23:38DROPS Design answered:
Dear Liudmila, use our yarn converter to see the different alternatives you can use - read more about alternatives here. Happy knitting!
28.02.2019 - 09:39
![]() Sara wrote:
Sara wrote:
Visto che il vestito si lavora top down, gli schemi vanno eseguiti leggendoli dal basso verso l'alto (come farei normalmente) o dall'alto verso basso? Grazie
13.02.2019 - 09:08DROPS Design answered:
Buongiorno Sara. Anche nella lavorazione top down, i diagrammi si leggono in maniera tradizionale: dal basso verso l'alto e da destra verso sinistra. Buon lavoro!
13.02.2019 - 09:19
![]() Anne wrote:
Anne wrote:
Ja, bitte die Anleitung, entlich mal Kleider zum Stricken.
21.01.2019 - 21:03
![]() Jenny Strick wrote:
Jenny Strick wrote:
Wunderschönes Design! Ich freue mich schon auf die Anleitung!
19.01.2019 - 11:10
![]() Mariandy wrote:
Mariandy wrote:
Mir gefällt besonders die A-Linie des Kleides. Ich würde es gerne stricken.
31.12.2018 - 11:56
![]() Beti wrote:
Beti wrote:
Dieses Modell ist traumhaft, würde es gern nacharbeiten.
20.12.2018 - 13:26
![]() Eva wrote:
Eva wrote:
Schöne Passe.
16.12.2018 - 19:49
![]() Natacha wrote:
Natacha wrote:
Quel modèle ! waouh, bon le mannequin ne gâche rien...
12.12.2018 - 21:29
|
|||||||||||||||||||
Desert Whispers#desertwhispersdress |
|||||||||||||||||||
 |
 |
||||||||||||||||||
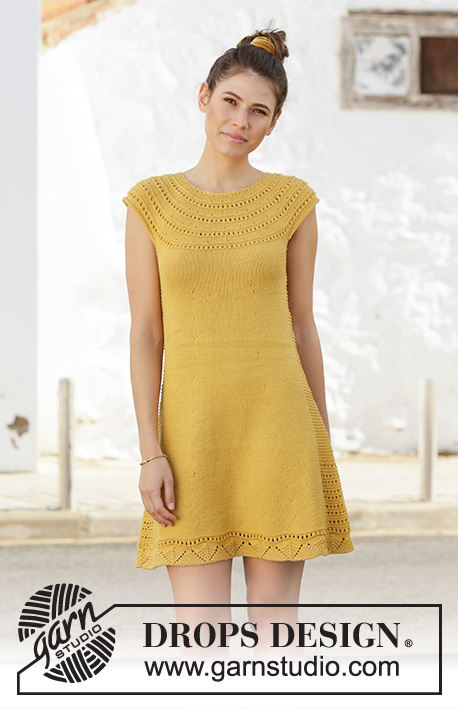
Knitted dress in DROPS Cotton Light. The piece is worked top down, with lace pattern, garter stitch and stocking stitch. Sizes S – XXXL.
DROPS 200-2 |
|||||||||||||||||||
|
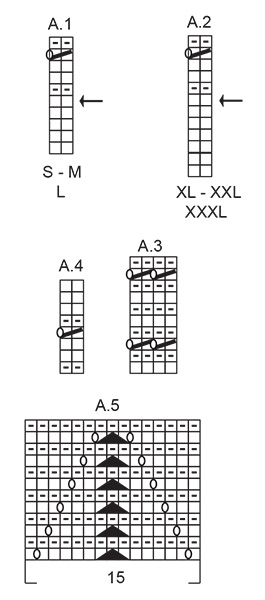
------------------------------------------------------- EXPLANATIONS FOR THE PATTERN: ------------------------------------------------------- RIDGE/GARTER STITCH (worked in the round): 1 ridge in height = 2 rounds; Knit 1 round and purl 1 round. RIDGE/GARTER STITCH (worked back and forth): Knit all rows. 1 ridge in height = Knit 2 rows. PATTERN: See diagrams A.1, A.2, A.3, A.4 and A.5. Choose diagram A.1/A.2 for your size. INCREASE TIP-1 (evenly spaced): To work out how to increase evenly, count the total number of stitches on the needle (e.g. 100 stitches) and divide by the number of increases to be made (e.g. 32) = 3.1. In this example, increase by making 1 yarn over after approx. each 3rd stitch. On the next round knit the yarn overs twisted to avoid holes. INCREASE TIP-2: Increase with yarn over, work the yarn over twisted on next round. When increasing stitches at 1st, 3rd, 4th and 6th marker, make 1 yarn over. On the next round, knit the yarn over twisted. When increasing stitches at the 2nd and 5th marker, make 1 yarn over on each side of 2 knit stitches (the marker sits between these 2 stitches). On the next round, work the yarn overs twisted and continue in garter stitch. ------------------------------------------------------- START THE PIECE HERE: ------------------------------------------------------- DRESS – SHORT OVERVIEW OF THE PIECE: The yoke with button-band on the back is worked back and forth with circular needle, top down. Then stitches are cast off for armholes and the piece is continued in the round. YOKE: Cast on 100-104-108-114-118-124 stitches with circular needle size 4 mm and Cotton Light. Knit 1 row from the wrong side. Work 1 RIDGE – see description above. Knit 1 row from the right side and increase 32-36-40-42-46-50 stitches evenly spaced - READ INCREASE TIP! = 132-140-148-156-164-174 stitches on row. Purl 1 row from the wrong side. READ THE WHOLE OF THIS SECTION BEFORE CONTINUING! Now work according to diagrams A.1 and A.2 in the different sizes as follows, from the right side: SIZES S, M and L: Work 3 band stitches in GARTER STITCH, work A.1 until there are 3 stitches left and 3 band stitches in GARTER STITCH. SIZES XL, XXL and XXXL: Work 3 band stitches in GARTER STITCH, work A.2 until there are 3 stitches left and 3 band stitches in GARTER STITCH. REMEMBER THE KNITTING TENSION! On the row marked with arrow, increase 40-44-50-52-56-62 stitches evenly spaced. Repeat the diagram and increase a total of 4-3-4-3-3-3 times in height. SIZES M, XL, XXL and XXXL: Work the diagram 1 more time in height, but at the arrow increase 48-54-62-64 stitches. ALL SIZES: The diagram has now been worked 4 times in all sizes and there are 292-320-348-366-394-424 stitches on the needle. The piece measures approx. 14-14-14-17-17-17 cm. Continue working according to diagram A.1/A.2 (without increasing) and with 3 band stitches in garter stitch on each side until the piece measures15-16-17-18-19-20 cm from the cast-on edge. The next row is worked as follows from the wrong side: Work 3 band stitches in garter stitch, purl 36-41-46-48-53-59 stitches (= half back piece), knit 68-72-76-81-85-88 stitches (= sleeve), purl 78-88-98-102-112-124 stitches (= front piece), knit 68-72-76-81-85-88 stitches (= sleeve), purl 36-41-46-48-53-59 stitches and finish with 3 band stitches in garter stitch= half back piece). Work as follows from the right side: Knit the first 39-44-49-51-56-62 stitches, cast off the next 68-72-76-81-85-88 stitches (= sleeve), knit 78-88-98-102-112-124 stitches (= front piece), cast off the next 68-72-76-81-85-88 stitches (= sleeve) and knit to end of row. You have now cast off stitches for the armholes in each side. BODY: You now work in the round (start the round mid back). Knit 39-44-49-51-56-62 stitches, cast on 8-8-8-12-14-14 new stitches in the side, knit 78-88-98-102-112-124 stitches, cast on 8-8-8-12-14-14 new stitches in the side and knit 39-44-49-51-56-62 stitches = 172-192-212-228-252-276 stitches. Continue with stocking stitch, but the 8-8-8-12-14-14 new stitches on each side are worked in GARTER STITCH – see description above. When the piece measures 8-8-9-9-10-10 cm from the division, insert 6 markers in the piece (start mid back) as follows: Work 13-15-17-17-19-21 stitches in stocking stitch and place 1st marker in the last of these stitches. Work 26-29-32-34-37-41 stitches in stocking stitch, work 4-4-4-6-7-7 stitches in garter stitch and place 2nd marker on needle here. Work 4-4-4-6-7-7 stitches in garter stitch, work 27-30-33-35-38-42 stitches in stocking stitch and place 3rd marker in the last of these stitches. Work 25-29-33-33-37-41 stitches in stocking stitch and place 4th marker in the last of these stitches. Work 26-29-32-34-37-41 stitches in stocking stitch, work 4-4-4-6-7-7 stitches in garter stitch and place 5th marker on needle here. Work 4-4-4-6-7-7 stitches in garter stitch, work 27-30-33-35-38-42 stitches in stocking stitch and place 6th marker in the last of these stitches. Work 12-14-16-16-18-20 stitches in stocking stitch to the beginning of the round. Continue in stocking stitch and garter stitch as before and increase as follows on next round: Increase 1 stitch before 1th and 4th marker, increase 1 stitch after 3rd and 6th marker. Increase 2 stitches at 2nd and 5th marker – READ INCREASE TIP-2! = 8 stitches increased on round. Repeat this increase every 13th-13th-13th-14th-14th-15th round a total of 11-11-11-10-10-10 times – AT THE SAME TIME when the piece measures 43-44-45-46-47-48 cm from the division, work diagram A.3 over the garter stitches on each side (adjust so that the increases are made on a knitted round in A.3). When all the increases are finished there are 260-280-300-308-332-356 stitches on the needle. When the piece measures 56-57-58-59-61-61 cm from the division, knit 1 round where you increase 10-20-15-22-13-19 stitches evenly spaced = 270-300-315-330-345-375 stitches. Work diagram A.4 over all stitches (in sizes L, XXL and XXXL knit 1 stitch at the end of the 4th round so the stitches fit). After diagram A.4 work diagram A.5 over all stitches. When diagram A.5 is finished, cast off with knit on the next round. The piece measures approx. 61-62-63-64-65-66 cm from the division and approx. 80-82-84-86-88-90 cm from the shoulder. ASSEMBLY: Crochet 3 buttonhole straps along left side on opening at the back. 1 strap = work with hook size 3.5 mm and Cotton Light as follows: 1 double crochet in edge stitch at the top by neck, 4 chain stitches and then 1 slip stitch in the same stitch as the double crochet was worked in, fasten off. Work 2 more straps along the opening. Sew buttons on to the right side of opening. |
|||||||||||||||||||
Diagram explanations |
|||||||||||||||||||
|
|||||||||||||||||||
|
|||||||||||||||||||

|
|||||||||||||||||||
Have you finished this pattern?Tag your pictures with #dropspattern #desertwhispersdress or submit them to the #dropsfan gallery. Do you need help with this pattern?You'll find 24 tutorial videos, a Comments/Questions area and more by visiting the pattern on garnstudio.com. © 1982-2025 DROPS Design A/S. We reserve all rights. This document, including all its sub-sections, has copyrights. Read more about what you can do with our patterns at the bottom of each pattern on our site. |
|||||||||||||||||||


With over 40 years in knitting and crochet design, DROPS Design offers one of the most extensive collections of free patterns on the internet - translated to 17 languages. As of today we count 314 catalogues and 11820 patterns translated into English (UK/cm). 11820
We work hard to bring you the best knitting and crochet have to offer, inspiration and advice as well as great quality yarns at incredible prices! Would you like to use our patterns for other than personal use? You can read what you are allowed to do in the Copyright text at the bottom of all our patterns. Happy crafting!
Post a comment to pattern DROPS 200-2
We would love to hear what you have to say about this pattern!
If you want to leave a question, please make sure you select the correct category in the form below, to speed up the answering process. Required fields are marked *.