DROPS Snow
DROPS Snow
100% Wool
from 2.20 € /50g
Get the yarn to make this pattern from 24.20€.

The yarn cost is calculated from the pattern’s smallest size and the yarn’s cheapest product type. Looking for an even better price? You might find it on the DROPS Deals!

DROPS SS24

Summer Shells

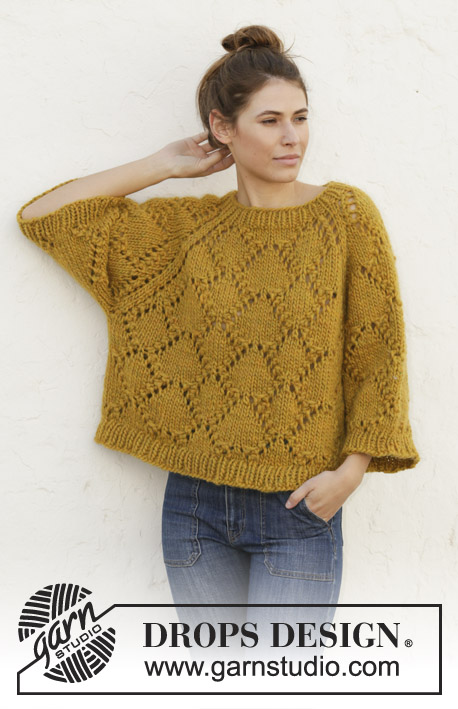
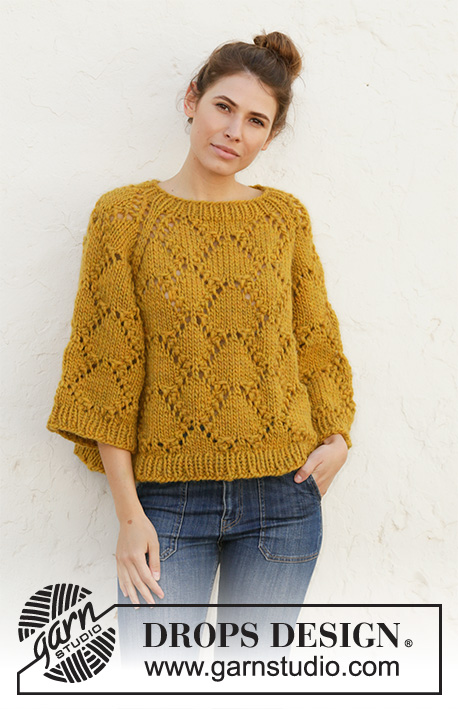
Knitted jumper with raglan with 1 thread DROPS Snow or 1 thread SROPS Wish or 2 threads Air. The piece is worked top down with lace pattern. Sizes S - XXXL.

DROPS 200-5
DROPS Design: Pattern no ee-657
Yarn group E or C + C
-------------------------------------------------------

SIZES:
S - M - L - XL - XXL - XXXL

MATERIALS:
DROPS SNOW from Garnstudio (belongs to yarn group E)
550-600-650-700-800-850 g colour 85, curry

or use:
DROPS WISH from Garnstudio (belongs to yarn group E)
400-450-450-500-650-650 g colour 12, curry

Or use:
DROPS AIR from Garnstudio (belongs to yarn group C)
400-400-450-500-550-600 g colour 22, yellow


KNITTING TENSION:
10 stitches in width and 14 rows in height with stocking stitch = 10 x 10 cm with 1 thread Snow, 1 thread Wish or 2 threads Air.

NEEDLES:
DROPS CIRCULAR NEEDLE SIZE 9 MM: length 40 cm and 80 cm for pattern.
DROPS CIRCULAR NEEDLE SIZE 8 MM: length 40 cm and 80 cm for rib.
The needle size is only a guide. If you get too many stitches on 10 cm, change to a larger needle size. If you get too few stitches on 10 cm, change to a smaller needle size.

-------------------------------------------------------

-------------------------------------------------------

Alternative Yarn – See how to change yarns here
Yarn Groups A to F – Use the same pattern and change the yarn here
Yarn usage using an alternative yarn – Use our yarn converter here

-------------------------------------------------------

DROPS Snow
DROPS Snow
100% Wool
from 2.20 € /50g
Get the yarn to make this pattern from 24.20€.

The yarn cost is calculated from the pattern’s smallest size and the yarn’s cheapest product type. Looking for an even better price? You might find it on the DROPS Deals!

Pattern instructions

-------------------------------------------------------

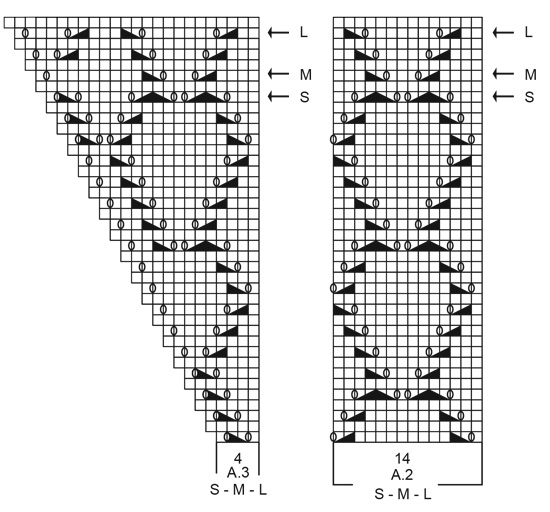
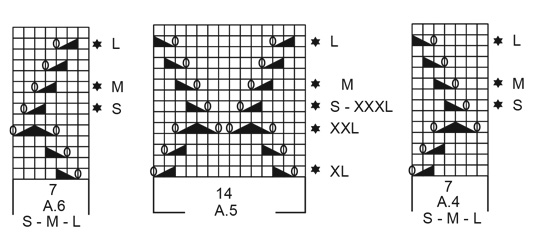
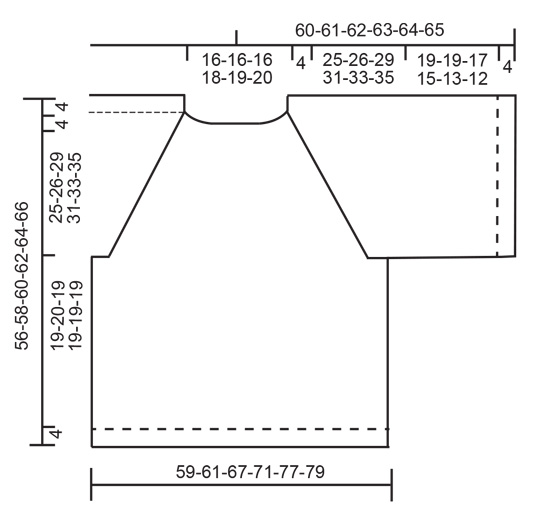
EXPLANATIONS FOR THE PATTERN:

-------------------------------------------------------

PATTERN: 
See diagrams A.1 to A.6 (A.4 and A.6 apply to sizes S, M and L). Choose diagram for your size.

DECREASE TIP (evenly spaced):
To work out how to decrease evenly, count the total number of stitches on the needle (e.g. 58 stitches) and divide by the number of decreases to be made (e.g. 2) = 29. 
In this example decrease by knitting each 28th and 29th stitch together.

INCREASE TIP (evenly spaced):
To work out how to increase evenly, count the total number of stitches on the needle (e.g. 118 stitches) and divide by the number of increases to be made (e.g. 24) = 4.9. 
In this example increase by making 1 yarn over after approx. each 5th stitch. On the next row work the yarn overs twisted to avoid holes.

-------------------------------------------------------

START THE PIECE HERE:

-------------------------------------------------------

JUMPER - SHORT OVERVIEW OF THE PIECE:
The piece is worked in the round with circular needle top down. Sleeves are worked in the round with short circular needle.

JUMPER:
NECK:
Cast on 56-58-60-64-64-68 stitches with circular needle size 8 mm and 1 thread Snow, 1 thread Wish or 2 threads Air. Knit 1 round. Then work rib (knit 1, purl 1) for 4 cm.

YOKE:
Change to circular needle size 9 mm. Knit 1 round where you decrease 0-2-4-0-0-4 stitches evenly spaced – read DECREASE TIP = 56-56-56-64-64-64 stitches. Now work pattern – choose diagram for your size, as follows: * insert a marker thread here, A.1 over the first 3-3-3-4-4-4 stitches, A.2 over the next 14 stitches, A.3 over the next 4-4-4-5-5-5 stitches (= back/ front piece), insert a marker thread here, A.1 over the next 3-3-3-4-4-4 stitches, A.3 over the next 4-4-4-5-5-5 stitches (= sleeve) *, work from *-* 1 more time on the round. There are now 4 marker threads in the piece. They follow your work onwards and mark the transitions between body and sleeves. Continue this pattern in the round. Increase on each side of the diagrams to raglan (increases are drawn into the diagrams). REMEMBER THE KNITTING TENSION! When you have worked as far as the round with an arrow in the diagrams (see arrow for your size), there are 192-200-216-232-248-256 stitches on the round. The piece measures approx. 29-30-33-35-37-39 cm from the cast-on edge and down mid front. The next round is worked as follows:
Work the first 55-57-61-65-69-71 stitches (= back piece), place the next 41-43-47-51-55-57 stitches on a thread (= sleeve), cast on 4-4-6-6-8-8 new stitches on the needle (= in side under sleeve), work the next 55-57-61-65-69-71 stitches (= front piece), place the next 41-43-47-51-55-57 stitches on a thread (= sleeve), cast on 4-4-6-6-8-8 new stitches under sleeve. THE PIECE IS NOW MEASURED FROM HERE!

BODY:
= 118-122-134-142-154-158 stitches. Insert a marker thread in each side, in the middle of the 4-4-6-6-8-8 new stitches cast on under the sleeves (= 2-2-3-3-4-4 new stitches on each side of the marker thread). Start the round by the marker thread on one side of the piece and work pattern, beginning on the round marked with a star for your size in the diagram(s) as follows:

Sizes S, M and L:
* Knit 1-2-5 stitches, A.4 over the next 7 stitches, A.5 over the next 42 stitches (= 3 repeats of 14 stitches), A.6 over the next 7 stitches, knit 2-3-6 stitches *, work from *-* 1 more time on the round.

Sizes XL, XXL and XXXL:
* Knit 0-3-4 stitches, A.5 over the next 70 stitches (= 5 repeats of 14 stitches), knit 1-4-5 stitches *, work from *-* 1 more time on the round.

Continue in the round like this until the piece measures approx. 19-20-19-19-19-19 cm – adjust so that you finish after round 5 or 13 in A.5. Knit 1 round where you increase 24-24-26-28-30-32 stitches evenly spaced – read INCREASE TIP = 142-146-160-170-184-190 stitches. Change to circular needle size 8 mm. Work rib (knit 1, purl 1) in the round for 4 cm. Cast off with knit over knit and purl over purl. Make sure that the cast-off edge is not tight. Use a size larger needle if necessary. The jumper measures approx. 56-58-60-62-64-66 cm from the shoulder down.

SLEEVE:
Place the 41-43-47-51-55-57 stitches from the thread on the one side of the piece back on short circular needle size 9 mm and knit up 1 stitch in each of the 4-4-6-6-8-8 stitches cast on under the sleeve = 45-47-53-57-63-65 stitches. Insert a marker thread in the middle of the 4-4-6-6-8-8 stitches cast on under the sleeve (= 2-2-3-3-4-4 new stitches on each side of the marker thread). Start the round by the marker thread and work pattern, beginning on the round marked with a star for you size in the diagram(s) as follows:

Sizes S, M and L:
Knit 1-2-5 stitches, A.4 over the next 7 stitches, A.5 over the next 28 stitches (= 2 repeats of 14 stitches), A.6 over the next 7 stitches, knit 2-3-6 stitches.

Sizes XL, XXL and XXXL:
Knit 0-3-4 stitches, A.5 over the next 56 stitches (= 4 reports of 14 stitches), knit 1-4-5 stitches.

Continue in the round like this until the piece measures approx. 19-19-17-15-13-12 cm – adjust so that you finish after round 5 or 13 in A.5. Knit 1 round where you increase 9-9-11-11-13-13 stitches evenly spaced = 54-56-64-68-76-78 stitches. Change to circular needle size 8 mm. Work rib (knit 1, purl 1) in the round for 4 cm. Cast off with knit over knit and purl over purl. Make sure that the cast-off edge is not tight. Use a size larger needle if necessary. The sleeve measures approx. 23-23-21-19-17-16 cm. Work the other sleeve in the same way.

This pattern has been corrected.

Updated online: 28.02.2019
Correction to diagrams A.1 and A.3 size S-M-L: dec on row 35 removed

Diagram

symbols = knit
symbols = between 2 stitches make 1 yarn over; on the next round knit the yarn over (there will be a hole)
symbols = purl 2 together
symbols = purl 2 twisted together
symbols = arrow shows where the yoke finishes in the diagram for the different sizes - read description in text
symbols = star shows which row the different sizes start on in the diagram - read description in the text
diagram
diagram
diagram
diagram
diagram

Each of our patterns has specific tutorial videos to help you.

Do you have a question? See a list of frequently asked questions (FAQ)

Knitting tension is what determines the final measurements of your work, and is usually measured per 10 x 10 cm. It is provided like so: number of stitches in width x number of rows in height - eg: 19 stitches x 26 rows = 10 x 10 cm.

The knitting tension is very individual; some people knit/crochet loosely while others work tightly. You adjust the knitting tension with the needle size, which is why the suggested needle size is only meant as a guide! You need to adjust this (up or down) to ensure that YOUR knitting tension matches the knitting tension provided in the pattern. If you work with a different knitting tension than provided you will have a different yarn consumption, and your work will have different measurements than what the pattern suggests.

The knitting tension also determines which yarns can replace each other. As long as you achieve the same knitting tension you can replace one yarn with another.

See DROPS lesson: How to measure your tension/gauge

See DROPS video: How to make a gauge tension swatch

The required amount of yarn is provided in grams, eg: 450 g. To calculate how many balls you’ll need you first need to know how many grams are in 1 ball (25g, 50g or 100g). This information is available if you click on the individual yarn quality on our pages. Divide the amount required with the amount of each ball. For example, if each ball is 50g (the most common amount), the calculation will be as follows: 450 / 50 = 9 balls.

The important thing when changing from one yarn to another is that the knitting/crochet tension remains the same. This is so that the measurements of the finished piece will be the same as on the sketch provided. It is easier to achieve the same knitting tension using yarns from the same yarn group. It is also possible to work with multiple strands of a thinner yarn to achieve the knitting tension of a thicker one. Please try our yarn converter. We recommend you to always work a test swatch.

Please NOTE: when changing yarn the garment might have a different look and feel to the garment in the photo, due to individual properties and qualities of each yarn.

See DROPS lesson: Can I use a different yarn than the one mentioned in the pattern?

All our yarns are categorised into yarn groups (from A to F) according to thickness and knitting tension – group A contains the thinnest yarns and group F the thickest. This makes it easier for you to find alternative yarns to our patterns, should you wish to switch yarn. All yarns within the same group have a similar knitting tension and can easily replace each other. However, different yarn qualities have different structures and properties which will give the finished work a unique look and feel.

Click here for an overview of the yarns in each yarn group

At the top of all our patterns you’ll find a link to our yarn calculator, which is a helpful tool should you wish to use a different yarn than suggested. By filling in the yarn quality you wish to replace, the amount (in your size) and number of strands, the calculator will present good alternative yarns with the same knitting tension. Additionally it will tell you how much you’ll require in the new qualities and whether you’ll need to work with multiple strands. Most skeins are 50g (some are 25g or 100g).

If the pattern is worked with multiple colours, every colour will have to be calculated separately. Similarly, if the pattern is worked with several strands of different yarns (for example 1 strand Alpaca and 1 strand Kid-Silk) you will have to find alternatives for each, individually.

Click here to see our yarn calculator

Since different yarns have different qualities and textures we have chosen to keep the original yarn in our patterns. However, you can easily find options among our available qualities by using our yarn calculator, or simply pick a yarn from the same yarn group.

It is possible that some retailers still have discontinued yarns in stock, or that someone has a few skeins at home that they would like to find patterns for.

The yarn calculator will provide both alternative yarn as well as required amount in the new quality.

If you think it's hard to decide what size to make, it can be a good idea to measure a garment you own already and like the size of. Then you can pick the size by comparing those measures with the ones available in the pattern's size chart.

You'll find the size chart at the bottom of the pattern.

See DROPS lesson: How to read size chart

The needle size provided in the pattern serves only as a guide, the important thing is to follow the knitting tension. And since knitting tension is very individual, you will have to adjust the needle size to ensure that YOUR tension is the same as in the pattern – maybe you’ll have to adjust 1, or even 2 needle sizes, up or down to achieve the correct tension. For this, we recommend that you work test swatches.

Should you work with a different knitting tension than the one provided, the measurements of the finished garment might deviate from the measurement sketch.

See DROPS lesson: How to measure your tension/gauge

See DROPS video: How to make a tension/gauge swatch

Working a garment top-down provides more flexibility and room for personal adjustment. For example it is easier to try the garment on while working, as well as making adjustments to length of yoke and shoulder caps.

The instructions are carefully explaining every step, in the correct order. Diagrams are adjusted to the knitting direction and are worked as usual.

The diagram depicts all rows/rounds, and every stitch seen from the right side. It is read from bottom to top, from right to left. 1 square = 1 stitch.

When working back and forth, every other row is worked from the right side and every other row is worked from the wrong side. When working from the wrong side, the diagram will have to be worked reversed: from left to right, knit stitches are purled, purl stitches are knit etc.

When working in the round every round is worked from the right side and the diagram are worked from right to left on all rounds.

See DROPS lesson: How to read knitting diagrams

The diagram depicts all rows/rounds, and every stitch seen from the right side. It is worked from bottom to top, from right to left.

When working back and forth every other row is worked from the right side: from right to left and every other row is worked from the wrong side: from left to right.

When working in the round, every row in the diagram are worked from the right side, from right to left.

When working a circular diagram you start in the middle and work your way outwards, counter clockwise, row by row.

The rows usually start with a given number of chain stitches (equivalent to the height of the following stitch), this will either be depicted in the diagram or explained in the pattern.

See DROPS lesson: How to read crochet diagrams

Instructions for working several diagrams after each other on the same row/round, will often be written like so: “work A.1, A.2, A.3 a total of 0-0-2-3-4 times". This means you work A.1 once, then A.2 is worked once, and A.3 is repeated (in width) the number of times provided for your size – in this case like so: S = 0 times, M = 0 times, L=2 times, XL= 3 times and XXL = 4 times.

The diagrams are worked as usual: begin with the first row in A.1, then work the first row in A.2 etc.

See DROPS lesson: How to read knitting diagrams

See DROPS lesson: How to read crochet diagrams

The total width of the garment (from wrist-to-wrist) will be larger in the larger sizes, despite the actual sleeves being shorter. The larger sizes have longer sleeve caps and wider shoulders, so there will be a good fit in all sizes.

The measurement sketch/schematic drawing provides information regarding the full length of the garment. If it’s a jumper or a jacket the length is measured from the highest point on the shoulder closest to the neckline, and straight down to the bottom of the garment. It is NOT measured from the tip of shoulder. Similarly, the length of yoke is measured from the highest point on the shoulder and down to where yoke is split into body and sleeves.

On a jacket measures are never taken along bands, unless specifically stated. Always measure inside band stitches when measuring the length.

See DROPS lesson: How to read a schematic drawing

Diagrams are often repeated on the round or in height. 1 repeat is the diagram the way it appears in the pattern. If it says to work 5 repeats of A.1 in the round, then you work A.1 a total of 5 times after/next to each other in the round. If it says to work 2 repeats of A.1 vertically/in height you work the entire diagram once, then begin again at the start and work the entire diagram one more time.

Chain stitches are slightly narrower than other stitches and to avoid working the cast-on edge too tight, we simply chain more stitches to begin with. The stitch count will be adjusted on the following row to fit the pattern and measurement sketch.

The rib edge is more elastic and will contract slightly compared to, for example, stocking stitch. By increasing before the rib edge, you avoid a visible difference in width between the rib edge and the rest of the body.

It’s very easy to cast off too tightly, and by making yarn overs while casting off (and simultaneously casting these off) you avoid a too tight cast off edge.

See DROPS video: How to bind off with yarn overs (yo)

To achieve an even increase (or decrease) you can increase on, for example: every 3rd and 4th row alternately, like so: work 2 rows and increase on the 3rd row, work 3 rows and increase on the 4th. Repeat this until the increase is complete.

See DROPS lesson: Increase or decrease 1 st on every 3rd and 4th row alternately

Should you prefer to work in the round instead of back and forth, you may of course adjust the pattern. You’ll need to add steeks mid-front (usually 5 stitches), and follow the instructions. When you would normally turn and work from the wrong side, simply work across the steek and continue in the round. At the end you’ll cut the piece open, pick up stitches to work bands, and cover the cut edges.

See DROPS video: How to knit steeks and cut open

Should you prefer to work back and forth instead of in the round, you may of course adjust the pattern so you work the pieces separately and then assemble them at the end. Divide the stitches for the body in 2, add 1 edge stitch in each side (for sewing) and work the front and back pieces separately.

See DROPS lesson: Can I adapt a pattern for circular needles into straight needles?

Pattern repeats can vary slightly in the different sizes, in order to get the correct proportions. If you’re not working the exact same size as the garment in the photo, yours might deviate slightly. This has been carefully developed and adjusted so that the complete impression of the garment is the same in all sizes.

Make sure to follow instructions and diagrams for your size!

If you have found a pattern you like which is available in women’s size it’s not very difficult to convert it to men’s size. The biggest difference will be the length of sleeves and body. Start working on the women size that you think would fit across the chest. The additional length will be worked right before you cast off for the armhole/sleeve cap. If the pattern is worked top-down you can add the length right after the armhole or before the first decrease on sleeve.

Regarding additional yarn amount, this will depend on how much length you add, but it is better with a skein too many than too few.

All yarns will have excess fibres (from production) that might come off as lint or shedding. Brushed yarns (ie hairier yarns) have more of these loose, excess fibres, causing more shedding.

Shedding also depends on what is worn under or over the garment, and whether this pulls at the yarn fibres. It’s therefore not possible to guarantee that there will be no shedding

Below are some tips on how to get the best result when working with hairier yarns:

1. When the garment is finished (before you wash it) shake it vigorously so the looser hairs come off. NOTE: do NOT use a lint roller, brush or any method that pulls at the yarn.

2. Place the garment in a plastic bag and put it in your freezer - the temperature will cause the fibres to become less attached to each other, and excess fibres will come off easier.

3. Leave in the freezer for a few hours before taking it out and shaking it again.

4. Wash the garment according to the instructions on the yarn label.

Pilling is a natural process that happens to even the most exclusive of fibers. It's a natural sign of wear and tear that is hard to avoid, and that is most visible in high friction areas of your garment like a sweater's arms and cuffs.

You can make your garment look as new by removing the pilling, using a fabric comb or a pill/lint remover.

Still can't find the answer you need? Then scroll down and leave your question so one of our experts can try to help you. This will be done normally within 5 to 10 working days.
In the meantime, you can read the questions and answers that others have left to this pattern or join the DROPS Workshop on Facebook to get help from fellow knitters/crocheters!

You might also like...

Summer Shells

mariayawa, Norway

Summer Shells

Anna Korotkevich, Belarus

Summer Shells

NeedlesWLove, Portugal

Summer Shells

rktaylor1984, United States

Summer Shells

Anne, United States

Summer Shells sweater

Randa, Norway

Summer Shells

Mária, Slovakia

Summer Shells

Leena, Finland

Post a comment to pattern DROPS 200-5

We would love to hear what you have to say about this pattern!

If you want to leave a question, please make sure you select the correct category in the form below, to speed up the answering process. Required fields are marked *.

Comments / Questions (199)

country flag Emi wrote:

Bonjour, je ne comprends pas : en commençant le tour au fil marqueur de l un des côtés et par le tour avec l étoile..... Le fil marqueur est placé au milieu des mailles montées sous la manche, les mailles montées sont sur l aiguille de droite et sur l aiguille de gauche se trouve le début du tricot. Pour le xl je fais le a5 et je commence par 1 maille m puis un jeté... ??? Mais du coup je ne commence pas au fil marqueur ???

27.03.2024 - 23:41

DROPS Design answered:

Bonjour Emi, pour que le motif tombe juste, vous allez commencer au milieu des 6 mailles montées sous la manche d'un côté de l'ouvrage et vous tricotez 5 fois A.5 et vous terminez par 1 maille endroit, puis vous tricotez de nouveau 5 fois A.5 et terminez par 1 maille endroit, les motifs doivent continuer ceux de l'empiècement, vous avez en plus 1 maille endroit sous chaque manche (autrement dit, vous n'avez pas les 10 motifs de A.( tout le tour, mais bien 5 x 14 m + 1 m endroit pour le devant/le dos. Bon tricot!

02.04.2024 - 12:50

country flag Agneta Edlund wrote:

Hejsan, stickar efter storlek S o tycker att det saknas förklaring på diagrammet. Mönster A2 o rad 5, den trekantiga triangeln? Hur stickas den?

24.03.2024 - 09:01

DROPS Design answered:

Hej Agneta. Då stickar du först den 4:e symbolen i teckenförklaringen och sedan den 3:e symbolen. Mvh DROPS Design

27.03.2024 - 14:18

country flag Stacey wrote:

I’m not sure how many stitch’s are between markers for the xl (a1) size on the set up for sleeves front and back. I’m struggling a bit to understand the instructions. Thanks for the help

22.03.2024 - 04:50

DROPS Design answered:

Dear Stacey, work the very first round as follow * insert a marker thread here, A.1 over the first 4 sts, A.2 over the next 14 stitches, A.3 over the next 5 sts (=4+14+5= 23 sts for back/ front piece), insert a marker thread here, A.1 over the next 4 sts, A.3 over the next 5 sts (= 4+5= 9 sts for sleeve) *, work from *-* 1 more time on the round (- 23+9+23+9=64 sts). Happy knitting!

22.03.2024 - 07:52

country flag Caroline Nilsson wrote:

Hej! Jag har precis delat stickningen i ärmar och bål och ska påbörja att sticka bålen. Jag stickar strlk L. Det står sticka fem maskor och sen diagram A4. Diagram A4 börjar med fem maskor, är det samma 5 maskor? Eller ska jag sticka fem maskor och sen ytterligare 5 enligt diagram. A4? Mvh Caroline

11.03.2024 - 11:10

DROPS Design answered:

Hej Caroline. Du stickar 5 maskor och sedan börjar du med första maskan i diagram A.4 (det är alltså inte samma 5 maskor). Mvh DROPS Design

13.03.2024 - 09:45

country flag Berit Makinen wrote:

Hvordan få mønster til å stemme med raglanøkningen? 3. omgang blir feil uansett hva jeg gjør. (Summer Shell genser)

02.03.2024 - 08:28

DROPS Design answered:

Hej Berit, du tager ud til raglan ifølge diagrammerne og de nye masker er tegnet ind i diagrammet. Du starter nederst i diagrammet og strikker opad :)

05.03.2024 - 14:26

country flag Erika wrote:

Thank you for the free pattern for this cute sweater! This pattern turned out as expected for me. However, I might suggest sizing down. I am 5'8", 145lbs. I made this sweater in size M, Drops Snow yarn. First wearing today and it is already looking stretched out, with the neck nearly falling off my shoulders. I did get several compliments, though. Also, with the larger gauge and yarn it went together quite quickly, which is always a plus.

12.02.2024 - 00:04

country flag Debora wrote:

Buongiorno, vorrei fare questo midrlli lavorando dal basso verso l'alto e con pezzi separati da cucire. È possibile? Non vedo scalfo nel girocollo, è corretto? Dietro r davanti sono uguali? Grazie

01.02.2024 - 10:28

DROPS Design answered:

Buongiorno Debora, questo modello è lavorato dall'alto in basso e in questa sede non ci è possibile adattare le costruzioni alle singole richieste. Per un aiuto più personalizzato può rivolgersi al suo rivenditore DROPS di fiducia. Buon lavoro!

03.02.2024 - 10:23

country flag Mette Jørgensen wrote:

Kan Drops Andes bruges i denne opskrift?

17.10.2023 - 16:52

DROPS Design answered:

Hej Mette, ja du kan bruge DROPS Andes til denne opskrift, prøv vores garnomregner. Vælg DROPS Snow, vælg antal gram i din størrelse, så finder du garnforbruget i det alternativ du vælger :)

18.10.2023 - 07:22

country flag Gry wrote:

Hei, kan det være feil i denne oppskriften?? Jeg er ikke nybegynner, men jeg teller og teller og strikker maske for maske, men det blir feil hele tida. Første mønsteromgang er tatt opp og gjentatt, mens andre mønsteromgang (3. omg.) blir også feil…

24.09.2023 - 22:07

DROPS Design answered:

Hej Gry, nej det skal ikke være fejl i opskriften, sæt et mærke imellem hver mønsterrapport, så du er sikker på at du strikker alle masker i hver diagramrapport :)

05.10.2023 - 09:04

country flag Dorthe Ellesen Rasmussen wrote:

Hej Jeg vil gerne strikke med drops Air . Skal jeg så bruge 2 tråde eller 1 ? Mvh Dorthe

08.09.2023 - 16:08

DROPS Design answered:

Hej Dorthe, ja så skal du bruge 2 tråde og det findes med i opskriften som et alternativ :)

14.09.2023 - 10:47