
Popular categories
Looking for a yarn?


Comments / Questions (30)
![]() Henriette wrote:
Henriette wrote:
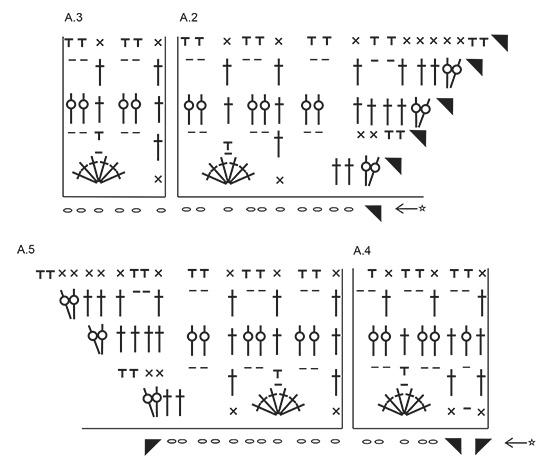
Bonjour, faut-il commencer le 1 er tour de bordure par 3ml en l'air (symbole triangle noir) de A2 puis terminer par A5 du côté gauche de ce diagramme....? Mais info crochet ? Merci de m'éclairer....
18.12.2019 - 14:54DROPS Design answered:
Bonjour Henriette,comme indiqué sous INFO CROCHET, vous commencez le 1er tour de la bordure par 6 ml (= 3 ml pour la dernière bride du tour = celle de A.5 + 3 ml pour le 1er arceau.), vous terminez le 1er tour par A.5 = 1 seule bride autour de l'arceau (la dernière bride = les 3 ml du début du tour). Bon crochet!
18.12.2019 - 15:49
![]() Henriette wrote:
Henriette wrote:
Bonjour, la réalisation de la bordure pas très claire pour moi : A4 s'intercalera dans A3? On a 40 ml sur un côté de carré. Si on fait A2 puis A3, on dépasse le coin ? D'avance Merci.
17.12.2019 - 11:48DROPS Design answered:
Bonjour Henriette, A.3 montre comment crocheter la bordure au-dessus des carrés, A.4 montre comment la crocheter à la transition entre les carrés, donc oui, A.4 sera intercalé entre A.3 - et les coins se font en crochetant d'abord A.5 (1ère moitié du coin) puis A.2 (2ème moitié du coin) (mais les tours de la bordure commencent par A.2 et se terminent par A.5). Bon crochet!
17.12.2019 - 14:56
![]() Martine wrote:
Martine wrote:
Bonjour, au tour 4, d'après le diagramme, il faut réaliser une demi-bride dans la maille du haut des 4 Double-B (du rang précédent)....si je vois bien sur la vidéo : en fait cette demi-bride est crochetée dans la première des 5 ml en l'air du rang précédent..... C'est bien cela ? D'avance merci.
29.11.2019 - 13:12DROPS Design answered:
Bonjour Martine, tout à fait, on commence ce tour par 1 ml, puis des mailles serrées dans le 1er arceau (= time code 9:11 dans la vidéo), et on le termine par 1 demi-bride dans le haut du groupe de double-brides (time code 10:49). Bon crochet!
29.11.2019 - 15:42
![]() Martine wrote:
Martine wrote:
Je voulais préciser que mon échantillon est correct. Du coup, je crains que mon plaid soit trop petit....
25.11.2019 - 17:32
![]() Martine wrote:
Martine wrote:
Je voulais préciser que mon échantillon est correct. Du coup, je crains que mon plaid soit trop petit....
25.11.2019 - 15:23DROPS Design answered:
Bonjour Martine, votre échantillon est-il bien correct en hauteur également? N'hésitez pas à utiliser un crochet plus gros pour que le carré ait la bonne dimensions, sinon votre couverture sera effectivement plus petite. Bon crochet!
25.11.2019 - 15:35
![]() Martine wrote:
Martine wrote:
Bonjour, je ne trouve pas que le carré mesure 28 cm de côté mais plutôt 23cm... La diagonale, elle, mesure 28 cm. Merci d'avance.
25.11.2019 - 15:15DROPS Design answered:
Bonjour Martine, n'hésitez pas à utiliser un crochet plus gros pour que le carré ait les bonnes dimensions - plus d'infos ici dans la FAQ. Bon crochet!
25.11.2019 - 15:33
![]() Lucy wrote:
Lucy wrote:
Where do I find the corrections for A1? Is there a mistake on the second video on round 8? I can't seem to get it right.
14.07.2019 - 01:38DROPS Design answered:
Dear Lucy, if you print the pattern after the correction has been published, the online diagram is correct. I checked round 8 in the video and didn't find anything wrong, can you please tell us more? Thank you!
15.07.2019 - 10:09
![]() Sylvie Krammy wrote:
Sylvie Krammy wrote:
Was ist die Korrektur der 4. und 5. Runde. Bei mir stimmen die Maschen nicht. Könnt Ihr helfen? Liebe Grüße
01.05.2019 - 18:24DROPS Design answered:
Liebe Frau Krammy, siehe bitte vorrige Antwort. Viel Spaß beim häkeln!
02.05.2019 - 09:44
![]() Sylvie Krammy wrote:
Sylvie Krammy wrote:
Was ist die Korrektur der 4. und 5. Runde. Bei mir stimmen die Maschen nicht. Könnt Ihr helfen? Liebe Grüße
01.05.2019 - 09:51
![]() Sylvie Krammy wrote:
Sylvie Krammy wrote:
Was ist die Korrektur der 4. und 5. Runde. Bei mir stimmen die Maschen nicht. Könnt Ihr helfen? Liebe Grüße
29.04.2019 - 21:49DROPS Design answered:
Liebe Frau Krammy, haben Sie das Diagram vor der Korrektur ausgedruckt? dann lieben sie nochmal drûcken. Bei 4. Runde häkeln Sie 6 feste maschen um jeden Luftmaschenbogen mit 1 Halbstäbchen oben in jede Doppelstäbchengruppe der 3. Runde. Bei 5. Runde häkeln Sie 1 feste Masche in jede Masche der Runde. Viel Spaß beim häkeln!
30.04.2019 - 10:13
|
||||||||||||||||||||||||||||||||||||||||||||||||||||
Ceramic Tiles#ceramictilesblanket |
||||||||||||||||||||||||||||||||||||||||||||||||||||
 |
 |
|||||||||||||||||||||||||||||||||||||||||||||||||||
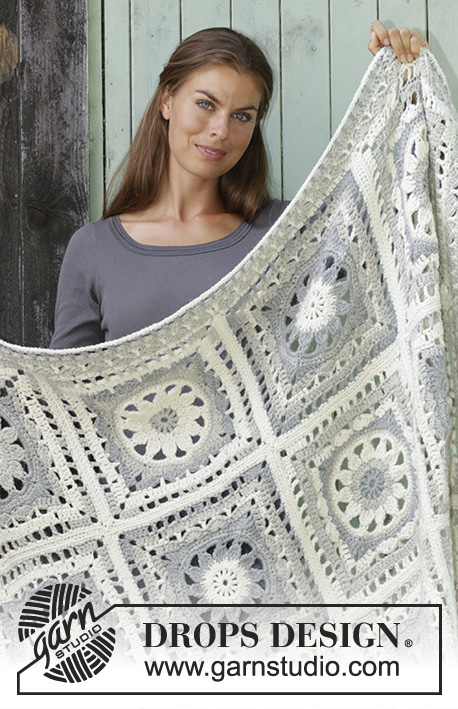
Crochet blanket with squares in DROPS Nepal.
DROPS 195-39 |
||||||||||||||||||||||||||||||||||||||||||||||||||||
|
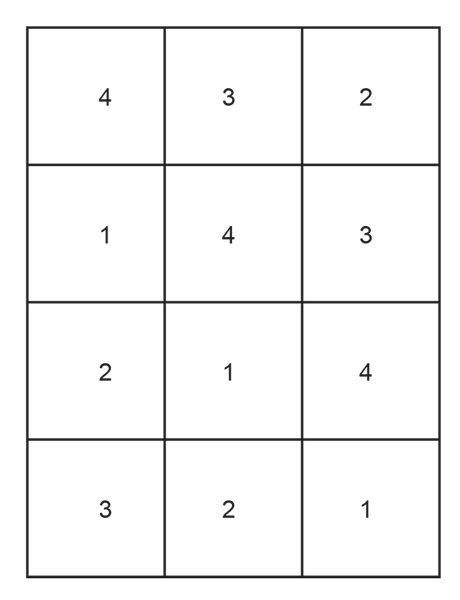
EXPLANATION FOR THE PATTERN: ---------------------------------------------------------- PATTERN: See diagrams A.1, A.2, A.3, A.4 and A.5. SQUARE COLOURS: Work 3 squares in every colour combination, at colour change work the last slip stitch on round with the colour on next round. Place the old yarn along the over side of stitches and work around this yarn a bit on next round before cutting the yarn. SQUARE 1: Round 1: grey Round 2: light grey Round 3: off white Round 4: off white Round 5: light grey Round 6: grey Round 7: off white Round 8: light grey Round 9: light grey Round 10: off white Round 11: off white SQUARE 2: Round 1: off white Round 2: light grey Round 3: light grey Round 4: grey Round 5: light grey Round 6: grey Round 7: light grey Round 8: off white Round 9: off white Round 10: light grey Round 11: off white SQUARE 3: Round 1: light grey Round 2: off white Round 3: off white Round 4: off white Round 5: light grey Round 6: light grey Round 7: grey Round 8: off white Round 9: off white Round 10: light grey Round 11: off white SQUARE 4: Round 1: off white Round 2: off white Round 3: grey Round 4: grey Round 5: light grey Round 6: grey Round 7: light grey Round 8: off white Round 9: light grey Round 10: grey Round 11: off white EDGE COLOUR: Switch colour for every round, at colour change work the last slip stitch on round with the colour on next round. Place the old yarn along the over side of stitches and work around this yarn a bit on next round before cutting the yarn. Work rounds in these colours: Round 1: light grey Round 2: off white Round 3: light grey Round 4: grey Round 5: off white CROCHET INFO (applies to diagram A.5): On 1st, 3rd and 4th round replace first symbol (3 chain stitches) with 6 chain stitches. These replace 3 chain stitches and last treble crochet on round. Therefore finish the round with 1 treble crochet less than shown in diagram A.5 and finish with 1 slip stitch in 3rd chain stitch at beginning of round. On 2nd and 5th round replace first symbol (3 chain stitches) with 4 chain stitches. These replace 3 chain stitches and last double crochet on round. Therefore finish the round with 1 double crochet less than shown in diagram A.5 and finish with 1 slip stitch in 1st chain stitch at beginning of round. ---------------------------------------------------------- START THE PIECE HERE: ---------------------------------------------------------- BLANKET - SHORT OVERVIEW OF THE PIECE: The blanket is made up of squares. Work the squares in 4 different colour combinations, when are squares are done, sew square together before crocheting an edge around the entire blanket. SQUARE: Begin with Nepal on hook size 5 mm and work SQAURE COLOURS – read explanation above and PATTERN according to diagram A.1. REMEMBER THE CROCHET TENSION! When all squares are done, there are 12 squares in total. ASSEMBLY: Place squares as shown on chart. Make sure they all lay with the right side up. Use off white and sew squares together edge to edge with one stitch in each stitch, make sure to make a flat seam. Fasten off. EDGE: Work 1 edge around the entire blanket. Work every round in different colours – read EDGE COLOURS above. Work according to diagram A.2, A.3, A.4 and A.5 as follows: Start with light grey and hook size 5 mm, begin in first corner on a short side on blanket. ** Work diagram A.2 over the first corner and the next 10 double crochets – read CROCHET INFO. Work A.3 over the next 30 double crochets (= 5 times), work A.4 in transition between squares and over the next 5 double crochets, * work A.3 over the next 36 double crochets (= 6 times), work A.4 in transition between squares and over the next 5 double crochets *, work A.3 over the next 24 double crochets (= 4 times), work A.5 over the next 11 double crochets and corner, work A.2 over the corner and the next 10 double crochets, work A.3 over the next 30 double crochets (= 5 times), work A.4 in transition between squares and over the next 5 double crochets, repeat from *-* 2 times in total, work A.3 over the next 24 double crochets (= 4 times), A.5 over the next 11 double crochets and corner **. 1 short side and 1 long side are now done. Repeat from **-** along the other 2 sides. When diagrams have been worked 1 time vertically, the edge is done. Fasten off. |
||||||||||||||||||||||||||||||||||||||||||||||||||||
Diagram explanations |
||||||||||||||||||||||||||||||||||||||||||||||||||||
|
||||||||||||||||||||||||||||||||||||||||||||||||||||

|
||||||||||||||||||||||||||||||||||||||||||||||||||||
|
||||||||||||||||||||||||||||||||||||||||||||||||||||
|
||||||||||||||||||||||||||||||||||||||||||||||||||||
Have you finished this pattern?Tag your pictures with #dropspattern #ceramictilesblanket or submit them to the #dropsfan gallery. Do you need help with this pattern?You'll find 13 tutorial videos, a Comments/Questions area and more by visiting the pattern on garnstudio.com. © 1982-2025 DROPS Design A/S. We reserve all rights. This document, including all its sub-sections, has copyrights. Read more about what you can do with our patterns at the bottom of each pattern on our site. |
||||||||||||||||||||||||||||||||||||||||||||||||||||


With over 40 years in knitting and crochet design, DROPS Design offers one of the most extensive collections of free patterns on the internet - translated to 17 languages. As of today we count 314 catalogues and 11820 patterns translated into English (UK/cm). 11820
We work hard to bring you the best knitting and crochet have to offer, inspiration and advice as well as great quality yarns at incredible prices! Would you like to use our patterns for other than personal use? You can read what you are allowed to do in the Copyright text at the bottom of all our patterns. Happy crafting!
Post a comment to pattern DROPS 195-39
We would love to hear what you have to say about this pattern!
If you want to leave a question, please make sure you select the correct category in the form below, to speed up the answering process. Required fields are marked *.