
Popular categories
Looking for a yarn?


|
|||||||||||||||||||||||||
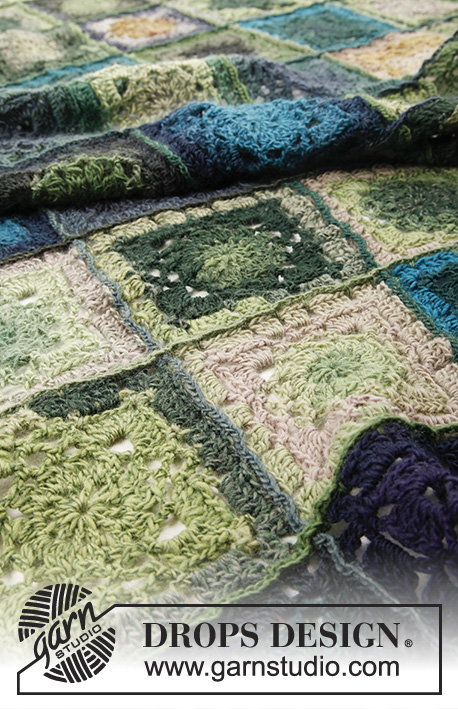
Nature Rules |
|||||||||||||||||||||||||
 |
 |
||||||||||||||||||||||||
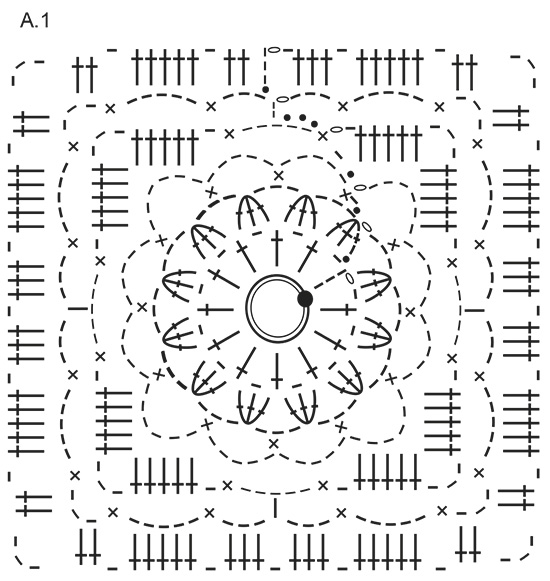
Crocheted blanket with squares in DROPS Delight.
DROPS 195-38 |
|||||||||||||||||||||||||
|
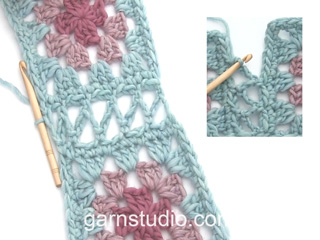
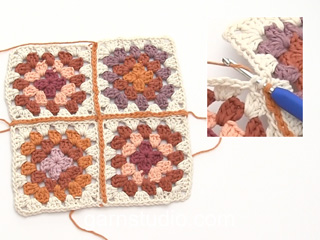
EXPLANATIONS FOR THE PATTERN: ------------------------------------------------------- PATTERN: See diagram A.1. WORK 3 TREBLE CROCHETS TOGETHER: Work 2 treble crochets around the chain stitch, but wait with the last yarn over and pull through on both of these treble crochets, work 1 more treble crochet in the same way and pull the last yarn over through all 4 loops on the hook. SQUARE COLOURS: Work 27 squares in green/beige (colour 08), 17 squares in green/blue (colour 16), 14 squares in beige/blue (colour 07) and 12 squares in turquoise/purple (colour 09). ------------------------------------------------------- START THE PIECE HERE: ------------------------------------------------------- BLANKET - SHORT OVERVIEW OF THE PIECE: The blanket consists of 70 squares in the different colours. When all the squares are finished, they are crocheted together. An edge is crocheted around the blanket to finish. SQUARE: Start with Delight and crochet hook size 4 mm and work SQUARE COLOURS – read description above and PATTERN according to diagram A.1. Fasten the strands as you go and REMEMBER THE CROCHET TENSION! Work a total of 70 squares. ASSEMBLY: Lay the squares out so that the colours are mixed in random and you like the combination. There should be 7 squares in width and 10 squares in height. The squares are crocheted together in rows, lengthwise, then these rows are worked together in width. Use hook size 4 mm and green/blue and work as follows: Lay 2 squares together, wrong side to wrong side. Work around both squares: * 1 double crochet around the corner, 4 chain stitches, skip 2 treble crochets and work 1 double crochet around the next chain stitch, work 6 chain stitches, skip 5 treble crochets, 1 double crochet around the next chain stitch, work 4 chain stitches, skip 3 treble crochets, 1 double crochet around the next chain stitch, work 4 chain stitches, skip 3 treble crochets, 1 double crochet around the next chain stitch, work 6 chain stitches, skip 5 treble crochets, 1 double crochet around the next chain stitch, work 4 chain stitches, skip 2 treble crochets, 1 double crochet around the corner, work 2 chain stitches, jump to corner on the next 2 squares *. Work from *-* until all squares on the row have been crocheted together, but at the end of the row work as far as the last corner and finish with 1 double crochet around the corner. Work all the rows together like this. Then work all the rows together in width in the same way. Cut and fasten the strands. EDGE: Using hook size 4 mm and green/blue, work one round around the whole blanket. Start in the one corner and work as follows: * 1 double crochet around the corner, work 2 chain stitches, skip 2 treble crochets, 1 double crochet around the next chain stitch, 5 chain stitches, skip 5 treble crochets, 1 double crochet around the next chain stitch, 3 chain stitches, skip 3 treble crochets, 1 double crochet around the next chain stitch, 3 chain stitches, skip 3 treble crochets, 1 double crochet around the next chain stitch, 5 chain stitches, skip 5 treble crochets, 1 double crochet around the next chain stitch, 2 chain stitches, skip 2 treble crochets, 1 double crochet around the next chain stitch (corner of square) *. Work 2 chain stitches and jump to the corner on the next square, work from *-* lengthwise as far as the next corner of the blanket. Around the corner work 1 double crochet and 2 chain stitches before working again from *-* onwards. When you have worked around the whole blanket, finish by working 1 double crochet around the corner you started on, work 2 chain stitches and 1 slip stitch in the first double crochet at the beginning of the round. Cut and fasten the strand. |
|||||||||||||||||||||||||
Diagram explanations |
|||||||||||||||||||||||||
|
|||||||||||||||||||||||||
|
|||||||||||||||||||||||||
|
Have you made this or any other of our designs? Tag your pictures in social media with #dropsdesign so we can see them! Do you need help with this pattern?You'll find tutorial videos, a Comments/Questions area and more by visiting the pattern on garnstudio.com. © 1982-2024 DROPS Design A/S. We reserve all rights. This document, including all its sub-sections, has copyrights. Read more about what you can do with our patterns at the bottom of each pattern on our site. |
|||||||||||||||||||||||||


With over 40 years in knitting and crochet design, DROPS Design offers one of the most extensive collections of free patterns on the internet - translated to 17 languages. As of today we count 304 catalogues and 11422 patterns - 11422 of which are translated into English (UK/cm).
We work hard to bring you the best knitting and crochet have to offer, inspiration and advice as well as great quality yarns at incredible prices! Would you like to use our patterns for other than personal use? You can read what you are allowed to do in the Copyright text at the bottom of all our patterns. Happy crafting!
Comments / Questions (12)
Hei, jeg har begynt å hekle på dette teppet, men skjønner ikke helt hvordan jeg skal hekle "HEKLE 3 STAVER SAMMEN". Jeg har lest forklaringen men det er fortsatt uklart. Jeg så videoen "Hvordan hekle 3 halvstaver sammen", men er usikker på om dette forklarer det samme? Gjør det det? Hvis ikke, hvordan hekler jeg "HEKLE 3 STAVER SAMMEN"? Takk for svar.
24.07.2023 - 11:59DROPS Design answered:
Hei Bendik Ta en titt på videoen: Hvordan hekle julekulen med relieffmønster i DROPS Extra 0-1589 og se på tidspunktet 01:39 – 02:13. Der ser du hvordan 3 staver hekles sammen. Mvh DROPS Design
27.07.2023 - 13:42Hello, I've just bought yarn to make the Nature Rules blanket by Drops Design. I've had a look at the pattern diagram but there does'nt seem to be a written pattern? I'm new to crochet and having trouble understanding the diagram. Are there any written instructions for this pattern? Kind regards Sara
13.09.2022 - 14:25DROPS Design answered:
Dear Sara, there is only a diagram to this pattern, but this lesson might help you understanding how to read crochet diagrams. Happy crocheting!
13.09.2022 - 16:16Hvor meget af grøn/blå farven skal cirka bruges til montering og kant?
09.04.2021 - 07:53DROPS Design answered:
Hej Marie, det kan jeg desværre ikke svare på... Håber du har nok :)
12.04.2021 - 14:50Hei, har heklet dette teppet men tenkte å hekle et til i en annen fargekombinasjon også, helst blått/ grønt/ grått. Forslag? Litt ‘ guttefarger’ hvis det er lov å si det.
21.11.2020 - 15:00DROPS Design answered:
Hei Livert. Farger er ganske personlig, anbefaler deg å se på fargekartet til DROPS delight og velg de fargene du syns er best. Du kan også ta en titt på andre tepper vi har i DROPS delight å se om det er noen fargesammensetninger du liker godt, f,eks DROPS Extra 0-1087, DROPS 136-32 eller BabyDROPS 20-22. mvh DROPS design
24.11.2020 - 14:33Hei, har heklet dette teppet nå, det ble nydelig, fine farger. Slet med få rutene store nok, brukte heklenål nr 4 og prøvde å hekle løst. Noe av årsaken er nok at garnet har ujevn tykkelse. Heklet derfor 88 ruter, ble nok garn, og teppet målte da ca 90x 125 cm.
21.11.2020 - 14:56Gostei muito de trabalhar com este fio. Sensacional.
30.08.2020 - 14:41Hei hvordan bestiller jeg garnet til dette pleddet?
02.04.2020 - 14:58Jeg klarer ikke å finne diagram A1
30.09.2018 - 21:54DROPS Design answered:
Hei Rikke. Diagrammet ligger helt nederst på siden. Vi har sjekket det og diagrammet er synlig på både pc og mobil. Gjelder det uansett hvaslags enhet du bruker? God fornøyelse.
01.10.2018 - 08:16E' la lavorata ad uncinetto non ai ferri. ^_^
14.08.2018 - 21:05DROPS Design answered:
Buongiorno Dea. Abbiamo corretto il testo. La ringraziamo per la segnalazione. Buon lavoro!
15.08.2018 - 21:34Underwater
20.07.2018 - 13:41