
Popular categories
Looking for a yarn?


Comments / Questions (42)
![]() Marielle wrote:
Marielle wrote:
Bonjour, J'aimerais tricoter ce gilet avec du fils Drops Andes dans une seule couleur, pouvez-vous me dire quelle quantité de fils est nécessaire pour une taille L ? Merci
08.04.2018 - 10:24DROPS Design answered:
Bonjour Marielle, nous estimons la quantité nécessaire en Brushed Alpaca Silk à environ 175-175-200-225-225-250 g pour un gilet uni. Calculez ici la quantité nécessaire en Andes. Bon tricot!
09.04.2018 - 13:30
![]() Patricia wrote:
Patricia wrote:
Bonjour, je suis entrain de faire ce magnifique gilet mais je n'arrive pas au même résultat au niveau de l'encolure. Il semble qu'il y ait une bordure corail autour de l'encolure. Pouvez vous m'éclairer ? Merci
01.04.2018 - 11:50DROPS Design answered:
Bonjour Patricia, nous avons transmis la question à nos stylistes qui vont vérifier les explications, merci d'avance pour votre patience. Bon tricot!
03.04.2018 - 08:44
![]() HILLION NICOLE wrote:
HILLION NICOLE wrote:
Bonjour, Pourriez-vous me dire combien de pelotes de laines faut-il pour Le gilet RED BERRY HILL taille L car ce n'est pas indiqué. Merci Mme HILLION Nicole
28.03.2018 - 10:46DROPS Design answered:
Bonjour Mme Hillion, vous trouverez la quantité nécessaire, au poids, pour chaque taille sous l'en-tête, soit en taille L: 75 g col. 0, 75 g col. 06 etc... 1 pelote Brushed Alpaca Silk = 25 g. Divisez le poids indiqué pour chaque couleur par 25 g, soit par ex 75/25 = 3 pelotes en col. 04, 3 pelotes en col. 06, 2 pelotes en col. 18 et 1 pelote en col. 07, 09 et 15. Bon tricot!
28.03.2018 - 15:55
![]() Annie wrote:
Annie wrote:
Je me suis mal exprimée dans ma question précédente. Sur la photo, je vois autour de l'encolure 4 rangs au point mousse tricotées à partir de mailles relevées sur le bord. Je ne retrouve pas ceci dans les explications. Combien de mailles faut-il relever à l'encolure sur chaque demi-devant et demi-dos ? Mis à part ce détail les explications sont très claires.
13.03.2018 - 20:35DROPS Design answered:
Bonjour Annie, les explications du col ont été ajoutées, merci. Bon tricot!
09.04.2018 - 12:01
![]() Annie wrote:
Annie wrote:
Bonjour, Je tricote ce magnifique gilet et je ne comprends pas comment avec les explications données on pourrait obtenir le résultat de la photo au niveau de l'encolure. En effet on voit une bordure corail sur les rayures comme lorsque l'on reprend les mailles sur le bord pour tricoter en travers. Ce n'est pas ce que je comprends en lisant les explications. Je vous remercie de m'éclaircir sur ce point.
13.03.2018 - 11:01DROPS Design answered:
Bonjour Annie, il faut tricoter à partir de la manche (cf flèches dans le schéma) tout en suivant les rayures, on termine avec 2 fils corail dans les 2 parties, en même temps, augmentez pour les manches et le devant & le dos de chaque côté. Pensez à bien vérifier votre tension pour que le nombre de rangs en hauteur corresponde bien aux rayures. Bon tricot!
13.03.2018 - 13:17
![]() Francine wrote:
Francine wrote:
Vraiment très très joli! Je guette avec impatience les explications!!! Quand seront-elles disponibles? Merciiiii!!!
22.02.2018 - 10:14DROPS Design answered:
Bonjour Francine, probablement très bientôt, revenez vite! Bon tricot!
22.02.2018 - 13:22
![]() Christine Letertre wrote:
Christine Letertre wrote:
J'adore! Quand les explications seront-elles disponibles?
27.01.2018 - 20:10
![]() Nicole wrote:
Nicole wrote:
Celui là, il me le faut !
22.01.2018 - 23:17
![]() Sylvie wrote:
Sylvie wrote:
Tricoter autrement, d'un poignet à l'autre, très intéressant !
13.12.2017 - 11:54
![]() Mieke wrote:
Mieke wrote:
I like the pattern and the yarn nice to work with
12.12.2017 - 12:52
|
|||||||
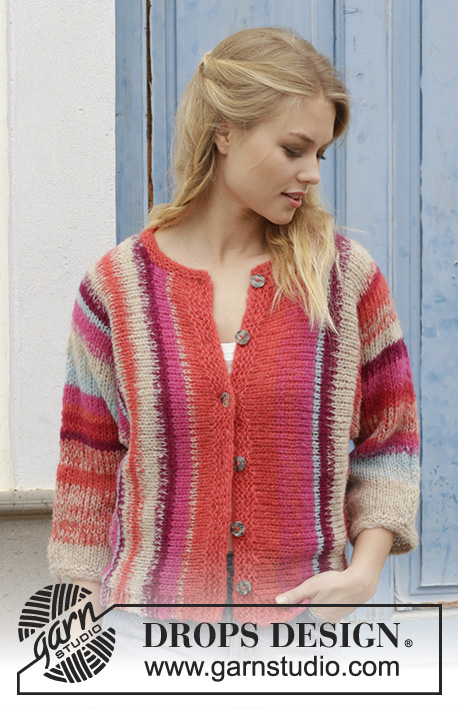
Red Berry Hill#redberryhillcardigan |
|||||||
 |
 |
||||||
Knitted jacket with stripes, worked sideways. Sizes S - XXXL. The piece is worked in 2 strands Brushed Alpaca Silk.
DROPS 187-18 |
|||||||
|
INFORMATION FOR THE PATTERN: RIDGE/GARTER STITCH (worked back and forth): 1 ridge = Knit 2 rows. STRIPES (right sleeve, front and back pieces): STRIPE 1: Work with 2 strands light beige until the piece measures 6-7-8-8-9-9 cm from the cast-on edge. Then work stripes as follows: ROWS 1-4: 1 strand light beige + 1 strand light sea green. ROWS 5-8: 2 strands light sea green. ROWS 9-10: 1 strand light sea green + 1 strand cerise. ROWS 11-12: 2 strands cerise. ROWS 13-14: 1 strand cerise + 1 strand coral. ROWS 15-22: 2 strands coral. ROWS 23-30: 1 strand coral + 1 strand light beige. ROWS 31-32: 1 strand coral + 1 strand red. ROWS 33-34: 2 strands red. ROWS 35-36: 1 strand red + 1 strand cerise. ROWS 37-40: 2 strands cerise. ROWS 41-42: 1 strand cerise + 1 strand purple. ROWS 43-44.: 2 strands purple. ROWS 45-48: 2 strands light beige. ROWS 49-54: 1 strand light beige + 1 strand coral. ROWS 55-58: 2 strands coral . ROWS 59-60: 2 strands red. ROWS 61-62: 1 strand coral + 1 strand light beige. ROWS 63-68: 2 strands light beige. ROWS 69-70: 1 strand beige + 1 strand purple. ROWS 71-72: 2 strands purple. ROWS 73-74: 2 strands light sea green. ROWS 75-78: 2 strands cerise. ROWS 79-84: 1 strand cerise + 1 strand coral. Then work with 2 strands coral to finished length. STRIPES (left sleeve, front and back pieces): STRIPE 1: Work with 2 strands light beige until the piece measures 4-5-6-6-7-7 cm from the cast-on edge. Then work stripes as follows: ROWS 1-21: 1 strand light beige + 1 strand coral. ROWS 22-25: 2 strands coral. ROWS 26-31: 1 strand coral + 1 strand light beige. ROWS 32-33: 2 strands purple. ROWS 34-35: 1 strand coral + 1 strand red. ROWS 36-37: 2 strands red. ROWS 38-39: 2 strands coral. ROWS 40-43: 2 strands cerise. ROWS 44-47: 2 strands light sea green. ROWS 48-51: 1 strand light sea green + 1 strand light beige. ROWS 52-55: 2 strands light beige. ROWS 56-57: 1 strand light beige + 1 strand cerise. ROWS 58-61: 2 strands cerise. ROWS 62-63: 2 strands light sea green. ROWS 64-65: 2 strands purple. ROWS 66-67: 1 strand purple + 1 strand light beige. ROWS 68-69: 2 strands light beige. ROWS 70-71: 1 strand light beige + 1 strand coral. ROWS 72-73: 2 strands coral. ROWS 74-75: 1 strand coral + 1 strand light beige. ROWS 76-79: 2 strands light beige. ROWS 80-81: 1 strand light beige + 1 strand purple. ROWS 82-83: 2 strands purple. ROWS 84-86: 2 strands cerise. ROWS 87-88: 1 strand coral + 1 strand light beige. Then work with 2 strands coral to finished length (= approx. 3-3-3-4-4-5 cm + 2 ridges on back piece and 4 ridges on front piece). ---------------------------------------------------------- JACKET: The piece is worked back and forth with circular needle. The 2 parts are worked sideways from the sleeves towards mid back/front. The jacket is sewn together mid back. The whole piece is worked in 2 strands Brushed Alpaca Silk. RIGHT SLEEVE, FRONT AND BACK PIECE: Cast on 36-38-38-40-42-42 stitches with circular needle size 7 mm and 2 strands light beige. Work 2 RIDGES – see description above. Then work stocking stitch with 1 edge stitch in garter stitch in each side and work STRIPES (right sleeve, front and back pieces) – see description above. REMEMBER THE KNITTING TENSION! AT THE SAME TIME when the piece measures 11-11-10-10-10-9 cm cast on new stitches at the end of each row in each side as follows: Cast on 1 stitch every 6th row 6-5-5-4-3-2 times, 1 stitch every 2nd row 7-9-9-11-13-14 times and 31-32-34-35-35-37 stitches 1 time = 124-130-134-140-144-148 stitches. The piece measures approx. 40-39-38-36-35-32 cm. Insert a marker thread here. THE PIECE IS NOW MEASURED FROM HERE! Continue stripes, stocking stitch and 4 stitches garter stitch in each side (= bottom of body on front and back pieces). When the piece measures 14-16-17-20-21-25 cm work the next row from the right side as follows: 4 stitches garter stitch, 52-55-56-59-60-62 stitches stocking stitch, place these 56-59-60-63-64-66 stitches for the front piece on a thread, cast off the next 9-9-10-10-11-11 stitches (= 6-6-7-7-8-8 stitches for neck on front piece and 3 stitches for neck on back piece), work stocking stitch over the next 55-58-60-63-65-67 stitches, 4 stitches garter stitch. There are now 59-62-64-67-69-71 stitches for the back piece. RIGHT BACK PIECE: = 59-62-64-67-69-71 stitches. Continue with stripes, stocking stitch and 1 edge stitch garter stitch towards the neck and 4 stitches garter stitch towards the bottom edge as before. On the next row from the neck cast off 1 stitch = 58-61-63-66-68-70 stitches. When the piece measures 22-24-26-29-31-35 cm from the marker thread work 2 ridges over all stitches on the row. The piece measures a total of 64-65-66-67-68-69 cm from the cast on edge on the sleeve. Cast off. To avoid the cast-off edge being tight, you can make 1 yarn over after approx. every 5th stitch. The yarn over is cast off as a normal stitch. RIGHT FRONT PIECE: = 56-59-60-63-64-66 stitches. Start from the wrong side (by the neck) and continue with stripes, stocking stitch, 1 edge stitch garter stitch towards the neck and 4 stitches garter stitch towards the bottom edge as before, AT THE SAME TIME cast off stitches every row from the neck as follows: Cast off 2 stitches 1 time and 1 stitch 2 times = 52-55-56-59-60-62 stitches. When the piece measures 22-24-26-29-31-35 cm work 2 ridges over all stitches on the row. Then work buttonholes as follows: ROW 1 (right side): Knit 8-6-7-5-6-8 stitches, * knit 2 together, 1 yarn over, knit 6-7-7-8-8-8 stitches *, work from *-* a total of 5 times, knit 2 together, 1 yarn over, knit 2 stitches. ROW 2: Knit all stitches and yarn overs. Work 1 ridge. The piece measures 26-28-30-33-35-39 cm (= a total of 66-67-68-69-70-71 cm from the cast on edge on the sleeve). Cast off. To avoid the cast-off edge being tight, you can make 1 yarn over after approx. every 5th stitch. The yarn over is cast off as a normal stitch. LEFT SLEEVE, FRONT AND BACK PIECES: Cast on 36-38-38-40-42-42 stitches with circular needle size 7 mm and 2 strands light beige. Work 2 ridges. Then work stocking stitch with 1 edge stitch in garter stitch in each side and work STRIPES (left sleeve, front and back pieces) – see description above. AT THE SAME TIME when the piece measures 11-11-10-10-10-9 cm cast on stitches at the end of the row in each side as follows: Cast on 1 stitch every 6th row 6-5-5-4-3-2 times, 1 stitch every 2nd row 7-9-9-11-13-14 times and 31-32-34-35-35-37 stitches 1 time = 124-130-134-140-144-148 stitches. The piece measures approx. 40-39-38-36-35-32 cm. Insert a marker thread here. THE PIECE IS NOW MEASURED FROM HERE! Continue with stripes, stocking stitch and 4 stitches garter stitch in each side (= bottom of body on front and back pieces). When the piece measures 14-16-17-20-21-25 cm work the next row from the right side as follows: 4 stitches garter stitch, 55-58-60-63-65-67 stitches stocking stitch, place these 59-62-64-67-69-70 stitches on a thread for back piece, cast off the next 9-9-10-10-11-11 stitches (= 3 stitches for neck on back piece and 6-6-7-7-8-8 stitches for neck on front piece), 52-55-56-59-60-62 stitches stocking stitch, 4 stitches garter stitch. There are now 56-59-60-63-64-66 stitches for front piece. LEFT FRONT PIECE: = 56-59-60-63-64-66 stitches. Continue with stripes, stocking stitch, 1 edge stitch garter stitch towards the neck and 4 stitches garter stitch towards bottom edge as before, AT THE SAME TIME cast off stitches on each row from the neck as follows: Cast off 2 stitches 1 time and 1 stitch 2 times = 52-55-56-59-60-62 stitches. When the piece measures 22-24-26-29-31-35 cm work 4 ridges over all stitches on the row. The piece measures 26-28-30-33-35-39 cm (= a total of 66-67-68-69-70-71 cm from the cast on edge on the sleeve). Cast off. To avoid the cast-off edge being tight, you can make 1 yarn over after approx. every 5th stitch. The yarn over is cast off as a normal stitch. LEFT BACK PIECE: = 59-62-64-67-69-71 stitches. Start from the wrong side (at the neck) and continue with stripes, stocking stitch, 1 edge stitch garter stitch towards the neck and 4 stitches garter stitch towards the bottom edge as before. On the next row from the neck cast off 1 stitch = 58-61-63-66-68-70 stitches. When the piece measures 22-24-26-29-31-35 cm work 2 ridges over all stitches on the row. The piece measures 64-65-66-67-68-69 cm from the cast-on edge on the sleeve. Cast off. To avoid the cast-off edge being tight, you can make 1 yarn over after approx. every 5th stitch. The yarn over is cast off as a normal stitch. ASSEMBLY: Sew the seam mid back inside the cast-off edge on each of the back pieces. Sew the seam under the sleeve and the side seam inside the 1 edge stitch in garter stitch/outermost stitch. Make sure the seam is not tight! Repeat on the other side. Sew buttons onto left band. NECK EDGE: Knit up 54-54-60-60-68-68 stitches from the right side of piece with circular needle size 7 with 2 strands coral. Work 2 ridges back and forth. Cast off with knit. To avoid a tight cast off, make a yarn over after approx. every 5th stitch. The yarn overs should be cast off as a stitch. |
|||||||
Diagram explanations |
|||||||
|
|||||||

|
|||||||
Have you finished this pattern?Tag your pictures with #dropspattern #redberryhillcardigan or submit them to the #dropsfan gallery. Do you need help with this pattern?You'll find 26 tutorial videos, a Comments/Questions area and more by visiting the pattern on garnstudio.com. © 1982-2025 DROPS Design A/S. We reserve all rights. This document, including all its sub-sections, has copyrights. Read more about what you can do with our patterns at the bottom of each pattern on our site. |
|||||||


With over 40 years in knitting and crochet design, DROPS Design offers one of the most extensive collections of free patterns on the internet - translated to 17 languages. As of today we count 314 catalogues and 11821 patterns translated into English (UK/cm). 11821
We work hard to bring you the best knitting and crochet have to offer, inspiration and advice as well as great quality yarns at incredible prices! Would you like to use our patterns for other than personal use? You can read what you are allowed to do in the Copyright text at the bottom of all our patterns. Happy crafting!
Post a comment to pattern DROPS 187-18
We would love to hear what you have to say about this pattern!
If you want to leave a question, please make sure you select the correct category in the form below, to speed up the answering process. Required fields are marked *.