
Popular categories
Looking for a yarn?


Comments / Questions (31)
![]() Edith PEDERSEN wrote:
Edith PEDERSEN wrote:
JEG VIL LIGE SIGE MANGE GANGE TAK FOR JERSE SPØRSMÅL SOM JEG HAR FÅET FRA JER OG JEG VIL UNDSKYLDE ALLE DE SPØRSMÅL JER HSR SENDT FOR DET VAR MIG SELV DER IKKE HAR TALT RIGTIG I MØNSTERET UNDSKYLD HILSEN EDITH
06.04.2022 - 19:36
![]() Edith PEDERSEN wrote:
Edith PEDERSEN wrote:
Jeg strikke str l-xl i 3 rakke hvor der tages en maske løs maske af og tag en maske over i 5 rækker mønster nr 183-22 hilsen edith
04.04.2022 - 15:43
![]() Edith wrote:
Edith wrote:
Jer syntes at der er en maske for meget i 4 rækker
04.04.2022 - 14:56
![]() EDITH PEDERSEN wrote:
EDITH PEDERSEN wrote:
Er der fejl i denne opskrift da jeg ikke få fejre række i mønstret til at passe opskriften er 183-22 på forhånd TAK
03.04.2022 - 17:08DROPS Design answered:
Hej Edith, nej det skal det ikke være. Hvilken størrelse strikker du, hvor mange masker har du og hvor er du i opskriften, så skal vi prøve at hjælpe dig :)
04.04.2022 - 11:21
![]() Edith PEDERSEN wrote:
Edith PEDERSEN wrote:
Begynde jeg med mønster med 14 maske eller med 34 maske
19.03.2022 - 09:41
![]() Edith PEDERSEN wrote:
Edith PEDERSEN wrote:
Hvor skal man begynde på mønster fra jeg kan ikke på den til at passe
19.03.2022 - 09:37DROPS Design answered:
Hei Edit. Du starter digrammet nederst til høyre (14 masker). Usikker på hvordan man leser et strikkediagram se her: Hvordan læses strikkediagrammer Om du fremdeles har problemer, legget et nytt spørsmål under oppskriften (husk å oppgi hvilken str. du strikker) mvh DROPS Design
21.03.2022 - 08:58
![]() Elena D'Amato wrote:
Elena D'Amato wrote:
Sto lavorando il raglan, misura M. C'è scritto "alla fine di tutti gli aumenti, lavorare 10 ferri del motivo come prima senza aumenti per il raglan. Il lavoro misura circa 25 cm. Io ne ho lavorato 14 e misura ancora 23 cm. Cosa comporta se lavoro ferri in più?
15.01.2022 - 20:43DROPS Design answered:
Buonasera Elena, se lavora più ferri rischia che il motivo non combaci in seguito. All'inizio del lavoro il suo campione corrispondeva a quello indicato? Può provare a portare alla misura corretta il lavoro durante il bloccaggio oppure lavorare fino a 20 ferri senza aumenti. Buon lavoro!
15.01.2022 - 22:39
![]() Monika wrote:
Monika wrote:
Ich habe die Jacke aus Drops Nord gestrickt und bin mit dem Ergebnis sehr zufrieden. Danke für die guten Anleitungen.
04.09.2021 - 20:12
![]() Loli wrote:
Loli wrote:
Hola, una duda que tengo es que dice montar 132 puntos del canesu y entre( parentesis incluyendo los del borde), lo que no se, es hay que montar los 132 mas 8 puntos que pone o ya estan incuidos en los 132 gracias
07.08.2020 - 18:14
![]() Christel Krieger wrote:
Christel Krieger wrote:
Frage zur Passe: Modell fl-011 (Elise Jacket) Die Zunahem von Raglan und Diagramm A2 und A3 sind 376 Maschen wie komme ich auf 436 Maschen zur Gr. XL
06.01.2020 - 06:53DROPS Design answered:
Liebe Frau Krieger, es wird 8 Maschen pro Zunahmenreihe zugenommen: 140 Maschen + (8 Maschen x 37) = 436 Maschen. Viel Spaß beim stricken!
06.01.2020 - 09:40
|
||||||||||||||||||||||
Für Elise Jacket#furelisejacket |
||||||||||||||||||||||
 |
 |
|||||||||||||||||||||
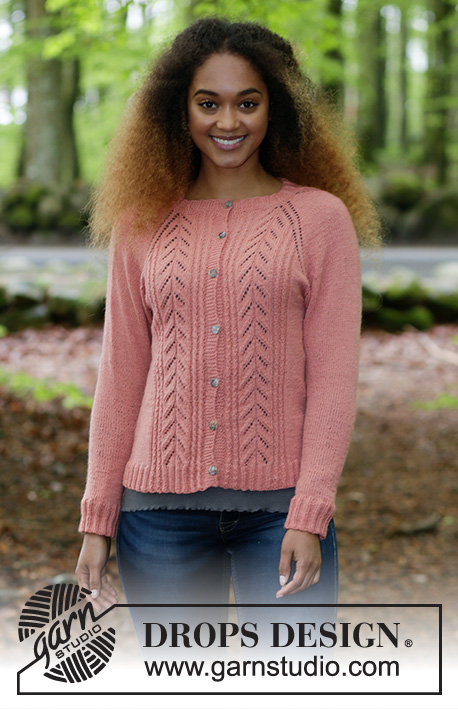
Knitted jacket with lace pattern, small cables and raglan, worked top down. Sizes S - XXXL. The piece is worked in DROPS Flora.
DROPS 183-22 |
||||||||||||||||||||||
|
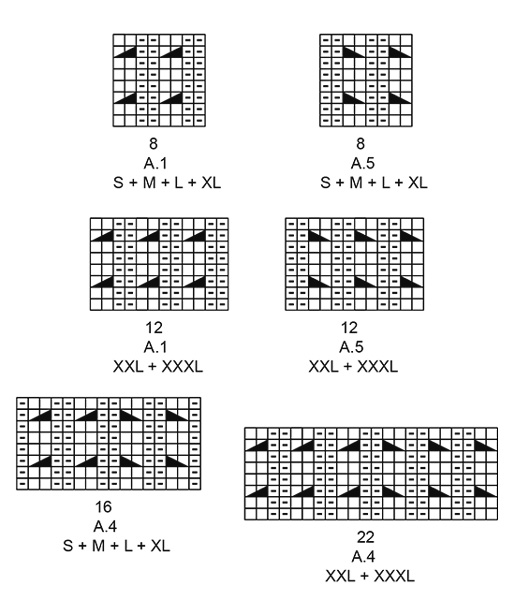
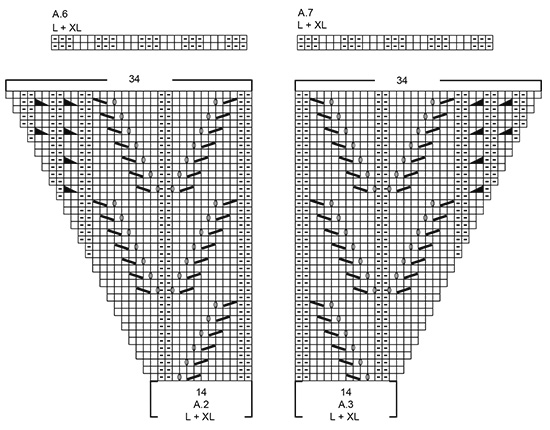
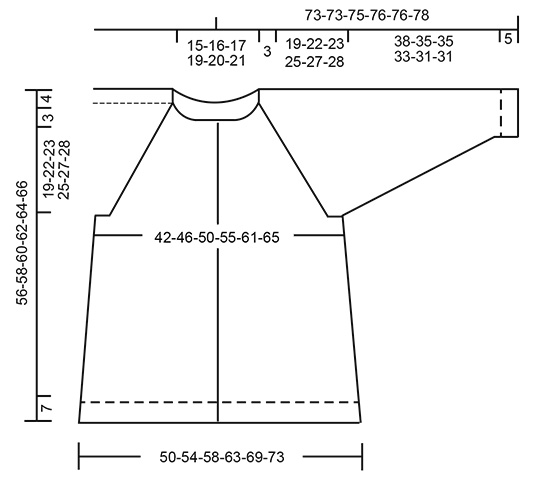
INFORMATION FOR THE PATTERN: RIDGE/GARTER STITCH (worked back and forth): 1 ridge = Knit 2 rows. DECREASE/INCREASE TIP (evenly spaced): To work out how to decrease/increase evenly, count the total number of stitches on needle (e.g. 132 stitches), minus the bands (e.g. 10 stitches) and divide by the number of decreases/increases to be made (e.g. 12) = 10.1. In this example, decrease by knitting together approx. every 9th and 10th stitch. Do not decrease over the bands. When increasing, make 1 yarn over after approx. every 10th stitch (on next row knit the yarn overs twisted to avoid holes). PATTERN: See diagrams A.1 to A.7. Choose diagram for your size! The diagrams show all rows in the pattern seen from the right side. RAGLAN: All increases are worked from the right side! Increase raglan in each transition between body and sleeves. Increase as follows: Work as far as 1 stitch before marker thread, 1 yarn over, 2 stitches stocking stitch (marker thread sits in the middle of these 2 stitches), 1 yarn over. Repeat at each of the remaining transitions between body and sleeves (= 8 stitches increased on row). On the next row (from wrong side) purl yarn overs so that there are holes. Then work the new stitches on the front and back pieces into the pattern A.2/A.3. The new stitches on the sleeves are worked in stocking stitch. INCREASE TIP (for sides of body): Start 5 stitches before marker thread, make 1 yarn over, knit 10 stitches (marker thread sits in the middle of these 10 stitches), make 1 yarn over (= 2 stitches increased). On the next row purl the yarn overs twisted to avoid holes. DECREASE TIP (for mid under sleeve): Start 3 stitches before marker thread, knit 2 together, knit 2 (marker thread sits in the middle of these 2 stitches), slip 1 stitch as if to knit, knit 1, pass the slipped stitch over the knitted stitch (= 2 stitches decreased). BUTTONHOLES: Work buttonholes on right band (when garment is worn): Work from the right side until there are 3 stitches left at end of row, make 1 yarn over, knit together the next 2 stitches and knit 1. On the next row, knit the yarn over to leave a hole. The first buttonhole is worked when the rib on the neck measures approx. 2 cm. Then work the remaining 6-6-7-7-8-8 buttonholes with approx. 8-8-7½-7½-7-7 cm between each. ---------------------------------------------------------- JACKET: The piece is worked back and forth with circular needle. It is worked top down. The sleeves are worked in the round with double pointed needles. YOKE: Cast on 132-137-142-147-152-157 stitches (including 5 band stitches in each side towards mid front) with circular needle size 2.5 mm and Flora. Purl 1 row from the wrong side. The next row is worked as follows from the right side: 5 band stitches in GARTER STITCH – see description above, * knit 2, purl 3 *, repeat from *-* until there are 7 stitches left on row, knit 2 and finish with 5 band stitches in garter stitch. Continue the rib in this way - remember BUTTONHOLE on right band – see description above. When the rib measures 3 cm knit 1 row from the right side where you decrease 12-13-12-11-10-9 stitches evenly on row – read DECREASE/INCREASE TIP = 120-124-130-136-142-148 stitches. Knit 1 row from wrong side. Work 1 row from right side where you increase as follows: 5 band stitches in garter stitch, knit 26-28-28-31-28-31 stitches, * knit 1, 1 yarn over *, work from *-* a total of 4-2-5-2-10-7 times, knit 50-54-54-60-56-62 stitches, * knit 1, 1 yarn over *, work from *-* a total of 4-2-5-2-10-7 times, knit 26-28-28-31-28-31 stitches, 5 band stitches in garter stitch = 128-128-140-140-162-162 stitches on row. Knit 1 row from wrong side where all yarn overs are knitted twisted to avoid holes. REMEMBER THE KNITTING TENSION! Change to circular needle size 3 mm and work PATTERN – see description above, from the right side: 5 band stitches in garter stitch, A.1 (= 8-8-8-8-12-12 stitches), A.2 (= 11-11-14-14-16-16 stitches), 1 yarn over, 2 stitches stocking stitch and insert a marker thread in the middle of these 2 stitches (= 1 stitch stocking stitch on each side of the marker thread), 1 yarn over, 17 stitches stocking stitch (= sleeve), 1 yarn over, 2 stitches stocking stitch and insert a marker thread in the middle of these 2 stitches (= 1 stitch stocking stitch on each side of the marker thread), 1 yarn over, A.3 (= 11-11-14-14-16-16 stitches), A.4 (= 16-16-16-16-22-22 stitches), A.2, 1 yarn over, 2 stitches stocking stitch and insert a marker thread in the middle of these 2 stitches (= 1 stitch stocking stitch on each side of the marker thread),1 yarn over, 17 stitches stocking stitch (= sleeve), 1 yarn over, 2 stitches stocking stitch and insert a marker thread in the middle of these 2 stitches (= 1 stitch stocking stitch on each side of the marker thread), 1 yarn over, A.3, A.5 (= 8-8-8-8-12-12 stitches), 5 band stitches in garter stitch. Work 1 row back in the same way (= 2nd row in diagrams), the yarn overs in each transition between body and sleeves are purled to leave holes. The first increases to raglan are now finished (= 8 stitches increased). Continue the pattern in this way and increase to RAGLAN – see description above. Increase like this every 2nd row (= each row from the right side) a total of 26-30-31-37-38-42 times = 336-368-388-436-466-498 stitches. NOTE: When A.2/A.3 has been completed in height, work the new increased stitches in each raglan in stocking stitch. The pattern in A.2/A.3 continues in height as before, i.e. the last 10-10-14-14-16-16 rows in diagram A.2/A.3 are repeated in height – NOTE!: The 2-2-2-2-3-3 cables in the diagrams are worked every 4th row to finished length. When all increases are finished, work 8-10-12-6-10-6 rows of pattern as before without increasing to raglan. The piece measures approx. 22-25-26-28-30-31 cm. The next row is worked as follows from the wrong side: Work the first 51-55-59-65-72-76 stitches (= right front piece), place the next 71-79-81-93-95-103 stitches on a thread (= sleeve), cast on 8-10-12-12-14-16 new stitches mid under sleeve, work the next 92-100-108-120-132-140 stitches (= back piece), place the next 71-79-81-93-95-103 stitches on a thread (= sleeve), cast on 8-10-12-12-14-16 new stitches mid under sleeve, work the remaining 51-55-59-65-72-76 stitches (= left front piece). Body and sleeves are finished separately. THE PIECE IS NOW MEASURED FROM HERE! BODY: = 210-230-250-274-304-324 stitches. Insert a marker thread after 55-60-65-71-79-84 stitches in each side (= 100-110-120-132-146-156 stitches on back piece). Continue back and forth with pattern, stocking stitch and 5 band stitches in garter stitch in each side towards mid front. Work stocking stitch over the new stitches cast on in each side. When piece measures 4 cm increase 2 stitches in each side (= 4 stitches increased on row) – read INCREASE TIP. Increase in this way every 6th round 10 times = 250-270-290-314-344-364 stitches. When piece measures 23-22-23-23-23-24 cm change to circular needle size 2.5 mm. The next row from the right side is worked as follows: 5 band stitches in garter stitch, work pattern as before over the next 39-39-42-42-51-51 stitches AT THE SAME TIME as all purl 2 are increased to purl 3 (= 7-7-7-7-8-8 stitches increased), work the next 42-52-56-68-66-76 stitches AT THE SAME TIME as you increase 19-19-27-25-31-31 stitches evenly over these stitches, work pattern as before over the next 78-78-84-84-100-100 stitches AT THE SAME TIME as all purl 2 are increased to purl 3 (= 11-11-11-11-15-15 stitches increased), work the next 42-52-56-68-66-76 stitches AT THE SAME TIME as you increase 19-19-27-25-31-31 stitches evenly over these stitches, work pattern as before over the next 39-39-42-42-51-51 stitches AT THE SAME TIME as all purl 2 are increased to purl 3 (= 7-7-7-7-8-8 stitches increased), finish with 5 band stitches in garter stitch = 313-335-371-391-437-457 stitches. Now work rib as follows: 5 band stitches in garter stitch, work rib with (purl 3 /2 cable stitches) as before over the next 10-10-10-10-15-15 stitches, A.6 (= 23-23-27-27-29-29 stitches), work (2 cable stitches/purl 3) as before over the next 10-10-10-10-15-15 stitches, continue with (knit 2 /purl 3) over the next 67-77-87-97-97-107 stitches, work (purl 3 /2 cable stitches) as before over the next 10-10-10-10-15-15 stitches, A.7 (= 23-23-27-27-29-29 stitches), purl over purl and cable over cable over the next 19-19-19-19-27-27 stitches, A.6, work (2 cable stitches/purl 3) as before over the next 10-10-10-10-15-15 stitches, continue with (knit 2 /purl 3) over the next 67-77-87-97-97-107 stitches, work (purl 3 /2 cable stitches) as before over the next 10-10-10-10-15-15 stitches, A.7, work (2 cable stitches/ purl 3) as before over the next 10-10-10-10-15-15 stitches, finish with 5 band stitches in garter stitch. Continue in this way until the rib measures 7 cm. Cast off with knit over knit and purl over purl. To avoid a tight cast-off edge you can cast off with a size larger needle. SLEEVE: Place the 71-79-81-93-95-103 stitches from the thread on double pointed needles size 3 mm and, in addition, knit up 1 stitch in each of the 8-10-12-12-14-16 new stitches cast on under the sleeve = 79-89-93-105-109-119 stitches. Insert a marker thread in the middle of the new stitches cast on under the sleeve (= 4-5-6-6-7-8 new stitches on each side of the marker thread). The start of the round is mid under sleeve. Work stocking stitch in the round. When the piece measures 4 cm decrease 1 stitch on each side of the marker thread under the sleeve - read DECREASE TIP-2. Decrease in this way every 8th-5th-5th-3rd-3rd-3rd round a total of 13-18-19-24-25-28 times = 53-53-55-57-59-63 stitches. Continue with stocking stitch until the sleeve measures 38-35-35-33-31-31 cm (shorter measurements in larger sizes because of broader shoulders). Work 1 round where you increase 12-12-15-13-11-12 stitches evenly on round = 65-65-70-70-70-75 stitches. Work rib (knit 2 /purl 3). When the rib measures 5 cm cast off with knit over knit and purl over purl. To avoid a tight cast-off edge you can cast off with a size larger needle. The sleeve measures 43-40-40-38-36-36 cm. Work the other sleeve in the same way. |
||||||||||||||||||||||
Diagram explanations |
||||||||||||||||||||||
|
||||||||||||||||||||||
|
||||||||||||||||||||||

|
||||||||||||||||||||||
|
||||||||||||||||||||||

|
||||||||||||||||||||||
|
||||||||||||||||||||||
Have you finished this pattern?Tag your pictures with #dropspattern #furelisejacket or submit them to the #dropsfan gallery. Do you need help with this pattern?You'll find 28 tutorial videos, a Comments/Questions area and more by visiting the pattern on garnstudio.com. © 1982-2025 DROPS Design A/S. We reserve all rights. This document, including all its sub-sections, has copyrights. Read more about what you can do with our patterns at the bottom of each pattern on our site. |
||||||||||||||||||||||


With over 40 years in knitting and crochet design, DROPS Design offers one of the most extensive collections of free patterns on the internet - translated to 17 languages. As of today we count 314 catalogues and 11821 patterns translated into English (UK/cm). 11821
We work hard to bring you the best knitting and crochet have to offer, inspiration and advice as well as great quality yarns at incredible prices! Would you like to use our patterns for other than personal use? You can read what you are allowed to do in the Copyright text at the bottom of all our patterns. Happy crafting!
Post a comment to pattern DROPS 183-22
We would love to hear what you have to say about this pattern!
If you want to leave a question, please make sure you select the correct category in the form below, to speed up the answering process. Required fields are marked *.