
Popular categories
Looking for a yarn?


Comments / Questions (13)
![]() Kari wrote:
Kari wrote:
Takk for svar ang. Lotta tunika. Hvis jeg ikke skal ha mønster hvordan øker jeg for å få 252 masker, når jeg har 105. Er det på hver pinne jeg øker, hvor mange, eller? Beklager at jeg ikke skjønner, men håper på en forklaring. MVH Kari nordstrand
24.06.2018 - 21:10DROPS Design answered:
Hei Kari, Du kan følge økningene i A.1 uten å strikke mønster. For eksempel, øk med 1 kast om pinnen hver 5. maske på omgang 3 og hver 6. maske på omgang 8 osv. God fornøyelse!
25.06.2018 - 06:17
![]() Kari wrote:
Kari wrote:
Ser på oppskrift Lotta tunika , eller hvem som helst oppskrift hvor det sakl strikkes ovenifra, halsen, og ned, det står ikke hvor ofte en skal øke for å få det maksimale antall masker. her 252 str 3/4.
20.06.2018 - 15:41DROPS Design answered:
Hei Kari. Det står du skal strikke 21 rapporter av A.1 etter at halskanten er ferdig. Alle økingene er lagt inn i diagrammet, som du ser nederst på siden – det økes med kast som strikkes vridd på neste omgang for at det ikke skal bli hull. Husk at diagrammet leses fra bunnen og opp selv om plagget strikkes ovenfra og ned. God fornøyelse.
22.06.2018 - 07:37
![]() Hélène wrote:
Hélène wrote:
Bonjour, Concernant les augmentations, comment les faites-vous? Merci, Hélène
06.11.2017 - 15:23DROPS Design answered:
Bonjour Hélène, les augmentations dans le diagramme (jacquard) sont faites avec 1 jeté (= 3ème symbole dans la légende) à tricoter torse à l'endroit au tour suivant pour éviter un trou (dans la vidéo ci-dessous, on le tricote torse à l'envers car l'échantillon se tricote en allers et retours). Bon tricot!
06.11.2017 - 15:54
|
||||||||||
Lotta#lottatunic |
||||||||||
 |
 |
|||||||||
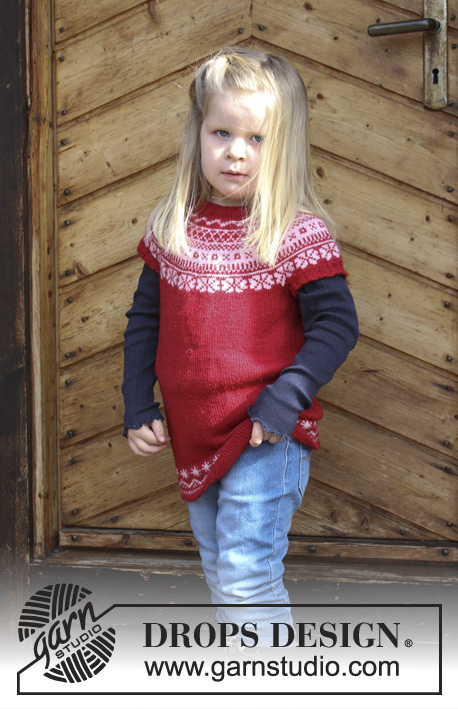
Children’s tunic with round yoke and multi-coloured Norwegian pattern, worked top down. Sizes 2 - 12 years. The piece is worked in DROPS BabyMerino.
DROPS Children 30-8 |
||||||||||
|
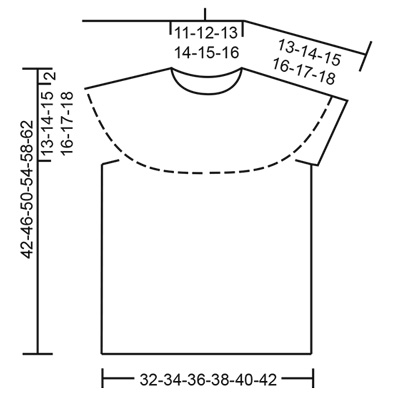
INFORMATION FOR THE PATTERN: PATTERN: See diagrams A.1 and A.2. Choose diagram for your size. KNITTING TIP (for multi-coloured pattern): To avoid the knitting tension becoming tighter when working the pattern, it is important that the strands do not pull at the back of the piece. You can increase a needle size when working pattern if this is a problem. ---------------------------------------------------------- TUNIC: The piece is worked in the round with circular needle, top down. You can work an elevation in the back of the neck to get a better fit, so that the yoke is a little higher in the neck. You can choose to leave out this elevation; the neck will then be the same front and back – see description of elevation further down the page. After the yoke, the body is worked in the round with circular needle. The sleeve edges are worked in the round with double pointed needles, top down. NECKLINE: Cast on 88-88-92-96-96-100 stitches with short circular needle size 2.5 mm and with red. Insert 1 marker at the beginning of the round (= mid back). Work rib (= knit 2 / purl 2) for 1½ cm. Change to circular needle size 3 mm. Knit 1 round where you increase 7-17-18-19-24-25 stitches evenly on round = 95-105-110-115-120-125 stitches. Now work an elevation in the back of the neck or go straight to working the yoke if you do not want an elevation. ELEVATION IN BACK OF NECK: Skip this section if you do not want an elevation. Knit 8 stitches past the marker, turn, tighten strand and purl 16 stitches back. Turn, tighten strand and knit 24 stitches, turn, tighten strand and purl 32 stitches back. Continue working 8 more stitches each time you turn until you have worked over a total of 48-48-48-64-64-80 stitches, turn and knit to mid back. YOKE: Continue by working A.1 (= 19-21-22-23-24-25 repeats in width) and read KNITTING TIP! REMEMBER THE KNITTING TENSION! Change to longer circular needle when necessary. When A.1 has been completed, there are 228-252-264-276-288-300 stitches on the round. Knit 1 round where the number of stitches is adjusted to 236-252-260-280-292-304 stitches, continue with red for 0-1-2-0-1-2 cm. The yoke now measures approx. 13-14-15-16-17-18 cm mid front (measured without the rib in neck). The next round is worked as follows: Work 35-38-39-42-44-46 stitches (= half back piece), place the next 48-50-52-56-58-60 stitches on 1 thread for sleeve edge (without working them), cast on 6-6-8-8-8-8 new stitches (= in side under sleeve), work 70-76-78-84-88-92 stitches (= front piece), place the next 48-50-52-56-58-60 stitches on 1 thread for sleeve edge (without working them), cast on 6-6-8-8-8-8 new stitches (= in side under sleeve), work 35-38-39-42-44-46 stitches (= half back piece). Body and sleeve edges are finished separately. THE PIECE IS NOW MEASURED FROM HERE! BODY: = 152-164-172-184-192-200 stitches. Continue with stocking stitch and red. When the piece measures 19-22-25-28-31-34 cm from the separation, knit 1 round where you increase 0-4-4-0-0-0 stitches evenly on round = 152-168-176-184-192-200 stitches. Work A.2 over all stitches (= 19-21-22-23-24-25 repeats of 8 stitches). Continue with red when A.2 has been completed. Purl 1 round (= the folding round), then work stocking stitch for 7 cm. Cast off. SLEEVE EDGE: Place the stitches from one of the threads on double pointed needles size 2.5 mm and, in addition, knit up 1 stitch in each of the 6-6-8-8-8-8 stitches cast on under the sleeve in red = 54-56-60-64-66-68 stitches. Insert 1 marker in the middle of the 6-6-8-8-8-8 stitches = mid under sleeve. Knit 1 round where you increase 2-0-0-0-2-0 stitches evenly on round = 56-56-60-64-68-68 stitches. Work rib in the round (= knit 2 / purl 2) for 1½ cm, then cast off with knit over knit and purl over purl. Work the other sleeve edge in the same way. ASSEMBLY: Fold the bottom 7 cm on the body in towards the wrong side of the tunic (at the folding round) and fasten neatly with small stitches. |
||||||||||
Diagram explanations |
||||||||||
|
||||||||||

|
||||||||||
|
||||||||||
Have you finished this pattern?Tag your pictures with #dropspattern #lottatunic or submit them to the #dropsfan gallery. Do you need help with this pattern?You'll find 27 tutorial videos, a Comments/Questions area and more by visiting the pattern on garnstudio.com. © 1982-2025 DROPS Design A/S. We reserve all rights. This document, including all its sub-sections, has copyrights. Read more about what you can do with our patterns at the bottom of each pattern on our site. |
||||||||||


With over 40 years in knitting and crochet design, DROPS Design offers one of the most extensive collections of free patterns on the internet - translated to 17 languages. As of today we count 314 catalogues and 11820 patterns translated into English (UK/cm). 11820
We work hard to bring you the best knitting and crochet have to offer, inspiration and advice as well as great quality yarns at incredible prices! Would you like to use our patterns for other than personal use? You can read what you are allowed to do in the Copyright text at the bottom of all our patterns. Happy crafting!
Post a comment to pattern DROPS Children 30-8
We would love to hear what you have to say about this pattern!
If you want to leave a question, please make sure you select the correct category in the form below, to speed up the answering process. Required fields are marked *.