
Popular categories
Looking for a yarn?


Comments / Questions (71)
![]() Sokhnamaggi wrote:
Sokhnamaggi wrote:
Fast fertig...in knallpink. Sieht klasse aus. Anleitung ist auch allerbest - bis auf eins: Zunahmetipp beachten- ich sehe nur einen Abnahmetipp...oder spinne ich😜?
24.08.2016 - 16:47
![]() Christina Mellberg wrote:
Christina Mellberg wrote:
Diagram A1 och måttangivelserna syns här på internetsidan men kommer inte med på utskriften
15.08.2016 - 09:28DROPS Design answered:
Hej. Om du trycker på knappen "Skriv ut mönster" så kommer de med på den fjärde sidan. Mvh DROPS Design
17.08.2016 - 10:19
![]() Christina Mellberg wrote:
Christina Mellberg wrote:
Saknar diagram A1 som texten hänvisar till. Ser bara teckenflrklaringen.
15.08.2016 - 09:23DROPS Design answered:
Hej. Diagram A1 finns längst ner på mönstret, till höger om måttskissen. Lycka till!
16.08.2016 - 11:27
![]() Jutta wrote:
Jutta wrote:
Eine sehr schöne Jacke, ich freue mich schon auf die Anleitung.
06.07.2016 - 17:19
![]() Shannon Furnish wrote:
Shannon Furnish wrote:
Love the design. Practical fit. Beautiful model.
20.06.2016 - 06:57
![]() CorinneF wrote:
CorinneF wrote:
I like the shawl collar and set-in sleeves. Looks cosy.
14.06.2016 - 19:16Laura wrote:
A classic design - I want to knit & wear this one👍
11.06.2016 - 05:52
![]() Ellis wrote:
Ellis wrote:
Easy, fast, elegant, non-expensive, ♡, 4 reasons to make this.
08.06.2016 - 22:09
![]() Annwe wrote:
Annwe wrote:
This one is a favourite, quick and easy knitted!!🐝🐝
07.06.2016 - 10:22
![]() Karin wrote:
Karin wrote:
Sehr aparte Jacke! wunderschöne Farbe und bezauberndes Model!
06.06.2016 - 08:41
|
|||||||
Winter Hues#winterhuescardigan |
|||||||
|
|
|||||||
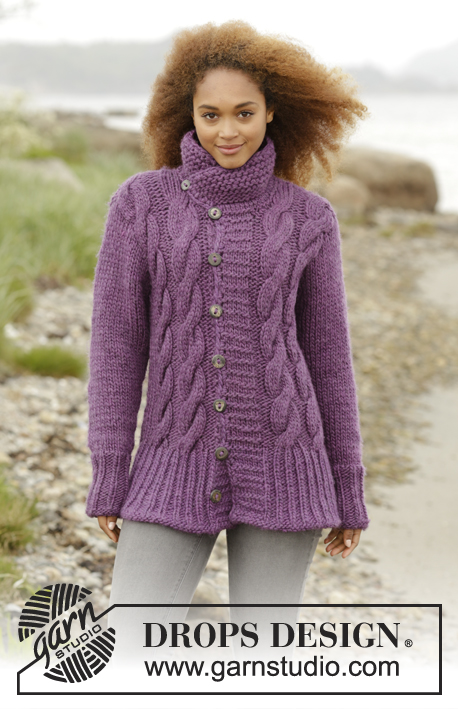
Knitted DROPS jacket with double moss st in band and shawl collar in DROPS Snow ot DROPS Wish. Size: S - XXXL.
DROPS 171-2 |
|||||||
|
GARTER ST (back and forth): K all rows. 1 ridge = 2 rows K. PATTERN: See diagram A.1. Diagram shows all rows in pattern, seen from RS. DECREASE TIP: Dec inside 1 edge st in garter st. All dec are done from RS! Dec as follows before 1 edge st: K 2 tog. Dec as follows after 1 edge sts: Slip 1 st as if to K, K 1, psso. INCREASE TIP Increase 1 stitch with a yarn over inside 1 edge stitch on each side. Work the yarn overs twisted on next row to avoid holes. BUTTONHOLES: Dec for buttonholes on right band. 1 buttonhole = K tog fourth and fifth st from edge and make 1 YO. Dec for buttonholes when piece measures: SIZE S: 17 and 26 cm. SIZE M: 18 and 27 cm. SIZE L: 19 and 28 cm. SIZE XL: 20 and 29 cm. SIZE XXL: 21 and 30 cm. SIZE XXXL: 22 and 31 cm. ---------------------------------------------------------- BACK PIECE: Worked back and forth on circular needle. Cast on 62-66-70-78-82-86 sts on circular needle size 7 mm with Snow or Wish. Work 2 ridges in GARTER ST - see explanation above. Switch to circular needle size 8 mm. Work in stocking st with 3 sts in garter st in each side. When piece measures 8 cm, cast on 1 new st at the end of the next 2 rows = 64-68-72-80-84-88 sts. Work in stocking st with 1 edge st in garter st in each side. REMEMBER THE KNITTING TENSION When piece measures 11 cm, dec 1 st in each side of piece - READ DECREASE TIP! Dec like this every 3-3-4-3-4-4 cm 8-8-7-8-7-7 times in total = 48-52-58-64-70-74 sts. When piece measures 35-36-37-38-39-40 cm, cast off for armhole in each side of piece on every other row: 3 sts 0-1-1-1-1-1 time, 2 sts 1-0-1-2-3-3 times and 1 st 1-1-2-2-2-3 times = 42-44-44-46-48-50 sts. When piece measures 52-54-56-58-60-62 cm, cast off the middle 10-10-12-12-14-14 sts for neck = 16-17-16-17-17-18 sts remain on each shoulder. Cast off when piece measures 54-56-58-60-62-64 cm. RIGHT FRONT PIECE: Cast on 45-47-49-55-57-59 sts (incl 14-14-14-16-16-16 band sts) on circular needle size 7 with Snow or Wish. Work 2 ridges. Switch to circular needle size 8 mm. Work as follows from RS: 14-14-14-16-16-16 band sts in A.1, stocking st until 3 sts remain, finish with 3 sts in garter st. Continue like this until piece measures 8 cm. Cast on 1 new st at the end of next row from RS = 46-48-50-56-58-60 sts. Work as follows from WS: 1 edge st in garter st, stocking st until 14-14-14-16-16-16 sts remain, A.1 over band sts as before. Continue like this. When piece measures 11 cm, dec in the side (i.e. at the end of row from RS) as on back piece = 38-40-43-48-51-53 sts. REMEMBER BUTTONHOLES! When piece measures 35-36-37-38-39-40 cm, cast off for armhole in the side as on back piece = 35-36-36-39-40-41 sts. When cast off for armhole is done work band sts (= 14-14-14-16-16-16 sts towards mid front) in garter st until finished measurements. When piece measures 54-56-58-60-62-64 cm, cast off the first 16-17-16-17-17-18 sts for shoulder on next row from WS = 19-19-20-22-23-23 sts remain for shawl collar. Continue in garter st over these sts - AT THE SAME TIME work short rows, beg from the neck (RS) as follows: * Work 1 ridge over all sts (= 2 rows K). On next row from RS K 14-14-14-16-16-16, turn and K back *, repeat from *-* until piece measures 7-7-8-8-9-9 cm from cast off for shoulder (short side). Loosely cast off all sts. LEFT FRONT PIECE: Work as right front piece but reversed. Do not dec for buttonholes on left band. SLEEVE: Worked back and forth on circular needle. Cast on 34-34-36-36-38-38 sts (incl 1 edge st in each side) on circular needle size 7 mm with Snow or Wish. Work 6 ridges. Switch to circular needle size 8 mm. Work in stocking st with 1 edge st in garter st in each side. When piece measures 12-13-13-12-10-11 cm, inc 1 st in each side of piece - READ INCREASE TIP! Inc like this every 8-6-6-5-5-4 cm 5-6-6-7-7-8 times in total = 44-46-48-50-52-54 sts. When piece measures 48-47-47-46-44-43 cm, cast off for sleeve cap in each side on every other row: 3 sts 1 time, 2 sts 1 time, 1 st 2-3-4-4-6-7 times, then cast off 2 sts in each side until piece measures 54-54-55-55-55-55 cm, then cast off 3 sts 1 time in each side before casting off the remaining sts. Piece measures approx. 56-56-57-57-57-57 cm. Knit another sleeve the same way. ASSEMBLY: Sew the shoulder seams tog. Sew in the sleeves inside 1 edge st. Sew side and sleeve seams in one inside 1 edge st down to where edge st were cast on (i.e. approx. 8 cm vent). Sew collar tog mid back - NOTE: Seam should be at the back so that it is not visible when collar is folded down. Sew collar along neckline in the back of neck. Sew buttons on left band. |
|||||||
Diagram explanations |
|||||||
|
|||||||

|
|||||||
Have you finished this pattern?Tag your pictures with #dropspattern #winterhuescardigan or submit them to the #dropsfan gallery. Do you need help with this pattern?You'll find 23 tutorial videos, a Comments/Questions area and more by visiting the pattern on garnstudio.com. © 1982-2025 DROPS Design A/S. We reserve all rights. This document, including all its sub-sections, has copyrights. Read more about what you can do with our patterns at the bottom of each pattern on our site. |
|||||||


With over 40 years in knitting and crochet design, DROPS Design offers one of the most extensive collections of free patterns on the internet - translated to 17 languages. As of today we count 314 catalogues and 11820 patterns translated into English (UK/cm). 11820
We work hard to bring you the best knitting and crochet have to offer, inspiration and advice as well as great quality yarns at incredible prices! Would you like to use our patterns for other than personal use? You can read what you are allowed to do in the Copyright text at the bottom of all our patterns. Happy crafting!
Post a comment to pattern DROPS 171-2
We would love to hear what you have to say about this pattern!
If you want to leave a question, please make sure you select the correct category in the form below, to speed up the answering process. Required fields are marked *.