
Looking for a yarn?


Comments / Questions (40)
Maria wrote:
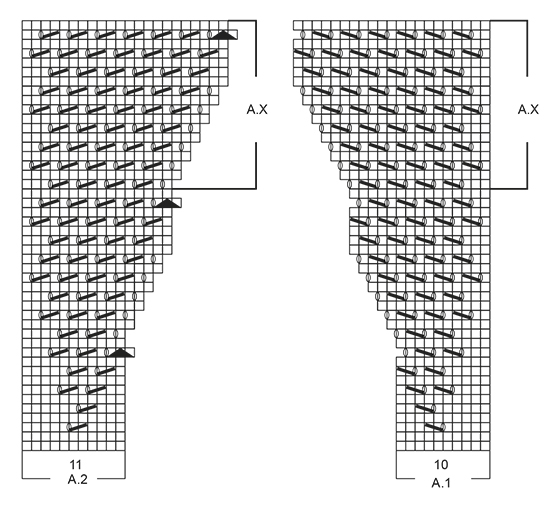
I am working on Venezia Top pattern and don't understand this AX at all. So HOW and WHERE exactly should I increase 12 sts? Could someone help me, please?
02.08.2016 - 10:49DROPS Design answered:
Dear Maria, when working A.x in height you are inc 6 sts in A.1 and 6 sts in A.2, ie you will inc a total of 12 sts after you have worked A.x 1 time in height on the side (= 24 sts around). Happy knitting!
02.08.2016 - 11:48
![]() Maria Turkia wrote:
Maria Turkia wrote:
En ymmärrä ohjeesta kohtaa AX ollenkaan. - Miten voin tehdä AX:ää, joka jo itsessään lisää silmukoita, ja vielä samalla lisätä kuten aiemmin? - Miten syntyy Jokaisen mallikerran jälkeen 2 reikäriviä lisää? En tajua.
23.07.2016 - 20:18DROPS Design answered:
Hei! Ohjeessa tarkoitetaan, että piirroksen A.X lisäyksiä jatketaan kuten aiemmin, eli muita silmukoita työhön ei lisätä. Lisätyillä silmukoilla neulotaan pitsineuletta, jolloin reikärivit lisääntyvät.
01.09.2016 - 14:14
![]() Cath wrote:
Cath wrote:
Hello My question is the same as the one on 07/05/16, 03:27 from Brenda but I don't see your reply. Shouldn't A1 and A2 be centred under the armhole?
24.06.2016 - 19:43DROPS Design answered:
Dear Cath, beg on round is mid under arm, count the number of sts between mid under arm (mid of new sts cast on) and number of sts for your size, so that A.1 and A.2 will be centered under armhole. Happy knitting!
27.06.2016 - 08:29
![]() Mariolina wrote:
Mariolina wrote:
Quando è scritto " aumentare dopo 12 cm dal bordo di avvio" si intende il bordo di avvio della spalla o del collo?
14.06.2016 - 17:55DROPS Design answered:
Buonasera Mariolina, le misure si intendono dall'inizio del lavoro, quindi dall'avvio della spalla. Buon lavoro!
14.06.2016 - 18:19
![]() Vanessa Machado wrote:
Vanessa Machado wrote:
Boa tarde, apesar de tentar perceber as questoes acima, continuo sem entender como se faz o aumento de AX, acrescenta-se um ajour em cada carreira? Onde? No meio do esquema? Os lados devem manter-se? Obrigado
28.05.2016 - 22:24DROPS Design answered:
Basta tricotar A.X em todas as malhas do ponto rendado. Ao tricotar A.X, irá continuar a fazer laçadas como antes num novo número de malhas e, desta forma, fará automáticamente os aumentos. Bom tricô!
30.05.2016 - 11:45Brenda Zmean wrote:
I have progressed to the body but I am confused with putting the markers. If I follow the directions the markers are not evenly placed according to each side in the front the marker on the left is further to the centre and the right side is close to the side under the arm. Could you please clarify... Brenda
07.05.2016 - 03:27DROPS Design answered:
Dear Mrs Zmean, diagrams should be centered mid under arm, beg of round = mid under arm. Happy knitting!
18.07.2016 - 09:53
![]() Karen wrote:
Karen wrote:
You say repeat AX over all sts in pattern but the section will have 43 sts for 31 sts so how do i work the extra sts. what does continue eyelets as before on the new number of sts and continue inc mean can you lay it out for me please
29.04.2016 - 18:48DROPS Design answered:
Dear Karen, the extra sts will be worked as the other from same row, A.1X will finish with K1, YO on the first rounds, and A.2X will start with K1, YO, ie work beg and end of repeats as before and continue eyelets in between as you did. Happy knitting!
29.04.2016 - 19:21
![]() Karen wrote:
Karen wrote:
I am working on this Venezia Top pattern. I am confused when i finish all of A1 and A2 it says to repeat AX but i will have 43 sts in the section and the AX section starts with about 31 sts so how do I work the section having more sts So please explain Thanks
28.04.2016 - 22:13DROPS Design answered:
Dear Karen, repeat A.X over all sts in pattern, ie continue working eyelets as before on the new number of sts and you will continue increase automatically. Happy knitting!
29.04.2016 - 08:56
![]() Karen wrote:
Karen wrote:
In the Venezia Top pattern. it says to inc 1 st inside the 3 sts garter st towards the neck (back piece about 4 lines down). My question is after that inc do you still only keep 3 garter sts or does the amount of garter sts inc and also since inc is within the garter sts, the pattern says on wrong side to purl in back loop since the inc is within the garter st do i do the purl or still knit it since the garter st i knit all rows
23.04.2016 - 18:47DROPS Design answered:
Dear Karen, the inc are worked in stocking st, ie you will keep 3 sts in garter st towards the neck and 3 sts in garter st towards the armhole. Happy knitting!
25.04.2016 - 10:06
![]() Eva Schlager wrote:
Eva Schlager wrote:
Liebes Drops Team, ich habe jetzt das Diagramm A1 und A2 einmal in der Höhe gestrickt und sollte jetzt mit A.X weitermachen. Allerdings verstehe ich das nicht. Ich habe jetzt 43 Maschen (21 Maschen für A1 und 22 Maschen für A2) mit Lochmuster auf der Nadel und A.X beginnt mit 15 Maschen für A1 . Was mache ich mit den restlichen 6 bzw. 7 Maschen ?? Ich stehe auf dem Schlauch und hoffe sie können mir helfen
24.03.2016 - 14:52DROPS Design answered:
Liebe Eva, den Übergang von A.1 bzw. A.2 zu A.x stricken Sie wie im Diagramm dargestellt, es ist an dieser Stelle alles abgebildet. Bei der Wiederholung von A.x gibt es - wie im Text beschrieben - jeweils 2 Lochstreifen mehr. Gutes Gelingen!
26.03.2016 - 08:43
|
||||||||||||||||
Venezia Top#veneziatop |
||||||||||||||||
|
|
||||||||||||||||
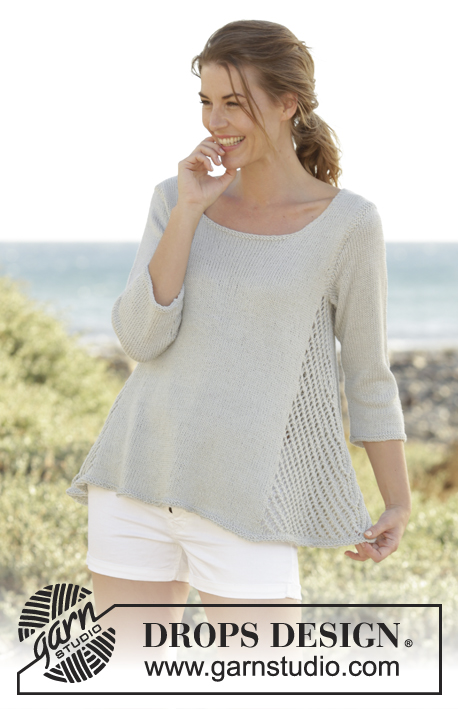
Knitted DROPS top with lace pattern in the sides and A-shape, worked top down in ”Belle”. Size: S - XXXL.
DROPS 168-33 |
||||||||||||||||
|
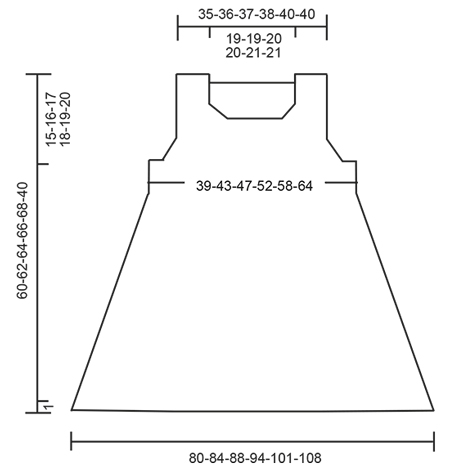
GARTER ST (worked in the round): 1 ridge = 2 rounds. * K 1 round and P 1 round *, repeat from *-*. GARTER ST (back and forth): K all rows. 1 ridge = 2 rows K. PATTERN: See diagrams A.1 and A.2. INCREASE TIP: Inc 1 st by making a YO. On next row P YO twisted (i.e. work in back loop of YO instead of front) to avoid holes. ---------------------------------------------------------- TOP: The piece is worked top down. Work first front and back piece separately, back and forth down to armhole, then work in the round. BACK PIECE: Work right shoulder as follows: Cast on 16-17-17-18-20-20 sts on circular needle size 4.5 mm with Belle. Work as follows (1st row = from RS): 3 sts in GARTER ST - see explanation above (= towards the neck), work 10-11-11-12-14-14 sts in stocking st, 3 sts in garter st (= towards armhole). Continue like this until 4 rows in stocking st have been work inside the 3 sts in garter st in each side. On next row inc 1 st inside the 3 sts in garter st towards the neck - READ INCREASE TIP = 17-18-18-19-21-21 sts. Work 1 row from WS and put piece aside. Work left shoulder as follows: Cast on and work as right shoulder but reversed. I.e. inc 1 st before the 3 sts in garter st towards the neck on 5th row in stocking st. Work 1 row from WS. Turn and work as before over all sts. At the end of row cast on 35-35-37-37-39-39 new sts for neck and then work the 17-18-18-19-21-21 sts from right shoulder on to needle = 69-71-73-75-81-81 sts. Work the new sts cast on for neck in garter st. When 2 ridges have been worked over these sts, continue in stocking st inside the 3 sts in garter st in each side. REMEMBER THE KNITTING TENSION When piece measures 13-12-12-10-10-7 cm from cast-on edge, inc 1 st inside the 3 sts in garter st in each side for armhole. Repeat inc on every row from RS 2-4-6-9-11-16 more times = 75-81-87-95-105-115 sts. Work 1 row from WS after last inc and put piece aside. FRONT PIECE: Work left shoulder as follows: Cast on 16-17-17-18-20-20 sts on circular needle size 4.5 mm with Belle. Work as follows (1st row = from RS): 3 sts in garter st (= towards neck), work 10-11-11-12-14-14 sts in stocking st, 3 sts in garter st (= towards the left). READ ALL OF THE FOLLOWING SECTION BEFORE CONTINUING! Continue like this, AT THE SAME TIME when piece measures 7-8-7-8-8-9 cm, inc for neck (- see explanation below) and when piece measures 13-12-12-10-10-7 cm inc for armholes the same way as on back piece. NOTE: In size XXXL beg inc for armholes before inc for neck. INCREASE NECK: Inc 1 st inside the 3 sts in garter st towards the neck. Repeat inc on every row from RS 4-4-5-5-6-6 more times = 5-5-6-6-7-7 sts inc for neck. When all inc are done, work 1 row from WS. Put piece aside. Work right shoulder as follows: Cast on and work as left shoulder but reversed. I.e. inc 1 st before the 3 sts in garter st towards the neck. When all inc for neck are done, work 1 row from WS. Turn and work as before over all sts. At the end of row cast on 27 new sts in all sizes for neck, then work all sts from left shoulder on to needle. Continue back and forth like this (continue inc for armholes) until 2 ridges have been worked over the new sts for neck. Continue in stocking st inside the 3 sts in garter st in each side. When all inc for armholes are done, there are 75-81-87-95-105-115 sts on needle. After last inc work 1 row from WS. Turn and work over all sts on front piece, cast on 3-5-7-9-11-13 new sts for armhole, work 75-81-87-95-105-115 sts from back piece on to same circular needle and cast on 3-5-7-9-11-13 new sts for armhole = 156-172-188-208-232-256 sts on round. Beg of round is after the last 3-5-7-9-11-13 new sts cast on. BODY: Then work in the round on circular needle. NOW MEASURE THE PIECE FROM HERE. Now continue with pattern as follows: Work 3 sts in garter st, continue in stocking st as before over the next 69-75-81-89-99-109 sts, 9-11-13-15-17-19 sts in garter st, stocking st over the next 69-75-81-89-99-109 sts, 6-8-10-12-14-16 sts in garter st. Continue like this until 2 ridges have been worked over the new sts cast on under armhole. Then work in stocking st until 12-13-14-15-16-17 sts remain before beg of round. This is now beg of round. Now work as follows: Insert a marker, work A.1 (= 10 sts on first round), A.2 (= 11 sts on first round), insert a marker, work in stocking st over the next 57-65-73-83-95-107 sts, insert a marker, A.1, A.2, insert a marker, work in stocking st over the remaining 57-65-73-83-95-107 sts. NOTE: Move markers upwards when working to make it easier to tell the section with lace pattern and stocking st apart. The section in stocking st is constant and inc sts in the section with lace pattern in the sides. Continue pattern like this until entire A.1 and A.2 have been worked 1 time vertically. There are now 200-216-232-252-276-300 sts on round and piece measures approx. 19 cm in all sizes. Then repeat A.X vertically AT THE SAME TIME continue inc in diagram as before: I.e. lace pattern in each side inc with 12 sts and there are 2 eyelet rows (1 eyelet row = 1 dec + 1 YO) more in A.1 and A.2 in each side every time A.X is worked 1 time vertically. When piece measures 44-45-46-47-48-49 cm, there are approx. 320-336-352-376-404-432 sts on round. Work 1 round in stocking st. Then work 2 ridges. Cast off. ASSEMBLY: Sew the shoulder seams tog. Make sure that to avoid a tight seam. |
||||||||||||||||
Diagram explanations |
||||||||||||||||
|
||||||||||||||||
 |
||||||||||||||||
 |
||||||||||||||||
Have you finished this pattern?Tag your pictures with #dropspattern #veneziatop or submit them to the #dropsfan gallery. Do you need help with this pattern?You'll find 21 tutorial videos, a Comments/Questions area and more by visiting the pattern on garnstudio.com. © 1982-2025 DROPS Design A/S. We reserve all rights. This document, including all its sub-sections, has copyrights. Read more about what you can do with our patterns at the bottom of each pattern on our site. |
||||||||||||||||


With over 40 years in knitting and crochet design, DROPS Design offers one of the most extensive collections of free patterns on the internet - translated to 17 languages. As of today we count 320 catalogues and 12094 patterns translated into English (UK/cm). 12094
We work hard to bring you the best knitting and crochet have to offer, inspiration and advice as well as great quality yarns at incredible prices! Would you like to use our patterns for other than personal use? You can read what you are allowed to do in the Copyright text at the bottom of all our patterns. Happy crafting!
Post a comment to pattern DROPS 168-33
We would love to hear what you have to say about this pattern!
If you want to leave a question, please make sure you select the correct category in the form below, to speed up the answering process. Required fields are marked *.