
Popular categories
Looking for a yarn?


Comments / Questions (167)
![]() Dominique wrote:
Dominique wrote:
Merci de votre réponse rapide! je vais essayer a nouveau.Là, j'ai tout défait!!
04.03.2016 - 11:47DROPS Design answered:
Bonjour Dominique, pour toute assistance à la réalisation d'un modèle, rappelez-vous que vous pouvez vous adresser à votre magasin ou au forum DROPS. Bon tricot!
04.03.2016 - 13:36
![]() Dominique wrote:
Dominique wrote:
Bonjour!, votre modèle n'est pas clair du tout! j'en suis au début de l'empiècement et je ne comprends absolument les augmentations et l'emplacement des marqueurs. Certains jetés sont tricotés à l'endroit d'autres en maille torse? Lesquels ? incompréhensibles! et pour tant, je tricote depuis plus de 30 ans! merci de m'aider. Je suis prête à laisser tomber.
04.03.2016 - 10:38DROPS Design answered:
Bonjour Dominique, dans les augmentations du raglan, les jetés les plus proches des marqueurs se tricotent à l'end (= on a ainsi des jours tout du long de chaque raglan), et, quand on augmente 4 m, les autres jetés se tricotent torse pour éviter les trous. On va avoir ceci: 1 jeté (à tricoter torse au tour suivant), 1 m end, 1 jeté (à tricoter à l'end au tour suivant = jour), 2 m end (le marqueur est entre ces m), A.2, 2 m end (marqueur), 1 jeté (à tricoter à l'end au tour suivant = jour), 1 m end, 1 jeté (= à tricoter torse au tour suivant). Bon tricot!
04.03.2016 - 10:59
![]() Torill wrote:
Torill wrote:
Når det skal økes til raglan,de fire som skal økes på for og bakstykke, skal de økes på den runden som ser ut til å strikkes med bare rette masker?torill
03.03.2016 - 20:31DROPS Design answered:
Hej Torill, Første økning er forklaret i teksten og økningerne til ærmerne er tegnet ind i diagrammet, så du øker på samme p som du øker ifølge diagrammet, men det vil ske helt automatisk når du følger oppskriften. god fornøjelse!
08.03.2016 - 09:21Maturose Layraman wrote:
Am I correct, work 2 ridges of garter, starts with P. 1 round then, K2 tog, yo (I cast on 95 sts., there will be 1 st left at the end of the round) . How to fix this? work another 2 ridges of garter, starts with K 1 round
29.02.2016 - 16:36DROPS Design answered:
Dear Mrs Layramn, Work A.1 as follows: P1 round, K1 round, P1 round, K1 round, on next round repeat *K2 tog, YO* all the round, then K 1 round, P1 round, K1 round, P1 round. Happy knitting!
29.02.2016 - 17:39Maturose Layraman wrote:
Hi, Can you explain the symbol in diagram A.1. I am about to knit this using DROPS Cotton Light instead. I have just ordered the yarn from Wool Warehouse in UK. I am just a beginner. Thanks.
29.02.2016 - 16:19DROPS Design answered:
Dear Mrs Layraman, start reading diagram at the bottom corner on the right side and towards the left from RS - 1 square = 1 st x 1 row - read more about diagrams here. Happy knitting!
29.02.2016 - 17:37ΚατΚαλ wrote:
The instruction of pattern: slip 1 st as if to K, K 2 tog, psso is not correct. K3tog is the correct
23.02.2016 - 00:31DROPS Design answered:
Dear ΚατΚαλ, 5th symbol is correct, you have to slip 1 as if to K, K2 tog, psso. Happy knitting!
23.02.2016 - 14:17
![]() Gunda Poll wrote:
Gunda Poll wrote:
In der Anleitung der passe ist in der 6.ten zeile etwas rätselhaft ich denke dort fehlt die angabe : (=11M) so, wie in der zeile 2. lg Gunda poll werde ich jetzt mal probestricken.
12.02.2016 - 19:04DROPS Design answered:
Liebe Gunda, ich konnte leider die Stelle nicht finden, auf die sich Ihr Kommentar bezieht. Beschreiben Sie mir das bitte etwas genauer, dann prüfe ich das gerne.
03.03.2016 - 07:35
![]() Alastaïr wrote:
Alastaïr wrote:
Hallo, ik heb een vraag: als je A1 bekijkt moet je in een bepaalde naald steeds twee rechten samen breien. Dan moet je weer verder in een naald recht, maar waar je eerder twee recht samen hebt gebreid moet je nu, blijkbaar in één steek, weer twee rechten breien? Met andere woorden, volgens mij zegt A1 dat je een naald mindert door steeds twee samen te breien, maar het aantal steken verandert niet in A1. Ik denk dat ik een denkfout maak? Groetjes, Alastaïr
09.02.2016 - 22:17DROPS Design answered:
Hoi Alastaïr. Nee, je mindert niet. Je maakt 1 omslag na elke keer samen breien (het cirkeltje). Het aantal st blijft gelijk.
10.02.2016 - 15:22
![]() Daniela wrote:
Daniela wrote:
Raffinatissimo.
29.01.2016 - 20:35
![]() Loredana wrote:
Loredana wrote:
Ancora.....la posizione dei segnapunti tra le due maglie a dritto deve rimanere costante per tutti gli aumenti? Grazie mille
27.01.2016 - 18:55DROPS Design answered:
Buongiorno Loredana. Sì esatto. Il segnapunti tra le 2 m dir, resta sempre in quella posizione per tutti gli aumenti del raglan. Buon lavoro!
28.01.2016 - 09:28
|
|||||||||||||||||||
Sea Nymph#seanymphsweater |
|||||||||||||||||||
 |
 |
||||||||||||||||||
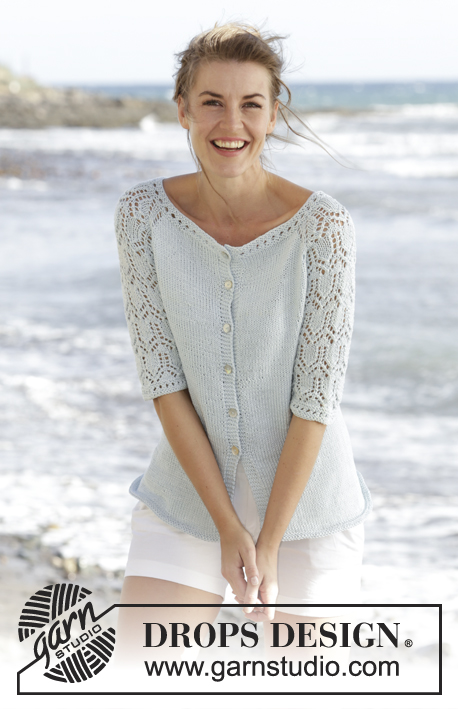
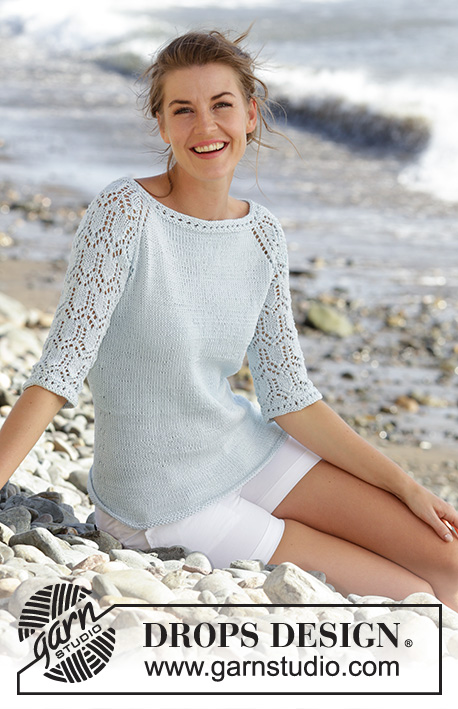
Knitted DROPS jumper with raglan, lace pattern and ¾ sleeves in "Muskat". Worked top down. Size: S - XXXL.
DROPS 168-1 |
|||||||||||||||||||
|
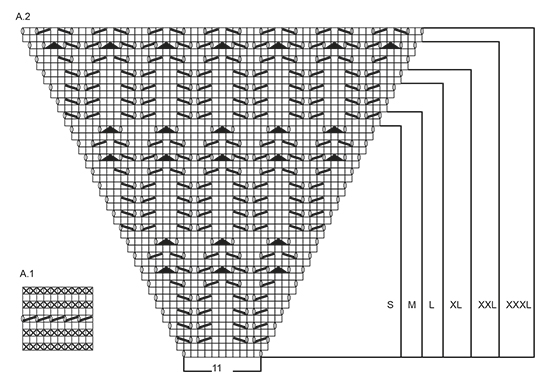
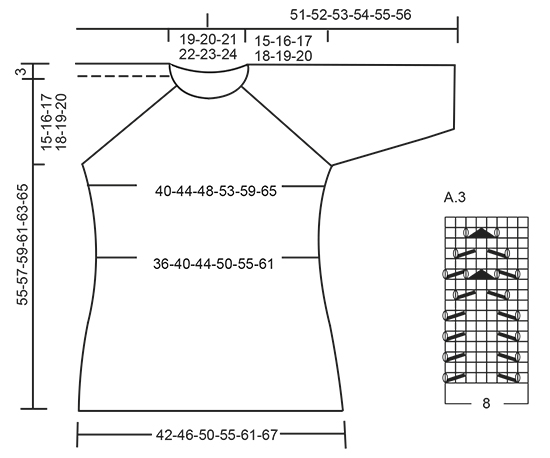
GARTER ST (worked in the round): 1 ridge = 2 rounds. * K 1 round and P 1 round *, repeat from *-*. PATTERN: See diagrams A.1 to A.3. See diagram for size! RAGLAN: Inc every other round as follows: Inc 4 sts on back piece, 4 sts on front piece and 2 sts on each sleeve (= 12 sts inc, inc on sleeve are drawn in pattern) – beg 3 sts before each A.2 and work as follows: 1 YO, K 1, 1 YO, K 2 (marker is in the middle of these sts), A.2, K 2 (marker is in the middle of these sts), 1 YO, K 1, 1 YO. K the YOs closest to markers on next row to make holes, K YOs towards back/front piece twisted to avoid holes. Inc 12 sts this way 0-2-3-7-10-14 times more (= 1-3-4-8-11-15 times in total, first inc is explained in the text). Then inc every other round as follows: Inc 2 sts on back piece, 2 sts on front piece and 2 sts on each sleeve (= 8 sts inc, inc on sleeve are drawn in pattern) – beg 2 sts before each A.2 and work as follows: 1 YO, K 2 (marker is in the middle of these sts), A.2, K 2 (marker is in the middle of these sts), 1 YO. K YOs on next round to make a hole. Inc 8 sts this way 16-15-16-13-12-9 times in total. ---------------------------------------------------------- JUMPER: Worked in the round on circular needle, top down. YOKE: Cast on 87-91-95-99-103-107 sts on circular needle size 4 mm with Muskat. K 1 round, them work A.1, on last round in A.1 inc 15 sts evenly = 102-106-110-114-118-122 sts. Then work as follows from mid back: K 17-18-19-20-21-22, 1 YO, K 1, 1 YO, K 2 (insert a marker between these sts), A.2 (= 11 sts), K 2 (insert a marker between these sts), 1 YO, K 1, 1 YO, K 34-36-38-40-42-44, 1 YO, K 1, 1 YO, K 2 (insert a marker between these sts), A.2, K 2 (insert a marker between these sts), 1 YO, K 1, 1 YO, K 17-18-19-20-21-22. Continue this pattern, and inc for RAGLAN as explained above, first inc is now done. REMEMBER THE KNITTING TENSION When A.2 has been worked vertically - see marking for your size, there are 242-262-286-314-346-374 sts on round, inc are now done. Work next round as follows: Work 38-42-46-52-58-64 sts (= half back piece), slip the next 45-47-51-53-57-59 sts on a stitch holder (= sleeve), cast on 8 sts under sleeve, work the next 76-84-92-104-116-128 sts (= front piece), slip the next 45-47-51-53-57-59 sts on a stitch holder (= sleeve), cast on 8 new sts under sleeve, work the last 38-42-46-52-58-64 sts (= half back piece). BODY: There are now 168-184-200-224-248-272 sts on body. Continue in stocking st. Insert a marker in each side, in the middle of the 8 new sts that were cast on. NOW MEASURE PIECE FROM HERE. When piece measures 4 cm, dec 1 st on each side of marker (= 4 sts dec), repeat dec every 4-4-4-5-5-5 cm 3 more times = 152-168-184-208-232-256 sts. When piece measures 22-23-24-25-26-27 cm, inc 1 st on each side of each marker (= 4 sts inc), repeat inc every 2 cm 5 more times = 176-192-208-232-256-280 sts. When piece measures 36-37-38-39-40-41 cm, work 2 ridges in GARTER ST - see explanation above, over all sts. Cast off K 1/P 1 (to avoid a wavy cast-off edge), piece measures approx. 55-57-59-61-63-65 cm from cast-on edge. SLEEVE: Worked in the round. Slip sts from sleeve back on double pointed needles size 4 mm, pick up 1 st in each of the 8 sts under sleeve = 53-55-59-61-65-67 sts. Insert 1 marker mid under sleeve = beg of round. NOW MEASURE PIECE FROM HERE! Then work as follows: 6-7-1-2-4-5 sts in stocking st, A.3 over the next 40-40-56-56-56-56 sts (beg A.3 where A.2 ends for your size), 7-8-2-3-5-6 sts in stocking st. When piece measures 4 cm, dec 1 st on each side of marker. Work the sts that do not fit the pattern in stocking st, make sure that no of dec and inc in pattern is correct. Repeat dec every 7-7-5-5-3-3 cm 2-2-3-3-4-4 more times = 47-49-51-53-55-57 sts. When piece measures 24-23-23-22-22-21 cm, work A.1 over all sts, then cast off. Work the other sleeve the same way. |
|||||||||||||||||||
Diagram explanations |
|||||||||||||||||||
|
|||||||||||||||||||
|
|||||||||||||||||||
|
|||||||||||||||||||
Have you finished this pattern?Tag your pictures with #dropspattern #seanymphsweater or submit them to the #dropsfan gallery. Do you need help with this pattern?You'll find 25 tutorial videos, a Comments/Questions area and more by visiting the pattern on garnstudio.com. © 1982-2025 DROPS Design A/S. We reserve all rights. This document, including all its sub-sections, has copyrights. Read more about what you can do with our patterns at the bottom of each pattern on our site. |
|||||||||||||||||||


With over 40 years in knitting and crochet design, DROPS Design offers one of the most extensive collections of free patterns on the internet - translated to 17 languages. As of today we count 314 catalogues and 11821 patterns translated into English (UK/cm). 11821
We work hard to bring you the best knitting and crochet have to offer, inspiration and advice as well as great quality yarns at incredible prices! Would you like to use our patterns for other than personal use? You can read what you are allowed to do in the Copyright text at the bottom of all our patterns. Happy crafting!
Post a comment to pattern DROPS 168-1
We would love to hear what you have to say about this pattern!
If you want to leave a question, please make sure you select the correct category in the form below, to speed up the answering process. Required fields are marked *.