
Looking for a yarn?


Comments / Questions (151)
![]() M.Jesús wrote:
M.Jesús wrote:
Hola de nuevo. Ya lo hice así pero el delantero no me queda al vies como en la fotografía
28.05.2015 - 16:32
![]() Lourdes wrote:
Lourdes wrote:
Perdona 3 p cad
27.05.2015 - 18:42
![]() Lourdes wrote:
Lourdes wrote:
Hola tengo otro problema con los delanteros cuando pone la primera vuelta :37 de cad (=1 p.b +22 cad) el resto creo entenderlo pero esto no se que significa
27.05.2015 - 18:41DROPS Design answered:
Hola Lourdes, el patrón dice 3 p.de cad al inicio de la fila, que sustituyen a 1 p.b. + 2 p.de cad. Trabajamos 3 p.de cad porque al principio de la vta no se trabaja 1 p.b.
28.05.2015 - 11:04
![]() Gitte wrote:
Gitte wrote:
Er nået til ærmegab, og er helt stået af. Plejer at danne et billede i hovedet af opgaven, men kan ikke se hvilken retning jeg skal hækle... Og alle de luftmasker?? Det er ikke kædemasker det menes???
25.05.2015 - 16:16
![]() M.Jesús wrote:
M.Jesús wrote:
Tengo bastante lío con la vuelta siguiente a la realización de la sisa. ¿Alguien podía decirme cómo se sigue? Yo seguí el cuadro de la misma manera y trabajando la cadeneta de la sisa pero veo que no me queda como en la fotografía así que algo debo de estar haciendo mal. Gracias
23.05.2015 - 22:24DROPS Design answered:
Hola M Jesus, no cambia nada, se ha de seguir el patrón como antes, los p.de cad sustituyen a los p.a. de la fila anterior
28.05.2015 - 10:57
![]() Catalina wrote:
Catalina wrote:
Podrían ayudarme. No entiendo como seguir con el delantero. Que hago con las esquinas? Segun el patrón se empieza directamente en los arcos y no se que hacer con los tres puntos altos de las esquinas. Gracias
23.05.2015 - 18:00DROPS Design answered:
Hola Catalina, los delanteros se trabajan de ida y vta entre las esquinas sin aumentos y siguiendo el diagrama A.2. Se empieza con 3 p.de cad en el p.a. central de la esquina y luego 1 p.b.+ 2p.de cad + 1 p.b. en el primer arco...
28.05.2015 - 10:52
![]() Ulla wrote:
Ulla wrote:
Det står inte i den svenska versionen att en rättelse är gjord! Troligen har detta skett alldeles nyligen. Synd om garnköpare som har lurats.
22.05.2015 - 17:14
![]() Sylvia Miller wrote:
Sylvia Miller wrote:
Thank you for responding to my previous question. I printed the pattern prior to the correction. guess that's why I am still confused. So, if I am working the sleeve starting under the arm and go around. How do I convert that to back and forth? Is there a Video tutorial t working the sleeves?
22.05.2015 - 00:10DROPS Design answered:
Dear Mrs Miller, start 1st row on sleeve at the underarm, work around armhole and finish at the underarm, then turn and work back and forth in rows as explained: 1 dc in first st, then work ch-space as on row 4 or 8 in A.2 you should get 12-16 ch-spaces around armhole, then continue in A.2. Happy crocheting!
22.05.2015 - 10:15
![]() Natalie wrote:
Natalie wrote:
Jetzt seh ich zum ersten mal das plötzlich 800g Wolle angegeben sind. Das war aber doch nicht schon die ganze Zeit so :-D na dann wird mir jetzt auch einiges klar...
21.05.2015 - 20:28DROPS Design answered:
Das stimmt, die Anleitung wurde am 22.04. korrigiert. Sie können anhand des Korrekturreiters oben im Kopf neben dem Foto sehen, ob und wenn ja, was und wann etwas korrigiert wurde. Es ist immer ganz gut, vor dem Loslegen noch einmal die aktuelle Anleitung anzuschauen.
22.05.2015 - 12:35
![]() Natalie wrote:
Natalie wrote:
Hallo...ich häkel die Jacke in Größe S. Angegeben sind 400g Wolle. Habe die Drops love you 5 verwendet, statt Paris, hat aber die gleiche Lauflänge und Häkelnadel 5, wie angegeben. Nun bin ich mit dem Rumpfteil fertig und meine 400g Wolle sind verhäkelt :-D. Wie kann das sein? Stimmen die Angaben nicht? Wie viel muss ich denn jetzt ca. noch nachbestellen für Vorderteil und Ärmel?
21.05.2015 - 20:25DROPS Design answered:
Antwort siehe oben! Trotz dieser Panne weiterhin viel Spaß beim Häkeln und gutes Gelingen! Da hinter den Anleitungen auch nur Menschen sitzen, kann es leider immer mal wieder vorkommen, dass ein Fehler unterläuft und korrigiert werden muss...
22.05.2015 - 12:37
|
||||||||||||||||||||||
Spring Bliss#springblisscardigan |
||||||||||||||||||||||
 |
 |
|||||||||||||||||||||
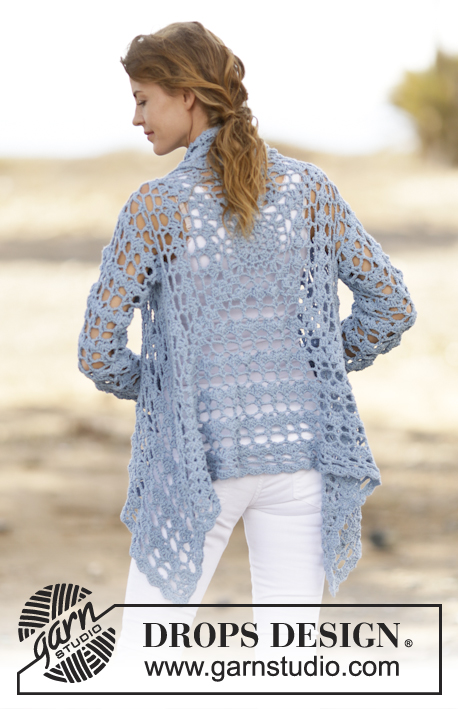
Crochet DROPS jacket with lace pattern in ”Paris”. Size: S - XXXL.
DROPS 162-5 |
||||||||||||||||||||||
|
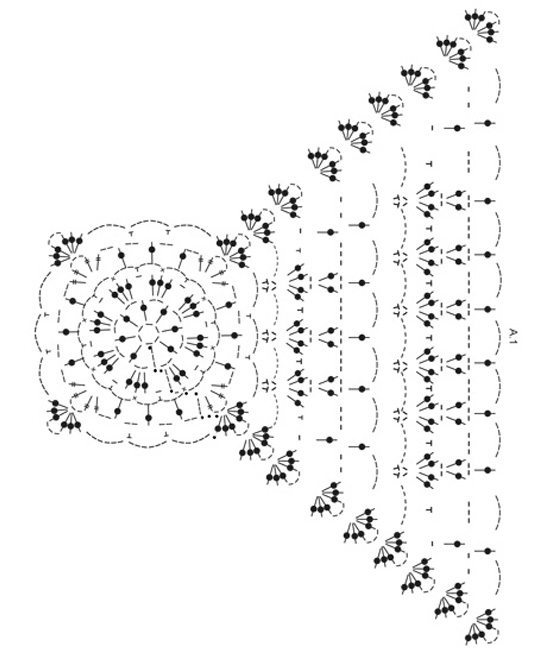
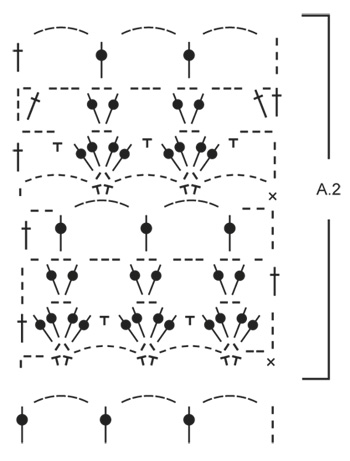
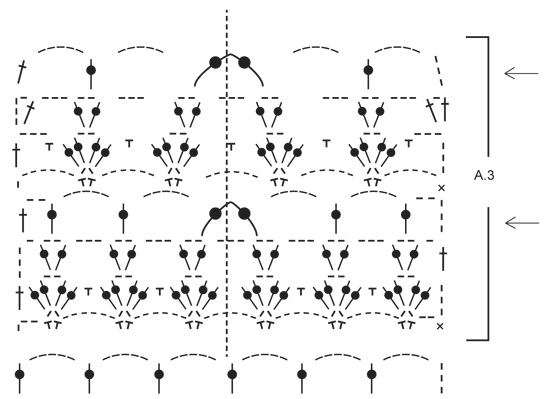
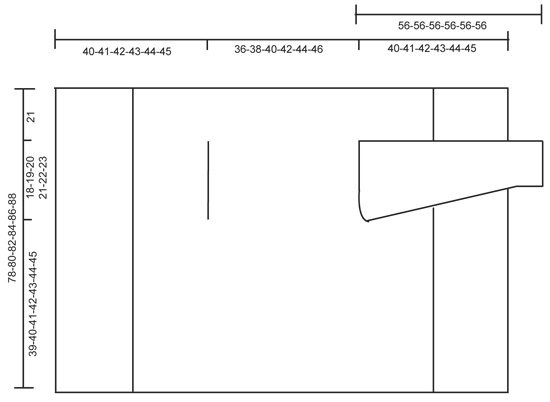
PATTERN: See diagrams A.1 and A.2. DECREASE TIP: Dec 1 tr by working 2 tr tog as follows: Work 1 tr in first ch-space but wait with last pull through, skip 3 ch, work 1 tr in next ch-space but on last pull through, pull yarn through all 3 loops on hook. ---------------------------------------------------------- BODY: Worked in the round from mid back on the back. Work 6 ch with Paris on hook size 5 mm and form a ring with 1 sl st in first ch. Work according to diagram A.1, i.e. work as follows: ROUND 1: 5 ch (= 1 tr + 2 ch), * 1 tr in ring, 2 ch *, repeat from *-* a total of 7 times, finish with 1 sl st in 3rd ch from beg of round = 8 tr with 2 ch between each. ROUND 2: 1 sl st in first ch-space, 3 ch (= 1 tr), 2 tr in same ch-space, * 1 ch, 3 tr in next ch-space *, repeat from *-* 7 times in total, and finish with 1 ch and 1 sl st in 3rd ch from beg of round = 8 tr-groups with 1 ch between each. ROUND 3: 1 ch, 1 dc in the middle tr in tr-group, * 3 ch, 1 dc in ch before next tr-group, 3 ch, 1 dc in the middle tr in next tr-group *, repeat from *-* 7 times in total, 3 ch, 1 dc in last ch, 3 ch and 1 sl st in first dc at beg of round = 16 ch-spaces. ROUND 4: Now work the circle into a square, i.e. work as follows: 1 sl st in first ch-space, 4 ch (= 1 dtr), 1 dtr + 3 ch + 2 dtr in same ch-space (= corner), * (2 ch, 1 tr in next ch-space) repeat from (-) 3 times in total, 2 ch, 2 dtr + 3 ch + 2 dtr in next ch-space (= corner) *, repeat from *-* 3 times in total, repeat from (-) 3 times in total and finish with 2 ch and 1 sl st in 4th ch from beg of round. ROUND 5: Work sl sts until ch-space in the corner, 3 ch (= 1 tr), 2 tr + 3 ch + 3 tr in same ch-space (= corner), * 5 ch, skip 1 ch-space, 1 dc in next ch-space, 5 ch, 1 dc in next ch-space, 5 ch, skip 1 ch-space, in next ch-space (= corner) work 3 tr + 3 ch + 3 tr *, repeat from *-* 3 times in total, 5 ch, skip 1 ch-space, 1 dc in next ch-space, 5 ch, 1 dc in next ch-space, 5 ch, skip last ch-space and finish with 1 sl st in 3rd ch at beg of round. ROUND 6: Work sl sts until ch-space in the corner, 3 ch (= 1 tr), 2 tr + 3 ch + 3 tr in same ch-space (= corner), * (6 ch, 1 dc + 2 ch + dc in next ch-space), repeat from (-) until corner, 6 ch, work 3 tr + 3 ch + 3 tr in ch-space in the corner *, repeat from *-* 3 times in total, repeat from (-) until the corner and finish with 6 ch and 1 sl st in 3rd ch at beg of round. ROUND 7: Work sl sts until ch-space in the corner, 3 ch (= 1 tr), 2 tr + 3 ch + 3 tr in same ch-space (= corner), * 1 ch, (1 dc in 6-ch-space, 2 tr + 2 ch + 2 tr in 2-ch-space), repeat from (-) until one 6-ch-space remains before the corner, 1 dc in 6-ch-space, 1 ch, 3 tr + 3 ch + 3 tr in ch-space in the corner *, repeat from *-* 3 times in total, 1 ch, repeat from (-) until one 6-ch-space remains before the corner and finish with 1 ch and 1 sl st in 3rd ch at beg of round. ROUND 8: Work sl sts until ch-space in the corner, 3 ch (= 1 tr), 2 tr + 3 ch + 3 tr in same ch-space (= corner), * 2 ch, 1 tr in first ch, (3 ch, 1 tr + 2 ch + 1 tr in ch-space in tr-group), repeat from (-) until corner, 3 ch, 1 tr in ch before corner, 2 ch, 3 tr + 3 ch + 3 tr in ch-space in the corner *, repeat from *-* 3 times in total, 2 ch, 1 tr in first ch, repeat from (-) until corner, 3 ch, 1 tr in last ch, 2 ch and 1 sl st in 3rd ch at beg of round. ROUND 9: Work sl sts until ch-space in the corner, 3 ch (= 1 tr), 2 tr + 3 ch + 3 tr in same ch-space (= corner), * 5 ch, 1 tr in first ch-space, (5 ch, 1 tr in ch-space in tr-group), repeat from (-) until 1 ch-space remains before tr-group in the corner, 5 ch, 1 tr in last ch-space before the corner, 5 ch and 3 tr + 3 ch + 3 tr in ch-space in the corner *, repeat from *-* 3 times in total, 5 ch, 1 tr in first ch-space, repeat from (-) until 1 ch-space remains before the corner, 5 ch, 1 tr in last ch-space, 5 ch and 1 sl st in 3rd ch at beg of round. REMEMBER THE CROCHET TENSION! Repeat 6th to 9th round (4 rounds) outwards as shown in diagram. Continue like this until square measures approx. 36-38-40-42-44-46 cm x 36-38-40-42-44-46 cm. Now work arm holes as follows: Work as before until first corner, work 3 tr + 3 ch + 3 tr in ch-space in the corner. Now work ch until the middle of next side (i.e. in the middle between 1st and 2nd corner) as follows: Work 1 ch for every ch/tr skipped. Then work pattern as before until the middle between 3rd and 4th corner. Now work ch until beg of round as follows: Work 1 ch for every ch/tr skipped. On next round work pattern and inc as before over all sts, also in ch for armholes. Continue like this until square measures approx. 78-80-82-84-86-88 cm x 78-80-82-84-86-88 cm (i.e. approx. 21 cm in all sizes from armhole) - adjust to finish after 9th round (round with ch-spaces and trebles). Cut the yarn. FRONT PIECE: Beg from WS and work back and forth between first and second corner. NOTE: Work front piece without inc. Work according to diagram A.2 from first corner, i.e. work as follows: ROW 1: 3 ch (= 1 dc + 2 ch), 1 dc + 2 ch + 1 dc in first ch-space, * 6 ch, 1 dc + 2 ch + 1 dc in next ch-space*, repeat from *-* the entire row and finish with 2 ch and 1 dc in first ch-space in the corner, turn piece. ROW 2 (= RS): 3 ch (= 1 tr), * 2 tr + 2 ch + 2 tr in ch-space between 2 dc, 1 dc in 6-ch-space *, repeat from *-* the entire row and finish with 1 tr in 1st ch from beg of previous row, turn piece. ROW 3: 4 ch (= 1 tr + 1 ch), * 1 tr + 2 ch + 1 tr in ch-space in the middle of tr-group, 3 ch *, repeat from *-* until 1 tr-group remains before the corner, 1 tr + 2 ch + 1 tr in ch-space in last tr-group, finish with 1 ch and 1 tr in 3rd ch from beg of previous row, turn piece. ROW 4 (= RS): 5 ch (= 1 tr + 2 ch), * 1 tr in ch-space in tr-group, 5 ch *, repeat from *-* until 1 tr-group remains, 1 tr in ch-space in last tr-group, 2 ch and 1 tr in 3rd ch from beg of previous row, turn piece. ROW 5: 7 ch (= 1 dc + 6 ch), * 1 dc + 2 ch + 1 dc in 5-ch-space, 6 ch *, repeat from *-* the entire row and finish with 1 dc in 3rd ch from beg of previous row, turn piece. ROW 6 (= RS): 6 ch (= 1 tr + 3 ch), * 1 dc in 6-ch-space, 2 tr + 2 ch + 2 tr in 2-ch-space *, repeat from *-* the entire row and finish with 1 dc in last 6-ch-space, 3 ch and 1 tr in first ch from beg of previous row, turn piece. ROW 7: 4 ch (= 1 tr + 1 ch), 1 tr in same st, * 3 ch, 1 tr + 2 ch + 1 tr in ch-space in the middle of next tr-group *, repeat from *-* the entire row and finish with 3 ch and 1 tr + 1 ch + 1 tr in 3rd ch from beg of previous row, turn piece. ROW 8 (= RS): 8 ch (= 1 tr + 5 ch), * 1 tr in ch-space in the middle of tr-group, 5 ch *, repeat from *-* the entire row and finish with 5 ch and 1 tr in 3rd ch from beg of previous row, turn piece. Repeat rows 1 to 8 outwards. Continue like this until approx. 19-20-21-22-23-24 cm have been worked back and forth, fasten off (adjust after 1st or 5th row in pattern). Repeat on the other side, now work back and forth from third to fourth corner. EDGE: Finally work a round around the entire piece with 2nd or 6th row in pattern but in ch-space in each corner work 6 tr. Fasten off. SLEEVE: Work back and forward and sew togheter at the end. Sleeve is worked straight out of armhole of the body, top down. Beg mid under armhole, from RS. 1 dc in first st, then work ch-space as on 4th or 8th row in A.2. Work so that there are 12-13-14-15-15-16 ch-spaces around armhole. Then continue with pattern according to diagram A.2. Work pattern like this until sleeve measures 26 cm. Now work according to A.3. On every row with arrow work 2 tr tog into 1 tr mid front of sleeve (i.e. dec 1 ch-space on every row with arrow) - READ DECREASE TIP. The dotted line shows mid front of sleeve. Otherwise continue the pattern as before. Dec on every 4th row a total of 4 times. Then work according to diagram A.2 until sleeve measures 56 cm in all sizes. Fasten off. Repeat in the other side. |
||||||||||||||||||||||
Diagram explanations |
||||||||||||||||||||||
|
||||||||||||||||||||||
 |
||||||||||||||||||||||
 |
||||||||||||||||||||||
 |
||||||||||||||||||||||
 |
||||||||||||||||||||||
Have you finished this pattern?Tag your pictures with #dropspattern #springblisscardigan or submit them to the #dropsfan gallery. Do you need help with this pattern?You'll find 12 tutorial videos, a Comments/Questions area and more by visiting the pattern on garnstudio.com. © 1982-2025 DROPS Design A/S. We reserve all rights. This document, including all its sub-sections, has copyrights. Read more about what you can do with our patterns at the bottom of each pattern on our site. |
||||||||||||||||||||||


With over 40 years in knitting and crochet design, DROPS Design offers one of the most extensive collections of free patterns on the internet - translated to 17 languages. As of today we count 320 catalogues and 12094 patterns translated into English (UK/cm). 12094
We work hard to bring you the best knitting and crochet have to offer, inspiration and advice as well as great quality yarns at incredible prices! Would you like to use our patterns for other than personal use? You can read what you are allowed to do in the Copyright text at the bottom of all our patterns. Happy crafting!
Post a comment to pattern DROPS 162-5
We would love to hear what you have to say about this pattern!
If you want to leave a question, please make sure you select the correct category in the form below, to speed up the answering process. Required fields are marked *.