
Popular categories
Looking for a yarn?


Comments / Questions (43)
![]() Carina wrote:
Carina wrote:
Hola. Para hacer una elevación de cuello qué modelo puedo seguir? Gracias por su respuesta.
06.05.2022 - 18:10DROPS Design answered:
Hola Carina, por ejemplo, podrías trabajar el 195-19. Este es un jersey de abajo arriba, hecho con el mismo grupo de lanas y con una elevación con un número de puntos similar al de este modelo.
08.05.2022 - 19:01
![]() AINA HELEN VANGEN wrote:
AINA HELEN VANGEN wrote:
Ok. Det hadde vært bedre om det var som det var før , så slipper man å bla seg gjennom hele oppskrifta for å finne str. Jeg brukte Drops design alltid før, det gjør jeg ikke lenger pga dette.
24.05.2021 - 10:16
![]() Aina wrote:
Aina wrote:
Hvorfor står det ikke hvor store størrelsene er lenger?? Hvor stort er large f.eks
21.05.2021 - 16:48DROPS Design answered:
Hej Aina. Längst ner på oppskriften har du en måleskiss där du ser alla mål i cm i alla storlekar. Mvh DROPS Design
24.05.2021 - 08:10
![]() Antonella wrote:
Antonella wrote:
Salve, sto eseguendo questo modello. Vorrei sapere da dove devo misurare l'altezza del lavoro, se partendo dal bordo a maglia legaccio sui lati o dalle punte del motivo A1 che producono il bordino ondulato alla base del capo. Tra queste due misure infatti ci sono circa 2 cm di differenza in altezza. Grazie in anticipo.
10.09.2018 - 18:19DROPS Design answered:
Buonasera Antonella. Deve misurare lungo il bordo a maglia legaccio sui lati. Buon lavoro!
10.09.2018 - 19:40
![]() Barbara Zimmerman wrote:
Barbara Zimmerman wrote:
Loving the pattern! Are your measurements for when to do buttonholes, measured from the bottom of the buttonhole band or the bottom of the points created by the slip/K2/psso? The points are a bit longer. Thanks for your help!
09.08.2017 - 03:46DROPS Design answered:
Dear Barbara, thank you for your note and question. The placement for the buttonholes are measured from the bottom of the button-band (from the cast on edge). I hope this helps. Happy Knitting!
09.08.2017 - 10:36
![]() Ehret Ingrid wrote:
Ehret Ingrid wrote:
Bin gerade am stricken dieses models. habe nun die Ärmel darzu aufgenommen und bin nun an der Einteilung des musters A 2. leider stimmt die einteilungsangabe nicht. am ende geht diese nicht auf. bitte um Überprüfung und schnelle Rückantwort. dieses Modell soll bis 13.1.2016 fertig sein dies gibt ein geschenk.
05.01.2016 - 21:53
![]() Marisa wrote:
Marisa wrote:
Buongiorno, non ho capito; dopo aver lavorato il diagramma A1 devo attaccare con A2 e poi A3 o ripetere sempre A1? io ho terminato A1 e poi stavo lavorando a maglia rasata, ma confrontando l'immagine , vedo che invece c'e' la ripetizione del disegno. Poi vi chiedero' altro andando avanti con il lavoro grazie Marisa
03.09.2015 - 15:12DROPS Design answered:
Buongiorno Marisa, questo modello è bottom up, inizia dal basso verso l'alto: alla fine di A.1 deve lavorare a m rasata con il bordo a m legaccio, e a 7 cm inizierà le diminuzioni come indicato. Ci riscriva se qualcosa non è chiaro. Buon lavoro!
03.09.2015 - 15:18
![]() Myriam Guillemin wrote:
Myriam Guillemin wrote:
Suis en train de tricoter l'empiècement et je ne trouve pas dans la marche à suivre ou se font les diminutions Merci de votre aide
21.05.2015 - 19:27DROPS Design answered:
Bonjour Mme Guillemin, les diminutions de l'empiècement se font au niveau des diagrammes: 4 m sont diminuées à l'avant-dernier rang de chacun des motifs A.2 et A.3 puis 2 m sont diminuées dans l'avant-dernier rang de A.4. Bon tricot!
22.05.2015 - 09:34
![]() Gitte Damsgaard wrote:
Gitte Damsgaard wrote:
I str XXL har du 263 masker, skal tage ind 6 gange af 4 masker. Bliver så 239 masker. Mennnn....... I får det til 235 😳 Er ikke den første fejl jeg finder ( se kommentar) Er da i den græd surt og trals man ik kan regne med jeres opskrifter. Hvorfor ligge sådan noget " makværk" op hvor man skal bruge en masse tid på ar rette fejl????????
14.05.2015 - 19:27DROPS Design answered:
Hej Gitte, du tager ind på hver side af de to mærker først 1 gang og så 6 gange til = ialt 7 gange i din størrelse. 263 - 14 - 14 = = 235 m! God fornøjelse!
15.05.2015 - 09:47
![]() Gitte Damsgaard wrote:
Gitte Damsgaard wrote:
I skriver i opskriften,ved udtagning: sno omkring for at undgå hul. MEN du få jo et hul når du snor omkring. I skriver/viser det i jeres video. SÅ er ski da ireterende at i skriver det modsatte i opskriften, og så får man "glæden" ved at pille op������SÅ alle strik medsøster, 2 masker i en ved udtagning ������
14.05.2015 - 19:07DROPS Design answered:
Hej Gitte, Jeg tror du har misforstået opskriften. Hvis du tager ud ved at slå om og strikker omslaget drejet på næste pind (som vi skriver i opskriften), så vil du kun få et meget lille hul. Du har ret i at der findes mange forskellige måder at tage ud på, og det er naturligvis en smags sag. Vi har gjort det på den måde der står i opskrften. God fornøjelse!
15.05.2015 - 13:55
|
|||||||||||||||||||
Call It Spring Cardigan#callitspringcardigan |
|||||||||||||||||||
 |
 |
||||||||||||||||||
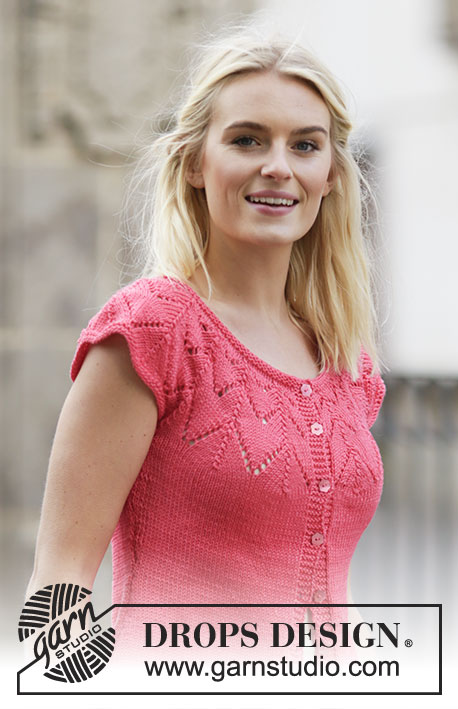
Knitted DROPS jacket in stocking st with lace pattern and round yoke in ”Muskat”. Size: S - XXXL.
DROPS 159-5 |
|||||||||||||||||||
|
GARTER ST (back and forth): K all rows. 1 ridge = 2 rows K. PATTERN: See diagrams A.1 to A.4. The diagrams show all rows in pattern seen from RS. DECREASE TIP: All dec are done from RS! Dec as follows before marker: Work until 2 sts before marker: K 2 tog. Dec as follows after marker: Slip 1 st as if to K, K 1, psso. INCREASE TIP: Inc 1 st by making 1 YO, on next row P YO twisted (i.e. work in back loop of st instead front) to avoid holes. BUTTONHOLES: Dec for buttonholes on right band. 1 buttonhole = K tog third and fourth st from edge and make 1 YO. Dec for buttonholes when piece measures: SIZE S: 5, 11, 17, 23, 29, 35, 41 and 47 cm. SIZE M: 6, 13, 19, 25, 31, 37, 42 and 49 cm. SIZE L: 6, 12, 19, 25, 32, 38, 45 and 51 cm. SIZE XL: 6, 12, 19, 26, 33, 40, 47 and 53 cm. SIZE XXL: 6, 13, 20, 27, 34, 41, 48 and 55 cm. SIZE XXXL: 7, 15, 22, 29, 36, 43, 50 and 57 cm. ---------------------------------------------------------- JACKET: Worked back and forth on circular needle. Cast on 221-235-249-277-305-333 sts (incl 5 band sts in garter st in each side) on circular needle size 4 mm with Muskat. Work 2 ridges in GARTER ST back and forth - see explanation above! Continue to work PATTERN as follows (= from RS): 5 band sts in garter st, A.1 (= 14 sts on 1st row) 15-16-17-19-21-23 times in width, 1 st in stocking st, 5 band sts in garter st = 191-203-215-239-263-287 sts. NOTE: Work 5 band sts in garter st in each side until finished measurements. REMEMBER THE KNITTING TENSION REMEMBER BUTTONHOLES! When entire A.1 has been worked vertically, insert a marker in each side as follows: Insert a marker after 50-53-56-62-68-74 sts in from each side of piece for front piece. There are now 91-97-103-115-127-139 sts for back piece. Then continue in stocking st inside band sts in garter st. When piece measures 7 cm, dec 1 st on each side of each marker - READ DECREASE TIP. Repeat dec every 2-2½-4-2½-2-2½ cm 6-5-3-5-6-5 more times = 163-179-199-215-235-263 sts. When piece measures 24 cm, inc 1 st on each side of the 2 markers - READ INCREASE TIP! Repeat inc every 1-1-1½-2-2-2 cm 7-6-5-4-6-6 more times = 195-207-223-235-263-291 sts. When piece measures 35-37-38-40-41-43 cm, cast off sts for armhole as follows on next row: Work the first 47-50-54-56-63-70 sts, cast off the next 8-8-8-10-10-10 sts for armhole, work the next 85-91-99-103-117-131 sts, cast off the next 8-8-8-10-10-10 sts for armhole, work the remaining 47-50-54-56-63-70 sts = 179-191-207-215-243-271 sts. Put piece aside and knit the sleeve edges. SLEEVE EDGE: Worked back and forth on circular needle. Cast on 62-64-65-71-74-76 sts on circular needle size 4 mm with Muskat. K 3 rows back and forth (1st row = WS). Work next row as follows: Cast off the first 4-4-4-5-5-5 sts, K the next 54-56-57-61-64-66 sts while AT THE SAME TIME inc 6-6-5-5-4-4 sts evenly (inc by working 2 sts in 1 st), cast off the last 4-4-4-5-5-5 sts, cut the yarn = 60-62-62-66-68-70 sts. Put piece aside and knit another sleeve edge. YOKE: Slip sleeve edges on to same circular needle as body where armholes were cast off = 299-315-331-347-379-411 sts. Work 1 row from WS. Now work pattern as follows: 5 band sts in garter st, A.2 (18-19-20-21-23-25 times) until 6 sts remain, 1 st in stocking st, 5 band sts in garter st. NOTE: See arrow in diagram A.2 and A.3 for correct size. When A.2 has been worked vertically, continue with A.3 over A.2 and A.4 over A.3. There are now 119-125-131-137-149-161 sts on needle. Work 1 ridge while AT THE SAME TIME dec 7-5-3-1-5-9 sts evenly on 1st row from RS = 112-120-128-136-144-152 sts. Work 1 more ridge and loosely cast off. ASSEMBLY: Sew sleeve seams tog edge to edge in front loop of outermost sts. Sew the openings under the sleeves. Sew in outer loops of edge sts. Sew the buttons on to the left band. |
|||||||||||||||||||
Diagram explanations |
|||||||||||||||||||
|
|||||||||||||||||||

|
|||||||||||||||||||

|
|||||||||||||||||||
Have you finished this pattern?Tag your pictures with #dropspattern #callitspringcardigan or submit them to the #dropsfan gallery. Do you need help with this pattern?You'll find 24 tutorial videos, a Comments/Questions area and more by visiting the pattern on garnstudio.com. © 1982-2025 DROPS Design A/S. We reserve all rights. This document, including all its sub-sections, has copyrights. Read more about what you can do with our patterns at the bottom of each pattern on our site. |
|||||||||||||||||||


With over 40 years in knitting and crochet design, DROPS Design offers one of the most extensive collections of free patterns on the internet - translated to 17 languages. As of today we count 314 catalogues and 11820 patterns translated into English (UK/cm). 11820
We work hard to bring you the best knitting and crochet have to offer, inspiration and advice as well as great quality yarns at incredible prices! Would you like to use our patterns for other than personal use? You can read what you are allowed to do in the Copyright text at the bottom of all our patterns. Happy crafting!
Post a comment to pattern DROPS 159-5
We would love to hear what you have to say about this pattern!
If you want to leave a question, please make sure you select the correct category in the form below, to speed up the answering process. Required fields are marked *.