
Looking for a yarn?


Comments / Questions (76)
Mahshid wrote:
I'm from Iran. thanks for your beautiful pattern.I love it
13.03.2013 - 06:32
![]() Annie wrote:
Annie wrote:
Ho! que c'est beau et frais !
06.02.2013 - 17:24
![]() Da Silva wrote:
Da Silva wrote:
J'adore ce modele,hate d'avoir les explications ,merci pour votre site
24.01.2013 - 10:20Diane wrote:
Super beau, j'aimerais bien avoir les explications.
20.01.2013 - 16:58
![]() Binini wrote:
Binini wrote:
Sehr schönes Modell, würde es gerne nacharbeiten.
18.01.2013 - 13:54
![]() Hana wrote:
Hana wrote:
HEZKÝ LETNÍ.
16.01.2013 - 14:27
![]() ArwensChild wrote:
ArwensChild wrote:
Hoffe, dieses Modell wird bald hochgeladen, freue mich schon so darauf!
16.01.2013 - 10:52Violeta wrote:
Schoen waere auch etwas laenger, als Kleid:-)
14.01.2013 - 11:29
![]() Inge wrote:
Inge wrote:
Den mus ich unbedingt nacharbeiten
11.01.2013 - 11:49
![]() Ruth wrote:
Ruth wrote:
Darling Baby Doll
06.01.2013 - 05:22
|
||||||||||
Yasmin#yasmintunic |
||||||||||
 |
 |
|||||||||
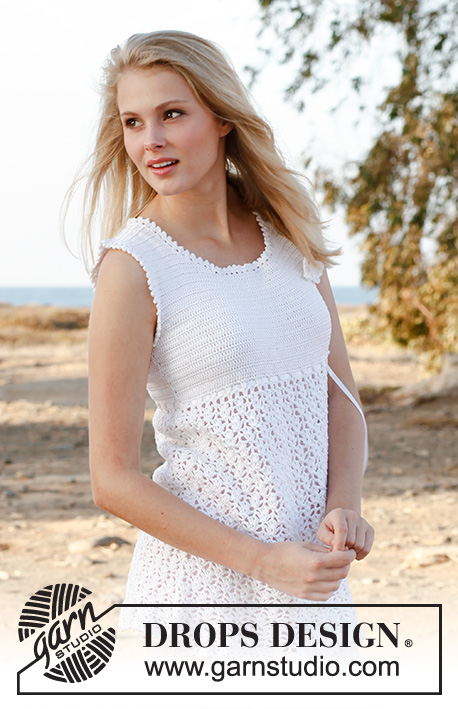
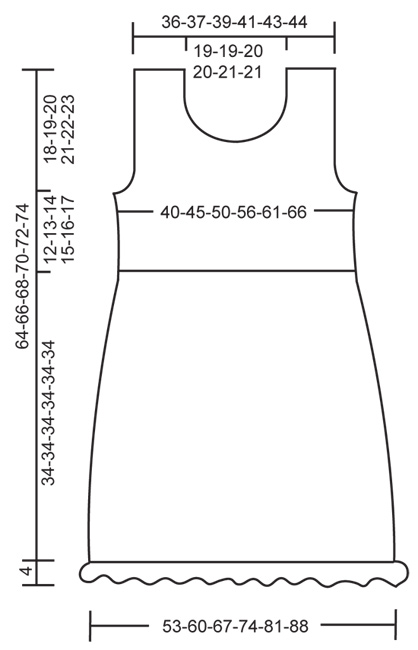
Crochet DROPS tunic with lace pattern, flounce at the bottom and butterfly for decoration in ”Cotton Viscose”.
DROPS 148-9 |
||||||||||
|
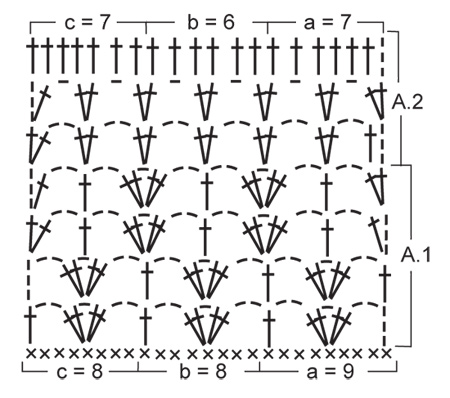
CROCHET INFO: Replace first tr on every row with 3 ch. PATTERN: See diagrams A.1 and A.2. DECREASE TIP (applies to neck and armhole): Dec at beg of row as follows: Work sl sts over no of tr to be dec. Dec at end of row as follows: When no of tr to be dec remains, turn. -------------------------------------------------------- TUNIC: Worked back and forth in 2 parts and sewn tog when finished. FRONT PIECE: Work 141-160-178-197-216-234 ch on hook size 3 mm with Cotton Viscose. Continue with 1 dc in 2nd ch from hook, then 1 dc in each of the next 6-4-8-6-4-8 ch, * skip 1 ch, 1 dc in each of the next 6 ch *, repeat from *-* the entire row = 121-137-153-169-185-201 dc. Continue pattern A.1 as follows: Diagram a over the first 9 dc, diagram b until 8 dc remain, then diagram c over these (= 15-17-19-21-23-25 repetitions in total on row). Repeat the 4 rows in diagram A.1 upwards until piece measures approx. 32 cm – finish after 4th row in diagram. REMEMBER THE CROCHET TENSION! Then work diagram A.2 one time vertically. When A.2 has been worked, there are 92-104-116-128-140-152 tr on row. Then work 1 tr in every tr - READ CROCHET INFO. When piece measures 46-47-48-49-50-51 cm, dec for armhole in each side on every row as follows – READ DECREASE TIP: 4 tr 1 time, 3 tr 0-0-1-1-2-3 times, 2 tr 0-1-1-3-3-4 times and 1 tr 1-3-4-4-5-4 times in each side = 82-86-90-94-98-102 tr remain on row. When piece measures 53-54-56-57-59-60 cm, beg neck dec and finish each shoulder separately. FIRST SHOULDER: Work tr back and forth over the first 28-30-31-33-34-36 tr in one side – AT THE SAME TIME dec towards the neck on every row: 3 tr 1 time, 2 tr 2 times and 1 tr 2 times = 19-21-22-24-25-27 tr remain on shoulder. When piece measures 64-66-68-70-72-74 cm, cut the thread. OTHER SHOULDER: Work the same way as the first. BACK PIECE: Work as front piece up to and with armhole dec = 82-86-90-94-98-102 tr on row. Continue to work until piece measures approx. 62-64-66-68-70-72 cm. Now finish each shoulder separately as follows: Work 1 row with tr over the first 21-23-24-26-27-29 tr, turn, dec the first 2 tr and work the rest of row, cut the thread. Repeat on the other shoulder. ASSEMBLY: Sew shoulder seams edge to edge to avoid a chunky seam. Sew side seams edge to edge so that they are less visible. FLOUNCE AT THE BOTTOM: Work in the dc row at the bottom of body as follows (beg in one side): ROUND 1: 1 dc in first dc, * 3 ch, skip 1 dc, 1 dc in next dc *, repeat from *-* the entire round, finish with 1 sl st in first dc. ROUND 2: 2 ch, 1 dc in first ch-loop, * 4 ch, 1 dc in next ch-loop *, repeat from *-* the entire round, finish with 1 sl st in first dc. ROUND 3: 2 ch, 1 dc in first ch-loop, * 4 ch, 1 dc in next ch-loop *, repeat from *-* the entire round, finish with 1 sl st in first dc. ROUND 4: 2 ch, 1 dc in first ch-loop, * 5 ch, 1 dc in next ch-loop *, repeat from *-* the entire round, finish with 1 sl st in first dc. ROUND 5: 2 ch, 1 dc in first ch-loop, * 5 ch, 1 dc in next ch-loop *, repeat from *-* the entire round, finish with 1 sl st in first dc. ROUND 6: Work as follows in every ch-loop: 2 dc + 1 picot (= 3 ch, 1 dc in first ch) + 2 dc. Cut and fasten the thread. EDGE AROUND THE ARMHOLES AND NECK: Beg mid back of neck and mid under armhole. ROUND 1: 1 dc in first st, * 3 ch, skip approx. ½ cm, 1 dc in next st *, repeat from *-* the entire round, finish with 1 sl st in first dc. ROUND 2: Work as follows in every ch-loop: 1 dc + 1 picot (= 3 ch, 1 dc in first ch) + 1 dc. Cut and fasten the thread. SILK RIBBON: Thread a silk ribbon in the row with eyelet holes at the top below the yoke – beg and end in the left side at the front and make a small bow. BUTTERFLY - for decoration: WINGS: Work 15 ch on hook size 3 mm. Work all rows from RS. ROW 1: Work 3 triple tr in 6th ch from hook, 1 ch, 1 tr in next ch, 2 ch (on 2nd row beg working here), 2 triple tr in next ch, 1 triple tr in next ch, 3 ch, 1 sl st in next ch, 3 ch (on 3rd row beg working here), 1 triple tr in next ch, 2 triple tr in next ch, 1 ch, 1 tr in next ch, 2 ch, 3 triple tr in next ch, 5 ch, 1 sl st in last ch. Cut and fasten the thread. ROW 2: Start by working 1 sl st in the second of the 2 ch from previous row (see 1st row), 1 ch, in next triple tr work as follows: 1 htr and 1 tr, in next triple tr work as follows: 1 tr (on 4th row beg working here), 1 ch, 1 dtr and 1 tr, in next triple tr work as follows: 1 tr and 1 htr, 1 ch, 1 sl st in the 1st of the 3 ch from previous row. Cut and fasten the thread. ROW 3: Start by working 1 sl st in the third of the 3 ch from 1st row (see 1st row), 1 ch, in next triple tr work as follows: 1 htr and 1 tr, in next triple tr work as follows: 1 tr (on 5th row beg working here), 1 dtr, 1 ch, 1 tr, in next triple tr work as follows: 1 tr and 1 htr, 1 ch, 1 sl st in 1 ch from 1st row. Cut and fasten the thread. ROW 4: Start by working 1 sl st in tr from 2nd row (see 2nd row), 1 ch, in next dtr work as follows: 1 dc, 1 ch and 1 dc, 1 ch, 1 sl st in next tr. Cut and fasten the thread. ROW 5: Start by working 1 sl st in tr from 3rd row (see 3rd row), 1 ch, in next dtr work as follows: 1 dc, 1 ch and 1 dc, 1 ch, 1 sl st in next tr. Cut and fasten the thread. BODY: Work as follows with double yarn: 6 ch, 2 dc in the 2nd ch from hook (= head). Cut and fasten the thread. Sew the body on to the wings with the head up between the big wings. Finish by working a row of sl sts along the edge of the big wings. Sew the butterfly to the left side of yoke. |
||||||||||
Diagram explanations |
||||||||||
|
||||||||||
 |
||||||||||
 |
||||||||||
Have you finished this pattern?Tag your pictures with #dropspattern #yasmintunic or submit them to the #dropsfan gallery. Do you need help with this pattern?You'll find 9 tutorial videos, a Comments/Questions area and more by visiting the pattern on garnstudio.com. © 1982-2025 DROPS Design A/S. We reserve all rights. This document, including all its sub-sections, has copyrights. Read more about what you can do with our patterns at the bottom of each pattern on our site. |
||||||||||


With over 40 years in knitting and crochet design, DROPS Design offers one of the most extensive collections of free patterns on the internet - translated to 17 languages. As of today we count 320 catalogues and 12092 patterns translated into English (UK/cm). 12092
We work hard to bring you the best knitting and crochet have to offer, inspiration and advice as well as great quality yarns at incredible prices! Would you like to use our patterns for other than personal use? You can read what you are allowed to do in the Copyright text at the bottom of all our patterns. Happy crafting!
Post a comment to pattern DROPS 148-9
We would love to hear what you have to say about this pattern!
If you want to leave a question, please make sure you select the correct category in the form below, to speed up the answering process. Required fields are marked *.