
Looking for a yarn?


Comments / Questions (77)
![]() Yolanda wrote:
Yolanda wrote:
Ik snap niet zo goed hoe ik de 4 patroonhh moet maken tot 32 cm hoogte a1 en dan 4 toeren dus maar als je dan weer bij toer 1 komt begint komt hetbpatroon niet uit als iknhet zo zie of moet ik alleen de eerste 2 rijen van a1 doen ik hoor graag van u mvg yolanda
07.07.2025 - 15:41DROPS Design answered:
Dag Yolanda,
Je haakt alle 4 toeren van A.1 in de hoogte, als je die klaar hebt, haak je opnieuw alle 4 toeren. Dit doe je steeds totdat je op de juiste hoogte bent.
08.07.2025 - 20:56
![]() Delphine wrote:
Delphine wrote:
Je fais le modèle en taille L et j'arrive à la fin des diminutions pour les emmanchures mais il me reste 88 mailles et non 90 ?
31.05.2025 - 17:07DROPS Design answered:
Bonjour Delphine, en taille L, vous diminuez pour les emmanchures de chaque côté: 1 x 4 B, 1 x 3 B, 1 x 2 B et 4x 1 B soit (4+3+2+4=13 B de chaque côté donc 26 brides au total, vous aviez alors 116 brides - 26, il doit bien vous en rester 90. Bon crochet!
02.06.2025 - 08:03
![]() Brenda Garrod wrote:
Brenda Garrod wrote:
I would like to make the bottom larger so that it would be looser. Do you have any suggestions? I thought of using a larger crochet hook.
02.02.2025 - 16:13DROPS Design answered:
Dear Mrs Garrod, this could be an idea, maybe divide the height in so many crochet hook size you will use to get the desired width (remember to swatch before), to make a smoother "increase". Happy crocheting!
03.02.2025 - 14:04
![]() Christy wrote:
Christy wrote:
I am having a issue with the dec for armhole. The issue is all the numbers I am making a size small dec for armhole in each side on every row as follows – READ DECREASE TIP: 4 dc 1 time, 3 dc 0-0-1-1-2-3 times, 2 dc 0-1-1-3-3-4 times and 1 dc 1-3-4-4-5-4 times in each side = 82-86-90-94-98-102 dc remain on row. When piece measures 53-54-56-57-59-60 cm / 21"-21 1/4"-22"-22½"-23 1/4"-23½", beg neck dec and finish each shoulder separately.
19.04.2022 - 02:21DROPS Design answered:
Dear Christy, size Small is the first size - you have then to follow only the first numbers: 4 dc 1 time and 1 dc 1 time in each side = 82 dc remain (= 5 dc decreased on each side). Happy crocheting!
19.04.2022 - 11:57
![]() Fia Älander wrote:
Fia Älander wrote:
Hur vet jag vilken storlek jag ska virka?
17.03.2022 - 10:49DROPS Design answered:
Hej Fia. Det finns en måttskiss längst ner på mönstret där alla mått finns i cm, i alla storlekar. Mät gärna ett plagg du redan har och välj den storlek som är närmast. Mvh DROPS Design
17.03.2022 - 12:00
![]() Desiree Barhorst-Weller wrote:
Desiree Barhorst-Weller wrote:
Oeps, ik stelde mijn vraag bij het verkeerde patroon! Toch heb ik hier ook een vraag over: de afmeting die ik heb onder mijn buste is 112 cm en ik haak wat ruimer (ik kwam bij XXXL op 92 i.p.v. 88 cm). Welke maat heb ik nu nodig en kan ik dan beter een haaknaald kleiner nemen? En als ik dan wel een proeflapje moet maken, hoe dan?
11.03.2022 - 14:32DROPS Design answered:
Dag Desiree,
Als je wat ruimer haakt kun je het beste een kleinere haaknaald nemen en opnieuw een proeflapje maken zodat de stekenverhouding overeenkomt met de stekenverhouding in het patroon. De maten in de schematekening zijn de maten over de buste, dus over het breedste punt van de buste gemeten en niet onder de buste.
14.03.2022 - 12:59
![]() Desiree Barhorst-Weller wrote:
Desiree Barhorst-Weller wrote:
Ik zou graag een deken willen haken van 120x200 cm. Hoeveel steken zou ik daarvoor op moeten zetten en hoeveel bollen zou ik daarvoor nodig hebben? Ik kan het helaas niet meer navragen in de winkel, omdat ik de bollen jaren geleden heb gekocht en de winkel er niet meer is.
11.03.2022 - 14:29
![]() Susan C wrote:
Susan C wrote:
I'm ready to start this pattern in size large but I don't understand why I should skip chains in the first row. I have looked at the instructions for the flounce and it doesn't seem to coincide with the beginning row of the sweater. What happens to those skipped chains? And I'm thinking of doing it in the round up to the armholes. So should I continue on with "skip 1 ch , 1 sc in next 6 chains"? Or should I do a second "sc in the next 8 chains"?
17.10.2021 - 19:19DROPS Design answered:
Dear Susan C, the chain is usually longer than the actual number of stitches needed in order to avoid it getting too tight. You only skip these in the first row, then you work according to the pattern. Happy crochetting!
17.10.2021 - 19:54
![]() Gia wrote:
Gia wrote:
I'm not able to understand the decreasing method for armholes .I am making the medium size
10.03.2021 - 19:10DROPS Design answered:
Dear Gia, what part is exactly that you do not understand? The method, or the amount of stitches decreased? Please remember that you can always ask for help (in person or over the phone) in the store you bought your DROPS yarn from. Happy Crafting!
11.03.2021 - 01:10
![]() Darlene M Duval wrote:
Darlene M Duval wrote:
I need to find an alternative yarn because the viscose cotton yarn has been discontinued. I need to replace it with 900 grams, the next choice in the conversion chart is the thread count. This I don't know. What thread count is the yarn? Please provide an alternative yarn, thread count. Thank you.
28.07.2020 - 05:13DROPS Design answered:
Dear Darlene, The thread count means if you want to knit up a garment with 1 yarn or with yarn doubled (for thicker garments). Here is a list of the substitute yarns for DROPS Cotton Viscose (note some are Winter yarns) 0g DROPS Fabel (1 thread) - 0g DROPS Delight (1 thread) - 0g DROPS Baby Merino (1 thread) - 0g DROPS Flora (1 thread) - 0g DROPS Safran (1 thread) - 0g DROPS Nord (1 thread) - 0g DROPS Alpaca (1 thread) - 0g DROPS BabyAlpaca Silk (1 thread) Happy Knitting!
28.07.2020 - 10:58
|
||||||||||
Yasmin#yasmintunic |
||||||||||
 |
 |
|||||||||
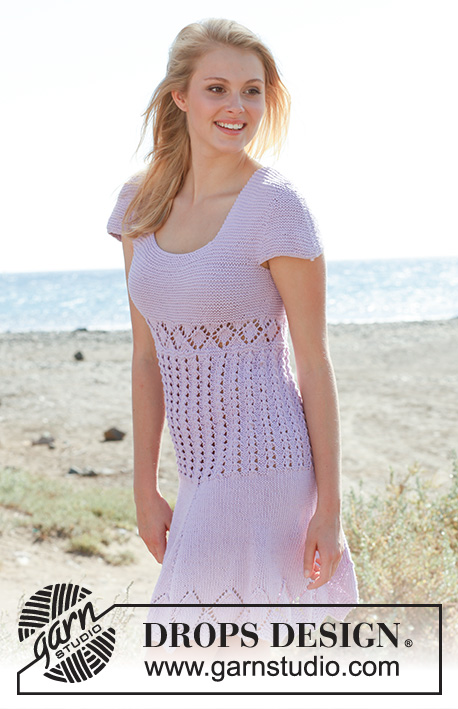
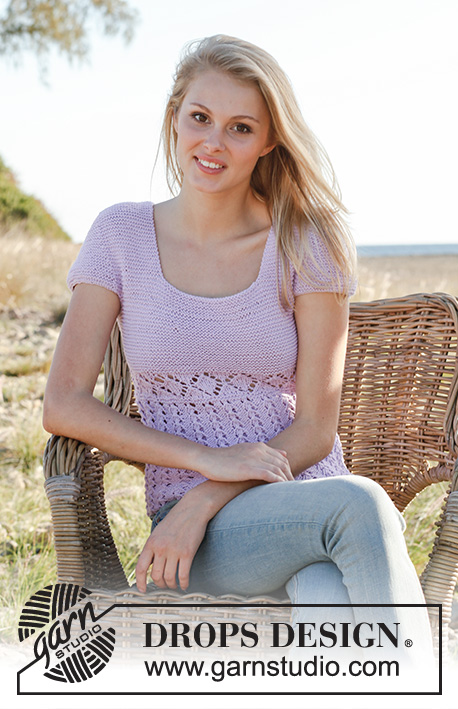
Crochet DROPS tunic with lace pattern, flounce at the bottom and butterfly for decoration in ”Cotton Viscose”.
DROPS 148-9 |
||||||||||
|
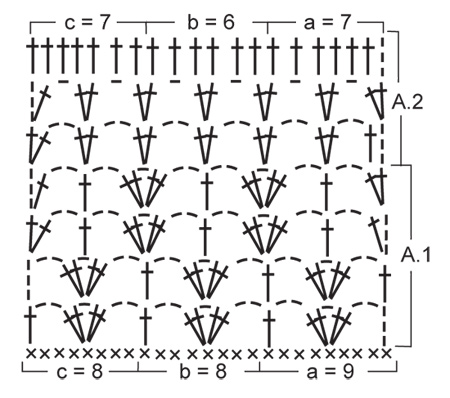
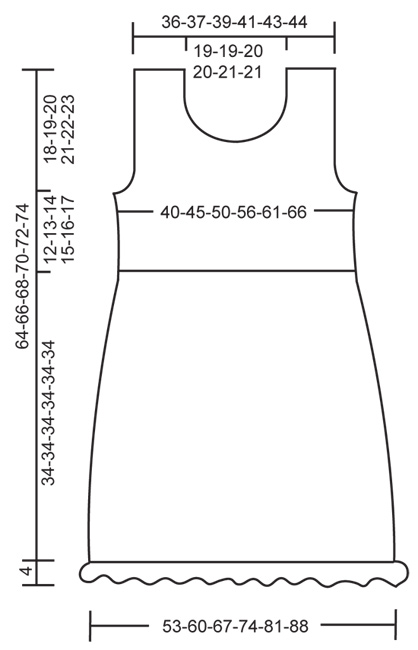
CROCHET INFO: Replace first dc on every row with 3 ch. PATTERN: See diagrams A.1 and A.2. DECREASE TIP (applies to neck and armhole): Dec at beg of row as follows: Work sl sts over no of dc to be dec. Dec at end of row as follows: When no of dc to be dec remains, turn. -------------------------------------------------------- TUNIC: Worked back and forth in 2 parts and sewn tog when finished. FRONT PIECE: With Cotton Viscose ch 141-160-178-197-216-234 on hook size 3 mm / C . Continue with 1 sc in 2nd ch from hook, then 1 sc in each of the next 6-4-8-6-4-8 ch, * skip ch 1, 1 sc in each of the next 6 ch *, repeat from *-* the entire row = 121-137-153-169-185-201 sc. Continue pattern A.1 as follows: Diagram a over the first 9 sc, diagram b until 8 sc remain, then diagram c over these (= 15-17-19-21-23-25 repetitions in total on row). Repeat the 4 rows in diagram A.1 upwards until piece measures approx. 32 cm / 12½" – finish after 4th row in diagram. REMEMBER THE CROCHET GAUGE! Then work diagram A.2 one time vertically. When A.2 has been worked, there are 92-104-116-128-140-152 dc on row. Then work 1 dc in every dc - READ CROCHET INFO. When piece measures 46-47-48-49-50-51 cm / 18"-18½"-19"-19¼"-19¾"-20" / 18"-18½"-19"-19¼"-19¾"-20", dec for armhole in each side on every row as follows – READ DECREASE TIP: 4 dc 1 time, 3 dc 0-0-1-1-2-3 times, 2 dc 0-1-1-3-3-4 times and 1 dc 1-3-4-4-5-4 times in each side = 82-86-90-94-98-102 dc remain on row. When piece measures 53-54-56-57-59-60 cm / 21"-21¼"-22"-22½"-23¼"-23½", beg neck dec and finish each shoulder separately. FIRST SHOULDER: Work dc back and forth over the first 28-30-31-33-34-36 dc in one side – AT THE SAME TIME dec towards the neck on every row: 3 dc 1 time, 2 dc 2 times and 1 dc 2 times = 19-21-22-24-25-27 dc remain on shoulder. When piece measures 64-66-68-70-72-74 cm / 25¼"-26"-26¾"-27½"-28⅜"-29⅛", cut the yarn. OTHER SHOULDER: Work the same way as the first. BACK PIECE: Work as front piece up to and with armhole dec = 82-86-90-94-98-102 dc on row. Continue to work until piece measures approx. 62-64-66-68-70-72 cm / 24⅜"-25¼"-26"-26¾"-27½"-28⅜". Now finish each shoulder separately as follows: Work 1 row with dc over the first 21-23-24-26-27-29 dc, turn, dec the first 2 dc and work the rest of row, cut the thread. Repeat on the other shoulder. ASSEMBLY: Sew shoulder seams edge to edge to avoid a chunky seam. Sew side seams edge to edge so that they are less visible. FLOUNCE AT THE BOTTOM: Work in the sc row at the bottom of body as follows (beg in one side): ROUND 1: 1 sc in first sc, * ch 3, skip 1 sc, 1 sc in next sc *, repeat from *-* the entire round, finish with 1 sl st in first sc. ROUND 2: ch 2, 1 sc in first ch-space, * ch 4, 1 sc in next ch-space *, repeat from *-* the entire round, finish with 1 sl st in first sc. ROUND 3: ch 2, 1 sc in first ch-space, * ch 4, 1 sc in next ch-space *, repeat from *-* the entire round, finish with 1 sl st in first sc. ROUND 4: ch 2, 1 sc in first ch-space, * ch 5, 1 sc in next ch-space *, repeat from *-* the entire round, finish with 1 sl st in first sc. ROUND 5: ch 2, 1 sc in first ch-space, * ch 5, 1 sc in next ch-space *, repeat from *-* the entire round, finish with 1 sl st in first sc. ROUND 6: Work as follows in every ch-space: 2 sc + 1 picot (= ch 3, 1 sc in first ch) + 2 sc. Fasten off. EDGE AROUND THE ARMHOLES AND NECK: Beg mid back of neck and mid under armhole. ROUND 1: 1 sc in first st, * ch 3, skip approx. ½ cm / ¼", 1 sc in next st *, repeat from *-* the entire round, finish with 1 sl st in first sc. ROUND 2: Work as follows in every ch-space: 1 sc + 1 picot (= ch 3, 1 sc in first ch) + 1 sc. Fasten off. SILK RIBBON: Thread a silk ribbon in the eyelet row at the top below the yoke – beg and end in the left side at the front and make a small bow. BUTTERFLY - for decoration: WINGS: Ch 15 on hook size 3 mm / C. Work all rows from RS. ROW 1: Work 3 dtr in 6th ch from hook, ch 1, 1 dc in next ch, ch 2 (on 2nd row beg working here), 2 dtr in next ch, 1 dtr in next ch, ch 3, 1 sl st in next ch, ch 3 (on 3rd row beg working here), 1 dtr in next ch, 2 dtr in next ch, ch 1, 1 dc in next ch, ch 2, 3 dtr in next ch, ch 5, 1 sl st in last ch. Fasten off. ROW 2: Start by working 1 sl st in the second of the 2 ch from previous row (see 1st row), ch 1, in next dtr work as follows: 1 hdc and 1 dc, in next dtr work as follows: 1 dc (on 4th row beg working here), ch 1, 1 tr and 1 dc, in next dtr work as follows: 1 dc and 1 hdc, ch 1, 1 sl st in the 1st of the 3 ch from previous row. Fasten off. ROW 3: Start by working 1 sl st in the third of the 3 ch from 1st row (see 1st row), ch 1, in next dtr work as follows: 1 hdc and 1 dc, in next dtr work as follows: 1 dc (on 5th row beg working here), 1 tr, ch 1, 1 dc, in next dtr work as follows: 1 dc and 1 hdc, ch 1, 1 sl st in 1 ch from 1st row. Fasten off. ROW 4: Start by working 1 sl st in dc from 2nd row (see 2nd row), ch 1, in next tr work as follows: 1 sc, 1 ch and 1 sc, ch 1, 1 sl st in next dc. Fasten off. ROW 5: Start by working 1 sl st in dc from 3rd row (see 3rd row), ch 1, in next tr work as follows: 1 sc, 1 ch and 1 sc, ch 1, 1 sl st in next dc. Fasten off. BODY: Work as follows with double yarn: ch 6, 2 sc in the 2nd ch from hook (= head). Fasten off.Sew the body on to the wings with the head up between the big wings. Finish by working a row of sl sts along the edge of the big wings. Sew the butterfly to the left side of yoke. |
||||||||||
Diagram explanations |
||||||||||
|
||||||||||
|
||||||||||
|
||||||||||
Have you finished this pattern?Tag your pictures with #dropspattern #yasmintunic or submit them to the #dropsfan gallery. Do you need help with this pattern?You'll find 9 tutorial videos, a Comments/Questions area and more by visiting the pattern on garnstudio.com. © 1982-2025 DROPS Design A/S. We reserve all rights. This document, including all its sub-sections, has copyrights. Read more about what you can do with our patterns at the bottom of each pattern on our site. |
||||||||||


With over 40 years in knitting and crochet design, DROPS Design offers one of the most extensive collections of free patterns on the internet - translated to 17 languages. As of today we count 314 catalogs and 11822 patterns - 11812 of which are translated into English (US/in).
We work hard to bring you the best knitting and crochet have to offer, inspiration and advice as well as great quality yarns at incredible prices! Would you like to use our patterns for other than personal use? You can read what you are allowed to do in the Copyright text at the bottom of all our patterns. Happy crafting!
Post a comment to pattern DROPS 148-9
We would love to hear what you have to say about this pattern!
If you want to leave a question, please make sure you select the correct category in the form below, to speed up the answering process. Required fields are marked *.