
Looking for a yarn?


Comments / Questions (53)
![]() Marylene wrote:
Marylene wrote:
Jolie
05.07.2012 - 09:20
![]() Rosmarie wrote:
Rosmarie wrote:
Zeichnet sich durch sein schlichtheit aus zudem liebe ich rot. als übergang zwischen sommer und herbst.
29.06.2012 - 13:05
![]() Gitte Skovholm wrote:
Gitte Skovholm wrote:
Den er rigtig rigtig sød.Håber den kommer med mønster.
27.06.2012 - 19:36Nathalie wrote:
Tres facile et super joli .on peut meme le faire avec le cotton litght pour l ete ?
18.06.2012 - 22:12
![]() Susanne wrote:
Susanne wrote:
I bladet med den. Den skal strikkes
08.06.2012 - 19:38Vtana wrote:
I'm not a fan of crochet, I do crochet for some projects, but I gotta say, this one so cool! I voted for it, so please public it! :D
07.06.2012 - 22:21
![]() Anke wrote:
Anke wrote:
Ein absoluter Hingucker!
06.06.2012 - 16:06
![]() Heidi wrote:
Heidi wrote:
Tosi kaunis liivi!
05.06.2012 - 11:40
![]() Magda wrote:
Magda wrote:
Wie schon gesagt, diese Häkelweste ist sehr schick und trägt nicht auf! Die möchte ich unbedingt nachhäkeln
03.06.2012 - 17:26
![]() Andrea wrote:
Andrea wrote:
Endlich mal ein gehäkeltes Kleidungsstück das auch wirklich schick ist. Ich liebe das Häkeln, aber meist tragen gehäkelte Sachen auf. Diese Weste nicht.
02.06.2012 - 17:32
|
||||||||||||||||||||||
Christel#christelcardigan |
||||||||||||||||||||||
|
|
||||||||||||||||||||||
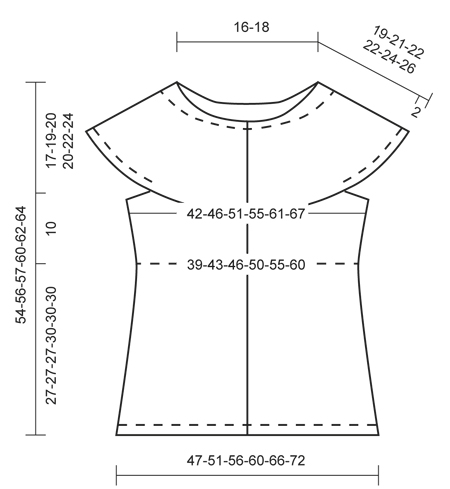
Crochet DROPS vest with round yoke in ”Lima”. Size: S - XXXL.
DROPS 140-7 |
||||||||||||||||||||||
|
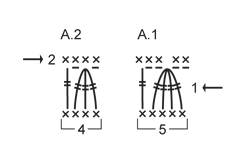
DC ROW: Beg every dc row with 1 ch (not counted as 1st dc), work 1 dc in every st the entire row, turn. PATTERN A.1 (divisible by 5 + 1): ROW 1 (= RS): Work 4 ch (= 1 dtr) in 1st dc, continue as follows – also see 1st row in diagram A-1: * 2 ch, work 1 bobble with 4 dtr, 2 ch, 1 dtr in next dc *, repeat from *-* the entire row, turn piece. ROW 2 (= WS): 1 ch, 3 dc in 1st ch-loop, skip 1st bobble, 2 dc in next ch-loop, continue as follows – also see 2nd row in diagram A-1: * 1 dc in next dtr, 2 dc in next ch-loop, skip next bobble, 2 dc in next ch-loop *, repeat from *-* the entire row, finish with 1 dc more in last ch-loop on row (= same no of dc as before). PATTERN A.2 (divisible by 4 + 1): ROW 1 (= RS): Work 4 ch (= 1 dtr) in 1st dc, continue as follows – also see 1st row in diagram A-2: * 1 ch, work 1 bobble with 3 dtr, 1 ch, 1 dtr in next dc *, repeat from *-* the entire row, turn piece. ROW 2 (= WS): 1 ch, 2 dc in 1st ch-loop, 1 dc in next bobble, 1 dc in next ch-loop, continue as follows – also see 2nd row in diagram A-2: * 1 dc in next dtr, 1 dc in next ch-loop, 1 dc in next bobble, 1 dc in next ch-loop *, repeat from *-* the entire row, finish with 1 dc more in last ch-loop on row (= same no of dc as before). INCREASE TIP: Inc 1 st by working 2 sts in the same st. TR ROW: Work all tr rows from RS. Beg every tr row with 3 ch (= 1st tr), skip 1st dc from previous row, work 1 tr in every dc the entire row, turn. PATTERN A.3: ROW 1 (= RS): Work 1 tr row. ROW 2 (= WS): Work 1 dc row. ROUNDS WITH DC: Beg every dc round with 1 ch (not counted as 1st dc), work 1 dc in every st the entire round, finish with 1 sl st in 1st dc. DECREASE TIP - DC: Work 1 dc but wait with last pull through (= 2 sts on hook), then work next dc but on last pull through, pull thread through all sts on hook = 1 dc dec over 2 sts -------------------------------------------------------- BODY: Worked back and forth from mid front. Work 157-172-187-202-222-242 LOOSE ch with Lima on hook size 4.5 mm, turn and work 1 dc in 2nd ch from hook, then 1 dc in every ch the entire row = 156-171-186-201-221-241 dc, turn (1st row = RS). Work DC ROWS - read explanation above - until piece measures 2 cm. Then work PATTERN A.1 - read explanation above = 31-34-37-40-44-48 repetitions + 1 dtr. When 2ND ROW has been worked, there are 156-171-186-201-221-241 dc on row. REMEMBER THE CROCHET TENSION! Work A.1 a total of 5-5-5-6-6-6 times vertically - but work last dc row from WS as follows: 1 ch, 2 dc in 1st ch-loop, 1 dc in next bobble, 1 dc in next ch-loop, * 1 dc in next dtr, 1 dc in next ch-loop, 1 dc in next bobble, 1 dc in next ch-loop *, repeat from *-* the entire row, finish with 2 dc in last ch-loop = 125-137-149-161-177-193 dc, turn piece. Then work PATTERN A.2 - read explanation above. When 2ND ROW has been worked, there are 125-137-149-161-177-193 dc on row. Work A.2 a total of 5 times vertically - but on last dc row from WS inc 10-10-12-14-16-18 dc evenly - READ INCREASE TIP = 135-147-161-175-193-211 dc. Piece now measures approx. 27-27-27-30-30-30 cm. Continue to work PATTERN A.3 - read explanation above - AT THE SAME TIME on 1st dc row from WS inc 9-9-11-13-15-17 sts evenly = 144-156-172-188-208-228 dc. Work A.3 a total of 6 times (last row = dc row from WS), piece now measures approx. 37-37-37-40-40-40 cm, cut and fasten the thread. Insert 1 marker 36-39-43-47-52-57 dc in from each side on last dc row (= 72-78-86-94-104-114 dc between markers on back piece). SLEEVE EDGE: Worked in the round. Crochet 50-52-56-60-64-66 LOOSE ch on hook size 4.5 mm with Lima and form a ring with 1 sl st in first ch. Work 1st round as follows: 1 ch, then work 1 dc in every ch, finish with 1 sl st in 1st dc at beg of round (= mid under sleeve) = 50-52-56-60-64-66 dc. Continue in the round with ROUNDS WITH DC - read explanation above - until piece measures 2 cm. Now insert 1 marker on each side of the middle 12-12-12-14-16-16 sts under sleeve = 38-40-44-46-48-50 dc between markers on top of sleeve. Put piece aside and crochet another sleeve edge the same way. YOKE: Insert 1 new marker mid front on body, now measure piece from here. Work 1st row from RS as follows: Work 1 tr in each of the first 30-33-37-40-44-49 sts on right front piece, work 1 tr in each of the 38-40-44-46-48-50 sts from one sleeve edge (i.e. do not work over the 12-12-12-14-16-16 sts between markers mid under sleeve), skip 12-12-12-14-16-16 sts in the middle of the side on body (i.e. 6-6-6-7-8-8 sts on each side of marker), work 1 tr in each of the next 60-66-74-80-88-98 sts (= back piece), work 1 tr in each of the 38-40-44-46-48-50 sts from the other sleeve edge, skip 12-12-12-14-16-16 sts in the side of body (i.e. 6-6-6-7-8-8 sts on each side of marker), and work 1 tr in each of the last 30-33-37-40-44-49 sts on left front piece = 196-212-236-252-272-296 tr. Continue back and forth with A.3 as before - AT THE SAME TIME on 3rd-4th-4th-4th-5th-5th dc row from WS, dec 32-36-40-44-48-54 dc evenly - READ DECREASE TIP - DC. Repeat dec on 6th-7th-7th-7th-8th-8th dc row, then on 8th-9th-9th-9th-10th-11th dc row and finally on 9th-10th-11th-11th-12th-13th dc row = 68-68-76-76-80-80 dc remain (last row = WS), yoke now measures approx. 15-17-18-18-20-22 cm from marker. Do not cut the thread. NECK EDGE: Then work an elevation at the back of neck as follows: ROW 1 (= RS): Beg at the top of right front piece, work 1 ch, 1 dc in 1st dc, * 1 ch, skip 1 dc, 1 dc in next dc *, repeat from *-* around the neck, turn piece. ROW 2 (= WS): Work 1 dc in every ch and 1 ch over every dc around the neck until 12 sts remain (= 6 dc + 6 ch) on right front piece. ROW 3: Work 1 dc in every ch and 1 ch over every dc until 12 sts remain on left front piece, turn piece. ROW 4: Work 1 dc in every ch and 1 ch in every dc around the neck until 18 sts remain before edge on right front piece (= 9 dc and 9 ch), turn piece. ROW 5: Work 1 dc in every ch and 1 ch over every dc around the neck until 18 sts remain before edge on left front piece, turn piece. ROW 6: Work 1 dc in every ch and 1 ch in every dc around the neck until 24 sts remain before edge on right front piece (= 12 dc and 12 ch), turn piece. ROW 7: Work 1 dc in every ch and 1 ch over every dc until 24 sts remain before edge on left front piece. Do not cut the thread. Then work 1 row with dc in every dc and in every ch, then work dc rows until edge in dc measures 2 cm mid front, cut and fasten the thread. ASSEMBLY: Sew the openings under the sleeves. BAND: Work from RS approx. 90 - 110 dc along the entire edge mid front on right front piece (incl neck edge). Then work 1 dc row from WS while AT THE SAME TIME adjusting no of sts to 92-94-98-102-104-108 dc. Insert 1 marker in the transition between A.2 and A.3. On next row from RS work dc - AT THE SAME TIME work 4 buttonholes evenly between marker and at the top edge in the neck (1 buttonhole = work 2 ch, skip the next 2 dc) - the last buttonhole should be approx. 1 cm from the top edge. On next row work 2 dc in every ch-loop for buttonhole. Work dc rows until band measures approx. 2 cm, cut and fasten the thread. Work 1 band along left front piece the same way but without buttonhole. Sew 4 buttons on to left band. |
||||||||||||||||||||||
Diagram explanations |
||||||||||||||||||||||
|
||||||||||||||||||||||
 |
||||||||||||||||||||||
 |
||||||||||||||||||||||
Have you finished this pattern?Tag your pictures with #dropspattern #christelcardigan or submit them to the #dropsfan gallery. Do you need help with this pattern?You'll find 6 tutorial videos, a Comments/Questions area and more by visiting the pattern on garnstudio.com. © 1982-2025 DROPS Design A/S. We reserve all rights. This document, including all its sub-sections, has copyrights. Read more about what you can do with our patterns at the bottom of each pattern on our site. |
||||||||||||||||||||||


With over 40 years in knitting and crochet design, DROPS Design offers one of the most extensive collections of free patterns on the internet - translated to 17 languages. As of today we count 320 catalogues and 12094 patterns translated into English (UK/cm). 12094
We work hard to bring you the best knitting and crochet have to offer, inspiration and advice as well as great quality yarns at incredible prices! Would you like to use our patterns for other than personal use? You can read what you are allowed to do in the Copyright text at the bottom of all our patterns. Happy crafting!
Post a comment to pattern DROPS 140-7
We would love to hear what you have to say about this pattern!
If you want to leave a question, please make sure you select the correct category in the form below, to speed up the answering process. Required fields are marked *.