
Looking for a yarn?


Comments / Questions (145)
![]() Yvonne Raden wrote:
Yvonne Raden wrote:
Hej! Kan man få bystmått på XL? Tycker upplägg med 262 luftmaskor blir jättestort. Känns fel, ska det bli bra?
21.02.2019 - 15:26DROPS Design answered:
Hej Yvonne, nederst i mönstret hittar du måttskissen, här ser du att XL har ett bystmått på 112 cm. Så om du använder samma garn och har samma virkfasthet som vi har i mönstret får du måtten som i måttskissen. Lycka till :)
05.04.2019 - 12:32
![]() Marianne wrote:
Marianne wrote:
Varför får jag på min MACdator inte symboler utskrivna?? Under rubriken DIAGRAM finns symboler hur jag ska läsa av era mönster. ex: en tom ruta = 1 fast maska Varför visas dessa rutor på min dator med blå botten och frågetecken i ??
23.01.2019 - 15:05DROPS Design answered:
Hej Marianne, när du skriver ut, skall du klicka på "Skriv ut-knappen - Mönster" precis ovanför "Instruktioner" - så kan du se alla symboler. Lycka till !
28.01.2019 - 09:56
![]() Kersti wrote:
Kersti wrote:
När man ska minska på ärmen och ”hoppa över en lm-båge” blir det ett stort hål och ganska fult, ska det vara så el gör jag fel?
13.01.2019 - 00:41DROPS Design answered:
Hej Kersti, jo det är så det är beskrivet i mönstret, det jämnar ut sig efter några varv. Lycka till :)
17.01.2019 - 08:39
![]() Smets Marijke wrote:
Smets Marijke wrote:
Hallo ik heb een probleem met de stekenverhouding voor patroon met de 5 lossenlussen kom ik groter uit maar voor patroon 2 kom ik wel aan 10cm. Kan het zijn dat voor patroon maar 4 lossen lussen gemaakt moeten worden om aan 10 cm te komen?
25.11.2018 - 00:39DROPS Design answered:
Dag Marijke,
Het patroon klopt wel met 5 lossen, maar je kan het natuurlijk ook met 4 lossen doen. Maak evt. nog even een proeflapje om te kijken of het er goed uitziet. Dan lijkt het me een prima oplossing!
28.11.2018 - 13:22
![]() DOUCERAIN wrote:
DOUCERAIN wrote:
Bonjour. J'ai beaucoup de plaisir à crocheter ce modèle. Merci. Cependant j'ai une question. J'ai fait le devant droit puis le gauche au point fantaisie 1. J'en suis au dos avec ce même point en aller retour sur les arceau du milieu. Ma question est de savoir comment relier le dos aux devant ? Est-ce avec une couture à la fin ou simultanément avec les aller retoursdu dos ? Merci de votre réponse.
17.11.2018 - 15:05DROPS Design answered:
Bonjour Mme Doucerain, vous crochetez d'abord la partie du haut du gilet en une seule partie jusqu'aux emmanchures. Vous crochetez ensuite les devants sur les 9-16 (cf taille) grands arceaux de chaque côté puis vous crochetez le dos sur les 17-31 arceaux au milieu. Cette ouverture va former les emmanchures. Bon crochet!
19.11.2018 - 08:16
![]() Conni wrote:
Conni wrote:
Bei mir weichen die Maße deutlich von den beschriebenen ab. 5 große LM-Bögen im M1 sind deutlich mehr als 10 cm (fast doppelt so lang). Ich habe es nun mit Nadelstärke 4 versucht und es ist immer noch viel zu groß. Woran könnte es liegen?
14.10.2018 - 21:03DROPS Design answered:
Liebe Conni, Die Angabe der Nadelstärke ist nur eine Orientierungshilfe. Wenn für 10 cm weniger Maschen als in der Maschenprobe angegeben benötigt werden, zu einer dünneren Nadelstärke wechseln. Viel Spaß beim häkeln!
15.10.2018 - 10:41
![]() Joy Lovell wrote:
Joy Lovell wrote:
I am really wanting to crochet this pattern but I am having difficulty following the pattern instructions in the diagram, can you tell me does this pattern have written instructions instead of diagram instructions, or is there a much better and simpler way of reading the pattern diagrams.
16.09.2018 - 16:13DROPS Design answered:
Dear Mrs Lovell, there are only diagrams to this pattern. Each symbol in diagram is explained under diagram key. Start reading the diagrams from the bottom corner on the right side towards the left from RS and from the left towards the right from WS. You are welcome to request assistance with diagrams from your DROPS store even per mail or telephone. Happy crocheting!
17.09.2018 - 10:06
![]() Johanne Elise Reianes wrote:
Johanne Elise Reianes wrote:
Jeg har heklet prøvelapp med nål Nr 3 og får fremdeles ikke 5 store lm-buer innenfor 10 cm. Jeg får ikke 4 lm-buer innenfor engang. Det må vel være feil i oppskriften? Jeg hekler ikke løst.
25.06.2018 - 14:42DROPS Design answered:
Hei Johanne. Vi har nå for orden skyld heklet M.1 som anvist (5 lm, hopp over 3 lm, 1 fm osv), og får da 5 luftmaskebuer på 10 cm, så det er ingen feil i oppskriften. Heklefastheten er veldig individuell og det er helt normalt å måtte endre på nåltykkelsen for å få det til å stemme. Det viktige er at du finner en nål som gir den riktige heklefastheten, men så lenge det er i orden blir i plagget riktige mål. God fornøyelse
27.06.2018 - 11:13
![]() Ines wrote:
Ines wrote:
Bin jetzt beim Beenden der Vorderteilen. Aber habe jetzt was bemerkt: die beiden Teile, vorne, also wo der Knopf hinkommt, sind nicht gleich/symmetrisch. Also die Löcher am Rand von linken und rechten Seite stimmen nicht überein (sind nicht gleich). Hab ich da was falsch gemacht? Und noch eine Frage, was macht man mit den Garnspitzen die da herumhängen? Wie versteckt man die?
20.06.2018 - 23:40DROPS Design answered:
Liebe Ines, es kann sein, daß die beiden Seiten von M.1 nicht genau symetrisch sein (siehe Diagram), aber solange Ihre Arbeit wie M.1 aussieht, stimmt es schon - gerne können Sie aber Ihre Arbeit Ihren Laden zeigen (auch im Foto und per Mail). Am Ende häkeln Sie noch die Blende. Dieses Video zeigt, wie man Baumwolle vernäht. Viel Spaß beim häkeln!
21.06.2018 - 08:20
![]() Ines wrote:
Ines wrote:
PONTO FANTASIA 1 CARREIRA 2 : 5 pc, 1 pb no pc a meio do 1.º aro, 2 pc, 1 mc no mesmo pc, *5 pc, 1 pb no pc a meio do aro seguinte, 2 pc, 1 pbx no mesmo pc... 1 mc ou será 1 pc no mesmo pc ? Ou é como na repetição 1 pbx?
13.06.2018 - 23:10DROPS Design answered:
Bom dia, O "mc" era uma gralha que já foi corrigida. Muito obrigada pela chamada de atenção! Efectivamente, é 1 pbx!
14.06.2018 - 11:51
|
||||||||||||||||
Buttercup#buttercupcardigan |
||||||||||||||||
 |
 |
|||||||||||||||
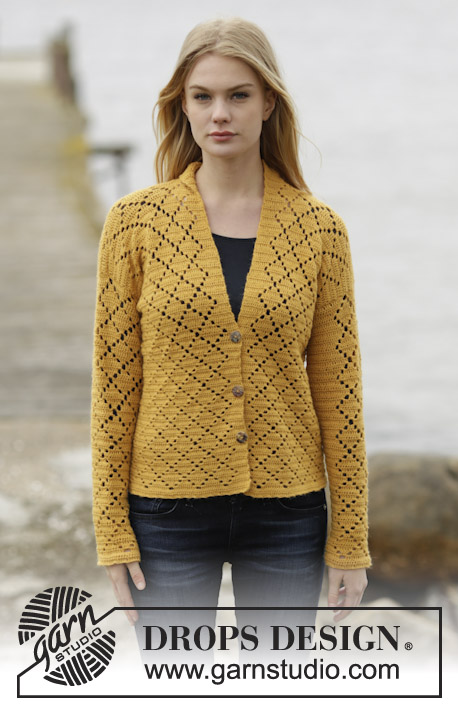
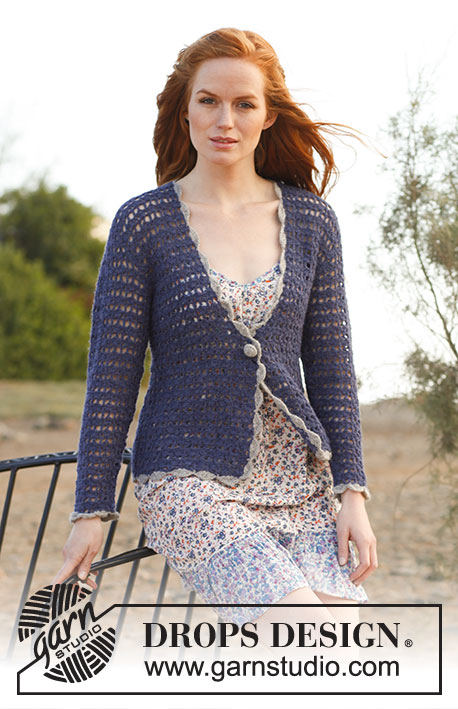
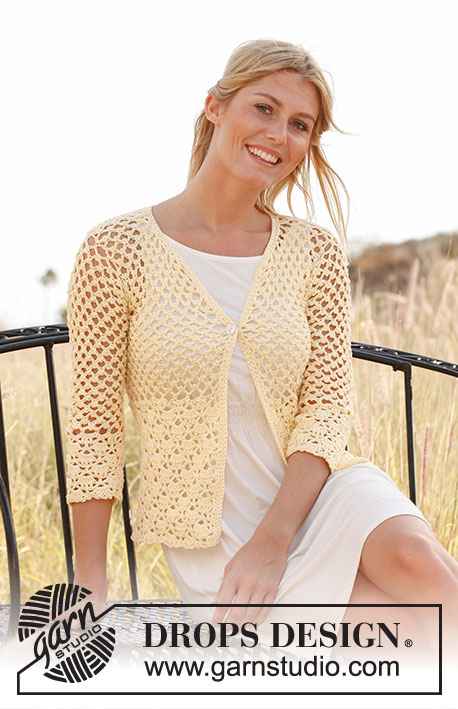
Crochet DROPS jacket in ”Muskat”. Size: XS - XXXL.
DROPS 136-30 |
||||||||||||||||
|
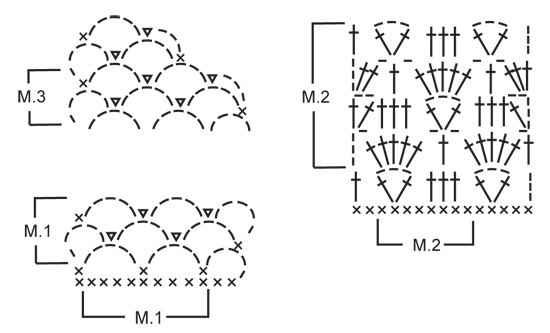
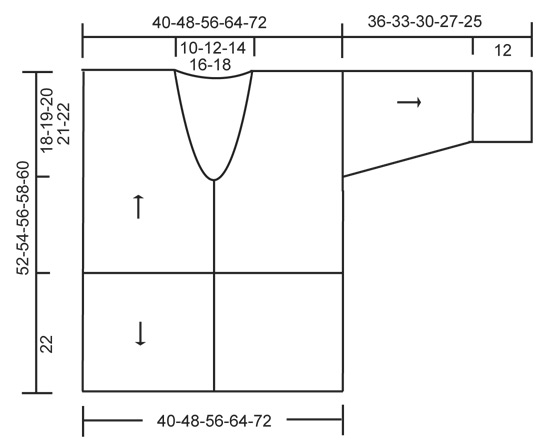
PATTERN 1 (also see diagram M.1): ROW 1: See explanation in pattern. ROW 2: 5 ch, 1 dc in middle ch on first ch-loop, 2 ch, 1 sl st in same ch, * 5 ch, 1 dc in middle ch on next ch-loop, 2 ch, 1 sl st in same ch *, repeat from *-* until 1 ch-loop remains, 5 ch, 1 dc in middle ch on last ch-loop, turn piece. Repeat 2nd row upwards. PATTERN 2 (also see diagram M.2): ROW 1: See explanation in pattern. ROW 2: 4 ch, * 5 tr in ch-loop, 1 ch, skip 2 tr, 1 tr in next tr, 1 ch, skip 2 tr *, repeat from *-* until 1 ch-loop remains, work 5 tr in this ch-loop, 1 ch and 1 tr in 3rd ch from beg of row, turn piece. ROW 3: 5 ch, 1 tr in first tr, * skip 1 tr, 1 tr in each of the next 3 tr, skip 1 tr, in next tr work 1 tr + 3 ch + 1 tr *, repeat from *-* until 5 tr remain, skip 1 tr, 1 tr in each of the next 3 tr, skip 1 tr, 1 tr + 2 ch + 1 tr in 3rd ch from beg of previous row, turn piece. ROW 4: 3 ch, 2 tr in first ch-loop, * 1 ch, skip 2 tr, 1 tr in next tr, 1 ch, skip 2 tr, in next ch-loop work 5 tr *, repeat from *-* until 5 tr remain, 1 ch, skip 2 tr, 1 tr in next tr, 1 ch, skip 2 tr, in last ch-loop work 3 tr, turn piece. ROW 5: 3 ch, skip 2 tr, *in next tr work 1 tr + 3 ch + 1 tr, skip 1 tr, 1 tr in each of the next 3 tr, skip 1 tr *, repeat from *-* until 4 tr remain, in next tr work 1 tr + 3 ch + 1 tr, skip 2 tr, 1 tr in 3rd ch from beg of previous row. Repeat rows 2 to 5. -------------------------------------------------------- JACKET: Worked back and forth from mid front. First work PATTERN 1 up to shoulder, then work PATTERN 2 from cast on edge and down. The sleeves are worked from armholes and down. Work 187-224-262-298-335 ch on hook size 4.5 mm with Muskat. Turn, work 1 dc in 2nd ch from hook, then work 1 dc in each of the next 3-5-1-2-4 ch, * skip 1 ch, work 1 dc in each of the next 6 ch *, repeat from *-* the rest of row = 160-192-224-255-287 dc. Work next row as follows: 5 ch, skip the first 2 dc, 1 dc in next dc, * 5 ch, skip 3 dc, 1 dc in next dc, 5 ch, skip 4 dc, 1 dc in next dc *, repeat from *-* until 4-0-5-0-5 dc remain. Sizes M and XXL are done. SIZE XS/S: 5 ch, skip 3 dc, 1 dc in last dc. SIZE L/XL and XXXL: 5 ch, skip 4 dc, 1 dc in last dc. Turn piece (= 35-42-49-56-63 large ch-loops + loop used when turning at beg of row). Continue PATTERN 1 (beg on 2nd row) – see explanation above! REMEMBER THE CROCHET TENSION! When piece measures approx. 12-13-14-15-16 cm, divide for armholes and finish each part separately. RIGHT FRONT PIECE: Work diagram M.1 back and forth over the first 9-11-12-14-16 large ch-loops - AT THE SAME TIME next time 3rd row in diagram is worked, dec for neck according to diagram M.3. Repeat dec until 6-7-9-10-11 large ch-loops remain on shoulder. Continue to work diagram M.1 until piece measures approx. 29-31-33-35-37 cm – work last row as follows: 5 ch, 1 dc in middle ch on first ch-loop from previous row, * 5 ch, 1 dc in middle ch on next ch-loop *, repeat from *-* the rest of row, cut the thread. LEFT FRONT PIECE: Work as right front piece but reversed. BACK PIECE: Work back and forth over the middle 17-20-25-28-31 large ch-loops. When piece measures approx. 29-31-33-35-37 cm (count so that no of ch-loops vertically on front piece is the same as on back piece), work 1 last row over 6-7-9-10-11 ch-loops in each side as on front piece (the 5-6-7-8-9 middle ch-loops = neck). EDGE AT THE BOTTOM: Work down from cast on edge as follows (beg from WS): 1 sl st in first dc, then 3 ch, skip 2 dc, in next dc work 1 tr + 3 ch + 1 tr, * skip 2 dc, work 1 tr in each of the next 3 dc, skip 2 dc, in next dc work 1 tr + 3 ch + 1 tr *, repeat from *-* until 4-4-4-3-3 dc remain, skip 3-3-3-2-2 dc and work 1 tr in last dc, turn piece. Continue PATTERN 2 (beg on 2nd row) – see explanation above! There will be a total of 20-24-28-32-36 repetitions on row. Work diagram M.2 for approx. 22 cm, finish after 2nd or 4th row in pattern. Work last row as follows: * 3 ch, skip 1 st (either 1 tr or 1 ch), 1 dc in next tr *, repeat from *-* the rest of row, cut the thread. The entire body measures approx. 52-54-56-58-60 cm vertically. ASSEMBLY: Crochet the shoulders tog as follows: * 1 dc in first large ch-loop on front piece, 2 ch, 1 dc in first large ch-loop on back piece, 2 ch *, repeat from *-* on both shoulders. SLEEVE: Worked back and forth from armhole and down. Work 1 dc in first ch-loop at the bottom of armhole, * 5 ch, skip approx. 2 cm, fasten with 1 dc *, repeat from *-* until bottom of other side of armhole, there should be 18-19-20-21-22 ch-loops in total. Turn and continue with 2ND ROW in PATTERN 1 (= 17-18-19-20-21 large ch-loops on row + ch-loop used when turning). When piece measures 2 cm, dec 1 large ch-loop at the end of next row, this is done by working until 2 large ch-loops remain, work 5 ch, skip first ch-loop and work 1 dc in middle ch on last ch-loop. Repeat dec every 4-3-3-2-2 cm (dec alternately in the right and left side) until 11-11-13-13-15 large ch-loops remain + ch-loop used when turning. When sleeve measures 24-21-18-15-13 cm (shorter measurements in the larger sizes because of broader shoulder width), work next row as follows: 5 ch, 1 dc in middle ch on first ch-loop, * 5 ch, 1 dc in middle ch on next ch-loop *, repeat from *-* the rest of row. Work next row as follows: 4 dc in every ch-loop and 3 dc in last ch-loop on row = 47-47-55-55-63 dc. Work next row as follows: 3 ch, skip the first 2 dc, in next dc work 1 tr + 3 ch + 1 tr, * skip 2 dc, work 1 tr in each of the next 3 dc, skip 2 dc, in next dc work 1 tr + 3 ch + 1 tr *, repeat from *-* until 4 dc remain, skip 3 dc and work 1 tr in last dc, turn piece. Continue PATTERN 2 (beg on 2nd row) – see explanation above! There will be a total of 6-6-7-7-8 repetitions on row. When diagram M.2 has been worked for approx. 12 cm (finish after 2nd or 4th row in pattern), work next row as follows: * 3 ch, skip 1 st (either 1 tr or 1 ch), 1 dc in next tr *, repeat from *-* the rest of row, cut the thread. ASSEMBLY: Work sleeve seams tog the same way as on shoulders. BANDS AND NECK EDGE: Work 1 dc row up along right band, around the neck and down along left band - make sure that dc row neither tightens nor widens the edges. There should be approx. 16 dc on 10 cm. Turn and work 1 row with 1 dc in every dc - when finished around the neck and beg down right front piece work as follows: 1 dc in first dc, 2 ch, skip 2 dc (= button hole), continue with dc down along the rest of front piece. Turn and work 1 dc row – work 2 dc in ch-loop. Cut and fasten the thread. Sew on button. |
||||||||||||||||
Diagram explanations |
||||||||||||||||
|
||||||||||||||||
 |
||||||||||||||||
 |
||||||||||||||||
Have you finished this pattern?Tag your pictures with #dropspattern #buttercupcardigan or submit them to the #dropsfan gallery. Do you need help with this pattern?You'll find 3 tutorial videos, a Comments/Questions area and more by visiting the pattern on garnstudio.com. © 1982-2025 DROPS Design A/S. We reserve all rights. This document, including all its sub-sections, has copyrights. Read more about what you can do with our patterns at the bottom of each pattern on our site. |
||||||||||||||||


With over 40 years in knitting and crochet design, DROPS Design offers one of the most extensive collections of free patterns on the internet - translated to 17 languages. As of today we count 320 catalogues and 12094 patterns translated into English (UK/cm). 12094
We work hard to bring you the best knitting and crochet have to offer, inspiration and advice as well as great quality yarns at incredible prices! Would you like to use our patterns for other than personal use? You can read what you are allowed to do in the Copyright text at the bottom of all our patterns. Happy crafting!
Post a comment to pattern DROPS 136-30
We would love to hear what you have to say about this pattern!
If you want to leave a question, please make sure you select the correct category in the form below, to speed up the answering process. Required fields are marked *.