
Popular categories
Looking for a yarn?


Comments / Questions (50)
Chiara wrote:
When I have to bind off 6 stcs for armhole, 3 by each marker, should I do that before or after each marker? thank you for your help.
22.10.2016 - 23:55DROPS Design answered:
Dear Chiara, you will bind off the 3 sts before each marker + the 3 sts after each marker (= 6 sts in total at each marker). Happy knitting!
24.10.2016 - 10:14Chiara wrote:
After stockinette st. at the beginning of the work, I should start M1 when the top measures 13 cm. I d like to know if you mean 13 cm of stockinette st. or if rib 2k/2p is included. Thanks for your help. Chiara
15.10.2016 - 22:53DROPS Design answered:
Hi Chiara, you should start M1 when the top measures 13 cm in total, including rib 2k/2p.
16.10.2016 - 11:49Chiara wrote:
At the beginning of the work, just before changing to 3mm circular needle, you say to add two markers each side, but I can't understand where. I have already a marker signing the beginning of the row, where should I add the further 2 markers? thank you
12.10.2016 - 00:28DROPS Design answered:
Dear Chiara, the 2nd marker should be inserted after the half of sts, ie if you are working 1st size with 112 sts, 1st marker is at the beg of round, count 56 sts, insert 2nd marker, there are 56 sts between 2nd and 1st marker. Happy knitting!
12.10.2016 - 09:38
![]() Judith Allison wrote:
Judith Allison wrote:
I can't figure out the back shoulders, I am making the 0-3 month size and when I cast off the 6 stitches after reaching 26cm length I can't see how the arm bands fit. I tried casting off the 6 stitches on the opposite side (neckline) but then I can't figure out how the button edge back pieces fit. I'm not sure where I am going wrong.
21.09.2016 - 22:47DROPS Design answered:
Dear Mrs Allison, on shoulder you cast off the first 6 sts towards neckline (= from WS on right shoulder - when workn), work to the end of row, work 1 more row and at beg of next row from WS, cast off 1st st, work to the end of row = 6 sts remain, work to 28 cm and cast off. On left shoulder cast off the sts at beg of rom from RS (when worn). When picking up sts for button edge, start at the top of neckline (right edge) where you cast off the 6 sts andn pick up sts to the bottom of split. For the left button edge, pick up sts from bottom of split to the 6 sts cast off for neckline. Happy knitting!
22.09.2016 - 09:27
![]() Sidsel C. Lindgaard wrote:
Sidsel C. Lindgaard wrote:
Jeg kan se flere har haft samme problem... Bagsiden giver ikke rigtig nogen mening. Jeg er nu nået til at strikke knappekanten, og det der åbenbart skulle være en slids er mere en rynding med enkelte hak i. Kan man ikke få den tegning eller et billede af hvordan det skal se ud? Og er I sikre på, at der skal lukkes 9 masker af mod halsen når skuldrene strikkes?? Er det ikke dér det går galt?
01.10.2015 - 09:40DROPS Design answered:
Hej Sidsel, jo du strikker op på hver side af slidsen bagpå, men kun op til der hvor du lukkede af for hals. På det ene stykke strikker du knaphuller, men ikke på det andet. Når du strikker halskanten strikker du også op over maskerne du strikkede i slidsen. God fornøjelse!
06.10.2015 - 15:08
![]() Jana wrote:
Jana wrote:
Hallo liebes Drops Team... obwohl ich alle kommentare dazu durchgelesen habe verstehe ich nicht wo ich die Knopfblende genau anstricken muss. gibt es dazu eine Zeichnung?
01.05.2015 - 23:25DROPS Design answered:
Antwort siehe unten! :-)
03.05.2015 - 12:50
![]() Jana wrote:
Jana wrote:
Hallo liebes Drops Team... obwohl ich alle kommentare dazu durchgelesen habe verstehe ich nicht wo ich die Knopfblende genau anstricken muss. gibt es dazu eine Zeichnung?
01.05.2015 - 22:26DROPS Design answered:
Eine weitere Zeichnung können wir leider nicht anbieten. Sie haben am Rückenteil ja M für den Schlitz abgekettet und jede Rückenteilseite einzeln weitergestrickt. Für die Knopfblende fassen Sie aus der einen Seite des Schlitzes (aus der senkrechten Kante also) M wie beschrieben auf (siehe auch das Video "Maschen auffassen - seitlich" im Kopf neben dem Foto unter "Videos") und stricken die Blende wie beschr. mit den Knopflöchern. Aus dem linken Rand des Schlitzes fassen Sie ebenso M auf + stricken die Blende an, nur ohne Knopflöcher. Aus den M, die Sie am Rückenteil für den Schlitz abgekettet haben, werden keine M aufgefasst, hier nähen Sie anschließend die beiden Blendenteile an.
03.05.2015 - 12:50
![]() Jacqueline wrote:
Jacqueline wrote:
Die Halskante, ist das im Bündchen gestrickt (re. über re.) oder wieder im Perlmuster?
15.03.2015 - 19:21DROPS Design answered:
Die Halsblende ist im Rippenmuster gestrickt, also immer re M re und li M li stricken, nicht im Perlmuster. Weiterhin gutes Gelingen!
15.03.2015 - 22:46
![]() Liselotte Mørk Andersen wrote:
Liselotte Mørk Andersen wrote:
Hvorfra og hvortil skal de 16 m tages op på rygstykket? Er det fra midten i slidsen? Forstår ikke hvordan det kan blive pænt med en knap? Ja, det kunne have været rart med et billede eller en tegning af rygstykket.
26.01.2015 - 21:44DROPS Design answered:
Hej Liselotte. Du skal tage dem op langs den højre side af slidsen på rygstk. Dvs, fra hvor slidsen begynder og op til kanten.
28.01.2015 - 16:20
![]() Svenja wrote:
Svenja wrote:
Hallo, ich bin jetzt bei der Knopfblende am Rückenteil angekommen und würde nun gerne wissen, was 1 M. Krausrippe heißt und wie man diese strickt, in der Anleitung steht zwar - siehe oben- aber da steht es garnicht... Lg und Danke schonmal.
24.01.2015 - 14:10DROPS Design answered:
Antwort siehe unten! :-)
27.01.2015 - 23:45
|
|||||||
Petit Lord#petitlordslipover |
|||||||
|
|
|||||||
Knitted vest / slipover with textured pattern for baby and children in DROPS BabyMerino
DROPS Baby 19-20 |
|||||||
|
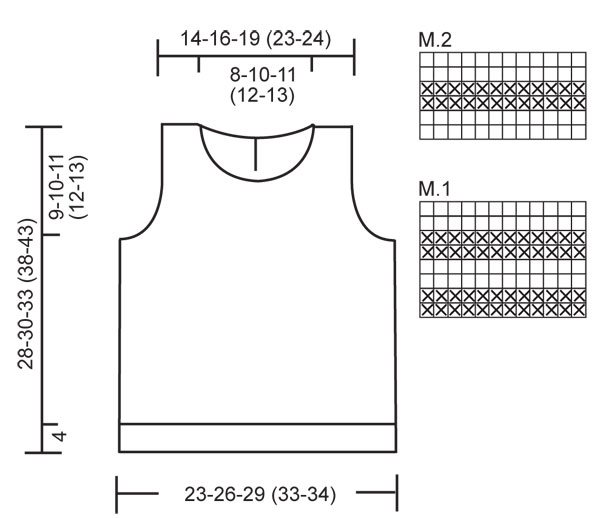
SLEEVELESS TOP: PATTERN: See diagram M.1 and M.2. Diagrams show the pattern from RS. DOUBLE MOSS ST: Row 1: * K2, P2 *, repeat from *-*. Row 2: K over K and P over P. Row 3: P over K and K over P. Row 4: Like row 2. Repeat row 1-4. GARTER ST (back and forth on needle): K all rows. -------------------------------------------------------- -------------------------------------------------------- SLEEVELESS TOP: Worked in the round on circular needle. Cast on 136-148-164 (188-196) sts on circular needle size 2.5 mm with Baby Merino. K 1 round and continue in rib K2/P2. When rib measures 4 cm dec 24-24-24 (32-32) sts evenly = 112-124-140 (156-164) sts. Insert a marker each side. Change to circular needle size 3 mm and continue in stocking st. REMEMBER THE KNITTING TENSION! When piece measures 13-14-15 (18-20) cm work M.1 on all sts. After 1 vertical repeat of M.1 continue in DOUBLE MOSS ST – see above - on all sts. When piece measures 19-20-22 (26-30) cm cast off 6 sts each side (i.e. 3 sts each side of marker) for armhole and complete front and back pieces separately. BACK PIECE: = 50-56-64 (72-76) sts. Continue back and forth on needle in double moss st. AT THE SAME TIME cast off for armhole each side on every other row: 2 sts 4 times and 1 st 1 time = 32-38-46 (54-58) sts. After dec for armhole are complete continue in M.2 on all sts. After 1 vertical repeat of M.2 continue in double moss st. AT THE SAME TIME 4 rows after M.2, cast off the middle 6-6-6 (6-6) sts for split and complete each shoulder separately. RIGHT SHOULDER: = 13-16-20 (24-26) sts. Continue back and forth on needle in double moss st until piece measures 26-28-31 (36-41) cm. Now cast off 6-8-9 (10-12) sts towards neck and cast off 1 st on neckline on next row = 6-7-10 (13-13) sts left on shoulder. Cast off when piece measures 28-30-33 (38-43) cm. LEFT SHOULDER: Like right shoulder but mirrored. FRONT PIECE: = 50-56-64 (72-76) sts. Continue back and forth on needle in double moss st. AT THE SAME TIME cast off for armhole each side as described for back piece = 32-38-46 (54-58) sts. After dec for armhole continue in M.2 on all sts. After 1 vertical repeat of M.2 continue in double moss st. When piece measures approx 24-25-28 (32-37) cm cast off the middle 10-14-16 (18-22) sts for neck and complete each shoulder separately. RIGHT SHOULDER: = 11-12-15 (18-18) sts. Continue back and forth on needle in double moss st, AT THE SAME TIME cast off to shape the neckline at the beg of every row from mid front: 2 sts 2 times and 1 st 1 time = 6-7-10 (13-13) sts left on shoulder. Cast off when piece measures 28-30-33 (38-43) cm. LEFT SHOULDER: Like right shoulder but mirrored. ASSEMBLY: Sew shoulder seams. BUTTON EDGE BACK PIECE: Pick up 12-16-16 (20-20) sts from RS on needle size 2.5 mm along right side of split on back piece. K 1 row from WS and work next row as follows from RS: 1 GARTER ST – see above - * K2/P2 *, repeat from *-* 2-3-3 (4-4) times and finish with K2 and 1 GARTER ST. Continue like this until edge measures approx 1 cm. Now make 1-1-1 (2-2) buttonholes as follows (from RS): SIZE 1/3 months: 1 garter st, K2, P2, cast off 2 sts, P2, K2 and 1 garter st. SIZE 6/9 + 12/18 months: 1 garter st, K2, P2, K2, cast off 2 sts, K2, P2, K2 and 1 garter st. SIZE 2 + 3/4 years: 1 garter st, K2, P2, cast off 2 sts, P2, K2, P2, cast off 2 sts, P2, K2 and 1 garter st. Cast on 2 new sts over cast off sts on return row. Cast off with K over k and P over P when edge measures approx 2 cm. Repeat along left side of split, but do not make buttonholes. NECKLINE: Pick up 88 to 128 sts (divisible by 4) from RS round neck (also pick up on button edges on back piece) on circular needle size 2.5 mm. K 1 row from WS and continue as follows from RS: 1 garter st, * K2/P2 *, repeat from *-* and finish with K2 and 1 garter st. When rib measures approx 1 cm make 1 buttonhole in line with the others on button edge on back piece. Cast off with K over K and P over P when rib measures approx 2-2-2 (3-3) cm. BORDER ROUND ARMHOLES: Beg mid under sleeve. Pick up 52 to 84 sts (divisible by 4) from RS round armhole on double pointed needles size 2.5 mm. P 1 round and continue in rib K2/P2 until border measures approx 2-2-2 (3-3) cm. Cast off with K over K and P over P. Repeat round the other armhole. ASSEMBLY: Sew on buttons on left side of split on back piece. Sew button edges to bottom of split. |
|||||||
Diagram explanations |
|||||||
|
|||||||
|
|||||||
Have you finished this pattern?Tag your pictures with #dropspattern #petitlordslipover or submit them to the #dropsfan gallery. Do you need help with this pattern?You'll find 18 tutorial videos, a Comments/Questions area and more by visiting the pattern on garnstudio.com. © 1982-2025 DROPS Design A/S. We reserve all rights. This document, including all its sub-sections, has copyrights. Read more about what you can do with our patterns at the bottom of each pattern on our site. |
|||||||


With over 40 years in knitting and crochet design, DROPS Design offers one of the most extensive collections of free patterns on the internet - translated to 17 languages. As of today we count 314 catalogues and 11820 patterns translated into English (UK/cm). 11820
We work hard to bring you the best knitting and crochet have to offer, inspiration and advice as well as great quality yarns at incredible prices! Would you like to use our patterns for other than personal use? You can read what you are allowed to do in the Copyright text at the bottom of all our patterns. Happy crafting!
Post a comment to pattern DROPS Baby 19-20
We would love to hear what you have to say about this pattern!
If you want to leave a question, please make sure you select the correct category in the form below, to speed up the answering process. Required fields are marked *.