
Looking for a yarn?


Comments / Questions (112)
Blanca Oses wrote:
Como puedo empezar . Soy aprendiz y me gusta mucho la falda para mí . No entiendo gracias
25.07.2017 - 01:54DROPS Design answered:
Hola Blanca. Te recomiendo primero hacer los cuadrados necesarios para hacer la falda. Y después comenzar con la falda, que se trabaja de arriba abajo. Al final se unen los cuadrados con la falda.
25.07.2017 - 20:21
![]() Heather wrote:
Heather wrote:
I am confused on the first instruction - I have done 136 chains but am confused when it says 1dc in each of the next 1-1-1-5-5-3. So does that mean I double crochet the following 3 chains and then skip 5 chains before dc again? And then miss another 5 chains again? It certainly doesn't look right if I do this!
13.01.2017 - 21:42DROPS Design answered:
Dear Heather, work first row as follows in the 1st size: 1 dc in 2nd ch from hook, 1 dc in each of the next ch, * skip 1 ch, 1 dc in each of the next 6 ch*, repeat from *-* a total of 19 times = 116 dc. Happy crocheting!
16.01.2017 - 08:56
![]() Nancy Krause wrote:
Nancy Krause wrote:
Warum wird abwechselnd eine Runde Stäbchen und eine Runde Feste Maschen gehäkelt? Das sieht auf den Bild doch nur nach Stäbchen aus. Hat das eine tiefere Bedeutung mit den abwechselnd häkeln.? Oder ist es egal ob man nur Stäbchen häkelt?
25.12.2016 - 10:12DROPS Design answered:
Liebe Frau Krause, der Rock ist im Muster gestrickt, dh abwechselnd 1 Reihe mit Stb und 1 Reihe mit fM - so wird auch der Maschenprobe gehäkelt (= 18 M x 12 R im Muster = 10 x 10 cm) Viel Spaß beim häkeln!
29.12.2016 - 13:53Tanja wrote:
Danke für die schnelle Antwort. Stimmt, Luftmaschenrand ist immer zu fest und zu eng. Den Trick werde ich auch bei anderen Werken anwenden. Super, dass ihr schnelle Hilfeleistung gebt!
08.12.2016 - 09:24Tanja wrote:
Hallo, Frage zu den ersten 5 Reihen: wird nur in der ersten Reihe abgenommen (überspringen jeder 7. Luftmasche)? 2.Reihe: Stäbchen in jede fm der Vorreihe, 3. Reihe: fm in jedes Stb. der Vorreihe, etc. Danke.
08.12.2016 - 08:14DROPS Design answered:
Liebe Tanja, damit der 1. Reihe nicht zu eng ist, häkelt man mehr Lm am Anfang, aber dann bei den ersten 5 Reihen muss die Maschenanzahl bleiben. Und genauso wie wird man dann häklen. Viel Spaß beim häkeln!
08.12.2016 - 09:03Maru Quintero wrote:
Don`t understand the pattern of the skirt ... too complicated for beginners. How bad because is beautiful
08.11.2016 - 04:15DROPS Design answered:
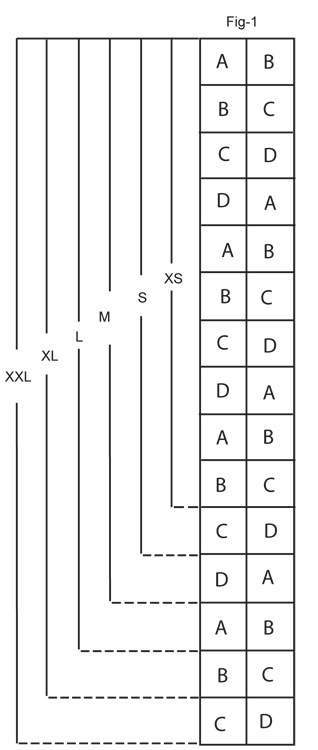
Dear Mrs Quintero, skirt is worked top down, back and forth with a seam on the side when work is done. After you have worked the skirt, crochet the number of squares required for your size following colours, then sew the squares tog into a strip as shown in fig.1 then sew this strip to the bottom of the skirt. Happy crocheting!
08.11.2016 - 09:48
![]() Anna wrote:
Anna wrote:
Ik draag maat 44/46 en zou graag willen weten of ik hiervoor maat XL of XXL moet aanhouden.
10.04.2016 - 08:39DROPS Design answered:
Hoi Anna. Kijk onderaan het patroon op de maattekening. Hier staan alle afmetingen in cm, je kan deze vergelijken met je eigen en de goede maat kiezen. Veel haakplezier.
12.04.2016 - 11:07
![]() Anne wrote:
Anne wrote:
Hej. mig igen :). Det er denne video jeg mener: -->må ikke indsætte link, men titlen på videoen er: "Hæklede bedstemorruder med farveskift"
16.09.2015 - 18:40
![]() Anne wrote:
Anne wrote:
Jeg er netop igang med at hækle nederdelen. Jeg er lige blevet færdig med ruderne, men opdagedevførst lige nu at der er en instruktionsvideo på drops hjemmeside der viser hvordan man hækler ruder med farveskift. Kan denne video ikke også vedlægges til denne opskrift, istedet for den der viser hækling af ruder i en farve. Mvh. Anne
14.09.2015 - 09:50
![]() Brenda wrote:
Brenda wrote:
I am confused as to where to place the markers. I will be making the large size. Do I put a marker at stitch 14, another after 28 stitches, then another after 14 stitches? This would only be 3 markers. Can you please explain the markers in a manner that would be like this: mark at 14 stitches, then count 28 stitches and mark that stitch, etc? Thank you.
26.03.2015 - 03:44DROPS Design answered:
Dear Brenda, in size L, put the 6 markers as follows: 1st after 14 sts, 2nd after 28 sts, 3rd after 28 sts, 4th after 28 sts, 5th after 28 sts, 6th after 28 sts, 14 sts remain after 6th marker to the end of row = 168 sts. Happy knitting!
26.03.2015 - 09:02
|
|
Licorice Squares |
|
|
|
|
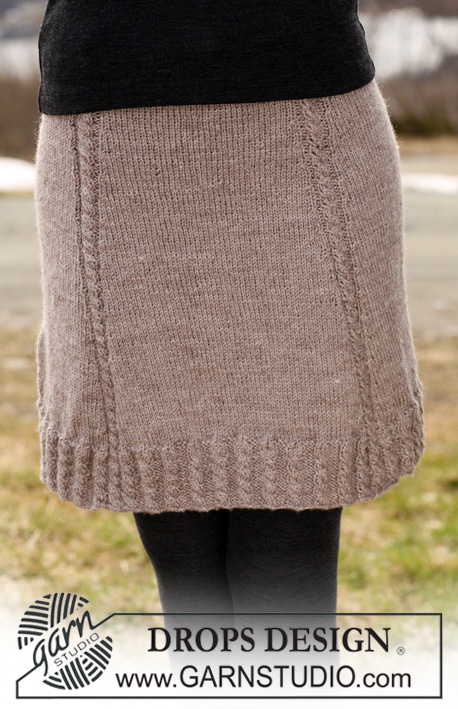
DROPS Crochet Skirt in ”Karisma” with patterned squares along bottom edge. Size XS-XXL.
DROPS 115-43 |
|
|
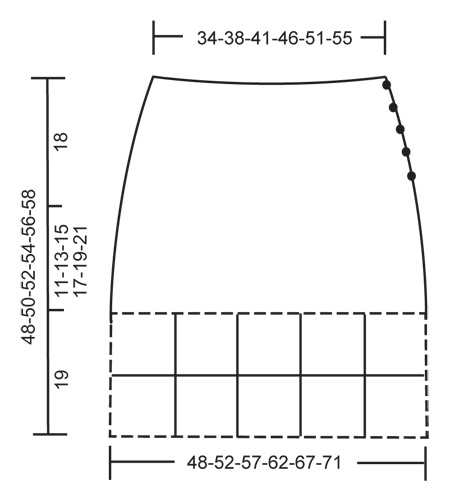
PATTERN: ROW 1: 1 tr in each dc, finish row with 1 ch to turn with. ROW 2: 1 dc in each tr, finish row with 3 ch to turn with. INCREASING TIP: Inc by working 2 tr in 1 dc. SKIRT: Worked back and forth from top down, and sewn tog at the side afterwards. Crochet 136-157-178-196-217-236 loose ch with charcoal grey with crochet hook size 4 mm. Crochet first row as follows: 1 dc in 2nd ch from hook, 1 dc in each of the next 1-1-1-5-5-3 ch, * skip 1 ch, 1 dc in each of the next 6 ch *, repeat from *-* = 116-134-152-168-186-202 dc. Continue in PATTERN – see above – until finished measurements. REMEMBER CROCHET TENSION! After 5 rows (last row is a row with dc) insert 6 markers in piece as follows: First marker after 11-12-14-14-16-19 sts, then 19-22-25-28-31-33 sts between each marker = 10-12-13-14-15-18 sts after the last marker. On next row inc 1 tr before all markers – SEE INCREASING TIP and repeat the inc on every other row (inc after and before marker alternately) a total of 9 times = 170-188-206-222-240-256 sts. Continue until piece measures 29-31-33-35-37-39 cm (or desired length), cut the thread. COLOURS OF SQUARES: SQUARE A: Beg + round 1 = charcoal grey, round 2 = light grey, round 3 = white, round 4 = black, round 5 = charcoal grey. SQUARE B: Beg + round 1 = black, round 2 = charcoal grey, round 3 = white, round 4 = light grey, round 5 = charcoal grey. SQUARE C: Beg + round 1 = white, round 2 = charcoal grey, round 3 = black, round 4 = light grey, round 5 = charcoal grey. SQUARE D: Beg + round 1 = white, round 2 = charcoal grey, round 3 = light grey, round 4 = black, round 5 = charcoal grey. CROCHET SQUARES: Crochet 6 ch with crochet hook size 4 mm and form a ring with 1 sl st in first ch. ROUND 1: 3 ch, 2 tr in ring, * 3 ch, 3 tr *, repeat from *-* a total of 3 times and finish with 3 ch and 1 sl st in 3rd ch from beg of round. Turn piece. ROUND 2: 3 ch, 2 tr in first ch-loop, 3 ch, 3 tr in the same ch-loop, * 1 ch, 3 tr in the next ch-loop, 3 ch, 3 tr in the same ch-loop *, repeat from *-* a total of 3 times, finish with 1 ch and 1 sl st in 3rd ch from beg of round. Turn piece. ROUND 3: 3 ch, 2 tr in the first ch-loop, 1 ch, * 3 tr in the next ch-loop, 3 ch, 3 tr in the same ch-loop, 1 ch, 3 tr in the next ch-loop, 1 ch *, repeat from *-* a total of 3 times, 3 tr in the next ch-loop, 3 ch, 3 tr in the same ch-loop, 1 ch, finish with 1 sl st in 3rd ch from beg of round. Turn piece. ROUND 4: 3 ch, 2 tr in the first ch-loop, 1 ch, * 3 tr in the next ch-loop, 3 ch, 3 tr in the same ch-loop, 1 ch, 3 tr in the next ch-loop, 1 ch, 3 tr in the next ch-loop, 1 ch *, repeat from *-* a total of 3 times, 3 tr in the next ch-loop, 3 ch, 3 tr in the same ch-loop, 1 ch, 3 tr in the next ch-loop, 1 ch, finish with 1 sl st in 3rd ch from beg of round. Turn piece. ROUND 5: Crochet 1 dc in each tr and 1 dc in each ch, finish with 1 sl st in first dc. 1 square = approx 9.5 x 9.5 cm. NUMBER OF SQUARES: Crochet 5-5-6-7-7-7 squares of A, 6-6-6-7-8-8 squares of B, 5-6-6-6-7-8 squares of C and 4-5-6-6-6-7 squares of D = a total of 20-22-24-26-28-30 squares. ASSEMBLY: Sew skirt tog at the side, edge to edge, but leave a 15 cm opening at the top. Sew squares tog, edge to edge, to a string as shown in fig-1, and then sew tog to form a ring. Now sew squares to bottom of skirt, edge to edge. BUTTONHOLE LOOPS: Crochet buttonhole loops on the side of opening towards front piece as follows (beg at bottom of opening): 1 dc in each of the first 2 sts, 3 ch, skip 1 cm, * crochet 1 dc in each st for 2 cm, 3 ch, skip 1 cm *, repeat from *-* a total of 4 times, and finish with 2 dc at the top. Turn and work return row as follows: 1 dc in each dc and 3 dc in each ch-loop, cut the thread. BUTTONHOLE BAND: Crochet 5 rows with dc along the side of opening towards back piece, cut the thread. Sew on buttons. |
|
 |
|
 |
|
Have you finished this pattern?Tag your pictures with #dropspattern or submit them to the #dropsfan gallery. Do you need help with this pattern?You'll find 8 tutorial videos, a Comments/Questions area and more by visiting the pattern on garnstudio.com. © 1982-2025 DROPS Design A/S. We reserve all rights. This document, including all its sub-sections, has copyrights. Read more about what you can do with our patterns at the bottom of each pattern on our site. |


With over 40 years in knitting and crochet design, DROPS Design offers one of the most extensive collections of free patterns on the internet - translated to 17 languages. As of today we count 320 catalogues and 12093 patterns translated into English (UK/cm). 12093
We work hard to bring you the best knitting and crochet have to offer, inspiration and advice as well as great quality yarns at incredible prices! Would you like to use our patterns for other than personal use? You can read what you are allowed to do in the Copyright text at the bottom of all our patterns. Happy crafting!
Post a comment to pattern DROPS 115-43
We would love to hear what you have to say about this pattern!
If you want to leave a question, please make sure you select the correct category in the form below, to speed up the answering process. Required fields are marked *.