
Looking for a yarn?


Comments / Questions (150)
![]() Barbara wrote:
Barbara wrote:
I am knitting the beret and I find this pattern to be far too complicated than it needed to be. It would have been much easier to give the number of stitches in which to increase in each row, rather than putting in markers. It is a pity that the shaping of the crown was not shown in a photograph and that the point at which decreases are necessary were not simply numbered. Stating "to the left" of a point many rows previous is not so good. I prefer precision.
02.10.2018 - 11:34
![]() Nobutan wrote:
Nobutan wrote:
I am so sorry, I still don't understand. I somehow have to always be purling for the trousers to have stocking stitches. I don't know how to work on the RS if I am starting from the middle of the left leg.
28.09.2018 - 21:56DROPS Design answered:
Dear Mrs Nobutan, take both pieces (legs) from RS and slip them onto the circular needle. Insert markers as expected and slip sts on to right needle to start on the left side of piece - continue working as explained from the side (= middle of left leg). You should have all K sts visible from the RS and all P sts inside (= WS). Happy knitting!
01.10.2018 - 07:54
![]() Nobutan wrote:
Nobutan wrote:
Thank you for your quick reply. So in my case the first 24 stocking stitches will be purl stitches? Unless the trousers are inside out then I can start with knit stitches?
18.09.2018 - 01:00DROPS Design answered:
Dear Mrs Nobutan, you will now work in the round ie always from RS, the 24 sts stocking stitch will be knit until piece will be divided and continued separately. Happy knitting!
18.09.2018 - 09:20
![]() Nobutan wrote:
Nobutan wrote:
Hi, I am confused after slipping both legs on the circular needle. Reading the other comments I think I understand what you mean by knit from left side, as in the left of the piece in the shape of the trousers, but I am not sure if I should be starting from the RS or WR? I seem to have started from the WS so I will always be purling when working in round?
15.09.2018 - 21:56DROPS Design answered:
Dear Mrs Nobutan, all stitches from both legs are now worked in the round on the circular needle, ie you will start round on the left side (= in the middle of left leg) and will work from the right side of piece (= in the round). Happy knitting!
17.09.2018 - 08:53
![]() Nobutan wrote:
Nobutan wrote:
It says "RIGHT LEG: Worked back and forth on circular needle. Cast on 47-53-53 (59-65) sts on circular needle size 3.5 mm" Does the 3.5mm needle for the rib also needs to be circular? Can I use a normal one side pointed needle? I am a beginner and a bit confused, thank you!
04.09.2018 - 00:04DROPS Design answered:
Hi Nobutan, The use of a circular needle when working back and forth is so that you have room for all the stitches, but of course you can use a normal needle if you prefer. Happy knitting!
04.09.2018 - 07:52
![]() Marilyne wrote:
Marilyne wrote:
Bonjour! J'en suis rendue à compléter le devant en taille 6-9mois, et le patron indique qu'une fois à 53cm de hauteur totale, il faut tricoter ens à l'end les mailles des torsades. Ce faisant, j'obtiens un total de 106m et non 102 comme le dit le patron. (110-4 diminutions=106). En faisant les calculs pour les autres grandeurs, ceux-ci s'avèrent exactes (ex: 100-4 diminutions=96, etc). Serait-ce une petite erreur du patron ?
14.08.2018 - 22:13DROPS Design answered:
Bonjour Marilyne, merci pour votre retour, il s'agissait d'une faute de frappe, on doit bien avoir 106 m en taille 6/9 mois. Bon tricot!
16.08.2018 - 08:54Froilan Suarez Castillo wrote:
Los diagramas de las piezas son muy ilustrativos pero si se colocaran medidas serían excelente así se podría desarrollar mejor . Saludos
18.07.2018 - 07:25
![]() Agueda wrote:
Agueda wrote:
Cuando dice tejer 1 hilera del revés por el lado reves, después de montar los puntos, como se haría la primera hilera porque después de montar los puntos la primera hilera es por el lado derecho, no entiendo cómo se haría. Muchas gracias
09.12.2017 - 21:21DROPS Design answered:
Hola Agueda, no siempre en todos los patrones la primera fila es por el lado derecho; en algunos casos, como en este, la primera fila es por el lado revés, siempre hay que trabajar según el patrón.
17.12.2017 - 18:35
![]() Alicia wrote:
Alicia wrote:
For right leg, when it says P1 row from WS then continue as follows from RS: 4 garter stitches. I'm a newer knitter.. It was my understanding that all rows are from the RS when knitting in the round, how do you P a round in WS? Also, for garter, is that alternative K and P rows? Thank you!
28.06.2017 - 23:59DROPS Design answered:
Dear Alicia, right leg is worked back and forth on circular needle, ie you will work alternately from RS and from WS. When sts are cast on, P all sts on 1st row = WS, then turn and work now from RS as explained. Happy knitting!
29.06.2017 - 08:20
![]() Erika Karpati wrote:
Erika Karpati wrote:
Jag kan inte få ihop flätorna mitt på benen. När jag följer instruktoner...sätt benen på samma rundst.. börja i plaggets vänster sida...18 21 24 27 m släts, 2 am osv.allting hamnar till "låren" ungefär inte i mitten. Samt hur blir det 108 mask (6/9 mån) och sedan när man nått 46cm och börjar sticka främre delen blir det 56 m ( 56x2 =112 ) eller? Tack på förhand ! Mvh Erika
29.05.2017 - 15:53DROPS Design answered:
Hej! Då man stickar flätmönstret enligt beskrivningen skall flätan komma mitt fram. Det ökas 4 m över framst innan mönstret påbörjas, vilket gör att det blir fler m på framst (56 m) än på bakst (52 m).
29.05.2017 - 16:39
|
||||||||||
Little Lamb#littlelambset |
||||||||||
|
|
||||||||||
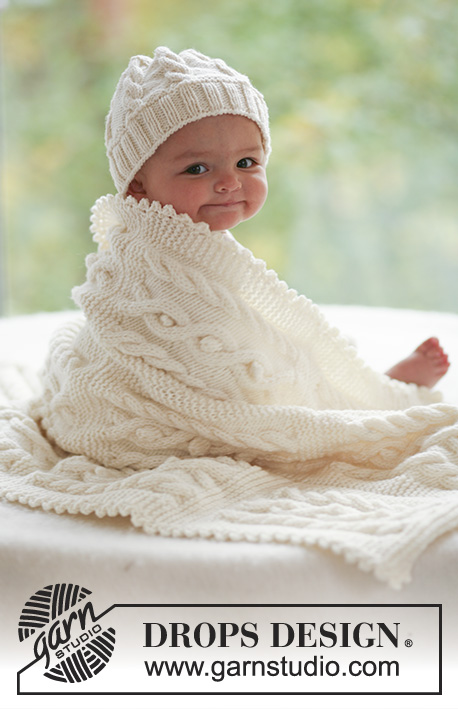
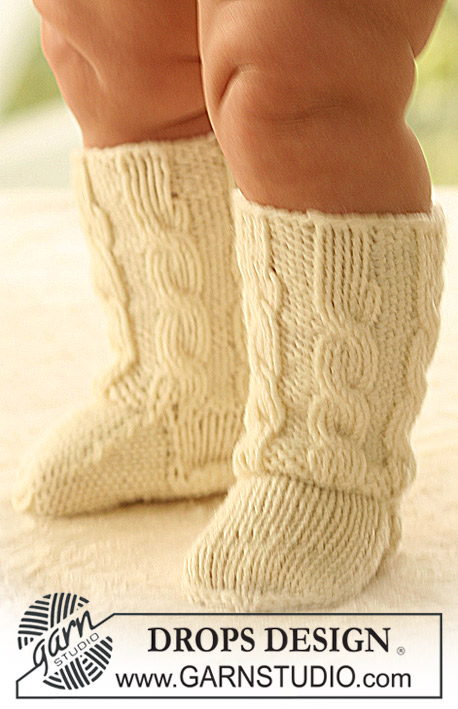
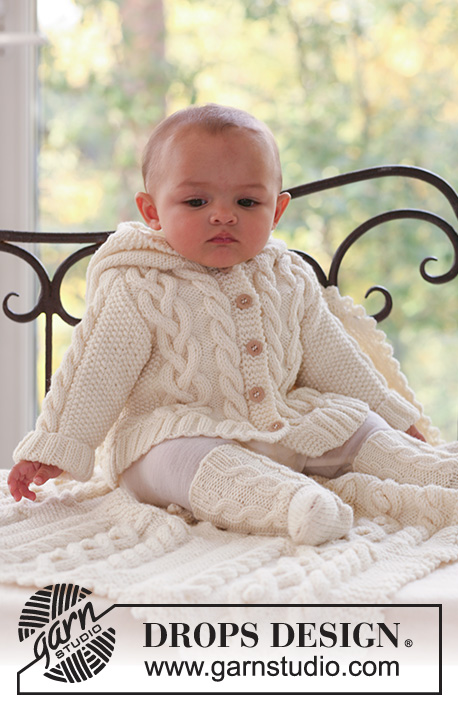
Set of beret hat and onesie with cables for baby in DROPS Merino Extra Fine
DROPS Baby 16-2 |
||||||||||
|
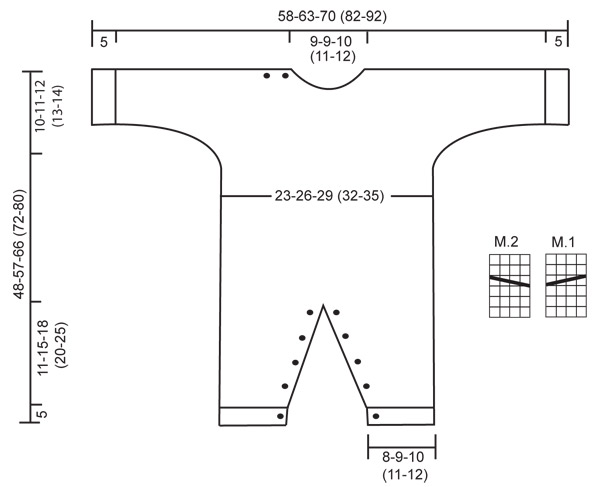
JUMPSUIT: GARTER ST (back and forth on needle): K all rows. PATTERN: See diagram M.1 and M.2. The diagrams show the pattern from the RS. BUTTONHOLES: Make buttonholes on buttonhole edge on front of leg. On right leg make buttonholes from RS and on left leg make buttonholes from WS. 1 buttonhole = K tog 2nd and 3rd st from edge and make 1 YO. Make buttonholes when leg measures: SIZE 1/3 months: 2, 5, 8, 11 and 14 cm. SIZE 6/9 months: 2, 6, 10, 14 and 18 cm. SIZE 12/18 months: 2, 6, 11, 16 and 21 cm. SIZE 2 years: 2, 6, 10, 14, 18 and 23 cm. SIZE 3/4 years: 2, 7, 12, 17, 22 and 28 cm. ---------------------------------------------------------- RIGHT LEG: Worked back and forth on circular needle. Cast on 47-53-53 (59-65) sts on circular needle size 3.5 mm with Merino Extra Fine. P 1 row from WS and continue as follows from RS: 4 garter sts (buttonhole edge) rib K3/P3, on the next 36-42-42 (48-54) sts and finish row with K3 and 4 garter sts (= buttonhole edge). Continue in rib with 4 garter sts each side, AT THE SAME TIME when piece measures 2 cm make buttonhole – SEE ABOVE. When piece measures 5 cm K 2 rows on all sts, AT THE SAME TIME dec 11-13-9 (11-13) sts evenly on first row = 36-40-44 (48-52) sts. Change to needle size 4.5 mm and continue in stocking st with 4 garter sts each side. AT THE SAME TIME when piece measures 6 cm inc 1 st each side inside the 4 garter sts on every 3-3-4 (4-4) row a total of 9-10-11 (12-13) times = 54-60-66 (72-78) sts. REMEMBER THE KNITTING TENSION! When piece measures 16-20-23 (25-30) cm cast off 4 sts each side = 46-52-58 (64-70) sts. Put piece aside and knit the other leg. LEFT LEG: Like right leg, but make buttonholes on the opposite side. BODY PIECE: Slip both legs on the same circular needle = 92-104-116 (128-140) sts. Insert 1 marker each side = 46-52-58 (64-70) sts between markers. Work next round as follows – beg on the left side of piece: 18-21-24 (27-30) stocking sts, P2, K2 in each of the next 2 sts (= K4), P2, K2 in each of the next 2 sts (= K4), P2 and work remaining sts in stocking st = 96-108-120 (132-144) sts. Work next round as follows: 18-21-24 (27-30) stocking sts, P2, M.1, P2, M.2, P2 and work remaining sts in stocking st. Continue like this until piece measures 38-46-54 (59-66) cm. Now divide the piece by markers at sides and complete front and back pieces separately – NOTE: Make sure to divide piece so that the cable row in M.1 and M.2 sits on the RS. FRONT PIECE: = 50-56-62 (68-74) sts. Continue in stocking st with cables as before, AT THE SAME TIME cast on new sts each side for sleeves. Cast on at the end of every row at the sides: 4 sts 2-1-1 (1-1) times, 6 sts 0-1-1 (2-1) times, 8 sts 1-1-1 (1-2) times and 9-9-13 (16-21) sts 1 time = 100-110-124 (148-168) sts – work inc sts in stocking st. When piece measures 44-53-61 (67-75) cm K2 tog on the 2 cables = 96-106-120 (144-164) sts. On next row slip the middle 10-10-12 (14-16) sts on a stitch holder for neck and complete each side separately. RIGHT SHOULDER/SLEEVE: Continue as before, AT THE SAME TIME cast off to shape the neckline at the beg of every row from mid front: 2 sts 1 time and 1 st 2 times = 39-44-50 (61-70) sts left on shoulder/sleeve. AT THE SAME TIME when piece measures 46-55-64 (70-78) cm work garter st on the first 12-13-14 (15-16) sts from mid front (work remaining sts as before). After 4 rows garter st make 2 buttonholes as follows from RS: K2 tog, 1 YO, work 5-6-7 (8-9) sts, K2 tog, 1 YO, work remaining sts on row. Continue in stocking st with garter st on the first 12-13-14 (15-16) sts from mid front until piece measures 48-57-66 (72-80) cm, cast off. LEFT SHOULDER/SLEEVE: Like right shoulder/sleeve, but mirrored = 39-44-50 (61-70) sts on shoulder/sleeve. Continue in stocking st until piece measures 48-57-66 (72-80) cm, cast off. BACK PIECE = 46-52-58 (64-70) sts. Cast on new sts each side for sleeves as described for front piece = 96-106-120 (144-164) sts. When piece measures 46-55-64 (70-78) cm cast off the middle 16-16-18 (20-22) sts for neck and complete each side separately. RIGHT SHOULDER/SLEEVE: = 40-45-51 (62-71) sts. Cast off 1 st on neckline on next row = 39-44-50 (61-70) sts. When piece measures 48-57-66 (72-80) cm cast off the first 27-31-36 (46-54) sts from sleeve edge towards shoulder. Work another 1.5 cm stocking st with 1 garter st each side on the remaining 12-13-14 (15-16) sts (= buttonhole edge). K 1 row from WS and cast off all sts from RS LEFT SHOULDER/SLEEVE: Continue and cast off as described for right shoulder/sleeve, but mirrored = 39-44-50 (61-70) sts left on shoulder/sleeve. Continue in stocking st until piece measures 48-57-66 (72-80) cm, cast off. ASSEMBLY: Sew upper arm seams, edge to edge to avoid a chunky seam – on right shoulder only sew seam up to buttonhole edge. CUFF: Pick up 38-44-50 (50-56) sts on needle size 3.5 mm along sleeve edge. K 2 rows and continue in rib, K3/P3, with 1 edge st each side. Cast off when rib measures 5 cm. Repeat along the other sleeve edge. Sew seams under arms inside 1 edge st. NECK: Pick up approx 48 to 64 sts round neckline (incl sts on stitch holders) on needle size 4.5 mm. K 3 rows and cast off. Sew tog buttonhole edges at the top of the front of legs and sew tog the buttonhole edges at the top of the back of legs. Sew on buttons to fit buttonholes on legs and shoulder. ---------------------------------------------------------- BASQUE HAT: Head circumference: 40/42 - 44/46 - 46/48 (48/50 - 50/52) cm INCREASING TIP: Inc 1 st by making 1 YO. Work YO into back of loop on return row to avoid a hole. ---------------------------------------------------------- HAT: Worked back and forth on pointed needles. Cast on 90-92-94 (96-98) sts on needle size 4 mm with Merino Extra Fine. Work 2 cm rib, K1/P1. Continue in garter st – SEE ABOVE – AT THE SAME TIME dec 5-7-4 (6-3) sts evenly on first row = 85-85-90 (90-95) sts. Insert 5 markers in piece as follows from RS: First marker after 1 st, and the remaining 4 markers with 17-17-18 (18-19) sts between each = 16-16-17 (17-18) sts left after the last marker. On next row from RS inc 1 st to the left of all markers – SEE INCREASING TIP – and repeat the inc on every other row a total of 6-7-8 (9-10) times = 115-120-130 (135-145) sts. REMEMBER THE KNITTING TENSION! When piece measures 6.5-7-7.5 (8-8.5) cm dec 1 st to the left of all markers by K2 tog, and repeat the dec on every other row a total of 18-19-20 (21-22) times = 25-25-30 (30-35) sts. Now K2 tog across the row. Cut the thread, pull through remaining sts and fasten. Sew hat tog mid back in outer loops of sts. Hat measures approx 15-16-17 (18-19) cm. |
||||||||||
Diagram explanations |
||||||||||
|
||||||||||
 |
||||||||||
Have you finished this pattern?Tag your pictures with #dropspattern #littlelambset or submit them to the #dropsfan gallery. Do you need help with this pattern?You'll find 16 tutorial videos, a Comments/Questions area and more by visiting the pattern on garnstudio.com. © 1982-2025 DROPS Design A/S. We reserve all rights. This document, including all its sub-sections, has copyrights. Read more about what you can do with our patterns at the bottom of each pattern on our site. |
||||||||||


With over 40 years in knitting and crochet design, DROPS Design offers one of the most extensive collections of free patterns on the internet - translated to 17 languages. As of today we count 320 catalogues and 12094 patterns translated into English (UK/cm). 12094
We work hard to bring you the best knitting and crochet have to offer, inspiration and advice as well as great quality yarns at incredible prices! Would you like to use our patterns for other than personal use? You can read what you are allowed to do in the Copyright text at the bottom of all our patterns. Happy crafting!
Post a comment to pattern DROPS Baby 16-2
We would love to hear what you have to say about this pattern!
If you want to leave a question, please make sure you select the correct category in the form below, to speed up the answering process. Required fields are marked *.