
Looking for a yarn?


Comments / Questions (150)
![]() Serita Joseph wrote:
Serita Joseph wrote:
Is this beret worked on 2 or 4 needles I don't understand this (worked back and forth on pointed kneedles) and there seems to be no seames thank you in advance
28.12.2019 - 22:48DROPS Design answered:
Dear Serita, the beret is worked with 2 single pointed needles. It's worked back and forth and with seams. Happy knitting!
29.12.2019 - 00:16
![]() Marga wrote:
Marga wrote:
Wat bedoelen julie bij de hals 2 steken samenbreien over de kabels
24.10.2019 - 09:23DROPS Design answered:
Dag Marga,
Over het gedeelte waar de kabels zitten brei je 2 steken samen. Voor kabels heb je namelijk meer steken nodig omdat het in elkaar trekt. Dit wordt gecompenseerd door 2 steken samen te breien.
29.10.2019 - 10:13
![]() Elena wrote:
Elena wrote:
Hi! I have started to knit the body piece. I don’t understand how I should proceed with the cable pattern, in the sense that in the instructions it looks like I should repeat the row with stockinette stitches and M1 and M2 until piece (I should count from the point where I start to join the legs in round?) measures 38cm (working at the smallest size). But if I see the picture of the pattern it looks like I have to knit for 3 rows, then row with M1 and M2 and 2 more k rows. Help!
31.08.2019 - 01:21DROPS Design answered:
Dear Elena, the first round worked on body is like a set-up row, you K or P the stitches as explained, then start with diagrams on next round. You then repeat diagrams in height as shown = there should be 5 rows between each cable row (= 2 rounds after cable + 3 rounds before next cable). Happy knititng!
02.09.2019 - 12:06
![]() Debra Lynn Radford wrote:
Debra Lynn Radford wrote:
I would love to find someone that would knit this set. I need to purchase for a gift... Thank you..
30.03.2019 - 15:04DROPS Design answered:
Dear Mrs Radford, we only provide the free patterns on our website, but you might try to ask in our Workshop if someone could help you.
01.04.2019 - 12:16
![]() Ina wrote:
Ina wrote:
Vielen Dank für die schnelle Hilfe!
14.03.2019 - 15:58
![]() Ina wrote:
Ina wrote:
Ich verstehe leider nicht, wie ich die Maschen für die Armel aufnehmen soll. Nehme ich in jeder Reihe Maschen auf? Zuerst 4, dann 6, dann wieder 6 Maschen, oder nur in den Hinrunden oder wie muss ich das genau machen? Vielen Dank für Ihre Hilfe.
13.03.2019 - 21:34DROPS Design answered:
Liebe Ina, die neuen Maschen für den Ärmel werden beim Vorderteil am Ende der Hinreihe sowie am Ende der Rückreihe zugenommenn bzw angeschlagen (siehe Video, dh Sie müssen dieselbe Maschenanzahl auf beiden Seiten (= am Ende der Hin- sowie der nächsten Rückreihe) anschlagen. Viel Spaß beim stricken!
14.03.2019 - 09:55
![]() Anita Selling wrote:
Anita Selling wrote:
Jag stickar strl. 44-46
08.03.2019 - 08:43DROPS Design answered:
Efter att du satt de 5 markörerna i arbetet har du 17 m mellan varje markör (17x5=85). Sedan ökar du 1 m på vänster sida om varje markör totalt 7 gånger, du har då alltså 17+7=24 m mellan varje markör (24x5=120 m totalt). Efter det minskar du 1 m på vänster sida om varje markör totalt 19 gånger och du har då alltså 24-19= 5 m mellan varje markör (5x5=25 m totalt). Lycka till!
08.03.2019 - 09:01
![]() Anita Selling wrote:
Anita Selling wrote:
Jag undrar: när man ska minska efter markörerna så vad ska jag göra där inga maskor finns kvar att minska?
05.03.2019 - 10:32DROPS Design answered:
Hej. Det ska finnas maskor kvar att minska. Vilken storlek stickar du? Mvh DROPS Design
08.03.2019 - 07:49
![]() Chantal Roig wrote:
Chantal Roig wrote:
Bonjour j ai commencé le béret en 24 mois en suivant scrupuleusement les indications et le me retrouve avec un coté en angle et l autre droit. Ne faut il pas des augmentations et des diminutions de chaque coté des lisières ? MERCI DE VOTRE RÉPONSE
08.12.2018 - 09:49DROPS Design answered:
Bonjour Mme Roig, les augmentations se font à gauche de chacun des 5 marqueurs (= 5 augmentations par rang), comme on augmente aussitôt après la 1ère maille, les augmentations seront plus visible de ce côté, car en fin de rang on augmente après le dernier marqueur, mais ainsi, on aura toujours le même nombre de mailles entre chaque marqueur quand la couture sera faite. Bon tricot!
10.12.2018 - 08:29
![]() Grethel wrote:
Grethel wrote:
Tack för ett jättefint mönster! Förstår inte riktigt hur jag ska göra vid delningen på byxan till fram- och bakstycke. Ska bakstycket sättas på en tråd och ska rundstickan användas?
14.10.2018 - 20:06DROPS Design answered:
Hej, du delar arb vid märket i varje sida. Du sätter maskorna över bakstycket på en tråd och fortsätter sticka fram och tilbaka på rundstickan.
18.10.2018 - 17:28
|
||||||||||
Little Lamb#littlelambset |
||||||||||
|
|
||||||||||
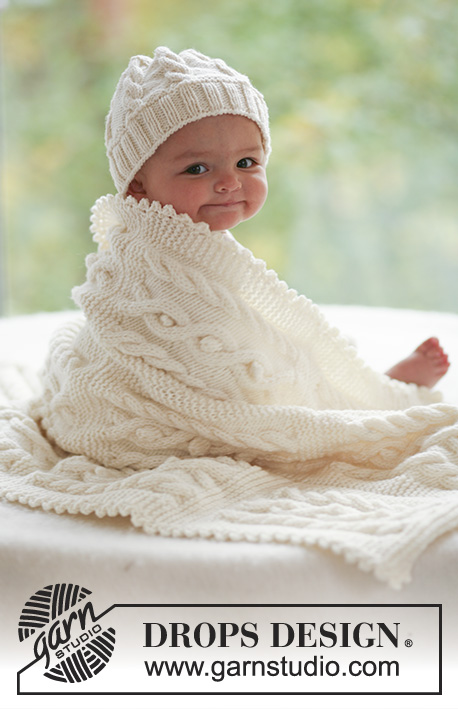
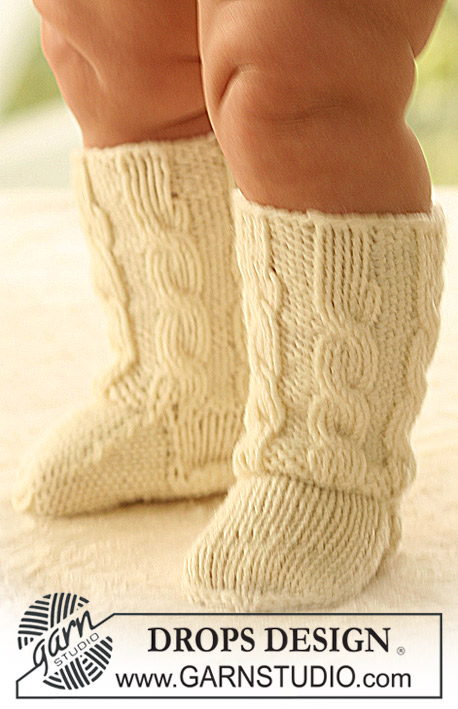
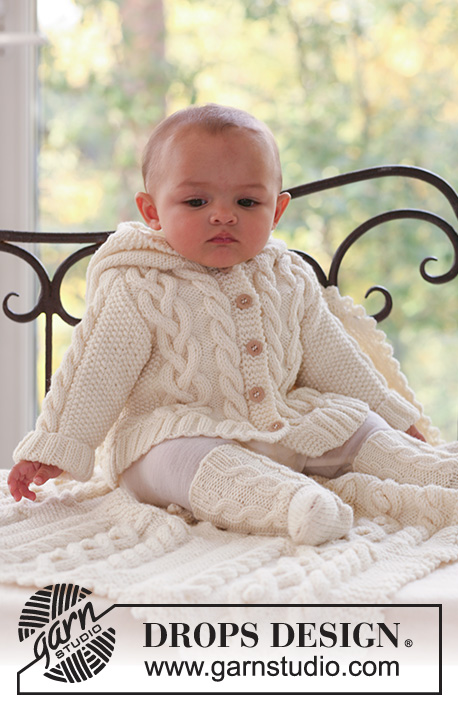
Set of beret hat and onesie with cables for baby in DROPS Merino Extra Fine
DROPS Baby 16-2 |
||||||||||
|
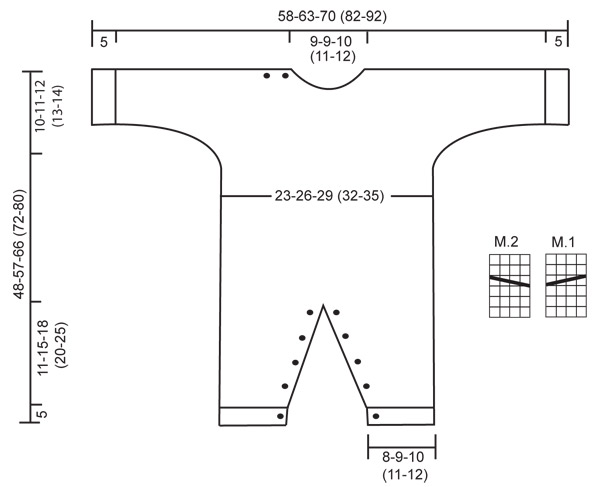
JUMPSUIT: GARTER ST (back and forth on needle): K all rows. PATTERN: See diagram M.1 and M.2. The diagrams show the pattern from the RS. BUTTONHOLES: Make buttonholes on buttonhole edge on front of leg. On right leg make buttonholes from RS and on left leg make buttonholes from WS. 1 buttonhole = K tog 2nd and 3rd st from edge and make 1 YO. Make buttonholes when leg measures: SIZE 1/3 months: 2, 5, 8, 11 and 14 cm. SIZE 6/9 months: 2, 6, 10, 14 and 18 cm. SIZE 12/18 months: 2, 6, 11, 16 and 21 cm. SIZE 2 years: 2, 6, 10, 14, 18 and 23 cm. SIZE 3/4 years: 2, 7, 12, 17, 22 and 28 cm. ---------------------------------------------------------- RIGHT LEG: Worked back and forth on circular needle. Cast on 47-53-53 (59-65) sts on circular needle size 3.5 mm with Merino Extra Fine. P 1 row from WS and continue as follows from RS: 4 garter sts (buttonhole edge) rib K3/P3, on the next 36-42-42 (48-54) sts and finish row with K3 and 4 garter sts (= buttonhole edge). Continue in rib with 4 garter sts each side, AT THE SAME TIME when piece measures 2 cm make buttonhole – SEE ABOVE. When piece measures 5 cm K 2 rows on all sts, AT THE SAME TIME dec 11-13-9 (11-13) sts evenly on first row = 36-40-44 (48-52) sts. Change to needle size 4.5 mm and continue in stocking st with 4 garter sts each side. AT THE SAME TIME when piece measures 6 cm inc 1 st each side inside the 4 garter sts on every 3-3-4 (4-4) row a total of 9-10-11 (12-13) times = 54-60-66 (72-78) sts. REMEMBER THE KNITTING TENSION! When piece measures 16-20-23 (25-30) cm cast off 4 sts each side = 46-52-58 (64-70) sts. Put piece aside and knit the other leg. LEFT LEG: Like right leg, but make buttonholes on the opposite side. BODY PIECE: Slip both legs on the same circular needle = 92-104-116 (128-140) sts. Insert 1 marker each side = 46-52-58 (64-70) sts between markers. Work next round as follows – beg on the left side of piece: 18-21-24 (27-30) stocking sts, P2, K2 in each of the next 2 sts (= K4), P2, K2 in each of the next 2 sts (= K4), P2 and work remaining sts in stocking st = 96-108-120 (132-144) sts. Work next round as follows: 18-21-24 (27-30) stocking sts, P2, M.1, P2, M.2, P2 and work remaining sts in stocking st. Continue like this until piece measures 38-46-54 (59-66) cm. Now divide the piece by markers at sides and complete front and back pieces separately – NOTE: Make sure to divide piece so that the cable row in M.1 and M.2 sits on the RS. FRONT PIECE: = 50-56-62 (68-74) sts. Continue in stocking st with cables as before, AT THE SAME TIME cast on new sts each side for sleeves. Cast on at the end of every row at the sides: 4 sts 2-1-1 (1-1) times, 6 sts 0-1-1 (2-1) times, 8 sts 1-1-1 (1-2) times and 9-9-13 (16-21) sts 1 time = 100-110-124 (148-168) sts – work inc sts in stocking st. When piece measures 44-53-61 (67-75) cm K2 tog on the 2 cables = 96-106-120 (144-164) sts. On next row slip the middle 10-10-12 (14-16) sts on a stitch holder for neck and complete each side separately. RIGHT SHOULDER/SLEEVE: Continue as before, AT THE SAME TIME cast off to shape the neckline at the beg of every row from mid front: 2 sts 1 time and 1 st 2 times = 39-44-50 (61-70) sts left on shoulder/sleeve. AT THE SAME TIME when piece measures 46-55-64 (70-78) cm work garter st on the first 12-13-14 (15-16) sts from mid front (work remaining sts as before). After 4 rows garter st make 2 buttonholes as follows from RS: K2 tog, 1 YO, work 5-6-7 (8-9) sts, K2 tog, 1 YO, work remaining sts on row. Continue in stocking st with garter st on the first 12-13-14 (15-16) sts from mid front until piece measures 48-57-66 (72-80) cm, cast off. LEFT SHOULDER/SLEEVE: Like right shoulder/sleeve, but mirrored = 39-44-50 (61-70) sts on shoulder/sleeve. Continue in stocking st until piece measures 48-57-66 (72-80) cm, cast off. BACK PIECE = 46-52-58 (64-70) sts. Cast on new sts each side for sleeves as described for front piece = 96-106-120 (144-164) sts. When piece measures 46-55-64 (70-78) cm cast off the middle 16-16-18 (20-22) sts for neck and complete each side separately. RIGHT SHOULDER/SLEEVE: = 40-45-51 (62-71) sts. Cast off 1 st on neckline on next row = 39-44-50 (61-70) sts. When piece measures 48-57-66 (72-80) cm cast off the first 27-31-36 (46-54) sts from sleeve edge towards shoulder. Work another 1.5 cm stocking st with 1 garter st each side on the remaining 12-13-14 (15-16) sts (= buttonhole edge). K 1 row from WS and cast off all sts from RS LEFT SHOULDER/SLEEVE: Continue and cast off as described for right shoulder/sleeve, but mirrored = 39-44-50 (61-70) sts left on shoulder/sleeve. Continue in stocking st until piece measures 48-57-66 (72-80) cm, cast off. ASSEMBLY: Sew upper arm seams, edge to edge to avoid a chunky seam – on right shoulder only sew seam up to buttonhole edge. CUFF: Pick up 38-44-50 (50-56) sts on needle size 3.5 mm along sleeve edge. K 2 rows and continue in rib, K3/P3, with 1 edge st each side. Cast off when rib measures 5 cm. Repeat along the other sleeve edge. Sew seams under arms inside 1 edge st. NECK: Pick up approx 48 to 64 sts round neckline (incl sts on stitch holders) on needle size 4.5 mm. K 3 rows and cast off. Sew tog buttonhole edges at the top of the front of legs and sew tog the buttonhole edges at the top of the back of legs. Sew on buttons to fit buttonholes on legs and shoulder. ---------------------------------------------------------- BASQUE HAT: Head circumference: 40/42 - 44/46 - 46/48 (48/50 - 50/52) cm INCREASING TIP: Inc 1 st by making 1 YO. Work YO into back of loop on return row to avoid a hole. ---------------------------------------------------------- HAT: Worked back and forth on pointed needles. Cast on 90-92-94 (96-98) sts on needle size 4 mm with Merino Extra Fine. Work 2 cm rib, K1/P1. Continue in garter st – SEE ABOVE – AT THE SAME TIME dec 5-7-4 (6-3) sts evenly on first row = 85-85-90 (90-95) sts. Insert 5 markers in piece as follows from RS: First marker after 1 st, and the remaining 4 markers with 17-17-18 (18-19) sts between each = 16-16-17 (17-18) sts left after the last marker. On next row from RS inc 1 st to the left of all markers – SEE INCREASING TIP – and repeat the inc on every other row a total of 6-7-8 (9-10) times = 115-120-130 (135-145) sts. REMEMBER THE KNITTING TENSION! When piece measures 6.5-7-7.5 (8-8.5) cm dec 1 st to the left of all markers by K2 tog, and repeat the dec on every other row a total of 18-19-20 (21-22) times = 25-25-30 (30-35) sts. Now K2 tog across the row. Cut the thread, pull through remaining sts and fasten. Sew hat tog mid back in outer loops of sts. Hat measures approx 15-16-17 (18-19) cm. |
||||||||||
Diagram explanations |
||||||||||
|
||||||||||
 |
||||||||||
Have you finished this pattern?Tag your pictures with #dropspattern #littlelambset or submit them to the #dropsfan gallery. Do you need help with this pattern?You'll find 16 tutorial videos, a Comments/Questions area and more by visiting the pattern on garnstudio.com. © 1982-2025 DROPS Design A/S. We reserve all rights. This document, including all its sub-sections, has copyrights. Read more about what you can do with our patterns at the bottom of each pattern on our site. |
||||||||||


With over 40 years in knitting and crochet design, DROPS Design offers one of the most extensive collections of free patterns on the internet - translated to 17 languages. As of today we count 320 catalogues and 12094 patterns translated into English (UK/cm). 12094
We work hard to bring you the best knitting and crochet have to offer, inspiration and advice as well as great quality yarns at incredible prices! Would you like to use our patterns for other than personal use? You can read what you are allowed to do in the Copyright text at the bottom of all our patterns. Happy crafting!
Post a comment to pattern DROPS Baby 16-2
We would love to hear what you have to say about this pattern!
If you want to leave a question, please make sure you select the correct category in the form below, to speed up the answering process. Required fields are marked *.