
Popular categories
Looking for a yarn?


Comments / Questions (73)
![]() Sine Bjerkan wrote:
Sine Bjerkan wrote:
Jeg kan ikke gennemskue om jakken også har to spidser bagpå?
25.01.2014 - 15:54
![]() Sine Bjerkan wrote:
Sine Bjerkan wrote:
Jeg kan ikke helt gennemskue hvordan ryggen ser ud. Foran går den ned i to spidser - gør den også det bag på?
25.01.2014 - 15:46DROPS Design answered:
Hej Sine. For- og bagstk er stort set identiske - men der er mere spids paa forst fordi der er taget mere ud.
28.01.2014 - 16:45
![]() Kathrin wrote:
Kathrin wrote:
Ich verstehe eine Passage bei den Erstellung der Ärmel nicht: auf beiden Seiten, gegen die Schulter, bei jeder 2. R. abk.: 3 M. 2 Mal. Was heisst gegen die Schulter abketten? Wird die Randmasche mit abgekettet?
14.11.2013 - 11:40DROPS Design answered:
Liebe Kathrin, ja das war wirklich etwas unverständlich. Es wird auf beiden Seiten abgekettet, der Zusatz "gegen die Schulter" macht keinen Sinn und wir haben ihn gelöscht. Diese ältere Anleitung werden wir demnächst neu übersetzen. Und ja, die Randmasche wird mit abgekettet, sie ist die 1. Masche.
15.11.2013 - 10:36
![]() Pammie wrote:
Pammie wrote:
Hello DROPS, may I congratulate you on a beautifully designed website which is very clear and user friendly. At present I have a few non-DROPS projects to complete and as soon as I have completed them I will look to start knitting or crocheting some of your beautiful designs which are of "top designer" standard. Do you sell your own "DROPS" labels? If not, where can I have them made to order? Keep up the good work. Kind regards
27.07.2013 - 15:37
![]() Emma wrote:
Emma wrote:
Erg leuk vest. Ik heb nog 700 gram Eskimo liggen. Is dit voldoende voor dit vest in maat S of M? Kreeg nl. ondermeer dit patroon als alternatief te zien. Dus wil het voor de zekerheid even checken. Bedankt.
21.09.2012 - 15:16DROPS Design answered:
Je kan dit berekenen met hulp van de looplengtes van beide garens. Klik op de link voor de garenalternatieven voor Highlander. Hier vindt je de rekenformule. Highlander liep ca 80 m per 50 gr en Eskimo loopt ca 50 m per 50 gr.
03.10.2012 - 12:44
![]() Mariann Ørberg wrote:
Mariann Ørberg wrote:
Hejsa Jeg er lige faldet over den her jakke, som jeg gerne strikke i jeres nye garn "drop for you" Men jeg har to spørgsmål: 1: Hvor stor er overviden på XL og XXL på den her lækre jakke? Jeg kan ikke finde ud af at læse det ud fra målene på tegningen. 2: Hvis jeg gerne vil lave lange ærmer på jakken, hvor meget garn vil I regne med der skal til?
31.08.2012 - 14:49DROPS Design answered:
Selve rygstykket måler 46-50 cm, men som du kan se på måleskitsen så er forstykkerne bredere. Hvis du strikker lange ærmer skal du nok regne med ca 3 nøgler ekstra.
13.12.2012 - 12:06
![]() Vera Schuster wrote:
Vera Schuster wrote:
Ich hätte auch gerne die Anleitung zu dem Modell. Mir ist nicht ganz klar wie ich beginnen soll. Die Maße und Maschen Anzahl stimmen nicht mit dem Schnittmuster überein
02.07.2012 - 19:17DROPS Design answered:
Die Anleitung ist ja mittlerweile aufgeschaltet. Sie beginnen wie beschrieben. Im Diagramm konnten wir die Schräge nicht genau darstellen wie im Original, aber wenn Sie der Anleitung folgen, ergibt es diese Form.
03.07.2012 - 13:49
![]() Tiia wrote:
Tiia wrote:
Todella hieno, toivottavasti tän ohje tulee pian nettisivuille!
01.10.2006 - 18:47
![]() Angelika wrote:
Angelika wrote:
Könnten Sie mir bitte die Anleitung zu diesem Modell - wenn möglich auf deutsch - zukommen lassen? Vielen Dank
26.09.2006 - 18:09Daniela wrote:
ich hätte gern die anleitung zu dem modell
25.09.2006 - 12:14
|
|
DROPS 96-12 |
|
|
|
|
DROPS Long jacket with ¾ sleeves
DROPS 96-12 |
|
|
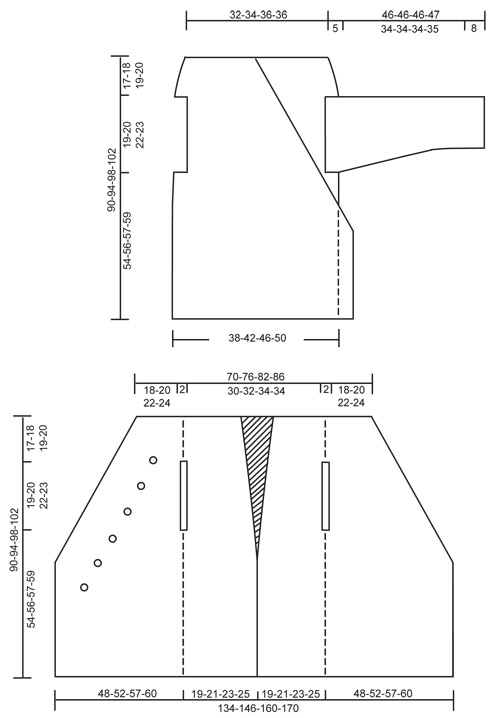
Knitting tension: 12 sts x 17 rows on needle size 8mm in stocking stitch = 10 x 10 cm Garter sts (back and forth on needle): knit all rows. Increasing tips: Inc inside 1 edge st on front piece and inside 2 edge sts on back piece. Inc by making a yo and knit into back of yo on the returning row (to avoid making a hole). Knit inc sts in stocking sts. Measurements tips: Because of the weight of the yarn, make all measurements whilst the pieces are hanging. Left front + back piece: Because of the number of sts the jacket is knitted back and forth on circular needles. The jacket is knitted from top down. Loosely cast on 35-38-41-43 sts on needle size 8 mm with Highlander and knit 4 rows garter sts (1st row = RS). At the same time insert a marking thread after the first 19-21-23-25 sts on left front (= 16-17-18-18 sts left on row towards back piece) - let the marking thread follow the piece as you progress. Read all of the following section before continuing! Continue in stocking sts, but with the 1st st on the right side of piece (= mid front) and the first 2 sts on the left side of piece (= mid back) in garter sts. Inc for sloping front: At the same time after the 4 rows in garter sts inc towards mid front on every 3rd row a total of 29-31-34-35 times – see Increasing tips. Inc mid back: At the same time when piece measures 17-13-11-8 cm – see Measurement tips – inc 1 st mid back on every 17-13-11-8 cm a total of 3-4-5-7 times – see Increasing tips. Armhole: At the same time when piece measures 17-18-19-20 cm cast off 1 st on both sides of the marking thread and continue knitting each piece separately – continue inc. as described above. When front piece and back piece measures 36-38-41-43 cm put all sts back on the same needle and cast on 2 new sts over the 2 sts cast off for armhole. Continue with inc as before. After all inc are complete = 67-73-80-85 sts on needle. When piece measures approx 89-93-97-101 cm (or desired length) – see Measurement tips – knit 1 row from the WS and cast off. Right front + back piece: Cast on and knit as left front + back piece, but mirrored. Sleeve: Knitted back and forth on circular needle. Cast on 28-30-32-34 sts (incl 1 edge st each side) on needle size 8 mm with Highlander. Knit 4 rows garter sts and continue in stocking sts. When sleeve measures 8 cm inc 1 st each side on every 6-6-5-5 cm a total of 6-6-7-7 times = 40-42-46-48 sts. When sleeve measures 43-43-43-44 cm dec for sleeve cap on every other row: 3 sts 2 times. Cast off remaining sts when sleeve measures approx 46-46-46-47 cm. Assembly: Sew left and right back pieces tog mid back – sew in the outer loop of the outermost st ( = 4 garter sts mid back). Sew sleeve seams inside 1 edge st and sew in sleeves. Crochet border: Crochet a border along the whole opening of the jacket and round the sleeve edges with crochet hook size 7 and Highlander as follows: 1 dc in first st, *2 ch, skip approx 2 - 2.5 cm, 1 dc in next st*, repeat from *-* and finish with 2 ch and 1 sl st in first dc from beginning of round – make sure the border is even and neither wavy nor too tight. Buttons: Sew on buttons on left front piece. Place the top button in line with the upper edge of the armhole approx 9-10-11-12 cm from the armhole towards mid front. Place the remaining buttons parallel with the sloping front edge – see measurement chart. There should be approx 7 to 10 cm between each button. Use the ch-loops in the crochet border as buttonholes. Crochet a buttonhole loop (approx 5-6 ch) and place this on the inside of the right front piece and sew on a button at the top of the left front edge to keep the jacket in place – try on the jacket for placing of the buttonhole loop and button. |
|
|
|
Have you finished this pattern?Tag your pictures with #dropspattern or submit them to the #dropsfan gallery. Do you need help with this pattern?You'll find 22 tutorial videos, a Comments/Questions area and more by visiting the pattern on garnstudio.com. © 1982-2025 DROPS Design A/S. We reserve all rights. This document, including all its sub-sections, has copyrights. Read more about what you can do with our patterns at the bottom of each pattern on our site. |


With over 40 years in knitting and crochet design, DROPS Design offers one of the most extensive collections of free patterns on the internet - translated to 17 languages. As of today we count 314 catalogues and 11820 patterns translated into English (UK/cm). 11820
We work hard to bring you the best knitting and crochet have to offer, inspiration and advice as well as great quality yarns at incredible prices! Would you like to use our patterns for other than personal use? You can read what you are allowed to do in the Copyright text at the bottom of all our patterns. Happy crafting!
Post a comment to pattern DROPS 96-12
We would love to hear what you have to say about this pattern!
If you want to leave a question, please make sure you select the correct category in the form below, to speed up the answering process. Required fields are marked *.