
Popular categories
Looking for a yarn?


Comments / Questions (21)
![]() Graziella wrote:
Graziella wrote:
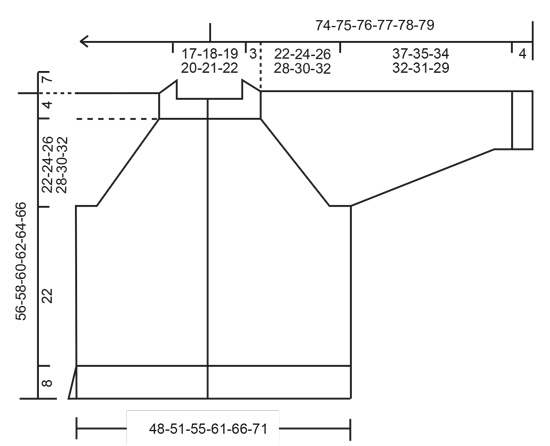
Hi, I'm knitting the small size & don't quite understand the instructions "At the same time when the diagrams have been worked vertically, repeat the last 2 rows vertically - is this after each vertical repeat or after the 3 pattern repeats. Also, I can't quite make out how the sts increase from 177 to 301 from the Raglan & pattern repeats - I get less than this by calculations. Thanks!
15.11.2023 - 21:00DROPS Design answered:
Dear Graziella, continue increasing for raglan as before an continue working diagrams/pattern as established until you will have a total of 301 sts, ie 55 sts stocking stitch between A.2 and A.3 on back piece, 28 sts stocking stitch between A.2 and A.3 and front band stitches. Happy knitting!
16.11.2023 - 10:10
![]() Gaby wrote:
Gaby wrote:
Hallo, Ich bin bei der Passe. Sind in Diagrammen nur die Hinreihen eingezeichnet? Was ist mit den Rückreihen, alles links?
16.10.2023 - 07:56DROPS Design answered:
Liebe Gaby, die Diagramme zeigen alle Reihen, dh die Hin- sowie die Rück-Reihen; siehe Symbolerklärungen. Hier lesen Sie noch mehr. Viel Spaß beim stricken!
16.10.2023 - 10:14
![]() Margaret T Winters wrote:
Margaret T Winters wrote:
I love the look of this cardigan, and am preparing to begin it. My chosen yarn is Pingouin 50wool/25acrylic/15silk and I was wondering if it would work to add in a kid mohair to beef it up a bit? Please advise. Thank you, Margaret
29.09.2023 - 08:44DROPS Design answered:
Dear Margaret, the composition of the yarn is not as important as the actual yardage. We are not familiar with this yarn so we can't assess whether it would be useful for this pattern. Happy knitting!
30.09.2023 - 23:58
![]() Judith Brink wrote:
Judith Brink wrote:
Hi, this pattern has me completely confused. Please help. For raglan sleeve increases must I just increase the knit 1, make 1 yo, knit 15 make 1 yo, knit 1 for the sleeves. Or do I need to increase as well between A2 and the sleeve marker? How many stitches should I have on my needles after row 3 and then row 5? Does it go 125, 133, 141? Thank you for any help. Regards Judith
25.09.2023 - 13:43DROPS Design answered:
Dear Mrs Brink, increase on sleeve as explained under RAGLAN (applies to sleeves):, this means work until the marker thread at the beginning of the sleeve, than knit 1, increase 1 stitch, work sleeve until 1 stitch remains before the marking thread at the end of sleeve, increase 1 stitch, knit 1. The number of sts between the yarn overs will increases as you increase. This is to increase on sleeves. On front and back pieces, increase as shonw in the diagrams (see written pattern) . Happy knitting!
25.09.2023 - 15:38
![]() Louise wrote:
Louise wrote:
Le modèle se tricote-t-il avec aiguille 3.5 ou 4.5? Sur l’image les mailles paraissent serrées , comme s’il était tricoté en côtes et avec aiguille 3.5.
23.02.2023 - 16:54DROPS Design answered:
Bonjour Louise, on utilise l'aiguille 3,5 pour les côtes du col, du bas du gilet et des poignets, le reste est tricoté avec l'aiguille 4,5 - ceci dit, pensez à bien vérifier votre tension, celle qui compte: vous devez avoir 20 m x 26 rangs = 10 x 10 cm, avec les aiguilles 4,5 ou, en fonction de votre façon de tricoter, celles dont vous aurez besoin pour avoir cet échantillon. Bon tricot!
24.02.2023 - 09:47
![]() Hansson wrote:
Hansson wrote:
När man använder 2 olika garn, vilket ofta förekommer ex 1 tråd kid silk också hur ska jag då söka mönster? Jag har ett B garn tillsammans med en tråd A garn. Det stämmer inte när jag försöker söka på masktäthet.
03.11.2022 - 15:51DROPS Design answered:
Hej Hansson. Når du vil finde en opskrift som passer til en kombination, så kan du søge på vores anbefalede strikkefasthed for prøven: 16-17 masker Eller så strikker du selv en prøve som du synes er fin, måler antal masker på 10 cm og vælger Stickfasthet i filter :)
04.11.2022 - 10:25
![]() Guilaine wrote:
Guilaine wrote:
Curiosità: nella spiegazione del Davanti Destra, non si può rilevare le maille col ferro n°4,5 fare gli aumenti sul rovescio del lavoro poi passare ai ferri n° 3,5 ed iniziare al lavorare ancora stando sul rovescio del lavoro?
23.10.2022 - 17:38DROPS Design answered:
Buonasera Guilaine, le spiegazioni riportano questo procedimento: può tagliare il filo e proseguire come indicato. Buon lavoro!
25.10.2022 - 19:30
![]() Jacqueline wrote:
Jacqueline wrote:
Is het bij dit patroon juist dat je na de 8 voorbies steken bij A1 gelijk 1 steek moet meerderen en aan het eind bij A5 voor de voorbies ook 1 steek moet meerderen. zijn A1 en A5 niet verwisseld zodat de meerderingen wel bij de raglan komen en niet bij de voorbies. Graag uw advies. Met groet Jacqueline
09.10.2022 - 19:11
![]() Anni wrote:
Anni wrote:
Hvilken str. er det på billederne?
08.10.2022 - 14:36DROPS Design answered:
Hei Anni. Det er str. S eller M. mvh DROPS Design
10.10.2022 - 13:55
![]() Julia Supit wrote:
Julia Supit wrote:
Is dit patroon ook met gewone breipennen te breien en is daar ook een beschrijving van.\r\nAlvast dank, Julia
01.10.2022 - 12:36DROPS Design answered:
Dag Julia,
Helaas is dit patroon daar niet zo ge geschikt voor omdat de pas in een stuk wordt gebreid.
01.10.2022 - 17:37
|
||||||||||
Spice Market Cardigan#spicemarketcardigan |
||||||||||
 |
 |
|||||||||
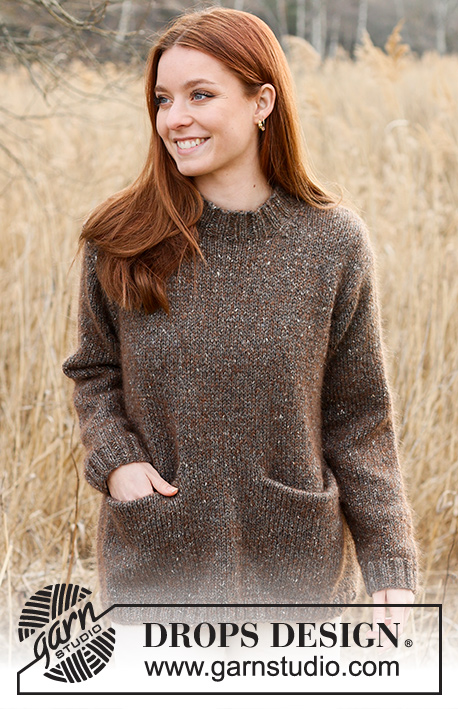
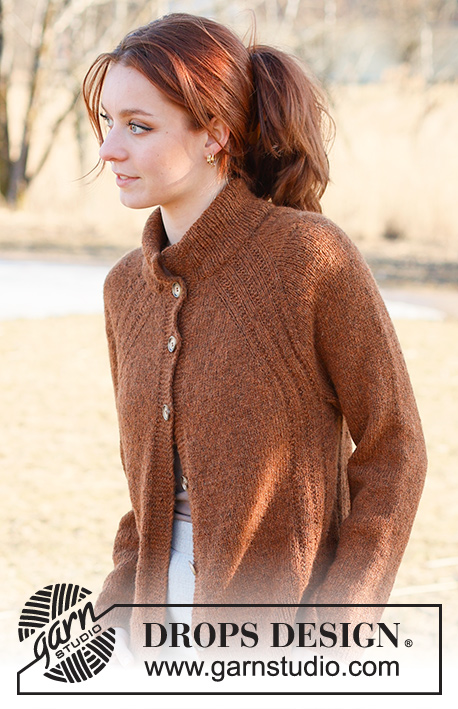
Knitted jacket in DROPS Sky. Piece is knitted top down with raglan, textured pattern and vents in the sides. Size: S - XXXL
DROPS 236-27 |
||||||||||
|
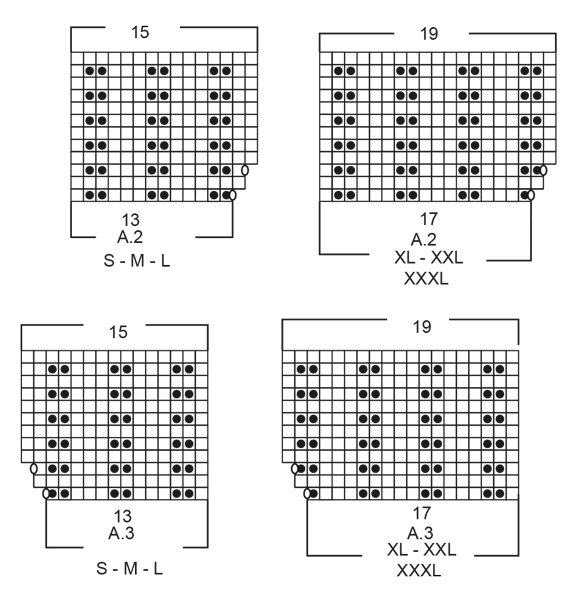
---------------------------------------------------------- EXPLANATION FOR THE PATTERN: ---------------------------------------------------------- GARTER STITCH (back and forth): Knit all rows. 1 ridge vertically = knit 2 rows. PATTERN: See diagrams A.1 to A.5. Choose diagram for your size in A.2 and A.3. BUTTONHOLES: Decrease for buttonholes on right band (when garment is worn). Decrease from right side when 5 stitches remain on row as follows: Cast off the next 2 stitches, knit the next 3 stitches. On next row cast on 2 new stitches over the cast off stitches. Cast off first button hole right after rib in the neck. Then decrease the next 5-5-5-5-6-6 buttonholes, approx. 9-9-10-10-9-9 cm between each. RAGLAN (applies to sleeves): All increases are done from the right side. Increase 1 stitch before/after marker threads on sleeves as follows: Work until first marker thread on sleeve, knit 1, make 1 yarn over, work until 1 stitch before next marker thread, make 1 yarn over, knit 1. Repeat on the other sleeve (= 4 stitches increased on sleeves). On next row (wrong side) purl yarn over twisted to avoid holes. Then work the new stitches in stocking stitch. DECREASE TIP (applies to sleeves): Decrease 1 stitch on each side of marker thread: Work until 3 stitches remain before marker thread and knit 2 together, knit 2 (marker thread is between these 2 stitches), slip 1 stitch knitwise, knit 1, pass slipped stitch over stitch worked. ---------------------------------------------------------- START THE PIECE HERE: ---------------------------------------------------------- JACKET - SHORT OVERVIEW OF THE PIECE: Work double neck edge and yoke back and forth on circular needle work top down. Work body back and forth in one down to vent in the sides, then finish front pieces and back back and forth separately. Work sleeves in the round on a short circular needle/double pointed needles. DOUBLE NECK EDGE: Cast on 119-123-129-133-139-143 stitches with DROPS Sky over a short circular needle size 4.5 and a short circular needle size 3.5 mm held together. Pull out circular 4.5 mm and keep stitches on the short circular needle size 3.5 mm (cast is done like this to get an elastic cast-on edge). Purl 1 row from wrong side, then work as follows from right side: * Knit 1, purl 1 *, work from *-* until 1 stitch remain, knit 1. Work like this until piece measures 7 cm. Now cast on 8 new stitches in each side = 135-139-145-149-155-159 stitches. Continue rib as before, work the outermost 8 stitches in each side in GARTER STITCH – read explanation above (= band stitches). This way the neck edge is worked double but the band stitches in garter stitch are not double (edge towards mid front will not be as thick when buttoned). Work rib until piece measures 14 cm. Now fold the rib inwards to form a double edge - then work next row from right side in rib as before, at the same time work every other stitch together with every other stitch from cast-on edge (begin and end with 8 stitches in garter stitch in each side). You now have a double neck edge. Insert 1 marker here – measure the piece from here. YOKE: Switch to circular needle size 4.5 mm. Purl 1 row from wrong side while decreasing 26-26-28-28-30-30 stitches evenly(work bands in garter stitch and do not decrease over bands) = 109-113-117-121-125-129 stitches. Work pattern as follows from right side: 8 band stitches in garter stitch, A.1, A.2, insert 1 marker thread here (left front piece), knit 1 stitch, make 1 yarn over, knit 11-13-15-9-11-13, make 1 yarn over, knit 1, insert a marker thread here (sleeve), A.3, A.4 (mid back), A.2, insert a marker thread here (back piece), knit 1, make 1 yarn over, knit 11-13-15-9-11-13, make 1 yarn over, knit 1, insert a marker thread here (sleeve), A.3, A.5, 8 band stitches in garter stitch (right front piece). 1 stitch for RAGLAN has now been increased – read explanation above, in each side of sleeve and 1 stitch has been increased on each A.2/A.3 on front pieces and back piece = 117-121-125-129-133-137 stitches. REMEMBER THE KNITTING TENSION and remember BUTTONHOLES - see explanation above. Continue back and forth like this and increase for raglan on sleeves every other row 21-25-26-31-31-30 more times (22-26-27-32-32-31 times in total), AT THE SAME TIME when diagrams have been worked vertically, repeat the last 2 rows vertically 20-23-27-28-33-36 more times (i.e. until there are 55-61-69-71-81-87 stitches in stocking stitch between A.2/A.3 on back piece and there are 28-31-35-36-41-44 stitches in stocking stitch between A.2/A.3 and the front band stitches on each of front piece) = 301-333-357-385-409-421 stitches. Continue with texture over the 15-15-15-19-19-19 stitches in A.2 and A.3, 8 band stitches in garter stitch in each side towards mid front and stocking stitch over the remaining stitches until piece measures 22-24-26-28-30-32 cm measured from marker mid front. Work next row from wrong side as follows: Work pattern as before over the first 51-54-58-63-68-71 stitches (= right front piece), slip the next 57-67-71-75-77-77 stitches on a thread (= sleeve), cast on 10-10-10-12-12-16 new stitches on needle (= in the side under sleeve), work the next 85-91-99-109-119-125 stitches (= back piece), slip the next 57-67-71-75-77-77 stitches on a thread (= sleeve), cast on 10-10-10-12-12-16 stitches on needle (= in the side under sleeve), work the remaining 51-54-58-63-68-71 stitches on needle (= left front piece). Now measure piece from here! BODY: = 207-219-235-259-279-299 stitches. Continue with the last 2 rows in A.2 and A.3, 8 band stitches in garter stitch in each side towards mid front, and stocking stitch over the remaining stitches. Work until piece measures 22 cm. Slip the first and last 56-59-63-69-74-79 stitches on a thread for left and right front piece. Then finish front/back piece separately to get a vent in each side. BACK PIECE: = 95-101-109-121-131-141 stitches. Knit 1 row from right side while increasing 24-24-28-28-32-38 stitches evenly = 119-125-137-149-163-179 stitches. Switch to circular needle size 3.5 mm. Work rib as follows – from wrong side: 2 edge stitches in garter stitch, * purl 1, knit 1 *, work from *-* until 3 stitches remain, purl 1 and 2 edge stitches in garter stitch. When rib measures 8 cm, cast off with knit over knit and purl over purl. Jacket measures approx. 56-58-60-62-64-66 cm from shoulder and down. RIGHT FRONT PIECE: Slip the 56-59-63-69-74-79 stitches from thread back on circular needle size 4.5 mm. Purl 1 row from wrong side while increasing 13-12-16-16-19-22 stitches evenly = 69-71-79-85-93-101 stitches. Switch to circular needle size 3.5 mm. Work rib as follows – from wrong side: 2 edge stitches in garter stitch, * purl 1, knit 1 *, work from *-* until 9 stitches remain, purl 1 and 8 band stitches in garter stitch. When piece measures 8 cm, cast off. LEFT FRONT PIECE: Work the same way as on right front piece but reversed. SLEEVE: Slip the 57-67-71-75-77-77 stitches from thread in one side of piece on a short circular needle/double pointed needles size 4.5 mm and pick in addition up 1 stitch in each of the 10-10-10-12-12-16 stitches cast on under sleeve = 67-77-81-87-89-93 stitches. Insert 1 marker thread in the middle of the new stitches under sleeve (= 5-5-5-6-6-8 new stitches on each side of marker thread). Work in stocking stitch in the round. When piece measures 4 cm from division, decrease 2 stitches mid under sleeve - read DECREASE TIP. Decrease like this every 7½-3½-3-2-2-2 cm 5-9-10-12-12-13 times in total. When all decreases are done, there are 57-59-61-63-65-67 stitches on round. Work until sleeve measures 37-35-34-32-31-29 cm from division. Knit 1 round while increasing 11 stitches evenly = 68-70-72-74-76-78 stitches. Switch to double pointed needles size 3.5 mm and work rib = knit 1/purl 1 for 4 cm. Cast off. Sleeve measures approx. 41-39-38-36-35-33 cm from division. Work the other sleeve the same way. ASSEMBLY: Sew opening towards mid front together on bands with neat little stitches. Sew the buttons on to the left band. |
||||||||||
Diagram explanations |
||||||||||
|
||||||||||

|
||||||||||
|
||||||||||
|
||||||||||
Have you finished this pattern?Tag your pictures with #dropspattern #spicemarketcardigan or submit them to the #dropsfan gallery. Do you need help with this pattern?You'll find 28 tutorial videos, a Comments/Questions area and more by visiting the pattern on garnstudio.com. © 1982-2025 DROPS Design A/S. We reserve all rights. This document, including all its sub-sections, has copyrights. Read more about what you can do with our patterns at the bottom of each pattern on our site. |
||||||||||


With over 40 years in knitting and crochet design, DROPS Design offers one of the most extensive collections of free patterns on the internet - translated to 17 languages. As of today we count 314 catalogues and 11821 patterns translated into English (UK/cm). 11821
We work hard to bring you the best knitting and crochet have to offer, inspiration and advice as well as great quality yarns at incredible prices! Would you like to use our patterns for other than personal use? You can read what you are allowed to do in the Copyright text at the bottom of all our patterns. Happy crafting!
Post a comment to pattern DROPS 236-27
We would love to hear what you have to say about this pattern!
If you want to leave a question, please make sure you select the correct category in the form below, to speed up the answering process. Required fields are marked *.