
Popular categories
Looking for a yarn?


Comments / Questions (32)
![]() Henni wrote:
Henni wrote:
Leider nein. Ich meine den Schritt der Zunahmen für die Schulter nachdem man die verkürzten Reihen gestrickt hat. Also den Schritt, in dem man bspw. für Grösse L immer 65 Maschen abzählt für das Vorder- und Rückteil. Man soll dann zunächst zwischen dem 2&3 Markierer die erste Runde beginnen. Soll dies dann in jeder Zunahmerunde der Rundenbeginn sein damit man immer an den selben Stellen zunimmt oder fängt die neue Runde dann dort an, wo die letzte beendet wurde?
05.05.2025 - 08:46DROPS Design answered:
Liebe Frau Henni, oops sorry für das Misverständnis, jezt ab hier (und bis Ende der Passe) werden die Runden zwischen 2. und 3. Markierungen beginnen; es sind immer noch 2 Maschen zwischen diesen Markierungen, hier wird mann noch die Maschenanzahl für Vorder- und Rückenteil zunehmen, die 2 Maschen zwischen den Markierungen nehmen nicht zu. Viel Spaß beim Stricken!
05.05.2025 - 09:09
![]() Henni wrote:
Henni wrote:
Hi! Wenn ich die Zunahmen für die Schulter arbeite, soll zunächst zwischen dem 2&3 Markierer die erste Runde begonnen werden. Soll dies in jeder Zunahmerunde der Rundenbeginn sein oder fängt die neue Runde dann dort an, wo die letzte beendet wurde? Durch die Zunahmen in jeder Runde ändert sich der Rundebginn dann ja nämlich jede Runde aufs neue. Liebe Grüße!
04.05.2025 - 21:12DROPS Design answered:
Liebe Henni, die 1. Schulter wird zuerst über die 1. /4. Markierung gestrickt (=linke Schulter), so bei den Hinreihen stricken Sie (immer mehr Maschen) nach der 1. Markierung und bei den Rückreihen (immer mehr Maschen) nach der 4. Markierung und gleichzeitig an den Markierungen zunehmen. Bei der 1. Reihe nimmt man nur nach der 1. Markierung und bei der letzten nur vor der 4. Mark. So hat man jeweils 10 Mal bei jeder Mark. zugenommen. Der Reihebeginn wird sich durch die verkürzten Reihen verschieben, da man immer 3 Maschen mehr am Ende jeder Reihe strickt. Kann das Ihnen helfen? Viel Spaß beim Stricken!
05.05.2025 - 08:36
![]() Catherine wrote:
Catherine wrote:
Bonsoir, au col: * pivoter les mailles sur l'aiguille droite de 360 degrés ainsi: mettre le fil sur l'endroit et passer l'aiguille droite sous l'ouvrage, de l'arrière vers l'avant, tricoter 6 mailles endroit*, tricoter de *-* jusqu'à ce qu'il reste 4 mailles, tricoter 3 mailles endroit et 1 maille lisière au point mousse. Dois-je terminer le tour avec 6 mailles ou le pivotement avant de tricoter les 4 mailles?
04.05.2025 - 07:20DROPS Design answered:
Bonjour Catherine, vous terminez le tour par 4 mailles endroit après le dernier pivotement; Retrouvez ici en vidéo, comment tricoter cette bordure. Bon tricot!
05.05.2025 - 07:45
![]() Ursula Van Lengerich wrote:
Ursula Van Lengerich wrote:
Hallo, ich habe die Halsblende gestrickt, in der Runde abgenommen und die Markierer gesetzt. Ab hier verstehe ich nichts mehr. Wie gehts weiter? Muss ich jetzt in Runden oder hin u. her Stricken.? Wieviel Maschen muss ich für die Schulter stricken? Sorry, aber dieses Mal blicke ich bei der Anleitung nicht durch. Ich hätte gern Hilfe. Vielen Dank.
06.02.2025 - 16:06DROPS Design answered:
Liebe Frau Van Lengerich, jetzt sollen Sie für jede Schulter verkürzten Reihen stricken. Bei der 1. Schulter stricken Sie bei der 1. Reihe bis 3 Maschen nach 1. Markier (gleichzeitig zunehmen) dann in Hin- und Rückreihen weiterstricken und immer 3 Maschen mehr am Ende jeder Reihe stricken bis 10 Reihen gestrickt wurden = 10 Maschen wurden bei jedem Markierer zugenommen; Faden abschneiden und jetzt die 2. Schulter mit den gleichen verkürzten Reihen stricken. Viel Spaß beim Stricken!
06.02.2025 - 16:51
![]() Helen wrote:
Helen wrote:
Where do you do the increase when working the shoulder . Do you do it immediately after the marker?
25.01.2025 - 19:52DROPS Design answered:
Dear Helen, you can see in the INCREASE TIP before or after which marker you work in each row (whether from the right side or wrong side). You increase directly before or after the marker. Happy knitting!
25.01.2025 - 22:31
![]() Mascha wrote:
Mascha wrote:
Guten Abend! Ich bin noch lange nicht fertig mit dem Stricken, aber beim Lesen der Anleitung sind mir zwei Fragen zur Fertigstellung gekommen: (1) Bei meinem Pullover ist die Halsblende nicht hinten in der Mitte, sondern seitlich offen. Habe ich etwas falsch gemacht? (2) Beginnt man das Zusammennähen besser am Ärmel oder am Vorder- und Rückenteil? Vielen Dank für Ihre Hilfe! :-)
10.10.2024 - 21:14DROPS Design answered:
Liebe Mascha, ja stimmt, da die Halsblende in Hin- und Rück-Reihen gestrickt wurde, ist sie "offen" , eine kleine Naht am Ende wird das "schließen". Die Naht können Sie ab Ärmel von unten bis oben und dann die Seiten von oben nach. unten schließen, oder beide von unten nach oben bis Armloch. Viel Spaß beim Stricken!
11.10.2024 - 07:58
![]() Lila wrote:
Lila wrote:
Dzień dobry :) Moje pytanie dotyczy dodawania oczek po zakończeniu rzędów skróconych. Należy przerobić 1 oczko między markerami 2 i 3, a potem dodać jedno oczko. Pytanie: czy oczko należy dodać przed czy za markerem 2 ? Mam z tym problem ;)
27.04.2024 - 20:35DROPS Design answered:
Witaj, na prawej stronie robótki (czyli już po wykonaniu rzędów skróconych) dodajesz oczko za markerami -1 i -3 i przed markerami -2 i -4. Początek okrążenia jest między markerami -2 i -3. Przerabiasz 1 oczko, przekładasz marker 3 na prawy drut i dodajesz oczko, dalej przerabiasz na prawo i dodajesz oczko przed markerem 4, przekładasz marker na prawy drut, przerabiasz 2 oczka prawe, marker 1 przekładasz na prawy drut i dodajesz oczko, przerabiasz na prawo i dodajesz oczko przed markerem 2, przekładasz marker 2 na prawy drut i przerabiasz 1 oczko. Koniec okrążenia. Pozdrawiamy!
29.04.2024 - 09:08
![]() Vaida wrote:
Vaida wrote:
Pattern says "work 3 stiches past marker 1, remember to increase on the shoulder, turn, tighten the strand and work 3 stiches past marker 4... Work 3 stiches past the previous short row". Does increase is doing right after marker 1 then work 3 stiches, or first knit 3 stiches, then increase, turn and then how is second row? I don't understand this type of increase
02.03.2024 - 16:50DROPS Design answered:
Dear Vaida, work as follows: work until marker-1, work the increase after the marker as indicated in INCREASE TIP, from the right side, work 3 stitches, turn. Now work back, work 3 stitches + the increased stitch, increase before marker-1 as indicated in INCREASE TIP, from the wrong side, and work until marker-4, increase after the marker as indicated in INCREASE TIP, from the wrong side, work 3 stitches, turn. Continue in the same way. Happy knitting!
04.03.2024 - 00:47
![]() Eija wrote:
Eija wrote:
Malli 230-50 piece of sky ohje on tasona voiko sen neuloa suljettuna?
30.01.2024 - 10:12DROPS Design answered:
Pääntien reunus neulotaan tasona, mutta tämän jälkeen neulotaan suljettua neuletta.
06.03.2024 - 17:20
![]() Monique wrote:
Monique wrote:
Hi I am new to knitting, I crochet normally. In the increase section after working the short rows do you increase 17stitches in total? Because 124 (small) + 17 isn’t 152 st it’s 141? What does “(including the short rows)” mean? Also when you are knitting 60 then inc 1 it doesn’t line up evenly each round is that planned? Thanks for the help :)
22.01.2024 - 00:26DROPS Design answered:
Dear Monique, you have to increase a total of 17 times, you already increased 10 times with the short rows = 84 sts + 10x4= 124 sts, you have to increase 7 more times: 124 +4x7= 152 sts. The increases should always be worked on same place, ie the number of sts between increases will increase by 2 after every increase round., on 2nd time you will work 62 sts, 3rd time 64 sts... Happy knitting!
22.01.2024 - 10:39
|
|
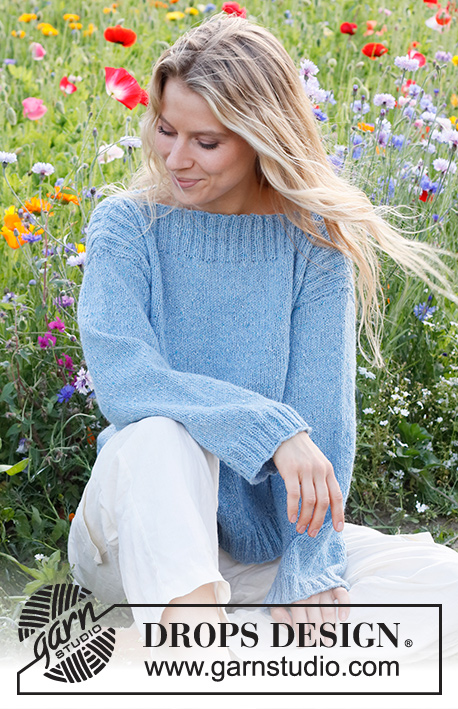
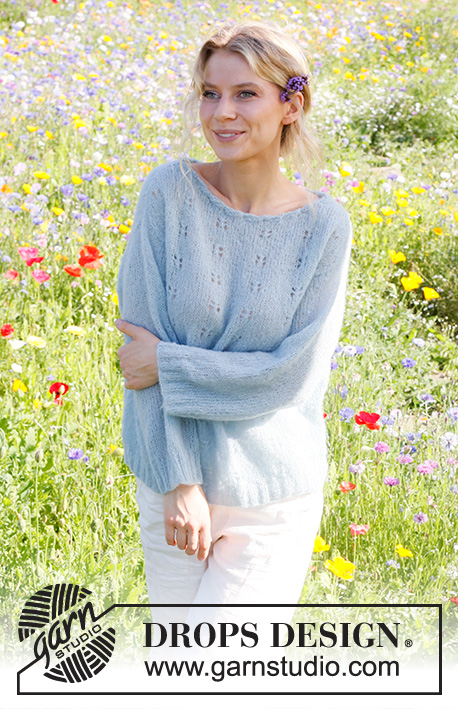
Piece of Sky#pieceofskysweater |
|
 |
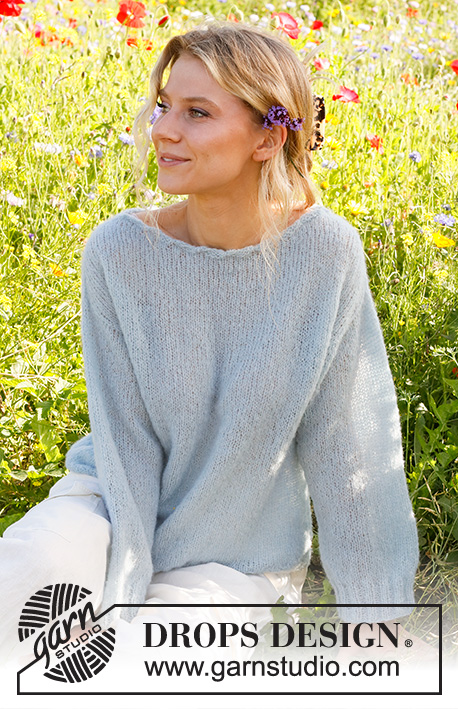 |
Knitted jumper in DROPS Brushed Alpaca Silk. The piece is worked top down, with increases for shoulders and decorative neck. Sizes S - XXXL.
DROPS 230-50 |
|
|
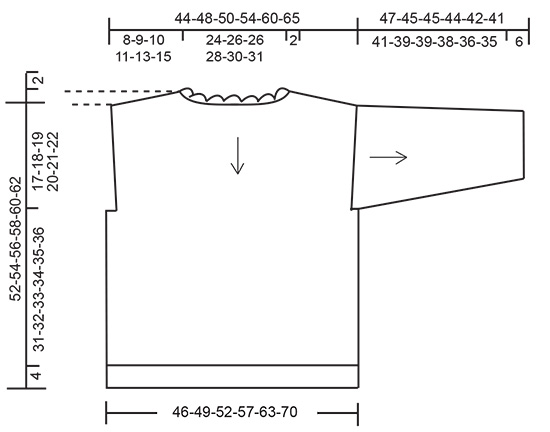
------------------------------------------------------- EXPLANATIONS FOR THE PATTERN: ------------------------------------------------------- RIDGE/GARTER STITCH (worked back and forth): Knit all rows. 1 ridge = knit 2 rows. INCREASE TIP (shoulders): RIGHT SIDE: Increase after markers 1 and 3 and before markers 2 and 4. BEFORE MARKER: The new stitch twists to the right. Use the left needle to pick up the strand between 2 stitches from the previous round/row, pick the strand up from the back and knit in the front loop. AFTER MARKER: The new stitch twists to the left. Use the left needle to pick up the strand between 2 stitches from the previous round/row, pick the strand up from the front and knit in the back loop. WRONG SIDE: Increase after markers 4 and 2 and before markers 3 and 1. BEFORE MARKER: The new stitch twists to the right. Use the left needle to pick up the strand between 2 stitches from the previous row, pick the strand up from the front and purl in the back loop. AFTER MARKER: The new stitch twists to the left. Use the left needle to pick up the strand between 2 stitches from the previous row, pick the strand up from the back and purl in the front loop. DECREASE TIP: All decreases are worked from the right side! Work 1 garter stitch, slip 1 stitch as if to knit, knit 1, pass the slipped stitch over the knitted stitch, work until there are 3 stitches left on the row, knit 2 together and 1 garter stitch. ------------------------------------------------------- START THE PIECE HERE: ------------------------------------------------------- JUMPER – SHORT OVERVIEW OF THE PIECE: The jumper is worked top down. The neck is worked back and forth, then the yoke in the round. The yoke is divided for the body and sleeves. Front and back pieces are worked separately back and forth with circular needle. The sleeves are worked back and forth with circular needle. NECK: Cast on 98-104-104-110-116-122 stitches with circular needle size 4 mm and DROPS Brushed Alpaca Silk. Work 3 RIDGES – read description above, back and forth. To create a rolling-edge work as follows from the right side: 1 edge stitch in garter stitch, knit 3, * twist the stitches on the right needle 360 degrees as follows: Take the strand to the right side and take the right needle under the piece and up to the right side, knit 6 *, work from *-* until there are 4 stitches left, knit 3 and 1 edge stitch in garter stitch. Now join the piece and continue in the round. Knit 1 round and decrease 14-16-10-12-14-16 stitches evenly spaced = 84-88-94-98-102-106 stitches. Insert 1 marker at the beginning of the round; the yoke is measured from this marker. YOKE: Change to circular needle size 5 mm. Insert 4 markers without working the stitches and insert them between 2 stitches: Count 1 stitch (shoulder-stitch), insert marker-1, count 40-42-45-47-49-51 stitches (back piece), insert marker-2, count 2 stitches (shoulder-stitches), insert marker-3, count 40-42-45-47-49-51 stitches (front piece), insert marker-4, there is 1 stitch left (shoulder-stitch). Now work short rows in stocking stitch over one shoulder AT THE SAME TIME as you increase 2 stitches for the shoulder on each row – read INCREASE TIP, as follows: Work 3 stitches past marker-1 – remember to increase on the shoulder, turn, tighten the strand and work 3 stitches past marker-4 – remember to increase, turn, tighten the strand, * work 3 stitches past the previous short row – remember to increase, turn, tighten the strand, work 3 stitches past the previous short row on the other side, turn, tighten the strand *, work from *-* until you have worked 10 short rows on each side, finish the last row at the beginning of the round (between the 2 stitches between markers 1 and 4). You have increased 10 stitches at each marker. Cut the strand. Move the start of the round to between the 2 stitches between markers 2 and 3 and work short rows here in the same way as on the first shoulder. When the short rows are finished, there are 124-128-134-138-142-146 stitches. REMEMBER THE KNITTING TENSION! Work the next round as follows (the start of the round is still between markers 2 and 3): Knit 1, increase 1 stitch for the shoulder, knit 60-62-65-67-69-71, increase 1 stitch for the shoulder, knit 2, increase 1 stitch for the shoulder, knit 60-62-65-67-69-71, increase 1 stitch for the shoulder, knit 1. Continue working and increase for the shoulders each round. The increased stitches are worked in stocking stitch. When you have increased 17-19-21-24-28-33 times (including the short rows) there are 152-164-178-194-214-238 stitches. The piece measures approx. 8-9-10-11-13-15 cm. Now divide for the front and back pieces as follows: Knit 1 stitch and place it on a thread for the sleeve, work 74-80-87-95-105-117 stitches in stocking stitch (front piece), knit 2, place these 2 stitches on a thread for the sleeve, work 74-80-87-95-105-117 stitches in stocking stitch and place these stitches on a thread for the back piece, knit 1 and place this stitch on the thread for the sleeve. Cut the strand. FRONT PIECE: = 74-80-87-95-105-117 stitches. Continue back and forth with stocking stitch and 1 edge stitch in GARTER STITCH – read description above, on each side. The front is measured from the division. When the piece measures 4 cm, decrease 1 stitch on each side – read DECREASE TIP! Decrease like this every 4 cm a total of 3-3-4-4-4-4 times = 68-74-79-87-97-109 stitches. When the piece measures 17-18-19-20-21-22 cm from the division, cast on 6 stitches at the end of the next 2 rows = 80-86-91-99-109-121 stitches. Continue with stocking stitch and 1 stitch in garter stitch on each side. When the piece measures approx. 31-32-33-34-35-36 cm from the 6 cast-on stitches, knit 1 row from the right side and increase 6-8-11-11-13-13 stitches evenly spaced = 86-94-102-110-122-134 stitches. Change to circular needle size 4 mm and work rib from the wrong side as follows: 1 garter stitch, knit 1, * purl 2, knit 2 *, work from *-* until there are 4 stitches left, purl 2, knit 1 and 1 garter stitch. Cast off when the rib measures 4 cm. BACK PIECE: Place the 74-80-87-95-105-117 stitches for the back piece on circular needle size 5 mm and work in the same way as the front piece. SLEEVES: Start at the cast-on stitches for the armhole on the back piece. Using circular needle size 5 mm, work as follows from the right side: Knit up 1 stitch in each of the 6 cast-on stitches under sleeve, knit up 23-25-26-28-30-31 stitches as far as the 2 stitches on the thread (shoulder-stitches), place these 2 stitches on the needle and knit them, knit up 23-25-26-28-30-31 stitches to the cast-on stitches under sleeve on the front piece and knit up 1 stitch in each of these 6 stitches = 60-64-66-70-74-76 stitches. Work stocking stitch back and forth, with 1 edge stitch in garter stitch on each side. When the sleeve measures 4 cm, decrease 1 stitch on each side. Decrease like this every 12-12-8-6-4-4 cm a total of 3-3-4-5-7-7 times = 54-58-58-60-60-62 stitches. When the sleeve measures 41-39-39-38-36-35 cm, knit 1 row from the right side and increase 0-0-0-2-2-0 stitches evenly spaced = 54-58-58-62-62-62 stitches. Change to circular needle size 4 mm and work rib from the wrong side as follows: 1 garter stitch, * knit 2, purl 2 *, work from *-* and 1 garter stitch. Cast off when the rib measures 6 cm. The sleeve measures approx. 47-45-45-44-42-41 cm. Work the other sleeve in the same way, but starting at the cast-on stitches for the armhole on the front piece. ASSEMBLY: Sew the sleeve and side seams in one go, inside the 1 edge stitch. Sew the neck together mid-back, inside the 1 edge stitch. |
|
|
|
Have you finished this pattern?Tag your pictures with #dropspattern #pieceofskysweater or submit them to the #dropsfan gallery. Do you need help with this pattern?You'll find 31 tutorial videos, a Comments/Questions area and more by visiting the pattern on garnstudio.com. © 1982-2025 DROPS Design A/S. We reserve all rights. This document, including all its sub-sections, has copyrights. Read more about what you can do with our patterns at the bottom of each pattern on our site. |
|


With over 40 years in knitting and crochet design, DROPS Design offers one of the most extensive collections of free patterns on the internet - translated to 17 languages. As of today we count 314 catalogues and 11820 patterns translated into English (UK/cm). 11820
We work hard to bring you the best knitting and crochet have to offer, inspiration and advice as well as great quality yarns at incredible prices! Would you like to use our patterns for other than personal use? You can read what you are allowed to do in the Copyright text at the bottom of all our patterns. Happy crafting!
Post a comment to pattern DROPS 230-50
We would love to hear what you have to say about this pattern!
If you want to leave a question, please make sure you select the correct category in the form below, to speed up the answering process. Required fields are marked *.