
Popular categories
Looking for a yarn?


Comments / Questions (19)
![]() Elisabeth S wrote:
Elisabeth S wrote:
Hej Jeg er lige begyndy på cardigan og jeg forstår ikke helt forklaringenp å diagrammerne ...jeg strikker str. L..Diagram A 3 er det vrangpinden ? og A 2 er Retsiden..? Venlig hilsen Elisabeth
27.01.2025 - 10:47DROPS Design answered:
Hei Elisabeth. Nei. Jakken strikkes ovenfra og ned og når du starter med bærestykket strikker du 5 stolpemasker + strikk A.2 20 ganger (start nederst til høyre på diagrammet) + strikk diagram A.3 + strikk 5 stolpemasker = 93 masker + 42 kast. Snu arbeidet og strikk fra vrangen og 2. pinne i diagrammene (blank rute = vrang, rute med strek = rett). Kastene strikkes vridd rett (det skal ikke bli hull). Nå leser du diagrammene fra venstre mot høyre. Les mer om hvordan diagrammer strikkes under TIPS & HJELP - DROPS Leksjoner - Les en oppskrift - Hvordan lese strikkediagrammer. mvh DROPS Design
27.01.2025 - 14:22
![]() Rosa wrote:
Rosa wrote:
Hvis vi tager str. S som eksempel. I halskanten står der at man skal slå 85 masker op, inklusive 5 kantmasker i hver side. Vil det sige at man skal slå 95 masker op i alt?
07.04.2024 - 18:47DROPS Design answered:
Hej Rosa. De 5 kantmasker er inkluderet (medregnet) i de 85 masker :)
09.04.2024 - 11:06
![]() Marianne Marianne Mogensen wrote:
Marianne Marianne Mogensen wrote:
Hej, er kommet til bærestykket, str. XXL, har strikket A2 rapporter a 4 masker afsluttet med A1 (med udtagninger i alt 6 m pr rapport) Så står der: strik A3 rapporter 3 m ? er det fra retsiden, eller starter mønster A3 fra vrang-siden ? er lidt forvirret over forklaringen
22.01.2023 - 12:44DROPS Design answered:
Hei Marianne. Litt usikker på hva du mener med "afsluttet med A1". Om du strikker Bærestykket skal ikke A.1 strikkes (A.1 strikkes kun ved halskant), men du skal avslutte med A.3. mvh DROPS Design
23.01.2023 - 14:12
![]() MARIE JOSE GALERAND wrote:
MARIE JOSE GALERAND wrote:
J'ai un problème avec le diagramme. Est-ce que l'on fait A3 seulement à la fin des rangs ou bien A2 et A3 tout le long du rang Merci
23.10.2022 - 17:40DROPS Design answered:
Bonjour Mme Galerand, vous répétez A.2 sur l'endroit jusqu'à ce qu'il reste 8 mailles et terminez par A.3 + les 5 m de bordure devant, et sur l'envers, vous commencez par A.3 (lisez les diagrammes de gauche à droite) et répétez A.2. Bon tricot!
24.10.2022 - 09:16
![]() Beatriz wrote:
Beatriz wrote:
Excusez moi, je n'ai pas précisé le modele, 226-4 Blackforest Memories Cardigan. Bonjour, pour commander la laine pour ce modele taille M, j'aurai besoin de 200 gr. ou 400 gr. pour tricoter avec deux fils? Merci de m'informer
14.12.2021 - 12:55DROPS Design answered:
Aucun souci, retrouvez la réponse ci-dessous, bon tricot!
14.12.2021 - 16:55
![]() Beatriz wrote:
Beatriz wrote:
Bonjour, pour commander la laine pour un modele taille M, j\'aurai besoin de 200 gr. ou 400 gr. pour tricoter avec deux fils. Merci de m\'informer
14.12.2021 - 12:45DROPS Design answered:
Bonjour Beatriz, en taille M il vous faudra soit 225 g /25 g la pelote = 9 pelotes Kid-Silk ou bien 200/25 g la pelote = 8 pelotes Brushed Alpaca Silk. Tricotez avec 2 fils Kid-Silk ou bien 1 fil Brushed Alpaca Silk (la quantité prend en compte la différence de métrage). Bon tricot!
14.12.2021 - 16:54
![]() Maria P wrote:
Maria P wrote:
Arrivant à empiècement je trouve une situation que je ne comprends pas : il est indiqué de tricoter les diagrammes A2 et A3 en entiers, en faisant le calcul ça devrait faire 44 rang , en tricotant avec des aiguilles n 5, et une hauteur de 20 cm et non comme est indiqué autour de 10 cm J'ai déjà tricoté les 18 premier rang de l’empiècement que corresponds à la première marche de A2 et A3 que mesurent 6 cm . Il y a t-il une erreur ? je tricote kidS et B Alp silk ai4,5 .
03.12.2021 - 16:24DROPS Design answered:
Bonjour Maria P, vous n'avez que 22 rangs à tricoter: les diagrammes A.2 et A.3 ne sont tricotés qu'une seule fois en hauteur ainsi: tricotez 5 mailles de bordure devant, répétez A.2 jusqu'à ce qu'il reste 8 mailles en fin de rang et terminez par A.3 et 5 mailles de bordure devant ; sur l'envers (lisez les diagrammes de gauche à droite cette fois) commencez par A.3 et répétez A.2. Bon tricot!
06.12.2021 - 09:29
![]() Corinna wrote:
Corinna wrote:
Hallo Also ich habe jetzt eine maschenprobe mit Drops Alpaca Silk gemacht und bin jetzt, um korrekt auf 10x10 zu kommen bei nadelstärke 9 gelandet. Nun ist das Maschenbild bei Weitem nicht mehr so dicht wie es auf dem Foto aussieht,sondern ich kann durchsehen und das ärgert mich ziemlich, zumal ich jetzt 200 gr Wolle gekauft habe. Wie kann es sein, dass das so von der Anleitung abweicht? Gruss Corinna
02.12.2021 - 20:25DROPS Design answered:
Liebe Corinna, für diese Jacke, brauchen Sie DROPS Brushed Alpaca Silk (Garngruppe C) not DROPS Baby Alpaca Silk (Garngruppe A), haben Sie den richtigen Garn? Die Maschenprobe 17 M x 22 Reihen ist typisch für dieses Garn der Garngruppe C. Vielleicht kann Ihnen Ihr DROPS Ladan mal mit Ihnen schauen - auch telefonisch oder per E-Mail wird man Ihnen dort gerne weiterhelfen. Viel Spaß beim stricken!
03.12.2021 - 08:20
![]() Aila Sävikari wrote:
Aila Sävikari wrote:
Ohje on puserolle vaikka kuvassa takki napeilla, mistä löydän ähän malliin neuletakin ohjeen.
17.10.2021 - 18:38DROPS Design answered:
Tähän oli vahingossa julkaistu väärä ohje. Nyt löydät jakun ohjeen klikkaamalla ohjeen kuvaa.
11.11.2021 - 17:15
![]() Trees wrote:
Trees wrote:
Kan ik voor dit patroon ook Drops Air gebruiken?
06.10.2021 - 19:22DROPS Design answered:
Dag Trees.
Ja, dit patroon kun je ook 1 draad met DROPS Air breien. Om uit te rekenen hoeveel garen je nodig hebt neem je de aangegeven hoeveelheid Alpaca die je nodig hebt. Doe de looplengte van DROPS Alpaca keer het aantal bollen. Deel dit getal weer door de looplengte van DROPS Air. Het getal wat je nu hebt geeft ongeveer aan hoeveel bollen je nodig hebt. Houd er rekening mee dat er een afwijking in kan zitten, dus koop eventueel extra bol en vraag je verkooppunt wat de voorwaarden zijn voor het terug brengen van overgebleven bollen.
07.10.2021 - 11:28
|
|||||||||||||||||||
Blackforest Memories Cardigan#blackforestmemoriescardigan |
|||||||||||||||||||
 |
 |
||||||||||||||||||
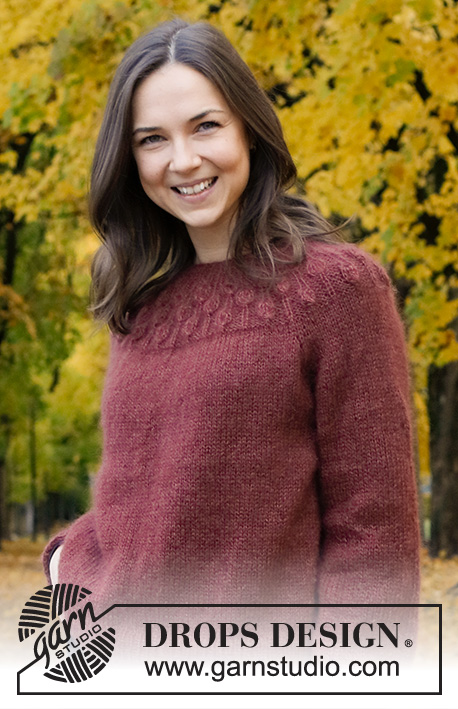
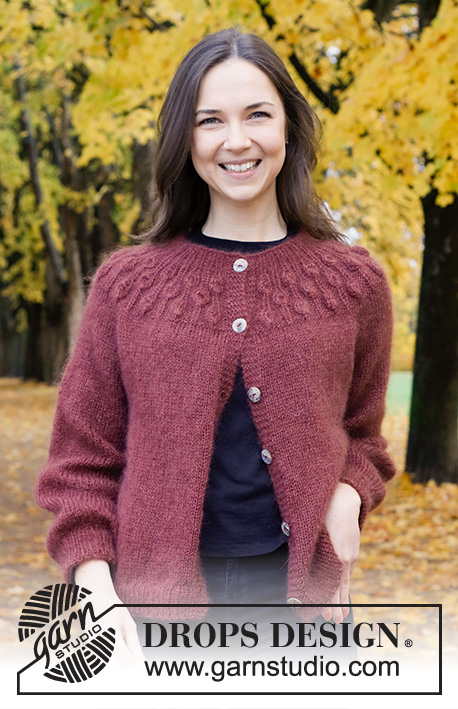
Knitted jacket in 2 strands DROPS Kid-Silk or 1 strand DROPS Brushed Alpaca Silk. Piece is knitted top down with round yoke, raglan and leaf pattern on yoke. Size: S - XXXL
DROPS 226-4 |
|||||||||||||||||||
|
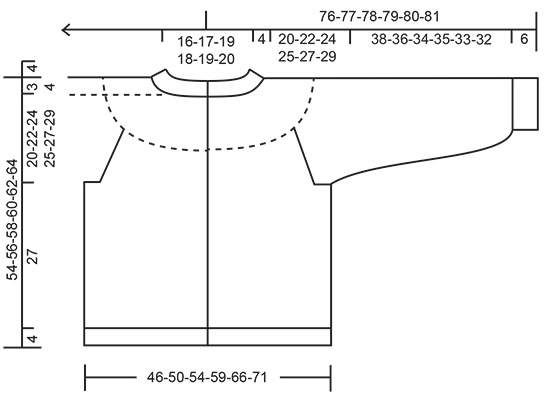
---------------------------------------------------------- EXPLANATION FOR THE PATTERN: ---------------------------------------------------------- GARTER STITCH (back and forth): Knit all rows. 1 ridge vertically = knit 2 rows. PATTERN: See diagrams A.1 to A.3. Choose diagram for your size (applies to A.2 and A.3). Diagrams show all rows in pattern seen from the right side. INCREASE/DECREASE TIP (evenly): To calculate how to increase/decrease evenly, use the total number of stitches on row (e.g. 199 stitches), minus bands (e.g. 10 stitches) , and divide the remaining 189 stitches by number of increases/decreases to be done (e.g. 6) = 31.5. In this example increase by making 1 yarn over after alternately every 31st and 32nd stitch (do not increase over bands). On next row work yarn overs twisted to avoid holes. If decreasing knit in this example every 30th and 31st stitch and every 31st and 32nd stitch together. RAGLAN: All increases are done from the right side. Increase 1 stitch in each side of the 4 stitches with marker - in every transition between front/back piece and sleeves (= 8 stitches increased on row). Increase 1 stitch by making 1 yarn over. On next row (wrong side) purl yarn over twisted to avoid holes. Then work the new stitches in stocking stitch. DECREASE TIP (applies to mid under sleeves): Decrease 1 stitch on each side of marker thread as follows: Work until 3 stitches remain before marker thread, knit 2 together, knit 2 stitches (marker thread is between these 2 stitches), slip 1 stitch knitwise, knit 1, pass slipped stitch over stitch worked (= 2 stitches decreased). BUTTONHOLES: Decrease for buttonholes on right band (when garment is worn). Decrease from right side when 4 stitches remain on row as follows: Make 1 yarn over, knit the next 2 stitches together, knit the last 2 stitches. On next row (wrong side) knit the yarn over to make a hole. Decrease first buttonhole when rib in neck measures approx. 2 cm. Then decrease the next 5-5-6-6-6-6 buttonholes, approx. 9½-10-8½-9-9½-9½ cm apart. CAST-OFF TIP: To avoid a tight cast-off edge when casting off, you may use a larger needle. If this still is too tight make 1 yarn over after approx. every 6th stitch while casting off (cast off yarn overs as stitches). ---------------------------------------------------------- START THE PIECE HERE: ---------------------------------------------------------- JACKET - SHORT OVERVIEW OF THE PIECE: Work neck edge and yoke back and forth on circular needle from mid front, work top down. Now divide yoke for body and sleeves. Work body back and forth on circular needle, top down. Work sleeves in the round on double pointed needles/short circular needle, top down. NECK EDGE: Cast on 85-89-93-97-101-105 stitches (including 5 band stitches in each side towards mid front) on circular needle size 4 mm with 2 strands DROPS Kid-Silk or 1 strand DROPS Brushed Alpaca Silk. Purl 1 row (= wrong side). Work next row as follows from right side: 5 band stitches in GARTER STITCH - read explanation above, work A.1 until 8 stitches remain on row (= 18-19-20-21-22-23 repetitions of 4 stitches), work the first 3 stitches in A.1 (so that pattern begins and ends the same in each side), and finish with 5 band stitches in garter stitch. Continue rib like this for 4 cm – remember BUTTONHOLES on right band – read explanation above, and finish after 1 row from wrong side. Insert 1 marker after band at the beginning of row mid front. Work yoke as explained below - measure yoke from this marker! YOKE: Switch to circular needle size 5 mm. Work first row as follows from right side: 5 band stitches in garter stitch, work A.2 until 8 stitches remain on row (= 18-19-20-21-22-23 repetitions of 4 stitches), work A.3 (= 3 stitches), and finish with 5 band stitches in garter stitch. Continue pattern back and forth like this and increase as shown in diagrams. When A.2 and A.3 have been worked vertically, there are 199-209-219-273-285-297 stitches on row and piece measures approx. 10-10-10-15-15-15 cm from marker by the neck. Work 2 rows in stocking stitch with 5 band stitches in garter stitch in each side - AT THE SAME TIME on first row increase 6-4-2-0-4-4 stitches evenly – read INCREASE/DECREASE TIP = 205-213-221-273-289-301 stitches. Now insert 4 new markers in the piece as explained below. Use these markers when increasing for raglan, and insert markers in piece without working: Count 35-37-38-45-49-52 stitches (= front piece), insert 1 marker in next stitch, count 36-36-38-50-50-50 stitches (= sleeve), insert 1 marker in next stitch, count 59-63-65-79-87-93 stitches (= back piece), insert 1 marker in next stitch, count 36-36-38-50-50-50 stitches (= sleeve), insert 1 marker in next stitch. 35-37-38-45-49-52 stitches remain on row after last marker (= front piece). Work in stocking stitch back and forth with 5 band stitches in garter stitch in each side towards mid front. AT THE SAME TIME on first row from right side increase for RAGLAN – read explanation above (= 8 stitches increased). Increase for raglan every other row (i.e. every row from right side) 0-2-3-0-2-3 times in total vertically and then every 4th row (i.e. every other row from right side) 5-5-5-5-4-5 times in total. After last increase there are 245-269-285-313-337-365 stitches on needle. Work in stocking stitch without increases, with 5 band stitches in garter stitch in each side towards mid front until yoke measures 20-22-24-25-27-29 cm from marker at the neck. Now divide yoke for body and sleeves and work last round as follows: Work 40-44-46-50-55-60 stitches as before (= front piece), slip the next 48-52-56-62-64-68 stitches on a stitch holder for sleeve, cast on 8-8-10-10-12-12 new stitches on row (= in the side under sleeve), work 69-77-81-89-99-109 stitches as before (= back piece), slip the next 48-52-56-62-64-68 stitches on a stitch holder for sleeve, cast on 8-8-10-10-12-12 new stitches on row (= in the side under sleeve) and work the remaining 40-44-46-50-55-60 stitches as before (= front piece). Finish body and sleeves separately. NOW MEASURE PIECE FROM HERE! BODY: = 165-181-193-209-233-253 stitches. Work in stocking stitch back and forth with 5 band stitches in garter stitch in each side towards mid front until piece measures 27 cm from division in all sizes. 4 cm remain until finished measurements. Try the jacket and work to desired length. Now increase stitches to stop the rib from contracting. Knit 1 row from right side while increasing 24-28-28-32-36-38 stitches evenly - remember INCREASE/DECREASE TIP = 189-209-221-241-269-291 stitches. Switch to circular needle size 4 mm. Work next row as follows from wrong side: 5 band stitches in garter stitch, * purl 1, knit 1 *, repeat from *-* until 6 stitches remain on needle, purl 1, and finish with 5 band stitches in garter stitch. Continue rib like this for 4 cm. Cast off stitches with knit over knit and purl over purl - read CAST-OFF TIP. Jacket measures approx. 54-56-58-60-62-64 cm from shoulder and down. SLEEVE: Slip the 48-52-56-62-64-68 stitches from stitch holder in one side of piece back on a short circular needle or double pointed needles size 5 mm – pick in addition up 1 stitch in each of the 8-8-10-10-12-12 stitches cast on under sleeve = 56-60-66-72-76-80 stitches. Insert 1 marker thread mid under sleeve - i.e. In the middle of the 8-8-10-10-12-12 stitches that were cast on under sleeves. Move the marker thread upwards when working; it should be used for decrease mid under sleeve. Begin round at the marker thread, and work stocking stitch in the round. When sleeve measures 3 cm from division in all sizes, decrease 2 stitches mid under sleeve - read DECREASE TIP. Decrease like this every 3 cm a total of 3-3-3-4-4-4 times vertically = 50-54-60-64-68-72 stitches. Continue until sleeve measures 38-36-34-35-33-32 cm from division (shorter measurements in the larger sizes because of wider neck and longer yoke). 6 cm remain until finished measurements. Try the jacket and work to desired length. Knit 1 round while decreasing 12-14-18-20-22-24 stitches evenly - read INCREASE/DECREASE TIP = 38-40-42-44-46-48 stitches. Switch to double pointed needles size 4 mm. Work rib in the round = knit 1/purl 1 for 6 cm. Cast off with knit over knit and purl over purl - remember CAST-OFF TIP. Sleeve measures approx. 44-42-40-40-39-38 cm from division. Work the other sleeve the same way. ASSEMBLY: Sew the buttons on to the left band. |
|||||||||||||||||||
Diagram explanations |
|||||||||||||||||||
|
|||||||||||||||||||

|
|||||||||||||||||||

|
|||||||||||||||||||
|
|||||||||||||||||||
Have you finished this pattern?Tag your pictures with #dropspattern #blackforestmemoriescardigan or submit them to the #dropsfan gallery. Do you need help with this pattern?You'll find 30 tutorial videos, a Comments/Questions area and more by visiting the pattern on garnstudio.com. © 1982-2025 DROPS Design A/S. We reserve all rights. This document, including all its sub-sections, has copyrights. Read more about what you can do with our patterns at the bottom of each pattern on our site. |
|||||||||||||||||||


With over 40 years in knitting and crochet design, DROPS Design offers one of the most extensive collections of free patterns on the internet - translated to 17 languages. As of today we count 314 catalogues and 11820 patterns translated into English (UK/cm). 11820
We work hard to bring you the best knitting and crochet have to offer, inspiration and advice as well as great quality yarns at incredible prices! Would you like to use our patterns for other than personal use? You can read what you are allowed to do in the Copyright text at the bottom of all our patterns. Happy crafting!
Post a comment to pattern DROPS 226-4
We would love to hear what you have to say about this pattern!
If you want to leave a question, please make sure you select the correct category in the form below, to speed up the answering process. Required fields are marked *.