
Popular categories
Looking for a yarn?


Comments / Questions (42)
![]() Christine Vet wrote:
Christine Vet wrote:
Ik begrijp niet hoe ik de bovenkant van de mouw moet breien en vastmaken aan het voor- en achterpand. Ik snap niet hoe die spit moet.
10.12.2021 - 12:26DROPS Design answered:
Dag Christine
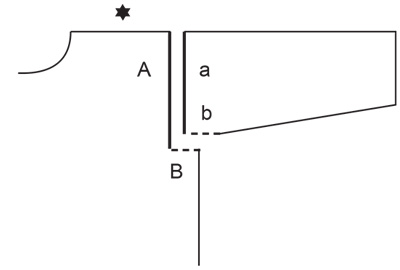
Het stukje split van 1cm van de mouw komt tegen de horizontale inham van het pand. Hier is een tekening van welke je helemaal onderaan het patroon kunt vinden, dus onderaan de maat tekening. b van de ene kant van de mouw wordt dus tegen B van het voorpand genaaid en b van de andere kant van de mouw wordt tegen B van het achterpand genaaid.
11.12.2021 - 15:33
![]() Sabrina wrote:
Sabrina wrote:
Buona sera, vorrei lavorare questo modello con i ferri circolari (topdown), ma no so proprio come fare. Mi potete aiutare...quante maglie devo avviare ? Come modifico lo schema indicato? Grazie.
01.12.2021 - 22:01DROPS Design answered:
Buonasera Sabrina, questo modello è stato progettato per essere lavorato in parti separate e poi cucito. Sul nostro sito può trovare altri modelli lavorati dall'alto in basso. Buon lavoro!
03.12.2021 - 00:25
![]() Hm wrote:
Hm wrote:
Hallo, Ik ben geïnteresseerd om deze trui te breien, maar zowel ik als de mama vragen ons af hoe we eraan zouden moeten beginnen. "RIBBEL/RIBBELSTEEK: Brei alle naalden recht. 1 ribbel = brei 2 naalden recht. Brei boordsteek: 3 kantsteken in RIBBELSTEEK – lees uitleg hierboven, A.1 tot er 4 steken over zijn, brei de eerste steek in A.1, 3 steken in ribbelsteek. " Zou u eventueel iets uitgebreider de boordsteek kunnen uitleggen? Mvg Hélène
21.11.2021 - 22:03DROPS Design answered:
Dag Hm,
Het patroon begint bij het achterpand onder 'Begin het werk hier'. Het achterpand wordt heen en weer gebreid, dus als je ribbels moet breien, brei je de betreffende steken telkens recht (zowel aan de goede als de verkeerde kant), dan herhaal je A.1 steeds in de breedte, dus je herhaalt steeds 1 gedraaid recht en2 averecht. Als er nog 4 steken op de linker naald staan brei je nog 1 gedraaid recht en daarna 3 3 recht. Je keert het werk en breit de steken terug. Omdat je nu aan de verkeerde kant bent moet je de steken breien zoals je ze op de verkeerde kant hoort te breien. Dit staat aangegeven bij het telpatroon.
23.11.2021 - 10:41
![]() Izaskun wrote:
Izaskun wrote:
Estoy haciendo este patrón y no concuerdan los puntos que hay que menguar para las sisas, creo. Talla l:" menguar 4 a cada lado en las dos filas siguientes" en total 16 puntos, restados a los 111 que tenía, no dan 89, hay algo que se pierde en la traducción? Gracias
30.10.2021 - 07:33DROPS Design answered:
Hola Izaskun, no cierras a cada lado, sino que al inicio de cada fila, que uno es a un lado y el otro inicio en el otro. Por lo tanto, cierras solo 8 puntos y obtienes 103 puntos. Luego trabajas sobre los 89 centrales de 103.
01.11.2021 - 12:48
![]() Caroline Hollebrandse wrote:
Caroline Hollebrandse wrote:
Kan het voorpand en achterpand ook op gewone breinaalden 3.5 / 4.5 gebreid worden? Er moet immers heen en weer gebreid worden.
08.10.2021 - 21:25DROPS Design answered:
Dag Caroline,
Jazeker, je kan dit patroon ook op gewone rechte naalden met knop breien.
16.10.2021 - 13:58
![]() Ida Hassing Kristensen wrote:
Ida Hassing Kristensen wrote:
Hvordan ved man hvilke mål de forskellige størrelser har?
31.08.2021 - 20:30DROPS Design answered:
Hej Ida, du finder målene i de forskellige størrelser i måleskitsen nederst i opskriften :)
01.09.2021 - 16:01
![]() Trine wrote:
Trine wrote:
Mangler en del på denne oppskriften ?
26.08.2021 - 11:34DROPS Design answered:
Hej Trine, så er opskriften lagt ud - tak for info :)
27.08.2021 - 08:30
![]() Eva wrote:
Eva wrote:
Diamond sweater
24.08.2021 - 23:32
![]() Norunn Eiane wrote:
Norunn Eiane wrote:
Hei, Det mangler en del av oppskriften på denne genseren.
24.08.2021 - 21:16
![]() Ekaterina wrote:
Ekaterina wrote:
Model "Warm networks"
06.08.2021 - 10:57
|
|||||||||||||
Deep Sea Diamond#deepseadiamondsweater |
|||||||||||||
 |
 |
||||||||||||
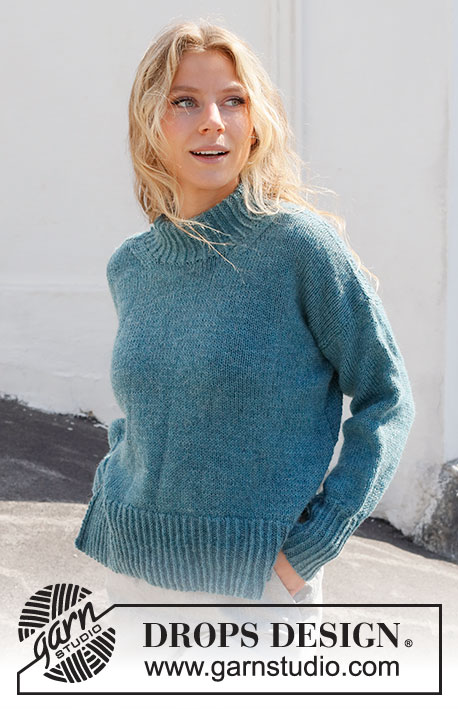
Knitted jumper in DROPS Karisma. Piece is knitted with textured pattern, vents in the sides and high collar. Size: S - XXXL
DROPS 227-3 |
|||||||||||||
|
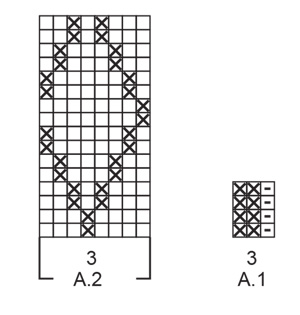
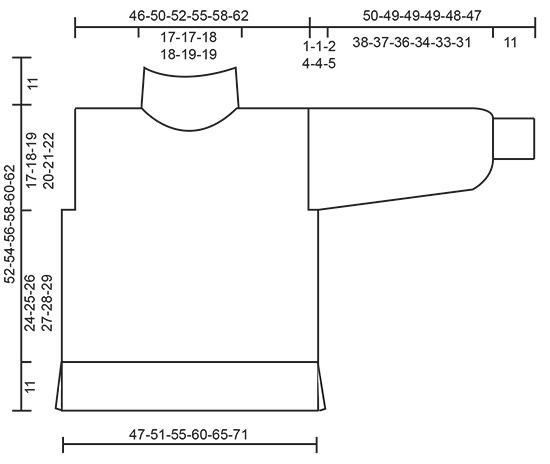
---------------------------------------------------------- EXPLANATION FOR THE PATTERN: ---------------------------------------------------------- GARTER STITCH (back and forth): Knit all rows. 1 ridge vertically = knit 2 rows. PATTERN: See diagrams A.1 and A.2. Diagrams show all rows in pattern seen from the right side. INCREASE/DECREASE TIP (evenly): To calculate how to increase/decrease evenly, use the total number of stitches on row (e.g. 127 stitches), minus edge stitches (e.g. 2 stitches) , and divide the remaining 125 stitches by number of increases/decreases to be done (e.g. 32) = 3.9. In this example increase by making 1 yarn over after approx. every 4th stitch. Do not increase over edge stitches. On next row work yarn overs twisted to avoid holes. To decrease in this example knit approx. every 3rd and 4th stitch together. INCREASE TIP (applies to sleeves): Work until 2 stitches remain before marker thread, make 1 yarn over, knit 4 (marker thread is in the middle of these 4 stitches), make 1 yarn over. On next round knit yarns over twisted to avoid holes. Then work the new stitches in stocking stitch. ---------------------------------------------------------- START THE PIECE HERE: ---------------------------------------------------------- JUMPER - SHORT OVERVIEW OF THE PIECE: Work front and back piece back and forth on circular needle in parts. Work sleeves in the round on double pointed needles/a short circular needle. Then assemble the piece by sewing parts together. Finish with a neck edge in round on a circular needle. BACK PIECE: Cast on 127-136-148-160-172-190 stitches on circular needle size 3.5 mm with DROPS Karisma. Work rib as follows: 3 edge stitches in GARTER STITCH – read explanation above, A.1 until 4 stitches remain, work first stitch in A.1, 3 stitches in garter stitch. Continue back and forth like this until rib measures 11 cm. Knit 1 row from right side while decreasing 32-33-37-39-41-47 stitches evenly - read INCREASE/DECREASE TIP = 95-103-111-121-131-143 stitches. Switch to circular needle size 4.5 mm. Purl 1 row from wrong side (knit the outermost edge stitch in each side). You can work the back piece either in stocking stitch or in pattern just as on front piece. If you work in stocking stitch, continue working in stocking stitch with 1 edge stitch in garter stitch on each side. If you work in pattern as on front piece, work as follows: 1 edge stitch in garter stitch, 6-6-10-11-12-14 stitches in stocking stitch, A.2 over the next 80-88-88-96-104-112 stitches (= 10-11-11-12-13-14 repetitions of 8 stitches), work first stitch in A.2, 6-6-10-11-12-14 stitches in stocking stitch, 1 edge stitch in garter stitch. This explanation is written with pattern, if you choose to knit without the pattern continue in stocking stitch instead. Continue pattern back and forth like this. REMEMBER THE KNITTING TENSION! When piece measures 35-36-37-38-39-40 cm, cast off 2-2-4-7-8-10 stitches for armholes in each side at the beginning of the next 2 rows = 91-99-103-107-115-123 stitches. Continue with pattern as before over the middle 81-89-89-97-105-113 stitches on needle, 1 edge stitch in garter stitch in each side and stocking stitch over the remaining stitches. When piece measures 50-52-54-56-58-60 cm, cast off the middle 31-31-33-33-35-35 stitches for neck and finish each shoulder separately. Then cast off 1 stitch on next row from the neck = 29-33-34-36-39-43 stitches remain for shoulder. When piece measures 52-54-56-58-60-62 cm, cast off. Work the other shoulder the same way. FRONT PIECE: Cast on 127-136-148-160-172-190 stitches on circular needle size 3.5 mm with DROPS Karisma. Work rib as follows: 3 edge stitches in garter stitch, A.1 until 4 stitches remain, work first stitch in A.1, 3 edge stitches in garter stitch. Continue back and forth like this until rib measures 11 cm. Knit 1 row from right side while decreasing 32-33-37-39-41-47 stitches evenly = 95-103-111-121-131-143 stitches. Switch to circular needle size 4.5 mm. Purl 1 row from wrong side (knit the outermost edge stitch in each side). Now work pattern as follows: 1 edge stitch in garter stitch, 6-6-10-11-12-14 stitches in stocking stitch, A.2 over the next 80-88-88-96-104-112 stitches (= 10-11-11-12-13-14 repetitions of 8 stitches), work first stitch in A.2, 6-6-10-11-12-14 stitches in stocking stitch, 1 edge stitch in garter stitch. Continue pattern back and forth like this. When piece measures 35-36-37-38-39-40 cm, cast off 2-2-4-7-8-10 stitches for armholes in each side at the beginning of the next 2 rows = 91-99-103-107-115-123 stitches. Continue with pattern as before over the middle 81-89-89-97-105-113 stitches on needle, 1 edge stitch in garter stitch in each side and stocking stitch over the remaining stitches. When piece measures 44-46-47-49-50-52 cm, slip the middle 25-25-27-27-29-29 stitches on a stitch holder for neck and finish each shoulder separately. Then cast off stitches on every row from neck as follows: Cast off 1 stitch 4 times = 29-33-34-36-39-43 stitches remain for shoulder. When piece measures 52-54-56-58-60-62 cm, cast off. Work the other shoulder the same way. SLEEVES: Cast on 51-54-57-60-63-66 stitches on double pointed needles size 3.5 mm. Work A.1 in the round for 11 cm. Knit 1 round while increasing 13-12-11-10-9-8 stitches evenly - read INCREASE/DECREASE TIP = 64-66-68-70-72-74 stitches. Insert a marker thread at beginning of round (= mid under sleeve). Switch to double pointed needles size 4.5 mm. Work in stocking stitch in the round. When sleeve measures 15-15-15-15-15-17 cm, increase 1 stitch on each side of marker thread under sleeves - read INCREASE TIP. Increase like this approx. every 15-14-9-6½-5-3½ cm 2-3-4-5-6-7 times in total = 68-72-76-80-84-88 stitches. When sleeve measures 49-48-47-45-44-42 cm, work sleeve cap back and forth on circular needle until finished measurements. Work until sleeve measures approx. 50-49-49-49-48-47 cm, i.e. there is a vent of 1-1-2-4-4-5 cm at the top of sleeve. ASSEMBLY: Sew the shoulder seams together. Sew sleeve cap to armhole. Then sew vent at the top of sleeve to bottom of armhole - see chart. Sew side seams from armhole and down to where rib ends (= 11 cm vent in each side). NECK EDGE: Pick up 108 to 126 stitches on a short circular needle size 3.5 mm with DROPS Karisma inside 1 edge stitch around the neck. Work A.1 in the round for 11 cm. Cast off stitches with knit over knit and purl over purl. |
|||||||||||||
Diagram explanations |
|||||||||||||
|
|||||||||||||
|
|||||||||||||
|
|||||||||||||
|
|||||||||||||
Have you finished this pattern?Tag your pictures with #dropspattern #deepseadiamondsweater or submit them to the #dropsfan gallery. Do you need help with this pattern?You'll find 33 tutorial videos, a Comments/Questions area and more by visiting the pattern on garnstudio.com. © 1982-2025 DROPS Design A/S. We reserve all rights. This document, including all its sub-sections, has copyrights. Read more about what you can do with our patterns at the bottom of each pattern on our site. |
|||||||||||||


With over 40 years in knitting and crochet design, DROPS Design offers one of the most extensive collections of free patterns on the internet - translated to 17 languages. As of today we count 314 catalogues and 11821 patterns translated into English (UK/cm). 11821
We work hard to bring you the best knitting and crochet have to offer, inspiration and advice as well as great quality yarns at incredible prices! Would you like to use our patterns for other than personal use? You can read what you are allowed to do in the Copyright text at the bottom of all our patterns. Happy crafting!
Post a comment to pattern DROPS 227-3
We would love to hear what you have to say about this pattern!
If you want to leave a question, please make sure you select the correct category in the form below, to speed up the answering process. Required fields are marked *.