
Populära kategorier
Letar du efter ett garn?


Kommentarer / Frågor (57)
![]() Michelle skrev:
Michelle skrev:
Bonjour. Ce modèle m interesse... j aimerais savoir si dans le dos vu qu il n y a pas de photo du dos. il y a de la dentelle ou est ce du jersey? merci 😁😁
25.09.2020 - 13:13DROPS Design svarede:
Bonjour Michelle, le point fantaisie ajouré est le même dans le dos que devant. Bon tricot!
25.09.2020 - 14:38
![]() Richard skrev:
Richard skrev:
HELP! I am in need of 3 x 50g balls of 'Drops Cotton Merino' - Colour 17- Dye Lot 52848. Any help or suggestions, gratefully received. Also, If I make a hat using Cotton Merino, but the pattern calls for 'Fingering Merino' will it make much difference?? Thank you. Richard.
27.01.2020 - 13:12DROPS Design svarede:
Dear Richard, please contact your DROPS store (and more stores if necessary) or even our DROPS Workshop - CottonMerino is a 8 ply/Dk/Worsted yarn - see shadecard - see here all patterns you can use for Cotton Merino. Happy knitting!
27.01.2020 - 14:24
![]() Richard skrev:
Richard skrev:
Sorry, the last comment should read with "I placed the marker to the side (on my RIGHT)!" Thanks.
24.01.2020 - 15:28
![]() Richard skrev:
Richard skrev:
Hi, Thanks for your replies & I've mastered the difficult start - as you say, with double-pointed needles. The raglan decreasing is another matter. As I look at the sleeve (to my left), I have placed a marker on the stitch nearest to the side. I have then placed another marker on the 1st stitch of the side (which is to my left). Now, you say to start 3 stitches before this marker- yes? Where to I start on the sleeve decrease, please.
24.01.2020 - 15:25DROPS Design svarede:
Dear Richard, you should have 1 marker between each piece; so if you look at the sleeve, there is 1 marker at the end of body (either back or front piece) = before the first stitch on sleeve and 1 marker at the end of sleeve, after the last stitch on sleeve = before the first stitch on front/back piece. Start 3 sts before the first of these 2 markers, K2 tog, = 1 stitch remain before marker, work this stitch + the next st (= first after marker) and dec = there are 2 sts decreased at the marker and K2 between the dec (with marker in the middle of these K2). Repeat at each marker. Happy knitting!
24.01.2020 - 16:04
![]() Richard skrev:
Richard skrev:
Hi, once more. I've placed markers at the sleeves & sides & now trying to knit the raglan decreases! I understand the pattern for instructions for the sides, but starting 3 stitches before the marker (does this include the marker), I end up, after the decrease, taking the first stitch of the sleeve. Your assistance once again would be very much appreciated. Thank you. Richard.
24.01.2020 - 12:29DROPS Design svarede:
Dear Richard, there should be 1 stitch on each side of marker on each piece between the raglan decreases, ie you will work at each transition: K2 tog (1 dec), K2 (= Knit the stitch before marker + the stitch after marker), slip 1 as if to K, K1, psso. So starting at the transition between back and one sleeve, you will start (and end) round with K1, Hope it helps, Happy knitting!
24.01.2020 - 14:23
![]() Richard skrev:
Richard skrev:
Good morning. I have completed the body & both sleeves. But now that I have joined them on one needle, I find that when trying to knit the sleeves, the stitches are stretched (almost impossible to do)! I've had to use double-pointed needles to help me out! I don't remember having this trouble when I made the first one of this pattern (in size medium). Please can you help. Thanks. Richard.
24.01.2020 - 10:15DROPS Design svarede:
Dear Richard, that's right, the first few rounds at the beginning of yoke can be somewhat tricky, you can use the double pointed needles or circular needles if you like to, after few rounds, all stitches will have enough place on the circular needle to work them on the round. Happy knitting!
24.01.2020 - 14:08
![]() Richard skrev:
Richard skrev:
Thank you for the reply to my question. I sent a sketch via email, showing how I was knitting the round. So, from what you are saying, I have to knit A1 (1st row), (only for the complete round)! Then for the next round, I have to knit A1 (2nd row), for the complete round! Then 3rd row, 4th row & so on.... This makes sense. Please can you confirm this for me.. Thanks a million. Richard.
13.01.2020 - 20:17DROPS Design svarede:
Dear Richard, that's how you should work the diagrams (row 1 in A.1 on all diagrams, then row 2 in A.1 on all diagrams and so on). Happy knitting!
14.01.2020 - 07:50
![]() Richard skrev:
Richard skrev:
Good morning, again. Continuing from the two Ridge rows, I began the round, as per your instructions. But, I find that the *A1* pattern, repeats 3 times (2 with odd row numbers, 1 even row number. in the first half, up to 124 stitches. But for the continuing *A1* pattern, there is only 1 odd number row! But, there are 2 even row numbers! Is this so? Please. Richard. I have made a drawing which explains better. If I may upload it.
13.01.2020 - 11:03DROPS Design svarede:
Dear Richard, not sure I'm getting this properly, when working A.1 in the round, you should work same round in each diagram all the round = round 1 A.1 when working round 1 on yoke, then work round 2 in A.1 and so on. What do I misunderstand?
13.01.2020 - 11:34
![]() Richard skrev:
Richard skrev:
Sadly, (Hi again). I'm still struggling after completing the two ridges! It is written that I knit 20, purl 3 (23 stitches), then *A1 (22 stitches, purl 6! (A1 = 10 rows @22 stitches) = 220 stitches. But adding the first 23 stitches to the 220 stitches = 243 stitches? Yet it is written, that I then purl 6! Doing this gives a total of 249 stitches! What am I doing wrong please? Forgive me, I am nearly 78 years old. Have a good day.
09.01.2020 - 12:22DROPS Design svarede:
Dear Richard, you should work the 248 sts in size L as follows: knit 20, purl 3, *A.1 (= 22 sts), purl 6*, repeat from *-* a total of 2 times (= 28 sts x 2= 56 sts), A.1 (= 22 sts), purl 3, knit 40 , purl 3, repeat from *-* (= 56 sts), A.1 (= 22 sts), purl 3, knit 20 = 20+3 + 56+22 + 3+40+3 + 56+22 +3+20=248 sts. Try to add markers between each section, it can help you to check the number of stitches. Happy knitting!
09.01.2020 - 14:07
![]() Richard skrev:
Richard skrev:
Hi (once again). This should be the last for awhile. I understand the A1 block now, working from the bottom up! But, please tell me: Do I follow the pattern from left to right or right to left?? I ask this, because, I am reading the block from right to left! I don't believe it makes much difference (but, there again, you are the Expert). Thank you. Richard.
07.01.2020 - 22:07DROPS Design svarede:
Dear Richard, diagrams are read bottom up starting from the right corner to the left, ie you will read every row in diagrams from the right towards the left (since you are working in the round) - read more about diagrams here (link is now working). Happy knitting!
08.01.2020 - 09:04
|
|||||||||||||||||||
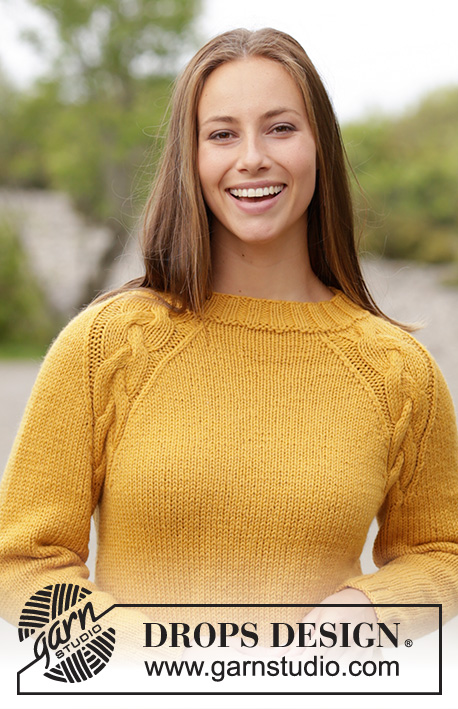
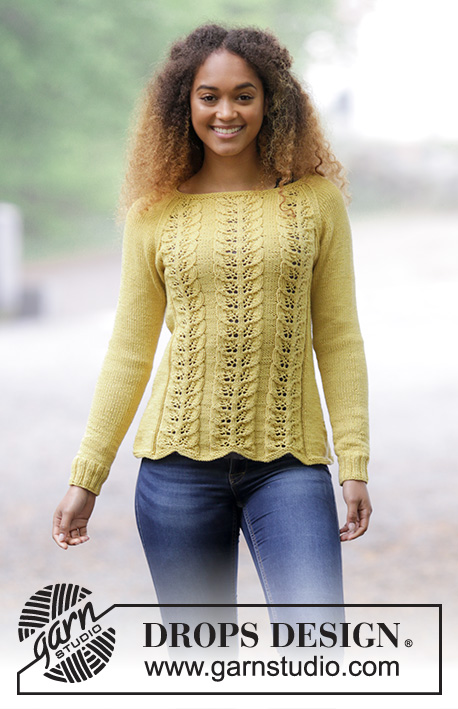
Lemon Parfait#lemonparfaitsweater |
|||||||||||||||||||
 |
 |
||||||||||||||||||
Stickad tröja med bladmönster och raglanminskning. Storlek S - XXXL. Arbetet är stickat i DROPS Cotton Merino.
DROPS 180-1 |
|||||||||||||||||||
|
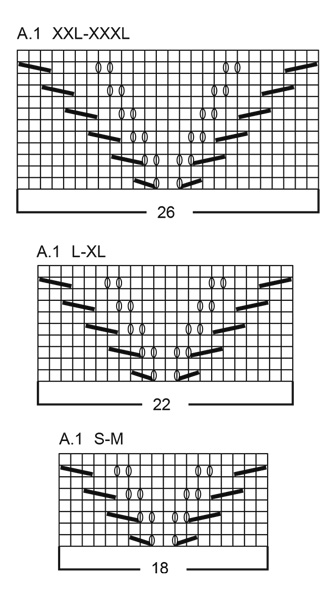
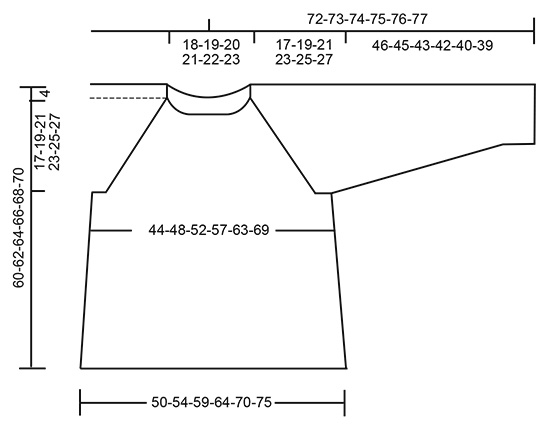
INFORMATION TILL MÖNSTER: RÄTSTICKNING (stickas runt): Sticka *1 varv rätt och 1 varv avigt*, upprepa *-*. MÖNSTER: Se diagram A.1. Välj diagram för din storlek. MINSKNINGSTIPS (gäller sidan): Börja 3 maskor före markören i sidan: Sticka 2 maskor räta tillsammans, sticka 2 rätmaskor (markören sitter mellan dessa maskorna), lyft 1 maska, sticka 1 rätmaska, drag den lyfta maskan över maskan som stickades. ÖKNINGSTIPS: Öka så här mitt under ärmen – börja 1 maska före markören: Gör 1 omslag om stickan, sticka 2 rätmaskor (markören sitter mellan dessa 2 maskorna), 1 omslag. På nästa varv stickas omslagen vridet räta så att det inte blir hål. RAGLAN: Det minskas 2 maskor i varje övergång mellan fram- och bakstycke och ärmar. Börja 3 maskor före markören: Sticka 2 maskor räta tillsammans, 2 rätmaskor (markören sitter mellan dessa maskorna), lyft 1 maska som om den skulle stickas rät, 1 rätmaska, drag den lyfta maskan över maskan som stickades. STICKTIPS: Om stickfastheten inte stämmer på höjden, och det stickas för stramt, kommer oket att bli för kort och ärmhålet för litet. Detta kan justeras genom att sticka 1 extra varv utan minskningar med jämna mellanrum mellan minskningarna. ---------------------------------------------------------- FRAM- OCH BAKSTYCKE: Arbetet stickas runt på rundsticka, nerifrån och upp. Lägg upp 212-228-248-268-292-316 maskor på rundsticka 4 med Cotton Merino. Sticka 4 varv RÄTSTICKNING – se förklaring ovan. Sedan stickas det så här: 17-21-20-25-25-31 rätmaskor, 3 avigmaskor, *A.1 (= 18-18-22-22-26-26 maskor), 6 avigmaskor *, sticka *-* totalt 2 ggr, A.1, 3 avigmaskor, 34-42-40-50-50-62 rätmaskor, 3 avigmaskor, *A.1, 6 avigmaskor *, sticka *-* totalt 2 ggr, A.1, 3 avigmaskor, 17-21-20-25-25-31 rätmaskor. Sätt 1 markör i början av varvet, och 1 efter 106-114-124-134-146-158 maskor = i sidorna. Fortsätt detta mönstret. KONTROLLERA STICKFASTHETEN! När arbetet mäter 8 cm minskas det 1 maska på varje sida av markörerna i sidorna (= 4 maskor minskade) – LÄS MINSKNINGSTIPS! Minska med 4½ cm mekllanrum totalt 7 ggr i alla storlekar = 184-200-220-240-264-288 maskor. När arbetet mäter 39-39-39-39-39-39 cm maskas det av 8-8-10-10-12-14 maskor i varje sida (= 4-4-5-5-6-7 maskor på varje sida av markörerna). Det är nu 84-92-100-110-120-130 maskor på bakstycket och framstycket. Lägg arbetet åt sidan och sticka ärmarna. ÄRM: Arbetet stickas runt på strumpstickor, byt till kort rundsticka när det har ökats tillräckligt med maskor. Lägg upp 48-52-56-56-60-64 maskor på strumpstickor 3,5 med Cotton Merino. Sticka 1 varv rätt, sedan stickas det resår 2 rätmaskor, 2 avigmaskor. När arbetet mäter 6 cm byts det till strumpstickor 4. Sticka 1 varv rätt där det minskas 4-6-8-6-8-10 maskor jämnt fördelat = 44-46-48-50-52-54 maskor. Sätt 1 markör i början av varvet (= mitt under ärmen). Fortsätt med slätstickning. När arbetet mäter 10-7-7-10-7-7 cm ökas det 2 maskor mitt under ärmen – LÄS ÖKNINGSTIPS. Öka med 3-2½-2-1½-1½-1½ cm mellanrum totalt 12-15-18-19-20-21 ggr = 68-76-84-88-92-96 maskor. När arbetet mäter 46-45-43-42-40-39 cm (kortare mått i större storlekar pga längre ok) maskas de mittersta 8-8-10-10-12-14 maskorna under ärmen av = 60-68-74-78-80-82 maskor. Lägg arbeteet åt sidan och sticka en ärm till. OK: Sätt in ärmarna på samma rundsticka som fram- och bakstycket där det maskades av maskor för ärmhål = 288-320-348-376-400-424 maskor. Sätt en markör i varje övergång mellan fram- och bakstycke och ärmar (= 4 markörer). Fortsätt med mönster som förut, och minska till RAGLAN – se förklaring ovan. Minska på vart 4:e varv 5-5-6-6-6-7 ggr, sedan på vartannat varv 14-16-18-21-23-24 ggr = totalt 19-21-24-27-29-31 ggr - maskorna som inte går upp i diagrammet när det minskas stickas i slätstickning. Efter alla minskningar är det 136-152-156-160-168-176 maskor på varvet. Sticka 4 varv rätstickning över alla maskor, men på första varvet stickas de 22-26-26-24-22-20 maskorna över varje ärm räta tillsammans 2 och 2, dessutom minskas det 18-28-26-28-34-40 maskor jämnt fördelat = 96-98-104-108-112-116 maskor. Maska av med rätmaskor. MONTERING: Sy ihop öppningen under ärmarna. |
|||||||||||||||||||
Diagram förklaring |
|||||||||||||||||||
|
|||||||||||||||||||
 |
|||||||||||||||||||
 |
|||||||||||||||||||
Har du gjort detta mönster?Tagga då dina bilder med #dropspattern #lemonparfaitsweater eller skicka in de till #dropsfan galleriet. Behöver du hjälp med mönstret?Du hittar 27 instruktionsvideoer, kommentarer/frågor och mer i mönstret på www.garnstudio.com © 1982-2026 DROPS Design A/S. Alla rättigheter är reserverade. Detta dokument med tillhörande underdokument har copyright. Läs mer om vad du kan göra med våra mönster längst ner på vår hemsida. |
|||||||||||||||||||


Med över 40 år i stick- och virkbranschen erbjuder DROPS Design en av de mest omfattande samlingarna av gratis mönster på internet - översatt till 17 språk. Per idag har vi 324 kataloger och 12290 mönster på och alla är översatta till Svenska.
Vi arbetar hårt för att kunna erbjuda det bästa inom stickning och virkning, inspiration och goda råd, men också kvalitetsgarn till fantastiska priser! Vill du använda våra mönster till annat än personligt användande? Du kan läsa om vilka regler som gäller i texten Copyright längst ner på sidan på alla våra mönster. Lycka till!
Kommentera mönster DROPS 180-1
Vi vill gärna ha din åsikt om denna modell!
Om du har en fråga kring den, kom ihåg att välja rätt kategori i menyn under, så får du snabbare svar! Obligatoriska fält är markerade med *.