
Populära kategorier
Letar du efter ett garn?


Kommentarer / Frågor (53)
![]() Michaela skrev:
Michaela skrev:
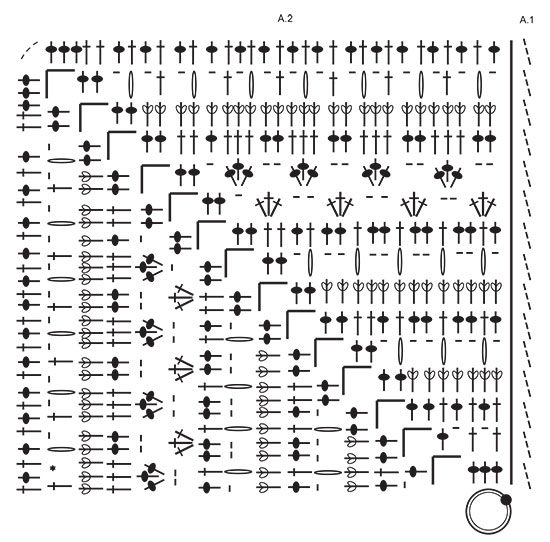
Tut mir leid, vielleicht war die Frage vorher unklar. Wenn man im Diagramm A2 z.B. die 4. und 5. Reihe von unten ansieht, dann sind in der 4. Reihe 9 Stäbchen dargestellt. In der 5. Reihe sollen dann jeweils 4 Stäbchen zusammengehäkelt werden, und dass insgesamt dreimal. Das geht sich aber nicht aus - dazu bräuchte ich in der 4. Reihe 12 Stäbchen und nicht 9. Daher meine Frage, ob man hier nicht immer 3 Stäbchen zusammenhäkelt anstatt 4? Vielen Dank!
27.05.2024 - 10:18DROPS Design svarede:
Liebe Michaela, die 4 Stäbchen zusammen sind als nur 1 Stäbchen gezählt und werden so gehäket (Anfang der 5. Reihe: 1 Lm, 1 M überpsringen, 4 Stb zs in das nächste Stb, 2 Lm, 2 M überspringen, 4 Stb zs in das nächste Stb, 2 Lm, 2 M überspringen, 4 Stb zs in das nächste Stb, 1 Lm, 1 Stäbchen überspringen (= 1+1+2+1+2+1+1= 9 Maschen), dann 2 Stäbchen in nächsten Luftmaschenbogen, usw... Viel Spaß beim Häkeln!
27.05.2024 - 12:59
![]() Michaela skrev:
Michaela skrev:
In der Anleitung steht bei einem Symbol: "4 STÄBCHEN ZU 1 STÄBCHEN ZUSAMMENHÄKELN." Wenn man aber das Diagramm A2 ansieht und dort die Maschen zählt, sieht es eher so aus, als würden nur 3 Stäbchen zusammengehäkelt? Habe ich etwas übersehen? Vielen Dank!
26.05.2024 - 13:37DROPS Design svarede:
Liebe Michaela, hier wird man 4 Stäbchen zusammen häkeln, so zählt jedes als 1 Stäbchen (wie für 1 Noppe z.B.). Viel Spaß beim Häkeln!
27.05.2024 - 08:46
![]() Gunvor skrev:
Gunvor skrev:
Jag blir galen på varv 4! Hur jag än gör får jag 2 stolpar över vid hörnet. Om jag tolkat diagramet rätt, är det sammanlagt 11 relief stolpar i varvet innan. Hoppar över 2m, en stolpgrupp i nästa, hoppas över 2m, en stolpgrupp i nästa. Hoppas över 2m 1 stolpgrupp i nästa, hoppa över 1m. Då är jag framme vid hörnet och har 2 st kvar. Det funkar ju inte? Tänker jag fel? Mönstret är jättevackert, men diagrammet är svårt att följa. Hade föredragit en beskrivning i text.
24.05.2024 - 08:56DROPS Design svarede:
Hej Gunvor, du starter med at hoppe over 1m, 1 stolpgrupp i nästa, hoppa över 2, 1 stolpgrupp i nästa, hoppa över 2, 1 stolpgrupp i nästa, hoppa över 1, 2 stolpar i lm-bågen, 5lm, 2 stolpar i samma lm-båge, hoppa över 1 osv :)
24.05.2024 - 10:25
![]() Hennie Verhees skrev:
Hennie Verhees skrev:
Bij dit patroon voel ik mij misleid, jullie geven 1200 gram aan en ik heb nld 4 gebruikt de afmeting is hetzelfde ,maar ik houd ruim 4 bollen garen over. Hoe kan dit? 1 bol dat snap ik , maar niet 4 volle bollen . ook lijkt dit patroon op een luchtige omslagdoek , terwijl het een best zware deken is. Graag hier uw antwoord op . Met vriendelijke groet , Hennie Verhees
02.04.2024 - 11:06
![]() Kathleen A Dougherty skrev:
Kathleen A Dougherty skrev:
This is a beautiful blanket. I am going to start it. Thank You for the pattern.
05.02.2024 - 21:23
![]() Mattea skrev:
Mattea skrev:
Buongiorno, volevo una precisazione. Nella riga 6 devo lavorare una maglia alta sul gruppo di 4 maglie sottostante ma non so dove devo inserire l'uncinetto. C'è per caso un video esplicativo? grazie
23.12.2023 - 10:17DROPS Design svarede:
Buongiorno Mattea, deve lavorare la maglia alta attorno al gruppo di maglie sotto. Provi a vedere se questo video può esserle di aiuto. Buon lavoro!
30.12.2023 - 10:51
![]() Agnieszka skrev:
Agnieszka skrev:
Not clear for me second row. I start wt chain 3, wich counts as first DC. Then directly I make second DC. Shouldn't I start with chain 4, which counts as first DC plus chain 1 space? Otherwise I have two DCs, without chain space in the begining of the row.
23.11.2023 - 10:25DROPS Design svarede:
Dear Agnieszka, in this pattern, the 3 chains to start rounds are not replacing the first dc, this means A.1 is worked extra: you first work A.1 then repeat A.2 a total of 4 times in the round. Happy crocheting!
23.11.2023 - 15:36
![]() Connie Sahagun skrev:
Connie Sahagun skrev:
I already did all the squares but I started too crochet the sides together with the single stich but what I I don’t understand what to do in the corners.
27.07.2023 - 21:11DROPS Design svarede:
Dear Mrs Sahagun, for the edge you will crochet 3 double crochets (US-crochet terminology) in each corner (and. 1 double crochet in each stitch along the sides of each square + 1 double crochet in the transition between 2 squares). Happy crocheting!
28.07.2023 - 07:39
![]() Gabi skrev:
Gabi skrev:
Guten Tag Werden nur vordere Reliefstäbchen gehäkelt oder abwechselnd vordere und hintere ? Herzlichen Dank
10.07.2023 - 06:43DROPS Design svarede:
Liebe Gabi, Diagram wird in Runde gehäkelt, so die Reliefstäbchen werden immer so gehäkelt. Viel Spaß beim häkeln!
28.07.2023 - 09:08
![]() Linda Mcsweeney skrev:
Linda Mcsweeney skrev:
The graph is confusing for the last round. How many stitches should you have on one side? The graph does not line up with the stiches below on the left side. Thanks.
12.06.2023 - 19:57DROPS Design svarede:
Dear Mrs Mcsweeney, on the last round you will have 32 dc (US-English) on the last half side on the square (A.2) and 3 chains in the corner, then 29 dc on the first half part on next side, this means you should have 32+29= 61 dc along each side of the square. Happy crocheting!
13.06.2023 - 08:14
|
||||||||||||||||||||||||||||
Day By The Sea#daybytheseablanket |
||||||||||||||||||||||||||||
 |
 |
|||||||||||||||||||||||||||
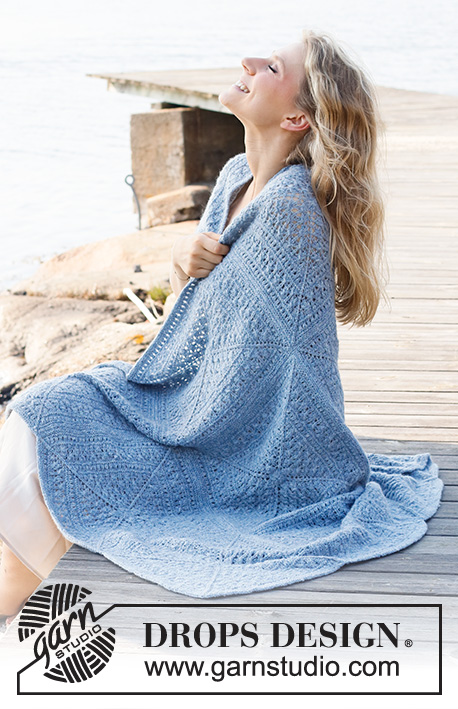
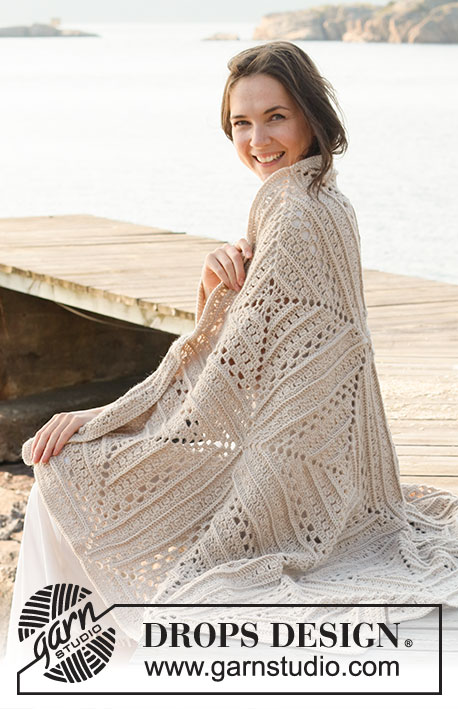
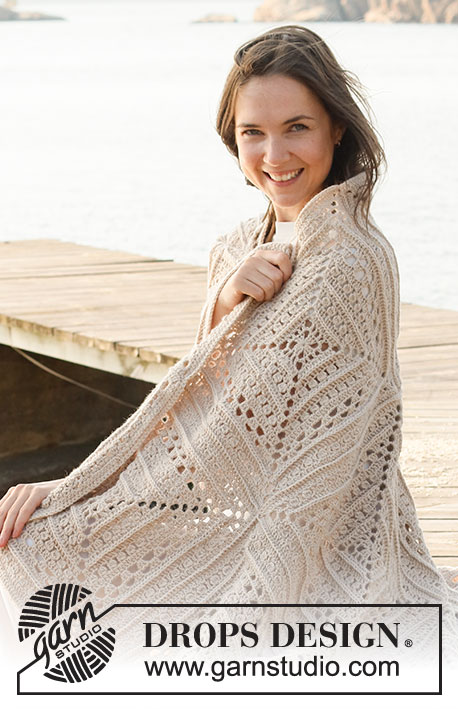
Virkad pläd med rutor i DROPS Lima.
DROPS 221-2 |
||||||||||||||||||||||||||||
|
------------------------------------------------------- FÖRKLARING TILL BESKRIVNINGEN: ------------------------------------------------------- MÖNSTER: Se diagram A.1 och A.2. Diagram A.1 visar hur varvet börjar och slutar. VIRKTIPS: Om du virkar ytterst på virknålen kommer luftmaskan ofta att bli för stram. 1 luftmaska ska vara lika lång som 1 stolpe är bred. ------------------------------------------------------- BÖRJA ARBETET HÄR: ------------------------------------------------------- PLÄD – KORT ÖVERSIKT ÖVER ARBETET: Arbetet består av 12 lika rutor som virkas efter diagram. Rutorna virkas tillsammans och till sist virkas det 1 kant runt hela pläden. RUTA: Börja med virknål 4 och Lima. Läs VIRKTIPS i förklaringen ovan. Virka diagram A.2 totalt 4 gånger runt luftmaskringen - A.1 visar hur varvet börjar och slutar. KONTROLLERA VIRKFASTHETEN! Virka totalt 12 rutor. MONTERING: Lägg ut rutorna så att de ligger med 3 rutor på bredden och 4 rutor på längden. Se till att alla ligger med rätsidan upp. Använd Lima, och virka tillsammans först på bredden, sedan på längden så här: Lägg 2 rutor tillsammans, avigsida mot avigsida, och virka rutorna tillsammans från rätsidan och genom båda lagren så här: Fäst tråden med 1 fastmaska om luftmaskbågarna i hörnet, * virka 1 fastmaska i varje maska fram till nästa hörn (= 3 luftmaskor), virka 1 fastmaska om hörnet, virka 2 luftmaskor och 1 fastmaska om nästa hörn (= 3 luftmaskor). Virka *-* till alla rutorna har virkats tillsammans, men på sista rutan avslutas det efter 1 fastmaska i sista hörnet (= 3 luftmaskor). Upprepa längs var och en av de resterande raderna på bredden. Sedan virkas rutorna tillsammans på samma sätt på längden. KANT: Använd Lima och virknål 4. Börja med att fästa tråden med 1 smygmaska i 1:a hörnet, sedan virkas det så här: Virka 3 luftmaskor och 2 stolpar om det första hörnet. * Virka 1 stolpe i varje maska fram till hörnet mellan rutorna, virka 1 stolpe om varje hörn *, virka *-* till sista hörnet längs denna sidan av pläden. Om det 2:a hörnet virkas det 3 stolpar, virka *-* fram till nästa hörn längs denna sidan av pläden. Om det 3:e hörnet virkas det 3 stolpar, virka *-* fram till nästa hörn längs denna sidan av pläden. Om det 4:e hörnet virkas det 3 stolpar, virka *-* fram till det 1:a hörnet och avsluta med 1 smygmaska i den 3:e luftmaskan i början av varvet. Klipp av tråden och fäst den. |
||||||||||||||||||||||||||||
Diagram förklaring |
||||||||||||||||||||||||||||
|
||||||||||||||||||||||||||||
 |
||||||||||||||||||||||||||||
Har du gjort detta mönster?Tagga då dina bilder med #dropspattern #daybytheseablanket eller skicka in de till #dropsfan galleriet. Behöver du hjälp med mönstret?Du hittar 9 instruktionsvideoer, kommentarer/frågor och mer i mönstret på www.garnstudio.com © 1982-2026 DROPS Design A/S. Alla rättigheter är reserverade. Detta dokument med tillhörande underdokument har copyright. Läs mer om vad du kan göra med våra mönster längst ner på vår hemsida. |
||||||||||||||||||||||||||||


Med över 40 år i stick- och virkbranschen erbjuder DROPS Design en av de mest omfattande samlingarna av gratis mönster på internet - översatt till 17 språk. Per idag har vi 324 kataloger och 12290 mönster på och alla är översatta till Svenska.
Vi arbetar hårt för att kunna erbjuda det bästa inom stickning och virkning, inspiration och goda råd, men också kvalitetsgarn till fantastiska priser! Vill du använda våra mönster till annat än personligt användande? Du kan läsa om vilka regler som gäller i texten Copyright längst ner på sidan på alla våra mönster. Lycka till!
Kommentera mönster DROPS 221-2
Vi vill gärna ha din åsikt om denna modell!
Om du har en fråga kring den, kom ihåg att välja rätt kategori i menyn under, så får du snabbare svar! Obligatoriska fält är markerade med *.