
Beliebte Kategorien
Suchen Sie nach einem Garn?


Kommentare / Fragen (61)
![]() Adriana hat geschrieben:
Adriana hat geschrieben:
Ciao. Volevo sapere cosa si intende per aumento ogni 3 giri. Cioè faccio 2 giri e aumento sul terzo o faccio 3 giri e aumento sul quarto? Grazie mille
27.10.2019 - 23:36DROPS Design hat geantwortet:
Buongiorno Adriana. Lavora due giri senza aumenti e poi aumenta al terzo. Buon lavoro!
28.10.2019 - 07:17
![]() Maryla hat geschrieben:
Maryla hat geschrieben:
Nie mogę zrozumieć jak wykonać : W TYM SAMYM CZASIE dodać z każdej strony wszystkich (1 o.l., 3 o.p., 1 o.l.) – PATRZ DODAWANIE OCZEK = 8 dodatkowych o. Przer. dodawane o. na praw. Przeciez 1ol, 3op. 1o.l z dwóch stron to 10 oczek a nie 8. Gdzie zacząć je dodawać i od jakiego zacząć. To nie jest zrozumiałe
22.10.2019 - 16:57DROPS Design hat geantwortet:
Witaj Marylo! W całym okrążeniu sekwencja (1 o.l., 3 o.p., 1 o.l.) występuje 4 razy > jest to w miejscach linii reglanów (tak jakbyś wykonywała sweter). Jeżeli dodasz po 1 o. z każdej strony tej sekwencji oczek to otrzymasz 8 dodatkowych oczek w okrążeniu (4x2=8). Później co 3 okrążenia powtarzasz to samo jeszcze 15-16-16 razy (w zależności od rozmiaru). Miłej pracy!
23.10.2019 - 08:27
![]() Anfal Wedaa hat geschrieben:
Anfal Wedaa hat geschrieben:
Thanks ,how I could send to you the photo of the poncho after finishing it ? And one more question When we increase every 3rnd It will be p1 k4 p1 and increase like that or we increase the k11 to be k 15 ?
08.07.2019 - 14:10DROPS Design hat geantwortet:
Dear Mrs Wedaa, when inc on each side of P1,k3,P1 you will increase in the K section on each side, so that in 2nd and 3rd size you will get after 1st increase: at the beg of the repeat: K12 (P1, K3,P1) K3, P1, A.1 ... and A.1, K3, (P1, K3, P1), K12 at the end of the repeat. You can tag us in the social medias with #dropsfan - read more here and join us in the DROPS Workshop. Happy knitting!
08.07.2019 - 14:37
![]() Anfal Wedaa hat geschrieben:
Anfal Wedaa hat geschrieben:
Thanks for video but can I ask more one question! When I finish the row one on k11 .. start the second row with k11 or p1 ?
08.07.2019 - 09:20DROPS Design hat geantwortet:
Dear Mrs Wedaa, you have to work all rounds as follows: * K11-11, P 1, K 3, P 1, K 2-2, P 1, A.1 (= 3 sts), P 2, A.2 (= 13 sts), ** P 2, A.1 **, repeat from **-** 0-1 more time, P 2, A.2, P 2, A.1, P 1, K 2-2, P 1, K 3, P 1, K 11-11 *, repeat from *-* 1 more time, ie work all stitches on the round as explained above, at the same time work row 1 in each diagram. On next round (=2nd round, work the stitches K over K and P over P and work row 2 in diagrams). Happy knitting!
08.07.2019 - 10:52
![]() Nathalie Bourassa hat geschrieben:
Nathalie Bourassa hat geschrieben:
Bonjour, merci pour vos magnifiques patrons. Je réalise présentement le modèle 157-15 , j’ai montré le cou à 138 mailles maintenant je dois augmenter de 24 mailles ce qui donne une augmentation au 5,75 mailles. Alors j’augmente à la 5ième et 6ième ou seulement à la 6ième mailles? Merci beaucoup!
15.10.2018 - 00:56DROPS Design hat geantwortet:
Bonjour Mme Bourrassa, augmentez après alternativement chaque 5ème et chaque 6ème m, mais veillez à bien vérifier votre nombre de mailles - voir aussi ici. Bon tricot!
15.10.2018 - 10:51
![]() Germana hat geschrieben:
Germana hat geschrieben:
Buonasera nelle spiegazioni degli intrecci mi manca 1 maglia .....dice trasferirire 3 m sul ferro ausiliario lavorare 3 m a dritto e 2 m dir dal ferro ausiliario .....ma le maglie in tutto non sono 6? Grazieeee
09.10.2018 - 21:00DROPS Design hat geantwortet:
Buonasera Germana. Abbiamo corretto il testo. La ringraziamo per la segnalazione. Buon lavoro!
09.10.2018 - 21:05
![]() Amurtiger hat geschrieben:
Amurtiger hat geschrieben:
1 Kraus Rippe in Hin und Rückreihen = 2 Reihen rechts Fehler: 1 Reihe rechts
04.05.2017 - 17:32DROPS Design hat geantwortet:
Lieber Frau Amurtiger, wenn mann 1 Kraus Rippe hin und zurück strickt, muss man 2 Reihe rechts stricken (1 Hinreiche rechts + 1 Rückreihe rechts). Viel Spaß beim stricken!
11.05.2017 - 14:30
![]() Eurydice hat geschrieben:
Eurydice hat geschrieben:
Please help, I am trying to do the poncho & when I do increases the pattern does not describe how to work the additional stitches that fall into the cable pattern. Am I just to do increases around the cable patterns so that it does not interfere with the cable pattern? Or do I work the increases into the cable pattern which will adjust the overall look of the garment? Please help. I am lost with this pattern as it does not provide much detail with the poncho.
01.02.2017 - 23:58DROPS Design hat geantwortet:
Dear Eurydice, inc for poncho are worked on either side of (P1,K3,P1) worked a total of 4 times in the round as raglan lines, work the inc sts in stocking st, so that inc will be worked before or after cable patterns and will not interfere the patterns. Happy knitting!
02.02.2017 - 10:11
![]() Eurydice hat geschrieben:
Eurydice hat geschrieben:
I made the headband but it did not come out the same as it is pictured on your site. I would like to know if I am suppose to work charts A.1 and A.2 front and back from starting with row 1-8 for A.2 and 1-4 for A.1? If so, I am also to work chart A.1 repeatedly over chart A.2? Please help.
31.01.2017 - 21:03DROPS Design hat geantwortet:
Dear Eurydice, when working the headband, you'll work the diagrams on same row, ie: K 2, P 1, A.1 (= 3 sts), P 2, A.2 (= 13 sts), P 2, A.1, P 1, K 2. When A.1 has been worked 1 time in height, repeat A.1 from row 1. When A.2 has been worked 1 time in height you have worked 2 repeats of A.1 in height. Happy knitting!
01.02.2017 - 09:24
![]() Eurydice hat geschrieben:
Eurydice hat geschrieben:
Also, for the poncho when doing the increases the pattern does not describe or detail how to work the additional stitches that fall into the cable pattern. Am I just to do increases around the cable patterns so that it does not interfere with the cable? Or do I work the increases into the cable pattern which will adjust the overall look of the garment? Please help. I am lost with this pattern as it does not provide much detail with the poncho.
31.01.2017 - 21:00DROPS Design hat geantwortet:
Dear Eurydice, you are working ( P 1, K 3, P 1) a total of 4 times in the round (like raglan lines), and the inc have to be worked on either side of these sts: inc, P1,K3,P1, inc. Inc will not affect the cable patterns. Happy knitting!
01.02.2017 - 09:17
|
||||||||||||||||||||||
Cold Springs#coldspringsset |
||||||||||||||||||||||
|
|
||||||||||||||||||||||
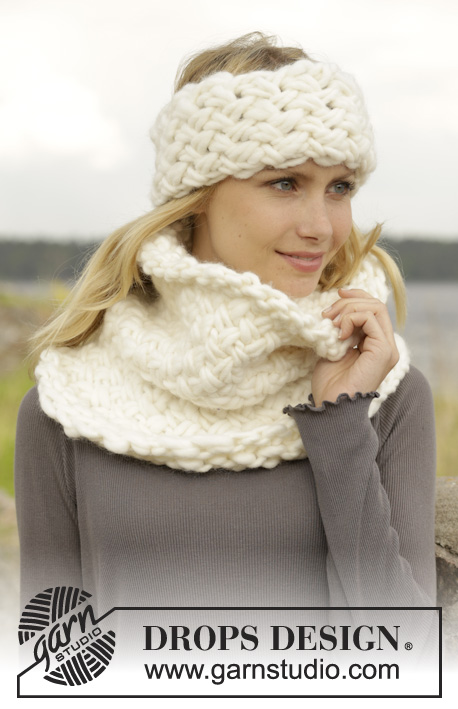
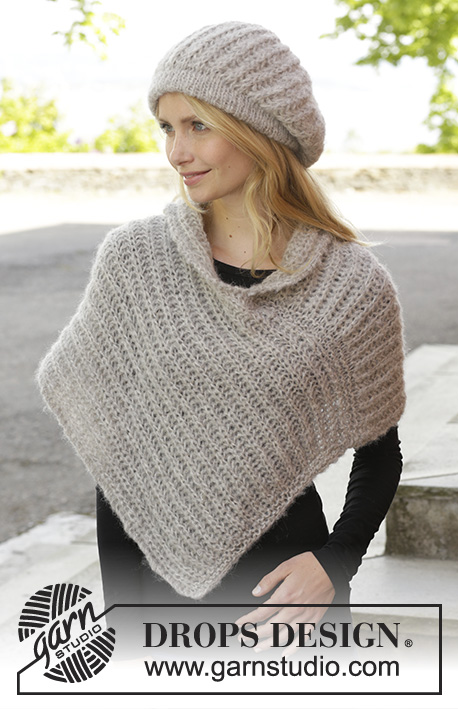
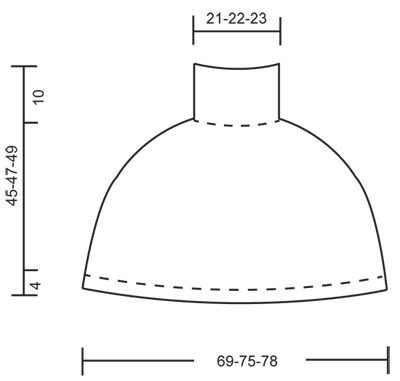
Von oben nach unten gestrickter DROPS Poncho und Stirnband in „Alaska“ mit Zöpfen. Größe S-XXXL.
DROPS 157-15 |
||||||||||||||||||||||
|
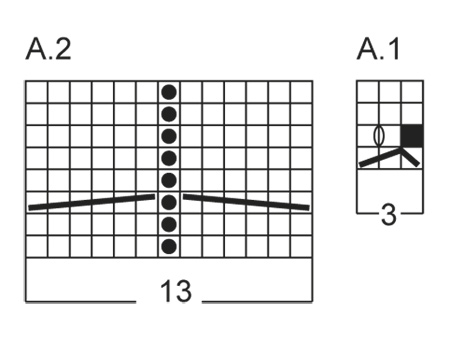
MUSTER: Siehe Diagramm A.1-A.2. Das Diagramm zeigt alle Rd., wie sie auf der Vorderseite erscheinen bzw. das Diagramm zeigt die Hin- und Rück-R, wie sie auf der Vorderseite erscheinen. KRAUS RECHTS (auf einer Rundnadel rund gestrickt): 1 Krausrippe = 1 Runde re und 1 Runde li. KRAUS RECHTS (in Hin- und Rückreihen gestrickt): 1 Krausrippe = 1 Reihen rechts TIPP ZUR ZUNAHME: 1 M zunehmen, indem man einen Umschlag macht. In der nächsten Rd wird der Umschlag re verschränkt gestrickt (d.h. man strickt in das hintere Maschenglied statt in das vordere), damit kein Loch entsteht. ---------------------------------------------------------- PONCHO : Die Arbeit wird auf einer Rundnadel von oben nach unten rund gestrickt. 132-138-144 M mit Rundnadel 4 mit Alaska anschlagen. 1 Rd re stricken. Dann im Rippenmuster stricken (= 3 re /3 li). Nach 10 cm 1 Krausrippe stricken – siehe oben – dabei GLEICHZEITIG gleichmäßig verteilt in der ersten Rd 18-24-28 M zun = 150-162-172 M. Zu Rundnadel 5 wechseln. BEACHTEN SIE DIE MASCHENPROBE! Die Runde beginnt nun auf der einen Seite der Arb. * 9-11-11 re, 1 li, 3 re, 1 li, 1-2-2 re, 1 li, A.1 (= 3 M), 2 li, A.2 (= 13 M), ** 2 li, A.1 **, von **-** noch 0-0-1 x wdh, 2 li, A.2, 2 li, A.1, 1 li, 1-2-2 re, 1 li, 3 re, 1 li, 9-11-11 re*, von * - * noch 1 x wdh. GLEICHZEITIG auf beiden Seiten aller «1 li, 3 re, 1 li» 1 M zunehmen – SIEHE TIPP ZUR ZUNAHME = 8 M zugenommen. Die zugenommenen Maschen werden rechts gestrickt. Wiederholen Sie diese Zunahmen in jeder 3.Runde insgesamt 16-17-17 x = 278-298-308 M. Im Muster weiterstricken. Nach 41-43-45 cm zu Rundnadel 4 wechseln und 1 Krausrippe über alle M str, dabei GLEICHZEITIG gleichmäßig verteilt 4-2-4 M zunehmen = 282-300-312 M. Dann im Rippenmuster (3 re/3 li) bis zu einer Gesamthöhe von 45-47-49 cm str. Die Maschen abketten, wie sie erscheinen (rechte Maschen rechts abketten und linke Maschen links abketten). ---------------------------------------------------------- STIRNBAND : Die Arbeit wird in Hin- und Rück-R gestrickt. 23 M mit Nadel 5 mit Alaska anschlagen. 1 Krausrippe stricken – siehe oben, dabei GLEICHZEITIG in der letzten R gleichmäßig verteilt 6 M zunehmen = 29 M. Dann wird die nächste Hin-R wie folgt gestrickt: 2 re, 1 li, A.1 (= 3 M), 2 li, A.2 (= 13 M), 2 li, A.1, 1 li, 2 re. Im Muster weiterstricken - BEACHTEN SIE DIE MASCHENPROBE! Nach 47 cm 1 Krausrippe über alle M stricken, dabei GLEICHZEITIG in der 1.R gleichmäßig verteilt 6 M abn = 23 M. Abketten. Das Stirnband in der hinteren Mitte zusammennähen. |
||||||||||||||||||||||
Erklärungen zum Diagramm |
||||||||||||||||||||||
|
||||||||||||||||||||||
 |
||||||||||||||||||||||
 |
||||||||||||||||||||||
Haben Sie diese Anleitung nachgearbeitet?Dann taggen Sie Ihre Fotos mit #dropspattern #coldspringsset oder schicken Sie sie an die #dropsfan Galerie Brauchen Sie Hilfe bei dieser Anleitung?Sie finden 17 Videotutorials, einen Kommentar/Fragen-Bereich und vieles mehr, wenn sie die Anleitung bei garnstudio.com aufrufen. © 1982-2026 DROPS Design A/S. Wir besitzen alle Rechte. Dieses Dokument, einschließlich aller Untersektionen, hat Urheberrechte. Mehr dazu, was Sie mit unseren Anleitungen machen können, finden Sie ganz unten auf der Seite zu jeder Anleitung. |
||||||||||||||||||||||


Mit über 40 Jahren Tätigkeit im Entwerfen von Strick- und Häkelmustern bietet Ihnen DROPS Design eine der umfangreichsten Sammlungen von kostenlosen Anleitungen im Internet - in 17 Sprachen übersetzt. Zum jetzigen Zeitpunkt haben wir insgesamt 325 Handarbeitshefte und 12298 Anleitungen auf Deutsch. 12210
Unser Ziel ist es, Ihnen die besten Angebote zum Stricken und Häkeln, Inspirationen und Ratschläge sowie qualitativ hochstehende Garne zu unglaublichen Preisen zu bieten! Möchten Sie unsere Anleitungen nicht nur für den persönlichen Gebrauch nutzen? Unsere Copyright Bedingungen finden Sie bei allen unseren Anleitungen ganz unten auf der jeweiligen Seite. Viel Spaß beim Handarbeiten!
Kommentieren Sie die Anleitung DROPS 157-15
Wir würden gerne Ihre Meinung zu diesem Modell erfahren!
Wenn Sie eine Frage stellen möchten, prüfen Sie bitte, dass Sie die richtige Kategorie im unten stehenden Formular gewählt haben - so bekommen Sie schneller eine Antwort. Die obligatorischen Felder sind mit einem * gekennzeichnet.