
Beliebte Kategorien
Suchen Sie nach einem Garn?


Kommentare / Fragen (58)
![]() Kathy hat geschrieben:
Kathy hat geschrieben:
Hello again, I apologize for having multiple questions, and I very much appreciate your help. After knitting the central cable portion, I have 207 rows. If I pick up a stitch on every row, I will have a rib consisting of 444 stitches (207 x 2 + 15 cast on edge + 15 cast off edge) for the rib rather than the 342 to 366 called for in the pattern. I could not determine from the pattern if I am supposed to pick up a stitch at each row. Would you please advise me? thank you.
03.04.2023 - 07:36DROPS Design hat geantwortet:
Hi Kathy, You do not need to pick up 1 stitch in each row - depending on the size you are working, you pick up approx. 310 to 366 stitches in addition to the cast-on and cast-off edges. This will be approx. pick up on first row, skip 1 row, pick up on 3rd and 4th row, skip 1 row, pick up on 6th and 7th row etc. Hope this helps and happy Easter!
04.04.2023 - 06:51
![]() Kathy hat geschrieben:
Kathy hat geschrieben:
Hello, Do you recommend blocking the central cable portion before adding the rib? Thank you.
03.04.2023 - 06:42DROPS Design hat geantwortet:
Hi Kathy, it is not necessary. Block the piece after completing the whole thing. Happy knitting!
04.04.2023 - 07:50
![]() Kathy hat geschrieben:
Kathy hat geschrieben:
I am confused by the increases and decreases. I have two questions. (1) does “inside 1 edge st” mean immediately after the first stitch of the row and immediately before the last stitch of the row? why is the increase done with a yarn over, which is used when you want to make a hole (such as lace). the instructions next say to knit into the back of the stitch to avoid a hole. I found the video confusing. Can I use another form of increase, such as Make One Right or Left? Thank you.
01.04.2023 - 04:47DROPS Design hat geantwortet:
Dear Kathy, yes, inside the edge stitch is immediately after the first stitch or before the last stitch of the row. You can increase in several different ways; yarn overs are the most basic and easier to work, even though there may be a small gap remaining (take into account that, since it's twisted on the next row, the gap will be smaller than in lace patterns). But of course you can use M1R or M1L for this pattern. Happy knitting!
02.04.2023 - 22:45
![]() Freda Corrigan hat geschrieben:
Freda Corrigan hat geschrieben:
Greetings, can I knit this neckwear using knit N purl stitching I really love the style but not good with pattern reading Thank you hope to hear from you soon
23.06.2022 - 14:58DROPS Design hat geantwortet:
Dear Mrs Corrigan, we only have diagrams to this pattern, but this lesson will explain you how to read a knitting diagram. Happy knitting!
23.06.2022 - 16:15
![]() Tanya hat geschrieben:
Tanya hat geschrieben:
I am sorry but i am lost on what this means. Could you lease step by step clarify this. "When Rib measures 2 cm inc every other P section to P2. When piece measures 3 cm inc remaining purl sections to P2. When Rib measures 5 cm inc every other purl section from P2 to P3. Cast off on next row in Rib." Thank you
24.11.2019 - 06:59DROPS Design hat geantwortet:
Dear Tanya, to beginn with you are knitting a K2, P2 rib. At the first increase (when piece is 2 cm) you knit the row like this: * K1, P1, K1, P1, make 1, * and repeat *-*. In the next oncrease row (piece is 3 cm), you knit *K1, 1 P, make1, K2, P2. * and repeat *-*. For the next increase round (piece is 5 cm, you knit like this: K2, P1, K2, P1, make 1, P1 * and repeat *-*. Casting of in rib means that you cast of knit stitches with knit stitches, and purl stitches with purl stitches. I hope this helps. Happy Knitting!
24.11.2019 - 16:16
![]() Tanya hat geschrieben:
Tanya hat geschrieben:
Hello: I see this says a sport weight yarn, would that be sport weight in "Canada" too or would it be classified as DK in Canada. I am also a bit confused as in some places that sell your yarn it says it is 4 ply others say 5 ply..
18.11.2019 - 20:31DROPS Design hat geantwortet:
Dear Tanya, we are glad to inform you that our yarns are available in Canada - please check retailer list in/to Canada here. Happy knitting!
19.11.2019 - 08:51
![]() Joyce Boatman hat geschrieben:
Joyce Boatman hat geschrieben:
Name it Beauty as it is Beautiful
17.11.2019 - 01:22Ngaire hat geschrieben:
Truly love this. Can this be knitted on straight needles
28.03.2018 - 06:19DROPS Design hat geantwortet:
Dear Mrs Ngaire, the main part of the neck warmer can be worked on straight needle, but the edge (ribbingn part) is then worked in the round picking up sts around whole neck warmer. Happy knitting!
28.03.2018 - 15:52
![]() Joana Rodrigues hat geschrieben:
Joana Rodrigues hat geschrieben:
Só uma pequena nota em relação à tradução para Português: Nas dicas para as diminuições, falta acrescentar que, antes da m/p ourela, deve-se tricotar 2 ms/pts juntamente em liga/tricô enfiando a agulha na alça de trás (m/pt liga/tricô torcida/o)
03.12.2016 - 21:06DROPS Design hat geantwortet:
Obrigado pela nota. Vamos editar as explicações. Bom tricô! Boas Festas!
16.12.2016 - 17:06Gwen Schmitt hat geschrieben:
I was wondering how much yarn to buy? I have a customer that wants to use a different yarn called Lions Pride Woolspun for this. Can anyone convert it for me and tell me how much to buy?
16.04.2016 - 06:40DROPS Design hat geantwortet:
Dear Mrs Schmitt, We are able to provide free patterns thanks to our yarns sold throughout the world. You will therefore understand that we can only recomand you to contact our DROPS Storefor any further help & assistance. Thank you for your comprehension.
18.04.2016 - 09:02
|
|||||||||||||
DROPS 98-1 |
|||||||||||||
|
|
|||||||||||||
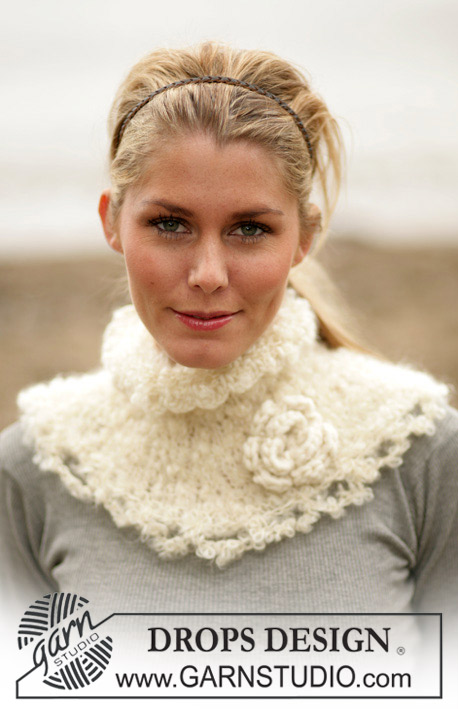
Kragen mit Blume in „Alpaca“ und „Snow“
DROPS 98-1 |
|||||||||||||
|
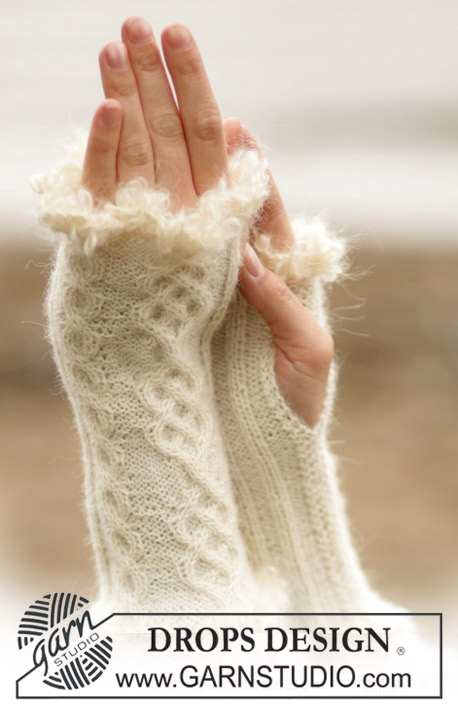
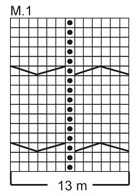
Maschenprobe: Achtung, die Nadelnummer (Ndl) ist nur ein Vorschlag! 19 M. x 25 R. auf Ndl. Nr. 4 und glatt gestrickt = 10 x 10 cm. Muster: Siehe Diagramm M1. Das Diagramm zeigt das Muster von rechts. Tipp zum Aufnehmen: Auf der Innenseite 1 Randm aufnehmen, indem man einen Umschlag macht und diesen Umschlag in der nächsten R. verschränkt strickt (d.h. in den hinteren Teil der M. einstechen), damit es kein Loch gibt. Tipp zum Abnehmen: Vor oder nach der Randm abn. Nach der Randm: 2 li. zusammenstricken. Vor der Randm: 2 li. verdreht (hinten einstechen) zusammenstricken. Hals: Der mittlere Teil mit dem Zopf wird zuerst gestrickt und das Bündchen wird danach rund um die Arbeit gestrickt. Mit 2 Fäden Alpaca auf Rundstricknadel Nr. 4, 15 M. anschlagen. 2 R. re. stricken (hin und zurück), danach M1 mit je 1 Randm auf beiden Seiten stricken. Mit dem Muster weiterfahren (die Randm werden immer re. gestrickt) gleichzeitig auf beiden Seiten, bei jeder 2. R. 1 M. aufnehmen total 6 Mal – siehe Tipp zum Aufnehmen = 27 M. - die aufgenommenen M. werden re. auf links und li. auf rechts gestrickt. Nach 65 cm, auf beiden Seiten, bei jeder 2. R. 1 M. abn. total 6 Mal – siehe Tipp zum Abnehmen = 15 M. 1 R. re. stricken und danach abk. Bündchen: Hier wird die Arbeit rund gestrickt. Mit 2 Fäden Alpaca auf Rundstricknadel Nr. 4, rund um die Arbeit ca. 342 bis 366 M. aufnehmen (muss durch 3 teilbar sein). 1 R. li. und 1 R. re. stricken. Danach 2 re./1 li. stricken. Nach 2 cm in jeder zweiten Links-Rippe 1 li. aufnehmen (1 li auf 2 li. aufnehmen) und nach 3 cm (total) in den restlichen Links-Rippen die 1 li. auf 2 li. aufnehmen. Nach 5 cm wiederum in jeder zweiten Links-Rippe 1 M li aufnehmen (2 li. auf 3 li. aufnehmen) und bei der nächsten R. alle M. re. über rechts und li. über links abk. Häkelblume: Mit Snow auf Ndl. Nr. 7: 4 Lm häkeln und mit 1 Kettm zu einem Ring zusammenhäkeln. 1. R.: 6 fM in den Ring häkeln und mit 1 Kettm in die erste fM abschliessen. 2. R.: * 4 Lm, 1 Stb in die erste der 4 Lm, 1 fM in de nächste M. *, von *-* wiederholen und mit 1 Kettm abschliessen = 6 Blätter. Faden abschneiden. Die Sicherheitsnadel an der Blume annähen und am Kragen befestigen. Haarband: Mit 2 Fäden Alpaca auf Ndl. Nr. 4 M. anschlagen. Wie folgt stricken: * 1 M. re., das Garn vor die Arbeit legen, 1 M. li. abheben, das Garn hinter die Arbeit legen *, von *-* wiederholen und nach ca. 150 cm abk. |
|||||||||||||
Erklärungen zum Diagramm |
|||||||||||||
|
|||||||||||||
 |
|||||||||||||
Haben Sie diese Anleitung nachgearbeitet?Dann taggen Sie Ihre Fotos mit #dropspattern oder schicken Sie sie an die #dropsfan Galerie Brauchen Sie Hilfe bei dieser Anleitung?Sie finden 22 Videotutorials, einen Kommentar/Fragen-Bereich und vieles mehr, wenn sie die Anleitung bei garnstudio.com aufrufen. © 1982-2026 DROPS Design A/S. Wir besitzen alle Rechte. Dieses Dokument, einschließlich aller Untersektionen, hat Urheberrechte. Mehr dazu, was Sie mit unseren Anleitungen machen können, finden Sie ganz unten auf der Seite zu jeder Anleitung. |
|||||||||||||


Mit über 40 Jahren Tätigkeit im Entwerfen von Strick- und Häkelmustern bietet Ihnen DROPS Design eine der umfangreichsten Sammlungen von kostenlosen Anleitungen im Internet - in 17 Sprachen übersetzt. Zum jetzigen Zeitpunkt haben wir insgesamt 324 Handarbeitshefte und 12290 Anleitungen auf Deutsch. 12202
Unser Ziel ist es, Ihnen die besten Angebote zum Stricken und Häkeln, Inspirationen und Ratschläge sowie qualitativ hochstehende Garne zu unglaublichen Preisen zu bieten! Möchten Sie unsere Anleitungen nicht nur für den persönlichen Gebrauch nutzen? Unsere Copyright Bedingungen finden Sie bei allen unseren Anleitungen ganz unten auf der jeweiligen Seite. Viel Spaß beim Handarbeiten!
Kommentieren Sie die Anleitung DROPS 98-1
Wir würden gerne Ihre Meinung zu diesem Modell erfahren!
Wenn Sie eine Frage stellen möchten, prüfen Sie bitte, dass Sie die richtige Kategorie im unten stehenden Formular gewählt haben - so bekommen Sie schneller eine Antwort. Die obligatorischen Felder sind mit einem * gekennzeichnet.