
Beliebte Kategorien
Suchen Sie nach einem Garn?


Kommentare / Fragen (28)
![]() R N hat geschrieben:
R N hat geschrieben:
Hei! Teen XL kokoa. Ohjeissa on virhe kun kainaloista lähdetään jatkamaan alaspäin. Kuviot eivät täsmää. Voitteko auttaa?
05.07.2024 - 10:56DROPS Design hat geantwortet:
Hei, etu-/takakappaleessa neulotaan mallineuletta piirroksen A.4 mukaisesti ja mallineule jatkuu siitä, mihin se kaarrokkeessa jäi. Mikäli neuletiheys täsmää, kaarroke on valmis, kun olet neulonut ylös piirrokseen kokosi nuolella merkittyyn kerrokseen.
05.07.2024 - 17:08
![]() Mary hat geschrieben:
Mary hat geschrieben:
But that’s precisely the problem! If I start the third line A4 from the underarm (the first stitch of the new round is basically the third stitch from the underarm) I get the mismatch because the triangle will be stitched earlier: I can’t understand where I am going wrong
09.04.2023 - 14:12DROPS Design hat geantwortet:
Dear Mary, you need to adjust the stitches before starting the triangle. In this case, you need to simply knit stitches (not just the amount indicated in the pattern) so that the triangle won't be mismatched. The pattern under the arm may get slightly mismatched initially but that isn't important, since it will later on match correctly. Happy knitting!
10.04.2023 - 13:34
![]() Mary hat geschrieben:
Mary hat geschrieben:
Yes, I can see that the pattern is the same. But if I follow the instructions from A4 third line, I should start the "triangle" after 3 stitches of the body, while according to the stitches I have after the line with the arrow, A1, I should start the triangle after 5 stitches but this means that it will be "anticipated" hence the mismatch. Does it mean that I have not divided the garment accordingly? Many thanks and Happy Easter!
09.04.2023 - 11:09DROPS Design hat geantwortet:
Dear Mary, take into account that you should have adjusted the start of the round in the body; you adjust so that the beginning of the round is in the middle stitch cast on under the sleeve. This should help adjust the pattern so that the triangle in A.4 won't get mismatched with the pattern in the yoke in A.1. Happy knitting!
09.04.2023 - 13:30
![]() Mary hat geschrieben:
Mary hat geschrieben:
Thanks! But I am still confused: the instructions say that the yoke is finished when I have 168 stitches (S size). If I had not knit the last row (the one with the arrow), I would not have got 168 stitches. In any case, once I have knit the row with the arrow, if I then start A4 from the third line I still get a mismatch in the pattern and I do not know where I get it wrong. Well, I know that I do something wrong while shifting from the yoke to the body but I can't figure out what.
07.04.2023 - 10:25DROPS Design hat geantwortet:
Dear Mary, after having worked the row with the arrow, you should have knitted round, where you separated the stitches for each part of the garment. Then, you should start the body with the third row of A.4. There shouldn't be a mismatch there. You can check that the third row of A.4 is exactly like the third row in A.1 after the row with the arrow, so they should be matching. Hope this helps!
08.04.2023 - 20:58
![]() Mary hat geschrieben:
Mary hat geschrieben:
Thanks! But I am still confused: the instructions say that the yoke is finished when I have 168 stitches (S size). If I had not knit the last row (the one with the arrow), I would not have got 168 stitches. In any case, once I have knit the row with the arrow, if I then start A4 from the third line I still get a mismatch in the pattern and I do not know where I get it wrong. Well, I know that I do something wrong while shifting from the yoke to the body but I can't figure out what.
07.04.2023 - 10:20DROPS Design hat geantwortet:
Dear Mary, after having worked the row with the arrow, you should have knitted round, where you separated the stitches for each part of the garment. Then, you should start the body with the third row of A.4. There shouldn't be a mismatch there. You can check that the third row of A.4 is exactly like the third row in A.1 after the row with the arrow, so they should be matching. Hope this helps!
08.04.2023 - 20:59
![]() Mary hat geschrieben:
Mary hat geschrieben:
Sorry, I am still unclear: I have finished the yoke knitting the A1-A3-A5 line with the arrow. Then I divided the work and I went for a knitted round. Now which line should I knit first and from which diagram?
05.04.2023 - 09:04DROPS Design hat geantwortet:
Dear Mary, the arrows in the chart mean that, if the gauge is correct, you should finish the raglan/yoke when you reach the arrow for your size (before working it). If you have worked this row, then you will need to start the new part by working the third row of the new chart (A.4). Happy knitting!
06.04.2023 - 23:29
![]() Mary hat geschrieben:
Mary hat geschrieben:
Hi! "Continue the pattern from yoke on body – making sure to continue with the correct row in the diagram after the yoke. " Does this mean that if I finish A1 (S size) with the line with the arrow, the next line for the body in A4 is in fact the thirs one of the diagram?
04.04.2023 - 08:59DROPS Design hat geantwortet:
Hi Mary, Yes, if you finished the diagram before separating for the body and sleeves, you continue with the first row in the diagram. Happy Easter!
05.04.2023 - 07:01
![]() Mary hat geschrieben:
Mary hat geschrieben:
"Knit as far as the middle stitch cast on under the sleeve. The round now starts here." Does it mean that the round starts after the second or after the third stitch under the sleeve? Many thanks!
08.03.2023 - 16:03DROPS Design hat geantwortet:
Dear Mary, yes correct: work the first 2 of the 5 stitches cast on under 1st sleeve, the rounds will now start here, before the middle of the new stitches. Happy knitting!
08.03.2023 - 16:08
![]() Mary hat geschrieben:
Mary hat geschrieben:
Following from your last answer: "...you will start the next round 1 stitch eariler. So, you need to not work the last stitch of the previous round". I interpret this as moving the stitch marker one stitch behind and working that stitch as the first one of the next round rather than the last one of the previous round. Is this correct? So it is basically just a matter of moving the stitch marker?
07.03.2023 - 12:16DROPS Design hat geantwortet:
Dear Mary, you will now work the dividing round, this means you don't need the markers anymore, you start working the dividing round when the last stitch on previous round remain on left needle, slip the next 39 sts (starting with the last stitch previous round + the first 38 sts next round). Happy knitting!
07.03.2023 - 14:37
![]() Mary hat geschrieben:
Mary hat geschrieben:
Hi, I have just finished all the increases on the raglan and I have 168 stitches (S size). I'll go now go for a knitted round but what does it mean " adjust so the round now starts 1 stitch earlier"? Plus, the 39 stitches I habe to put aside, correspond to the stiches that are within the first and the second marker?
04.03.2023 - 10:25DROPS Design hat geantwortet:
Dear Mary, after finishing the increases and reaching the indicated length (21cm from the marker), you will start the next round 1 stitch eariler. So, you need to not work the last stitch of the previous round. On the other hand, the first marker was inserted in the transition between the back and the sleeve and the second marker between the sleeve and the front. Since you have to put aside the stitches which correspond to the sleeve, these stitches are all in between the first and 2nd marker. Happy knitting!
05.03.2023 - 20:45
|
|||||||||||||||||||
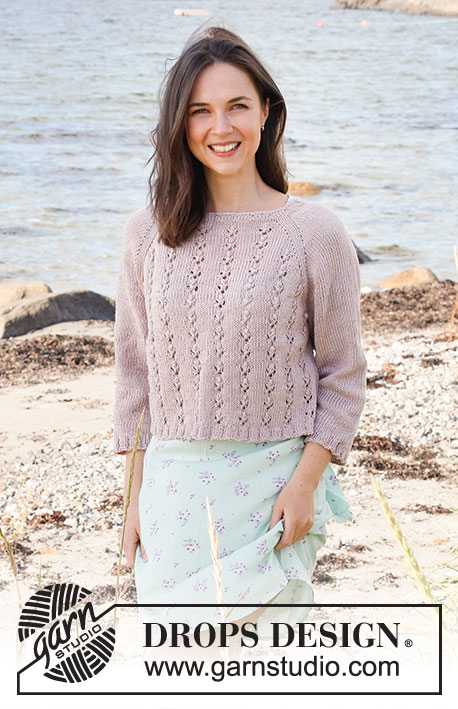
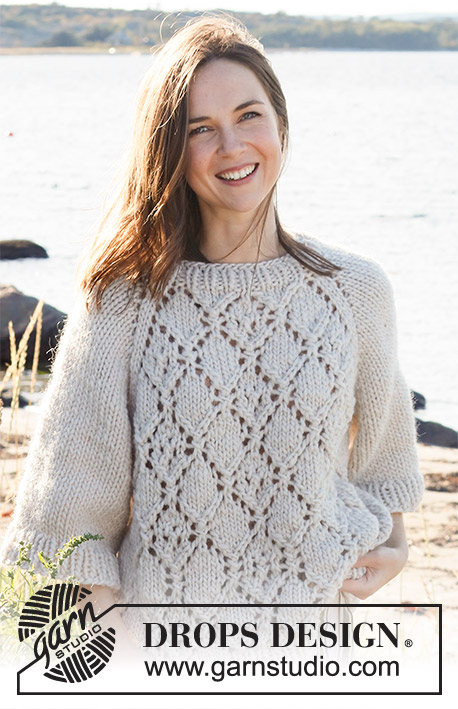
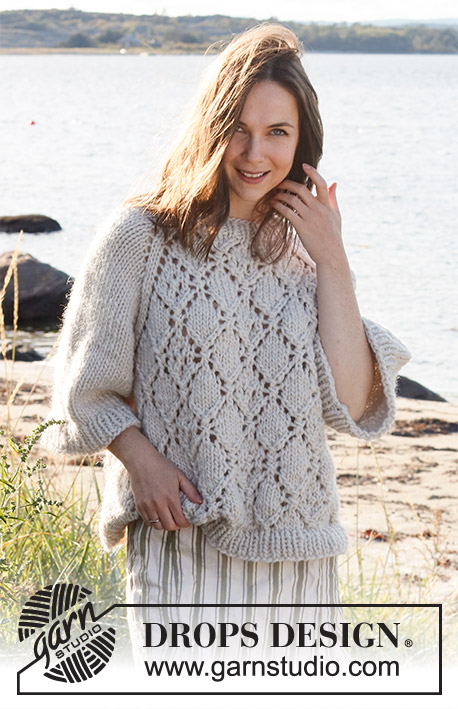
Diamonds in the Sky#diamondsintheskysweater |
|||||||||||||||||||
 |
 |
||||||||||||||||||
Gestrickter Pullover in DROPS Snow oder DROPS Wish. Die Arbeit wird von oben nach unten mit Raglan, Lochmuster und ¾ langen weiten Ärmeln gestrickt. Größe S - XXXL.
DROPS 221-29 |
|||||||||||||||||||
|
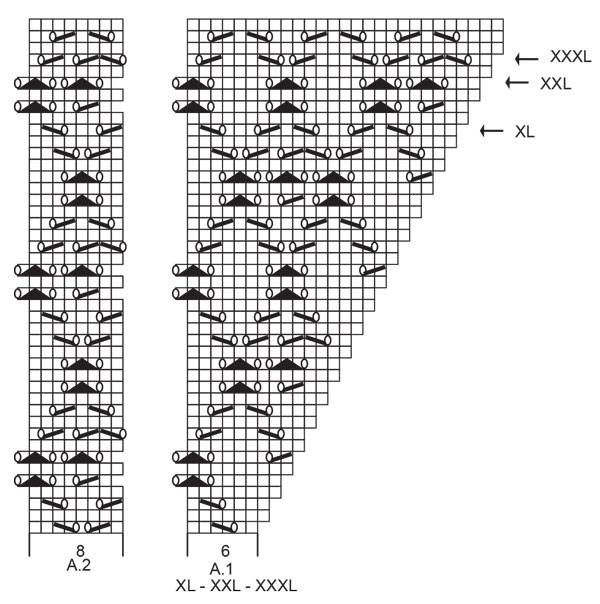
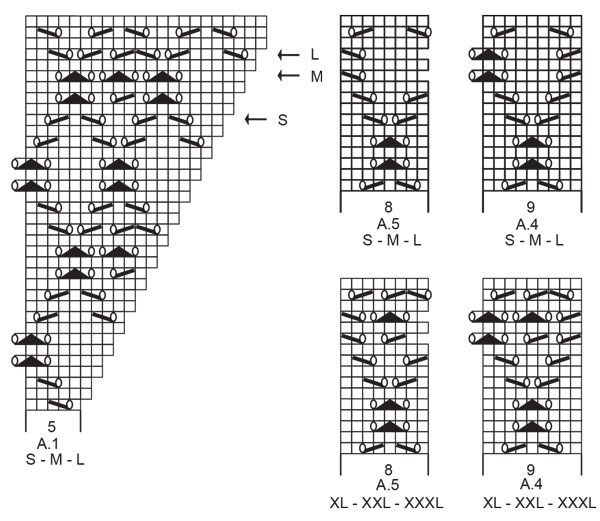
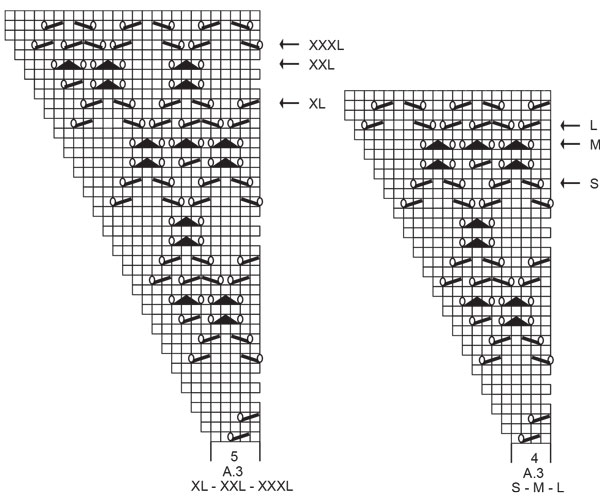
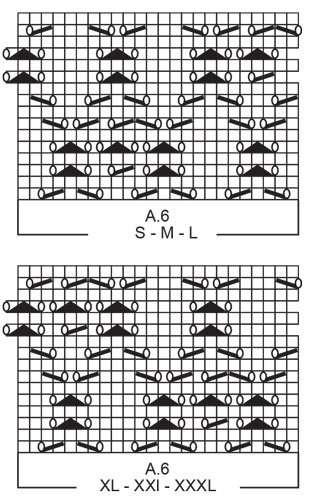
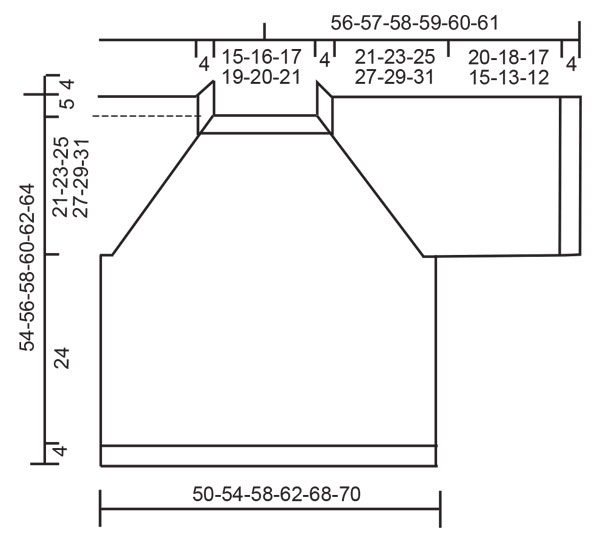
------------------------------------------------------- HINWEISE ZUR ANLEITUNG: ------------------------------------------------------- MUSTER: Siehe Diagramm A.1 bis A.6. Das Diagramm für die gewünschte Größe wählen. ZUNAHMETIPP (gleichmäßig verteilt): Um zu berechnen, wie gleichmäßig verteilt zugenommen werden muss, die gesamte Maschenzahl auf der Nadel (z.B. 46 Maschen) durch die Anzahl an Zunahmen, die gemacht werden sollen, teilen (z.B. 10) = 4,6. In diesem Beispiel wie folgt zunehmen: 1 Umschlag abwechselnd nach ca. jeder 4. und 5. Masche. In der nächsten Runde die Umschläge verschränkt stricken, um Löcher zu vermeiden. RAGLANZUNAHMEN: Je 1 Masche beidseitig der 2 Maschen (der Markierer sitzt in der Mitte zwischen diesen Maschen 2 Maschen) an jedem Übergang zwischen Rumpfteil und Ärmeln zunehmen (= 8 Maschen zugenommen in der Runde). 1 Masche zunehmen, indem 1 Umschlag gearbeitet wird. In der nächsten Runde die Umschläge rechts stricken, sodass Löcher gebildet werden. Dann die neuen Maschen an Vorderteil und Rückenteil ins Muster einarbeiten und an den Ärmeln glatt rechts stricken. TIPP ZUM ABKETTEN: Zur Vermeidung einer zu strammen Abkettkante kann mit einer etwas dickeren Nadel abgekettet werden. Wenn die Abkettkante trotzdem noch zu stramm wird, 1 Umschlag nach ca. jeder 4. Masche arbeiten, der direkt wieder wie eine normale Masche abgekettet wird. ------------------------------------------------------- DIE ARBEIT BEGINNT HIER: ------------------------------------------------------- PULLOVER – KURZBESCHREIBUNG DER ARBEIT: Die Halsblende und die Passe werden in Runden auf der Rundnadel gestrickt, von oben nach unten. Die Passe wird für das Rumpfteil und die Ärmel aufgeteilt. Rumpfteil und Ärmel werden jeweils einzeln in Runden weitergestrickt, von oben nach unten. HALSBLENDE: Anschlag: 46-48-50-54-56-58 Maschen auf der kurzen Rundnadel Nr. 8 mit Snow oder Wish. 1 Runde rechts stricken. Dann 4 cm in Runden im Rippenmuster stricken (= 1 Masche rechts / 1 Masche links). 1 Runde rechts stricken und dabei 10-8-6-6-4-2 Maschen gleichmäßig verteilt zunehmen – ZUNAHMETIPP lesen = 56-56-56-60-60-60 Maschen. 1 Runde rechts stricken. Zu Rundnadel Nr. 9 wechseln. 1 Markierer nach 20-20-20-21-21-21 Maschen anbringen (= ca. vordere Mitte), die Passe wird nun ab diesem Markierer gemessen! PASSE: Nun im Muster stricken und dabei 4 Markierer anbringen, wie folgt: 1 Markierer am Rundenbeginn anbringen (= im Übergang zwischen dem Rückenteil und dem rechten Ärmel), 1 Masche rechts, 1 Umschlag arbeiten, rechts über die nächsten 7 Maschen, 1 Umschlag arbeiten, 1 Masche rechts, hier 1 Markierer anbringen (= im Übergang zwischen dem rechten Ärmel und dem Vorderteil), 1 Masche rechts, 1 Umschlag arbeiten, A.1 über die ersten 5-5-5-6-6-6 Maschen, A.2 über die nächsten 8 Maschen, A.3 über die nächsten 4-4-4-5-5-5 Maschen, 1 Umschlag arbeiten, 1 Masche rechts, hier 1 Markierer anbringen ( im Übergang zwischen dem Vorderteil und dem linken Ärmel), 1 Masche rechts, 1 Umschlag arbeiten, 7 Maschen rechts, 1 Umschlag arbeiten, 1 Masche rechts, hier 1 Markierer anbringen (= im Übergang zwischen dem linken Ärmel und dem Rückenteil), 1 Masche rechts, 1 Umschlag arbeiten, A.1 über die ersten 5-5-5-6-6-6 Maschen, A.2 über die nächsten 8 Maschen, A.3 über die nächsten 4-4-4-5-5-5 Maschen, 1 Umschlag arbeiten, 1 Masche rechts. MASCHENPROBE BEACHTEN! Die erste RAGLANZUNAHME – siehe oben – ist nun fertig. Weiter in dieser Weise in Runden im Muster stricken und dabei die Raglanzunahmen in jeder 2. Runde insgesamt 14-16-17-18-20-21 x arbeiten = 168-184-192-204-220-228 Maschen. Nach der letzten Zunahme hat die Arbeit eine Länge von ca. 20-23-24-26-29-30 cm ab dem Markierungsfaden nach der Halsblende. Ohne Zunahmen weiterstricken, bis die Arbeit eine Länge von 21-23-25-27-29-31 ab dem Markierungsfaden nach der Halsblende hat (so viele Maschen des Musters in Richtung Raglanlinie wie möglich stricken, dabei darauf achten, dass die Zunahmen und Abnahmen im Muster ausgeglichen bleiben, damit sich die Maschenzahl nicht ändert – die restlichen Maschen glatt rechts stricken). In der nächsten Runde (d.h. einer Rechts-Runde) wie folgt stricken – die Runde bereits 1 Masche vor dem ursprünglichen Rundenbeginn beginnen: Die ersten 39-43-45-47-51-53 Maschen für den Ärmel stilllegen, 5-5-7-7-9-9 neue Maschen anschlagen (= an der Seite unter dem Arm), die nächsten 45-49-51-55-59-61 Maschen wie zuvor stricken (= Vorderteil), die nächsten 39-43-45-47-51-53 Maschen für den Ärmel stilllegen, 5-5-7-7-9-9 neue Maschen anschlagen (= an der Seite unter dem Arm), die nächsten 45-49-51-55-59-61 Maschen wie zuvor stricken (= Rückenteil). Dann Rumpfteil und Ärmel jeweils einzeln weiterstricken. DIE ARBEIT WIRD NUN AB HIER GEMESSEN. RUMPFTEIL: = 100-108-116-124-136-140 Maschen. Bis zur mittleren Masche der neu angeschlagenen Maschen rechts stricken. Die Runde beginnt nun vor dieser Masche. Nun das Muster der Passe fortsetzen – mit der passenden Runde in den Diagrammen weiterstricken -, an den Seiten des Rumpfteils glatt rechts stricken, wie folgt: * 1-3-5-3-6-7 Maschen rechts, A.4 über die nächsten 9 Maschen (das Diagramm für die gewünschte Größe wählen), A.6 über die nächsten 24 Maschen (das Diagramm für die gewünschte Größe wählen), die ersten 8-8-8-16-16-16 Maschen von A.6, A.5 über die nächsten 8 Maschen (das Diagramm für die gewünschte Größe wählen), 0-2-4-2-5-6 Maschen rechts *, von *-* noch 1 x in der Runde wiederholen. Bei einer Länge von 24 cm 1 Runde rechts stricken und dabei 10-10-12-12-14-14 Maschen gleichmäßig verteilt zunehmen = 110-118-128-136-150-154 Maschen. Zu Rundnadel Nr. 8 wechseln. In Runden 4 cm im Rippenmuster stricken (= 1 Masche rechts / 1 Masche links). Die Maschen abketten, wie sie erscheinen (d.h. rechte Maschen rechts und linke Maschen links abketten). Der Pullover hat eine Länge von ca. 54-56-58-60-52-64 cm ab der Schulter nach unten. ÄRMEL: Die 39-43-45-47-51-53 stillgelegten Maschen der einen Seite der Arbeit zurück auf die kurze Rundnadel Nr. 9 legen und zusätzlich je 1 Masche aus den 5-5-7-7-9-9 neu angeschlagenen Maschen auffassen = 44-48-52-54-60-62 Maschen. Glatt rechts in Runden stricken. Bei einer Länge des Ärmels von 20-18-17-15-13-12 cm 4-4-4-4-6-6 Maschen gleichmäßig verteilt zunehmen = 48-52-56-58-70-68 Maschen. Zu Rundnadel Nr. 8 wechseln. 4 cm im Rippenmuster stricken (= 1 Masche rechts / 1 Masche links). Die Maschen abketten, wie sie erscheinen (d.h. rechte Maschen rechts und linke Maschen links abketten). Der Ärmel hat eine Länge von ca. 24-22-21-19-17-16 cm ab der Teilung. Den 2. Ärmel ebenso stricken. |
|||||||||||||||||||
Erklärungen zum Diagramm |
|||||||||||||||||||
|
|||||||||||||||||||
 |
|||||||||||||||||||
 |
|||||||||||||||||||
 |
|||||||||||||||||||
 |
|||||||||||||||||||
 |
|||||||||||||||||||
Haben Sie diese Anleitung nachgearbeitet?Dann taggen Sie Ihre Fotos mit #dropspattern #diamondsintheskysweater oder schicken Sie sie an die #dropsfan Galerie Brauchen Sie Hilfe bei dieser Anleitung?Sie finden 24 Videotutorials, einen Kommentar/Fragen-Bereich und vieles mehr, wenn sie die Anleitung bei garnstudio.com aufrufen. © 1982-2026 DROPS Design A/S. Wir besitzen alle Rechte. Dieses Dokument, einschließlich aller Untersektionen, hat Urheberrechte. Mehr dazu, was Sie mit unseren Anleitungen machen können, finden Sie ganz unten auf der Seite zu jeder Anleitung. |
|||||||||||||||||||


Mit über 40 Jahren Tätigkeit im Entwerfen von Strick- und Häkelmustern bietet Ihnen DROPS Design eine der umfangreichsten Sammlungen von kostenlosen Anleitungen im Internet - in 17 Sprachen übersetzt. Zum jetzigen Zeitpunkt haben wir insgesamt 324 Handarbeitshefte und 12272 Anleitungen auf Deutsch. 12184
Unser Ziel ist es, Ihnen die besten Angebote zum Stricken und Häkeln, Inspirationen und Ratschläge sowie qualitativ hochstehende Garne zu unglaublichen Preisen zu bieten! Möchten Sie unsere Anleitungen nicht nur für den persönlichen Gebrauch nutzen? Unsere Copyright Bedingungen finden Sie bei allen unseren Anleitungen ganz unten auf der jeweiligen Seite. Viel Spaß beim Handarbeiten!
Kommentieren Sie die Anleitung DROPS 221-29
Wir würden gerne Ihre Meinung zu diesem Modell erfahren!
Wenn Sie eine Frage stellen möchten, prüfen Sie bitte, dass Sie die richtige Kategorie im unten stehenden Formular gewählt haben - so bekommen Sie schneller eine Antwort. Die obligatorischen Felder sind mit einem * gekennzeichnet.