
Popular categories
Looking for a yarn?


|
|||||||||||||||||||||||||||||||||||||||||||||||||||||||||||||
Bending Willows |
|||||||||||||||||||||||||||||||||||||||||||||||||||||||||||||
 |
 |
||||||||||||||||||||||||||||||||||||||||||||||||||||||||||||
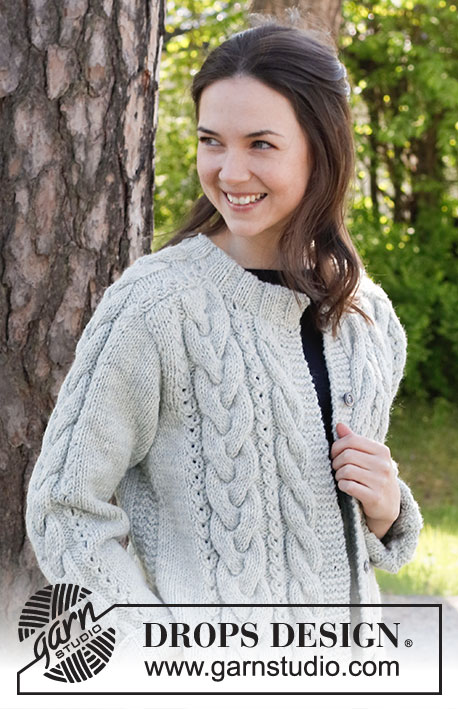
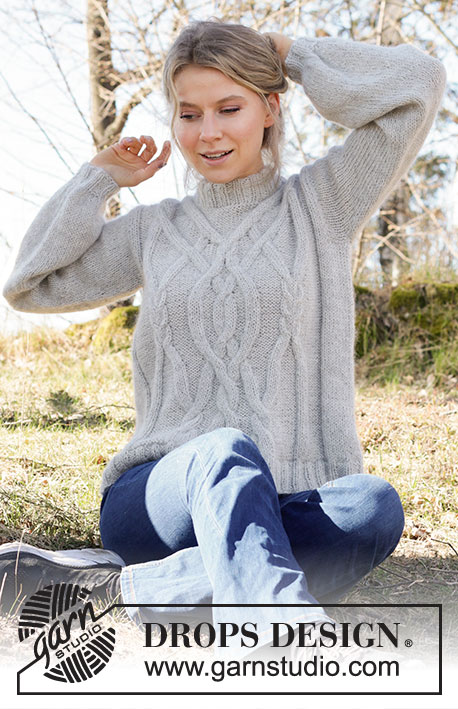
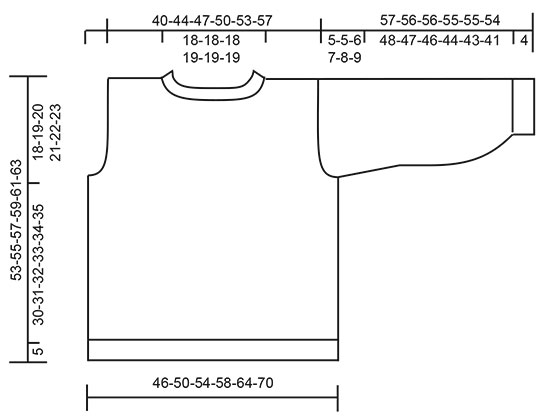
Knitted jumper in DROPS Puna and DROPS Kid-Silk. Piece is knitted top down with cables and double neck edge. Size XS–XXL.
DROPS 217-32 |
|||||||||||||||||||||||||||||||||||||||||||||||||||||||||||||
|
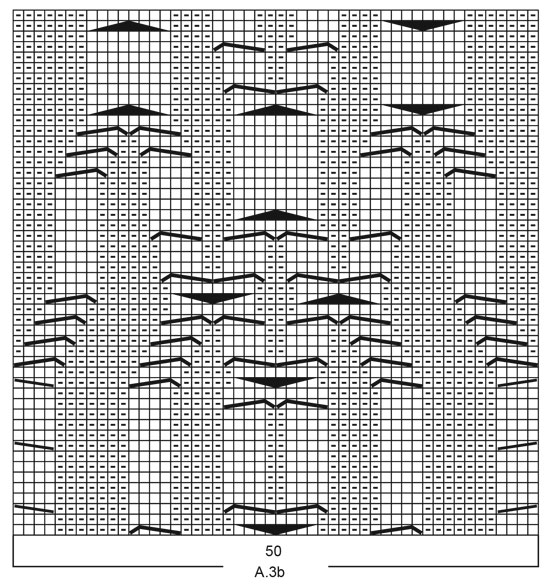
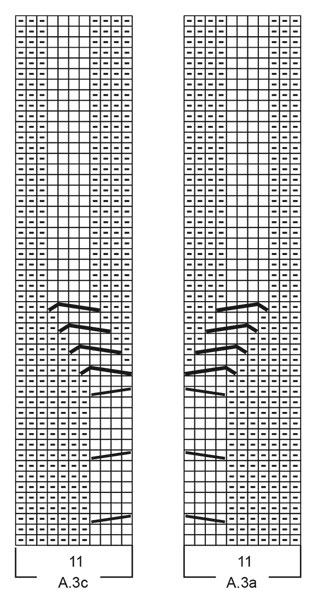
------------------------------------------------------- EXPLANATION FOR THE PATTERN: ------------------------------------------------------- GARTER STITCH (back and forth): Knit all rows. 1 ridge vertically = knit 2 rows. PATTERN: See diagrams A.1 to A.4. Choose diagram for your size (applies to A.1a and A.1b). Diagrams show all rows in pattern seen from the right side. INCREASE/DECREASE TIP (evenly): To calculate how to increase/decrease evenly, use the total number of stitches on row (e.g. 19 stitches) minus 1 edge stitch in each side (e.g. 2 stitches) , and divide the remaining stitches by number of increases/decreases to be done (e.g. 4) = 4.3. In this example increase by making 1 yarn over after alternately approx. every 4th and 5th stitch, do not increase over bands. On next row work yarn overs twisted to avoid holes If decreasing knit in this example alternately approx. every 3rd and 4th stitch and every 4th and 5th stitch together. INCREASE TIP (applies to sleeves): Work until 1 stitches remain before the first of the 3 marker threads, make 1 yarn over, work until 1 stitch remains before marker thread mid under sleeve, make 1 yarn over, knit 2 (marker thread is in the middle of these 2 stitches), work 1 yarn over, knit until next marker thread, knit 1, make 1 yarn over = 4 stitches increased. On next round knit yarn overs twisted to avoid holes. Then work the new stitches in stocking stitch. DECREASE TIP (applies to sleeves): Decrease 1 stitch on each side of marker thread as follows: Work until 3 stitches remain before marker thread and knit 2 together, knit 2 (marker thread is between these stitches), slip 1 stitch knitwise, knit 1, pass slipped stitch over stitch worked. CAST-OFF TIP: To avoid a tight cast-off edge you may use a larger needle size. If this also is too tight, work a 1 yarn over after approx. every 5th stitch while casting off (cast off yarn overs as regular stitches). ------------------------------------------------------- START THE PIECE HERE: ------------------------------------------------------- JUMPER - SHORT OVERVIEW OF THE PIECE: Work back and forth in parts, work top down. Sew the parts together when finished. Work sleeve first back and forth until sleeve cap is done, then work sleeve in the round on a short circular needle/double pointed needles. Work neck edge in the round on a short circular needle at the end. FRONT PIECE: Right shoulder: Cast on 19-22-24-26-28-31 stitches on circular needle size 5.5 mm with 1 strand Puna and 1 strand Kid-Silk (= 2 strands). Purl 1 row from wrong side while increasing 4 stitches evenly - read INCREASE/DECREASE TIP = 23-26-28-30-32-35 stitches. On next row (from right side) work pattern as follows: 1 edge stitch in GARTER STITCH – read explanation above, 2-3-4-6-8-10 stitches in stocking stitch, purl 3-5-6-7-7-8, A.1a (choose diagram for your size) over the next 17-17-17-16-16-16 stitches. Continue back and forth like this. On 7th-7th-7th-9th-9th-9th row in diagram begin increase for neck. Cast on stitches at the end of every row from right side as follows (the increased stitches are shown in diagram). Cast on 1 stitch 2-2-2-1-1-1 time and 2 stitches 2-2-2-3-3-3 times (6-6-6-7-7-7 stitches increased for neck + 3 stitches increased in diagram). When the last 2 stitches have been cast on, 1 row remains in diagram. Cut the yarn and put piece aside (work last row in diagram later when right and left shoulder are put together). There are now 32-35-37-40-42-45 stitches for right shoulder. Left shoulder: Cast on 19-22-24-26-28-31 stitches on circular needle size 5.5 mm with 1 strand Puna and 1 strand Kid-Silk (= 2 strands). Purl 1 row from wrong side while at the same time increasing 4 stitches evenly = 23-26-28-30-32-35 stitches. On next row (from right side) work pattern as follows: A.1b (choose diagram for your size) over the first 17-17-17-16-16-16 stitches, purl 3-5-6-7-7-8, 2-3-4-6-8-10 stitches in stocking stitch, 1 edge stitch in garter stitch. On 6th-6th-6th-8th-8th-8th row in diagram begin increase for neck. Cast on stitches at the end of every row from wrong side as follows (the increased stitches are shown in diagram). Cast on 1 stitch 2-2-2-1-1-1 time and 2 stitches 2-2-2-3-3-3 times (6-6-6-7-7-7 stitches increased for neck + 3 stitches increased in diagram). When last row in diagram has been worked (there are now 32-35-37-40-42-45 stitches on needle for left shoulder), cast on 16-16-16-16-16-16 stitches on needle for neck, then work last row in A.1a (from wrong side) over the first 26-26-26-26-26-26 stitches on right shoulder, then work as before over the remaining stitches = 80-86-90-96-100-106 stitches. REMEMBER THE KNITTING TENSION! Now work pattern from right side as follows: 1 stitch in garter stitch, knit over knit and purl over purl over the first 5-8-10-13-15-18 stitches, A.2a over the next 34 stitches, A.2b over the next 34 stitches, knit over knit and purl over purl over the next 5-8-10-13-15-18 stitches, 1 edge stitch in garter stitch. Continue back and forth like this (increase 2 stitches in A.2a and 2 stitches in A.2b) = 84-90-94-100-104-110 stitches. When armhole measures 17-18-18-19-19-19 cm, cast on new stitches for armholes in each side as follows: Cast on 1 stitch 1-1-2-2-2-3 times, 2 stitches 0-0-0-0-1-1 time and 3-4-4-5-6-6 stitches 1 time = 92-100-106-114-124-132 stitches. Insert a marker here. Now measure piece from here. Work the new stitches in stocking stitch. When A.2a and A.2b have been worked vertically, work pattern as follows: Work 1 edge stitch in garter stitch, knit over knit and purl over purl over the next 9-13-16-20-25-29 stitches, A.3a over the next 11 stitches, A.3b over the next 50 stitches, A.3c over the next 11 stitches, knit over knit and purl over purl over the next 9-13-16-20-25-29 stitches, 1 edge stitch in garter stitch. Continue like this until piece measures 30-31-32-33-34-35 cm from marker. If piece is shorter than this before A.3a to A.3c have been worked vertically, continue with A.4 over the middle 50 stitches on needle, and work knit over knit and purl over purl over the remaining stitches until correct measurements. Knit 1 row from right side while increasing 12-14-18-20-20-22 stitches evenly = 104-114-124-134-144-154 stitches. Purl 1 row from wrong side. Switch to circular needle size 4.5 mm. Work rib from right side as follows: 1 edge stitch in garter stitch, rib (= knit 2/purl 3) until 3 stitches remain on row, knit 2, 1 edge stitch in garter stitch. Continue back and forth with rib like this. When rib measures 5 cm, cast off with knit over knit and purl over purl. Jumper measures approx. 53-55-57-59-61-63 cm from shoulder and down. BACK PIECE: Left shoulder: Cast on 19-22-24-26-28-31 stitches on circular needle size 5.5 mm with 1 strand Puna and 1 strand Kid-Silk (= 2 strands). Purl 1 row from wrong side while at the same time increasing 4 stitches evenly = 23-26-28-30-32-35 stitches. On next row (from right side) work pattern as follows: 1 edge stitch in garter stitch, 2-3-4-6-8-10 stitches in stocking stitch, purl 3-5-6-7-7-8, A.1a (choose diagram for your size) over the next 17-17-17-16-16-16 stitches. Continue back and forth like this until 7th row has been worked. At the end of this row cast on 1 new stitch (= towards the neck) = 24-27-29-31-33-36 stitches. Cut the yarn and put piece aside. Right shoulder: Cast on 19-22-24-26-28-31 stitches on circular needle size 5.5 mm with 1 strand Puna and 1 strand Kid-Silk (= 2 strands). Purl 1 row from wrong side while at the same time increasing 4 stitches evenly = 23-26-28-30-32-35 stitches. On next row (from right side) work pattern as follows: A.1b (choose diagram for your size) over the first 17-17-17-16-16-16 stitches, purl 3-5-6-7-7-8, 2-3-4-6-8-10 stitches in stocking stitch, 1 edge stitch in garter stitch. When 6th row has been worked, cast on 1 stitch at the end of this row (= towards the neck) = 24-27-29-31-33-36 stitches. Work 1 row from right side. Work next row from wrong side as follows: Work as before over stitches on right shoulder, knit the new stitch (seen from wrong side), cast on 26-26-26-28-28-28 stitches for neck, work stitches from left shoulder onto needle from wrong side as follows: Knit first stitch (seen from wrong side), work next row in A.1a and continue as before the rest of row. There are now 74-80-84-90-94-100 stitches on needle. Continue back and forth with pattern as before and purl (seen from right side) stitches cast on for neck. The cable on each side of neck is displaced inwards towards mid back as shown in A.1a and A.1b (increase shown in diagrams towards the neck, does not apply to back piece). When A.1a and A.1b have been worked vertically, 3 stitches have been increased in each diagram and there are 80-86-90-96-100-106 stitches on needle. Then work rest of back piece the same way as on front piece. I.e. work pattern the same way (increase 2 stitches in A.2a and 2 stitches in A.2b) = 84-90-94-100-104-110 stitches. When piece measures 17-18-18-19-19-19 cm, cast on new stitches for armhole in each side the same way as on front piece = 92-100-106-114-124-132 stitches. Continue with pattern and rib the same way as on front piece. SLEEVES: Cast on 24-26-26-28-28-30 stitches on with 1 strand Puna and 1 strand Kid-Silk (= 2 strands) on circular needle size 5.5 mm. Now work in stocking stitch back and forth and cast on stitches for sleeve cap in each side as follows: Cast on 2 stitches 5-5-6-6-4-4 times, 1 stitch 0-0-0-0-3-4 times, 2 stitches 0-0-0-0-1-1 time and 3-4-4-5-6-6 stitches 1 time = 50-54-58-62-66-70 stitches. Then work sleeves in the round on double pointed needles/a short circular needle. Insert a marker thread mid under sleeve (= in the middle of the 6-4-4-10-12-12 new stitches under sleeve = 3-4-4-5-6-6 new stitches on each side of marker thread). NOW MEASURE PIECE FROM HERE! When piece measures 3 cm, decrease 1 stitch on each side of marker thread under sleeve - read DECREASE TIP. Decrease like this approx. every 3 cm 3 times in total in all sizes = 44-48-52-56-60-64 stitches. When sleeve measures 21-21-21-20-18-16 cm, insert 1 new marker thread after 12 stitches on each side of marker thread mid under sleeve (= 3 marker threads under sleeve). On next round begin increase under sleeve – read INCREASE TIP. Increase like this approx. every 3-4-4-5-5-5 cm 5-4-4-3-3-3 times in , total = 64-64-68-68-72-76 stitches. Continue round in stocking stitch until sleeve measures 48-47-46-44-43-41 cm. Knit 1-1-2-2-0-1, * knit 2 together, knit 1 *, work from *-* the entire round = 43-43-46-46-48-51 stitches. Knit 1 round while decreasing 13-8-11-11-8-11 stitches evenly = 30-35-35-35-40-40 stitches. Switch to double pointed needles size 4.5 mm. Work rib (knit 2/purl 3) in the round for 4 cm. Cast off stitches with knit over knit and purl over purl. Sleeve measures approx. 57-56-56-55-55-54 cm. Work the other sleeve the same way. ASSEMBLY: Sew shoulder seams together with grafting/kitchener stitches inside cast-on edge. Sew sleeves to body inside cast-on edge/1 edge stitch in garter stitch. Then sew side seam from armhole and down inside 1 edge stitch in garter stitch. Repeat in the other side. DOUBLE NECK EDGE: Pick up 80-88 stitches with a short circular needle size 4.5 mm and 1 strand in each quality (= 2 strands), inside 1 edge stitch around the neck. Number of stitches must be divisible by 4. Work rib (knit 2/purl 2) in the round for 11 cm. Cast off stitches with knit over knit and purl over purl. Fold rib at the top of neck down on the inside of garment. Fasten rib to form a folding edge. To avoid a tight neck edge and avoiding the edge to tip outwards, it is important to make the seam elastic. |
|||||||||||||||||||||||||||||||||||||||||||||||||||||||||||||
Diagram explanations |
|||||||||||||||||||||||||||||||||||||||||||||||||||||||||||||
|
|||||||||||||||||||||||||||||||||||||||||||||||||||||||||||||

|
|||||||||||||||||||||||||||||||||||||||||||||||||||||||||||||
|
|||||||||||||||||||||||||||||||||||||||||||||||||||||||||||||
|
|||||||||||||||||||||||||||||||||||||||||||||||||||||||||||||

|
|||||||||||||||||||||||||||||||||||||||||||||||||||||||||||||

|
|||||||||||||||||||||||||||||||||||||||||||||||||||||||||||||

|
|||||||||||||||||||||||||||||||||||||||||||||||||||||||||||||
|
|||||||||||||||||||||||||||||||||||||||||||||||||||||||||||||
|
Have you made this or any other of our designs? Tag your pictures in social media with #dropsdesign so we can see them! Do you need help with this pattern?You'll find tutorial videos, a Comments/Questions area and more by visiting the pattern on garnstudio.com. © 1982-2024 DROPS Design A/S. We reserve all rights. This document, including all its sub-sections, has copyrights. Read more about what you can do with our patterns at the bottom of each pattern on our site. |
|||||||||||||||||||||||||||||||||||||||||||||||||||||||||||||


With over 40 years in knitting and crochet design, DROPS Design offers one of the most extensive collections of free patterns on the internet - translated to 17 languages. As of today we count 304 catalogues and 11422 patterns - 11422 of which are translated into English (UK/cm).
We work hard to bring you the best knitting and crochet have to offer, inspiration and advice as well as great quality yarns at incredible prices! Would you like to use our patterns for other than personal use? You can read what you are allowed to do in the Copyright text at the bottom of all our patterns. Happy crafting!
Comments / Questions (32)
Sehr schöne Zöpfe
05.06.2020 - 21:10Ce modele est très beau, l'hiver dernier vous aviez deja proposé ce modele, j'ai acheté la laine puna pour le faire et vous ne l'avez pas publié, j'etais deçu car c'etait mon préféré, j'espère que vous allez le publier cette année!! merci
05.06.2020 - 08:00