DROPS Sky
DROPS Sky
74% Alpaca, 18% Polyamide, 8% Wool
from 7.20 $ /50g
Get the yarn to make this pattern from 21.60$.

The yarn cost is calculated from the pattern’s smallest size and the yarn’s cheapest product type. Looking for an even better price? You might find it on the DROPS Deals!

DROPS SS24

Blue August

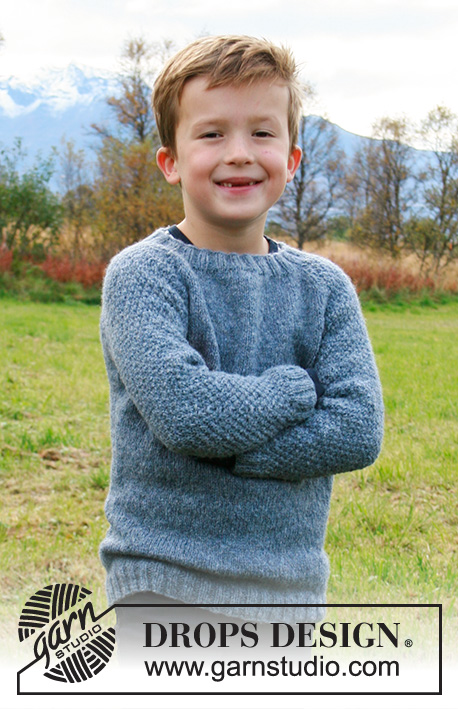
Knitted sweater for children in DROPS Sky. The piece is worked top down with raglan and double moss stitch on sleeves. Sizes 2-12 years.

DROPS Children 34-17
DROPS Design: Pattern no sk-005-bn
Yarn group B
-------------------------------------------------------

SIZES:
2 - 3/4 - 5/6 - 7/8 - 9/10 - 11/12 years
Equivalent to approx. height of child in cm:
3ft – 3ft3/3ft5 – 3ft7/3ft9 – 4ft/4ft2 – 4ft5/4ft7 – 4ft9/4ft12
Equivalent to approx. height of child in cm:
92 - 98/104 - 110/116 - 122/128 - 134/140 - 146/152

MATERIALS:
DROPS SKY from Garnstudio (belongs to yarn group B)
150-150-200-200-250-250 g color 12, jeans blue

KNITTING GAUGE:
21 stitches in width and 28 rows in height with stockinette stitch = 10 x 10 cm = 4" x 4".

NEEDLES:
DROPS DOUBLE POINTED NEEDLES SIZE 4 MM = US 6.
DROPS CIRCULAR NEEDLE SIZE 4 MM = US 6: length 40 cm = 16" and 60 cm = 24" for stockinette stitch.
DROPS DOUBLE POINTED NEEDLES SIZE 3 MM = US 2,5.
DROPS CIRCULAR NEEDLE SIZE 3 MM = US 2,5: length 40 cm = 16" and 60 cm = 24" for rib.
Needle size is only a guide. If you get too many stitches on 10 cm = 4", change to a larger needle size. If you get too few stitches on 10 cm = 4", change to a smaller needle size.

-------------------------------------------------------

Alternative Yarn – See how to change yarns here
Yarn Groups A to F – Use the same pattern and change the yarn here
Yarn usage using an alternative yarn – Use our yarn converter here

-------------------------------------------------------

DROPS Sky
DROPS Sky
74% Alpaca, 18% Polyamide, 8% Wool
from 7.20 $ /50g
Get the yarn to make this pattern from 21.60$.

The yarn cost is calculated from the pattern’s smallest size and the yarn’s cheapest product type. Looking for an even better price? You might find it on the DROPS Deals!

Pattern instructions

NOTE: This pattern is written in American English. All measurements in charts are in cm. For conversion from inches to cm - click here. There are different terms for crocheting in American and British English. If this pattern includes crochet, click for "crochet terms" here. For this pattern in British English, please click here.
-------------------------------------------------------

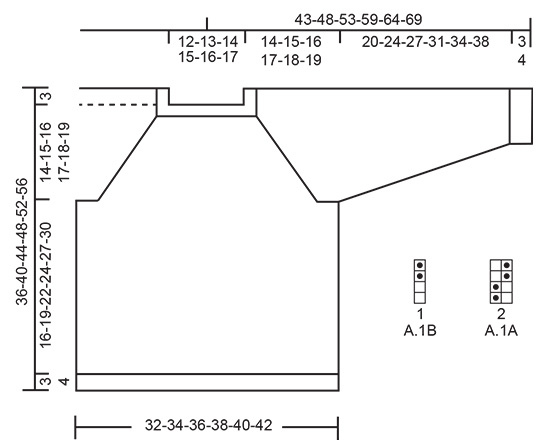
EXPLANATIONS FOR THE PATTERN:

-------------------------------------------------------

INCREASE TIP:
To work out how to increase evenly, count the total number of stitches on the needle (e.g. 76 stitches) and divide by the number of increases to be made (e.g. 14) = 5.4.
In this example, increase by making 1 yarn over after alternately each 5th and 6th stitch. On the next round work the yarn overs twisted to avoid holes

PATTERN (for sleeves):
See diagram A.1.

RAGLAN:
Increase for raglan in every transition between front/back piece and sleeves as explained below:
Increase after the marker like this: knit 1, make 1 yarn over.
Increase before the marker thread like this: work until 1 stich remain before the marker, make 1 yarn over, knit 1.
You increase 2 stitches at each marked, and a total of 8 stitches on the round.
On the next round work the yarn overs twisted to avoid holes. Then work the new stitches in stockinette stitch on front and back pieces and in A.1 on both sleeves.

DECREASE TIP (for mid under sleeves):
Decrease 1 stitch on each side of the marker thread as follows: Work until there are 2 stitches left before the marker thread, slip 1 stitch as if to knit, knit 1 and pass the slipped stitch over the knitted stitch, marker thread, knit 2 together (2 stitches decreased).
-------------------------------------------------------

START THE PIECE HERE:

-------------------------------------------------------

SWEATER- SHORT OVERVIEW OF THE PIECE:
Neck and yoke are worked in the round with circular needle, top down. The yoke is divided for body and sleeves. The body is continued in the round with circular needle. The sleeves are worked in the round with double pointed needles, top down.

NECK:
Cast on 76-80-84-88-92-96 stitches with short circular needle size 3 mm = US 2,5 and jeans blue. Knit 1 round then work rib in the round (knit 2/ purl 2) for 3 cm = 1⅛". Knit 1 round where you increase 14 stitches evenly spaced in all sizes – read INCREASE TIP = 90-94-98-102-106-110 stitches. Then work the yoke as described below.

YOKE:
Change to circular needle size 4 mm = US 6. Insert 4 markers in the piece as described below (without working the stitches). The markers will be used when increasing to raglan.
Insert 1 marker at the beginning of the round, count 13 stitches (= sleeve), insert 1 marker before the next stitch, count 32-34-36-38-40-42 stitches (= front piece), insert 1 marker before the next stitch, count 13 stitches (= sleeve) and insert 1 marker before the next stitch. There are 32-34-36-38-40-42 stitches left after the last marker on the back piece.
The first round is worked as follows: increase for RAGLAN after marker– read explanation above, work A.1A over the next 10 stitches (= 5 repeats of 2 stitches), A.1B (= 1 stitch), increase to raglan on each side of marker, work stockinette stitch on front piece until there is 1 stitch left before the marker, increase to raglan on each side of marker, work A.1A over the next 10 stitches (= 5 repeats of 2 stitches), work A.1B (= 1 stitch), increase to raglan on each side of marker, work stockinette stitch on back piece until 1 stitch remains before marker thread at beginning of round and increase for raglan before the marker (= 8 stitches increased).
Continue this pattern with A.1 on both sleeves, stockinette stitch on front and back pieces and 2 stitches in stockinette stitch along each raglan-line (1 stitch on each side of each marker). REMEMBER THE KNITTING GAUGE!
AT THE SAME TIME increase to raglan every 2nd round a total of 16-17-18-19-20-21 times on both sides of the 4 markers (including the first increase described above) = 218-230-242-254-266-278 stitches.
Continue the pattern without increasing until the piece measures 14-15-16-17-18-19 cm = 5½"-6"-6¼"-6¾"-7"-7½" from the cast-on edge.
Now divide the yoke for body and sleeves on the next round as follows: Start 1 stitch before the marker at the beginning of the round (i.e. slip the first stitch on right needle onto left needle), place the first 47-49-51-53-55-57 stitches on 1 thread for sleeve (the 2 stitches in stockinette stitch in the raglan line are now part of the sleeve), cast on 6 new stitches on needle (= in side under sleeve), work 62-66-70-74-78-82 stitches in stockinette stitch (= front piece), place the next 47-49-51-53-55-57 stitches on 1 thread for sleeve, cast on 6 new stitches on needle (= in side under sleeve) and work 62-66-70-74-78-82 stitches in stockinette stitch (= back piece). Body and sleeves are finished separately. THE PIECE IS NOW MEASURED FROM HERE!

BODY:
= 136-144-152-160-168-176 stitches. Work stockinette stitch in the round until the piece measures 16-19-22-24-27-30 cm from the division (or to desired length; there is approx. 3-3-3-4-4-4 cm = 1⅛"-1⅛"-1⅛"-1½"-1½"-1½" left to finished length). Knit 1 round where you increase 8 stitches evenly spaced in all sizes = 144-152-160-168-176-184 stitches. Change to circular needle size 3 mm and work rib in the round (= knit 2/ purl 2) for 3-3-3-4-4-4 cm = 1⅛"-1⅛"-1⅛"-1½"-1½"-1½". Loosely bind off with knit over knit and purl over purl. The sweater measures approx. 36-40-44-48-52-56 cm = 14¼"-15¾"-17¼"-19"-20½"-22" from the shoulder down.

SLEEVE:
Place the 47-49-51-53-55-57 stitches from the thread on the one side of the piece on double pointed needles size 4 mm = US 6 and knit up 1 stitch in each of the 6 stitches cast on under the sleeve = 53-55-57-59-61-63 stitches. Insert 1 marker thread in the middle of these 6 stitches. Allow the marker thread to follow your work onwards; it will be used when decreasing mid under sleeve.
Start the round by the marker thread and work A.1 in the round (make sure you start on the right row in the diagram to match where you stopped on the yoke).
When the sleeve measures 3 cm = 1⅛" from the division decrease 2 stitches mid under sleeve – read DECREASE TIP. Decrease like this every 2-2½-3-3½-4-4½ cm = ¾"-1"-1⅛"-1¼"-1½"-1¾" a total of 8 times in all sizes = 37-39-41-43-45-47 stitches. Continue A.1 until the sleeve measures 20-24-27-31-34-38 cm = 8"-9½"-10⅝"-12¼"-13⅜"-15" from the division (or to required length; there is approx. 3-3-3-4-4-4 cm = 1⅛"-1⅛"-1⅛"-1½"-1½"-1½" left to finished length). Knit 1 round where you increase 3-5-3-5-3-5 stitches evenly spaced = 40-44-44-48-48-52 stitches. Change to double pointed needles size 3 mm = US 2,5 and work rib in the round (= knit 2/ purl 2) for 3-3-3-4-4-4 cm = 1⅛"-1⅛"-1⅛"-1½"-1½"-1½". Loosely bind off with knit over knit and purl over purl. The sleeve measures approx. 23-27-30-35-38-42 cm = 9"-10⅝"-11¾"-13¾"-15"-16½" from the division. Work the other sleeve in the same way.

Diagram

All measurements in charts are in cm.

symbols = knit
symbols = purl
diagram

Each of our patterns has specific tutorial videos to help you.

Do you have a question? See a list of frequently asked questions (FAQ)

Knitting tension is what determines the final measurements of your work, and is usually measured per 10 x 10 cm. It is provided like so: number of stitches in width x number of rows in height - eg: 19 stitches x 26 rows = 10 x 10 cm.

The knitting tension is very individual; some people knit/crochet loosely while others work tightly. You adjust the knitting tension with the needle size, which is why the suggested needle size only serve as a guide! You need to adjust this (up or down) to ensure that YOUR knitting tension matches the knitting tension provided in the pattern. If you work with a different knitting tension than provided you will have a different yarn consumption, and your work will have different measurements than what the pattern suggests.

The knitting tension also determines which yarns can replace each other. As long as you achieve the same knitting tension you can replace one yarn with another.

See DROPS lesson: How to measure your tension/gauge

See DROPS video: How to make a gauge tension swatch

The required amount of yarn is provided in grams, eg: 450 g. To calculate how many balls you’ll need you first need to know how many grams are in 1 ball (25g, 50g or 100g). This information is available if you click on the individual yarn quality on our pages. Divide the amount required with the amount of each ball. For example, if each ball is 50g (the most common amount), the calculation will be as follows: 450 / 50 = 9 balls.

The important thing when changing from one yarn to another is that the knitting/crochet tension remains the same. This is so that the measurements of the finished piece will be the same as on the sketch provided. It is easier to achieve the same knitting tension using yarns from the same yarn group. It is also possible to work with multiple strands of a thinner yarn to achieve the knitting tension of a thicker one. Please try our yarn converter. We recommend you to always work a test swatch.

Please NOTE: when changing yarn the garment might have a different look and feel to the garment in the photo, due to individual properties and qualities of each yarn.

See DROPS lesson: Can I use a different yarn than the one mentioned in the pattern?

All our yarns are categorised into yarn groups (from A to F) according to thickness and knitting tension – group A contains the thinnest yarns and group F the thickest. This makes it easier for you to find alternative yarns to our patterns, should you wish to switch yarn. All yarns within the same group have a similar knitting tension and can easily replace each other. However, different yarn qualities have different structures and properties which will give the finished work a unique look and feel.

Click here for an overview of the yarns in each yarn group

At the top of all our patterns you’ll find a link to our yarn converter, which is a helpful tool should you wish to use a different yarn than suggested. By filling in the yarn quality you wish to replace, the amount (in your size) and number of strands, the converter will present good alternative yarns with the same knitting tension. Additionally it will tell you how much you’ll require in the new qualities and whether you’ll need to work with multiple strands. Most skeins are 50g (some are 25g or 100g).

If the pattern is worked with multiple colours, every colour will have to be converted separately. Similarly, if the pattern is worked with several strands of different yarns (for example 1 strand Alpaca and 1 strand Kid-Silk) you will have to find alternatives for each, individually.

Click here to see our yarn converter

Since different yarns have different qualities and textures we have chosen to keep the original yarn in our patterns. However, you can easily find options among our available qualities by using our yarn converter, or simply pick a yarn from the same yarn group.

It is possible that some retailers still have discontinued yarns in stock, or that someone has a few skeins at home that they would like to find patterns for.

The yarn converter will provide both alternative yarn as well as required amount in the new quality.

If you think it's hard to decide what size to make, it can be a good idea to measure a garment you own already and like the size of. Then you can pick the size by comparing those measures with the ones available in the pattern's size chart.

You'll find the size chart at the bottom of the pattern.

See DROPS lesson: How to read size chart

The needle size provided in the pattern serves only as a guide, the important thing is to follow the knitting tension. And since knitting tension is very individual, you will have to adjust the needle size to ensure that YOUR tension is the same as in the pattern – maybe you’ll have to adjust 1, or even 2 needle sizes, up or down to achieve the correct tension. For this, we recommend that you work test swatches.

Should you work with a different knitting tension than the one provided, the measurements of the finished garment might deviate from the measurement sketch.

See DROPS lesson: How to measure your tension/gauge

See DROPS video: How to make a gauge tension swatch

Working a garment top-down provides more flexibility and room for personal adjustment. For example it is easier to try the garment on while working, as well as making adjustments to length of yoke and shoulder caps.

The instructions are carefully explaining every step, in the correct order. Diagrams are adjusted to the knitting direction and are worked as usual.

The diagram depicts all rows/rounds, and every stitch seen from the right side. It is read from bottom to top, from right to left. 1 square = 1 stitch.

When working back and forth, every other row is worked from the right side and every other row is worked from the wrong side. When working from the wrong side, the diagram will have to be worked reversed: from left to right, knit stitches are purled, purl stitches are knit etc.

When working in the round every round is worked from the right side and the diagram are worked from right to left on all rounds.

See DROPS lesson: How to read knitting diagrams

The diagram depicts all rows/rounds, and every stitch seen from the right side. It is worked from bottom to top, from right to left.

When working back and forth every other row is worked from the right side: from right to left and every other row is worked from the wrong side: from left to right.

When working in the round, every row in the diagram are worked from the right side, from right to left.

When working a circular diagram you start in the middle and work your way outwards, counter clockwise, row by row.

The rows usually start with a given number of chain stitches (equivalent to the height of the following stitch), this will either be depicted in the diagram or explained in the pattern.

See DROPS lesson: How to read crochet diagrams

Instructions for working several diagrams after each other on the same row/round, will often be written like so: “work A.1, A.2, A.3 a total of 0-0-2-3-4 times". This means you work A.1 once, then A.2 is worked once, and A.3 is repeated (in width) the number of times provided for your size – in this case like so: S = 0 times, M = 0 times, L=2 times, XL= 3 times and XXL = 4 times.

The diagrams are worked as usual: begin with the first row in A.1, then work the first row in A.2 etc.

See DROPS lesson: How to read knitting diagrams

See DROPS lesson: How to read crochet diagrams

The total width of the garment (from wrist-to-wrist) will be larger in the larger sizes, despite the actual sleeves being shorter. The larger sizes have longer sleeve caps and wider shoulders, so there will be a good fit in all sizes.

The measurement sketch/schematic drawing provides information regarding the full length of the garment. If it’s a jumper or a jacket the length is measured from the highest point on the shoulder (usually closest to the neckline), and straight down to the bottom of the garment. It is NOT measured from the tip of shoulder. Similarly, the length of yoke is measured from the highest point on the shoulder and down to where yoke is split into body and sleeves.

See DROPS lesson: How to read a schematic drawing

Diagrams are often repeated on the round or in height. 1 repeat is the diagram the way it appears in the pattern. If it says to work 5 repeats of A.1 in the round, then you work A.1 a total of 5 times after/next to each other in the round. If it says to work 2 repeats of A.1 vertically/in height you work the entire diagram once, then begin again at the start and work the entire diagram one more time.

Chain stitches are slightly narrower than other stitches and to avoid working the cast-on edge too tight, we simply chain more stitches to begin with. The stitch count will be adjusted on the following row to fit the pattern and measurement sketch.

The rib edge is more elastic and will contract slightly compared to, for example, stocking stitch. By increasing before the rib edge, you avoid a visible difference in width between the rib edge and the rest of the body.

It’s very easy to cast off too tightly, and by making yarn overs while casting off (and simultaneously casting these off) you avoid a too tight cast off edge.

See DROPS video: How to bind off with yarn overs (yo)

To achieve an even increase (or decrease) you can increase on, for example: every 3rd and 4th row alternately, like so: work 2 rows and increase on the 3rd row, work 3 rows and increase on the 4th. Repeat this until the increase is complete.

See DROPS lesson: Increase or decrease 1 st on every 3rd and 4th row alternately

Should you prefer to work in the round instead of back and forth, you may of course adjust the pattern. You’ll need to add steeks mid-front (usually 5 stitches), and follow the instructions. When you would normally turn and work from the wrong side, simply work across the steek and continue in the round. At the end you’ll cut the piece open, pick up stitches to work bands, and cover the cut edges.

See DROPS video: How to knit steeks and cut open

Should you prefer to work back and forth instead of in the round, you may of course adjust the pattern so you work the pieces separately and then assemble them at the end. Divide the stitches for the body in 2, add 1 edge stitch in each side (for sewing) and work the front and back pieces separately.

See DROPS lesson: Can I adapt a pattern for circular needles into straight needles?

Pattern repeats can vary slightly in the different sizes, in order to get the correct proportions. If you’re not working the exact same size as the garment in the photo, yours might deviate slightly. This has been carefully developed and adjusted so that the complete impression of the garment is the same in all sizes.

Make sure to follow instructions and diagrams for your size!

If you have found a pattern you like which is available in women’s size it’s not very difficult to convert it to men’s size. The biggest difference will be the length of sleeves and body. Start working on the women size that you think would fit across the chest. The additional length will be worked right before you cast off for the armhole/sleeve cap. If the pattern is worked top-down you can add the length right after the armhole or before the first decrease on sleeve.

Regarding additional yarn amount, this will depend on how much length you add, but it is better with a skein too many than too few.

All yarns will have excess fibres (from production) that might come off as lint or shedding. Brushed yarns (ie hairier yarns) have more of these loose, excess fibres, causing more shedding.

Shedding also depends on what is worn under or over the garment, and whether this pulls at the yarn fibres. It’s therefore not possible to guarantee that there will be no shedding

Below are some tips on how to get the best result when working with hairier yarns:

1. When the garment is finished (before you wash it) shake it vigorously so the looser hairs come off. NOTE: do NOT use a lint roller, brush or any method that pulls at the yarn.

2. Place the garment in a plastic bag and put it in your freezer - the temperature will cause the fibres to become less attached to each other, and excess fibres will come off easier.

3. Leave in the freezer for a few hours before taking it out and shaking it again.

4. Wash the garment according to the instructions on the yarn label.

Pilling is a natural process that happens to even the most exclusive of fibers. It's a natural sign of wear and tear that is hard to avoid, and that is most visible in high friction areas of your garment like a sweater's arms and cuffs.

You can make your garment look as new by removing the pilling, using a fabric comb or a pill/lint remover.

Still can't find the answer you need? Then scroll down and leave your question so one of our experts can try to help you. This will be done normally within 5 to 10 working days.
In the meantime, you can read the questions and answers that others have left to this pattern or join the DROPS Workshop on Facebook to get help from fellow knitters/crocheters!

You might also like...

Post a comment to pattern DROPS Children 34-17

We would love to hear what you have to say about this pattern!

If you want to leave a question, please make sure you select the correct category in the form below, to speed up the answering process. Required fields are marked *.

Comments / Questions (38)

country flag Megan wrote:

I’m confused about the splitting of the body and sleeves. Am I taking the last stitch of a round, without knitting it, and placing it along with the first 46 stitches of the next round, on a thread, to be used to make the first sleeves?

31.03.2022 - 22:26

DROPS Design answered:

Hi Megan, Yes, the last stitch on the previous round is included in the sleeve stitches, so end the previous round 1 stitch early, move the last stitch to the right needle and place the right number of stitches on a thread for the sleeve. Happy knitting!

01.04.2022 - 06:51

country flag Yenny wrote:

Bonjour, est-ce que c’est possible d’avoir le patron pour un taille médium pour adulte Merci 🙏

17.03.2022 - 12:31

DROPS Design answered:

Bonjour Yenny, nous ne sommes malheureusement pas en mesure de pouvoir adapter chacun de nos modèles à chaque demande, mais vous pourrez vous aider de nos modèles de pulls top down pour femme ou homme ici et . Merci pour votre compréhension, bon tricot!

17.03.2022 - 17:12

country flag Megan wrote:

If I need to use 5mm needles to meet the stitch gauge, do I replace the 3 mm needles, to start the pattern, with 4mm needles?

17.02.2022 - 03:18

DROPS Design answered:

Hi Megan, Yes, if you need to increase the guage by 1 mm, you need to do that for all needles. Happy knitting!

17.02.2022 - 06:45

country flag Meral wrote:

Hallo, leider werden mir die Diagramme nicht angezeigt? Bei allen anderen Anleitungen sehe ich die Diagramme, ist dies ein Fehler bei meiner Anzeige oder fehlen die Diagramme tatsächlich? Liebe Grüße

29.12.2021 - 17:12

DROPS Design answered:

Liebe Frau Meral, Diagramme finden Sie beide bei der Maßskizze unter der Ärmel. Viel Spaß beim stricken!

03.01.2022 - 09:43

country flag Kaidi wrote:

Tuleeko hihassa aina oikea ja oikea tai nurin ja nurin vierekkäin hihan keskiosaan.? En nyt ymmärrä. Kun on pariton määrä silmukkoita

14.11.2021 - 11:36

DROPS Design answered:

Hei, keskelle hihan alle tulee aina joko 2 oikeaa tai nurjaa silmukkaa vierekkäin.

09.03.2022 - 16:50

country flag Anna Engkvist wrote:

Kan man även sticka fram- och bakstycke i mosstickning utan att behöva ändra på mönstret?

22.04.2021 - 13:43

country flag JessicaG wrote:

I would like to work the sleeves in a different colour. Would you know the best way to do this?

09.03.2021 - 17:20

DROPS Design answered:

Dear Jessica, unless you want to totally convert the pattern to one that is knitted flat and in piecces, it would not be easy to knit the sleeves in a different color, as the piece is knitted on teh round. If you are really adamant, you might try using a separate ball for each the front and the backk and for both sleevs (4 balls all together) and make sure you twist the yarns around each other at each change, like you would do when you knit Intarsia. Happy Knitting!

09.03.2021 - 18:52

country flag Astori wrote:

Hvilke pinnenummer har dere brukt på prøvelappen? 3 eller 4? STRIKKEFASTHET: 21 masker i bredden og 28 pinner i høyden med glattstrikk = 10 x 10 cm

08.02.2021 - 15:59

DROPS Design answered:

Hei Astori, Prøvelappen er med pinnestr. 4. God fornøyelse!

09.02.2021 - 07:35

country flag Charlotte wrote:

Het is me niet duidelijk of ik voor de raglan elke naald moet meerderen, of om de naald?

24.01.2021 - 08:14

DROPS Design answered:

Dag Charlotte,

Je meerdert voor de raglan in iedere 2e naald 16-17-18-19-20-21 keer aan beide kanten van alle markeerdraden.

24.01.2021 - 11:42

country flag Maura wrote:

Potete gentilmente inviare istruzioni x realizzare questo modello senza utilizzare ferri circolari? Grz

30.12.2020 - 09:52

DROPS Design answered:

Buongiorno Maura, questo modello è stato progettato per essere lavorato in tondo e non possiamo fornirle un'assistenza così personalizzata in questa sede, ma le possiamo consigliare di rivolgersi al suo rivenditore DROPS di fiducia. Buon lavoro!

30.12.2020 - 11:41