


Komentáře / Otázky (23)
![]() Nicole Godinat napsala:
Nicole Godinat napsala:
En effectuant ce modèle, j’ai trouvé les manipulations pour la séparation assez fastidieuses. Ne serait -il pas plus simple de mettre les mailles pour les manches en attente, remonter 6 mailles pour le dessous des manches, continuer à tricoter en circulaire sur 1 cm et séparer les dos et devants quand on commence le digramme A1 ?
01.06.2025 - 18:33Odpověď DROPS Design :
Bonjour Mme Godinat, le choix qui a été fait par la styliste est de diviser le dos et le devant en même temps que l'on met les mailles des manches en attente, on aura ainsi une couture côté qui fera toute la longueur, à partir de la division de l'empiècement jusqu'aux côtes. Bon tricot!
02.06.2025 - 08:56
![]() Liss Burger napsala:
Liss Burger napsala:
Hei, jeg strikker størrelse 3/4, hvor etter raglan økning, genseren skal deles til for-og bakstykke og ermer. Men etter raglanøkningen på 17 runder er jeg allerede kommet til 16 cm. fra oppleggskanten, mens arbeidet skal deles etter bare 15 cm, har riktig garn og pinne størrelse, og god strikkefasthet.Hjelp!
03.12.2024 - 08:13Odpověď DROPS Design :
Hej Lis, hvis du har færre end 28 pinde i højden på 10 cm, så bliver du færdig tidligere end de 15 cm. Da kan du vælge at skifte pindestørrelse, så strikkefastheden stemmer med opskriften eller at følge målene i opskriften :)
04.12.2024 - 14:37
![]() Gun Nilsson napsala:
Gun Nilsson napsala:
Hej! Jag har kört fast i mönstret till Fladdermuströjan (Modell sk-006-bn) där man ska dela oket i fram- och bakstycke. Är det meningen att man ska ta av garnet när man satt de 3 första maskorna som las upp under ärmen på samma tråd som på bakstycket innan man kan fortsätta att sticka framstycket fram och tillbaka?
21.11.2024 - 14:24Odpověď DROPS Design :
Hei Gun. Du kan fint klippe tråden når du har satt de 3 nye maskene + bakstykket + 3 nye masker på 1 tråd. Eller så kan du starte på et nytt nøste og bruke det andre nøste (det du brukte når du la opp de 6 siste maskene) når du skal fortsette med bakstykket. mvh DROPS Design
25.11.2024 - 10:59
![]() Elisabeth Pollak napsala:
Elisabeth Pollak napsala:
Guten Tag, ich habe eine Frage die Zunahme nach den 3cm Halsblende sonst geht sich das Rippenmuster nicht aus ? Vielen Dank!
11.11.2024 - 10:41Odpověď DROPS Design :
Liebe Frau Pollak, diese Zunahmen werden durch 1 Umschlag gestrickt - diese Zunahmenrunde is rechts gestrickt; bei der nächsten Runde = die 1. Runde der Passe, wird man diese Umschläge rechts verschränkt stricken. Viel Spaß beim Stricken!
11.11.2024 - 12:42
![]() Claudia napsala:
Claudia napsala:
Guten Tag, ich habe noch eine Frage: DEn Teil mit dem Strickmuster (A1) soll man mit 3 Knäuel stricken. Nach den Ohren ist das klar, aber die Ohren am Anfang werden mit 2 Knäuel gestrickt und hinten sind die Fäden? Es wäre hilfreich die Arbeit auch von der Rückseite zu sehen. Vielen Dank!
03.11.2024 - 19:06Odpověď DROPS Design :
Liebe Claudia, also am Anfang können Sie schon mit 5 Knäuel stricken: vor 1. Ohr, 1. Ohr, zwischen beiden Ohren, 2. Ohren und nach 2. Ohr. Viel Spaß beim Stricken!
04.11.2024 - 09:52
![]() Claudia napsala:
Claudia napsala:
Guten Tag, Meine Frage: Bei der Passe muss man 17mal (Größe 3/4) 2 Reihen stricken (1mal mit Zunahme und 1mal ohne Zunahme, aber die Zunahmen der vorigen Reihe verkreuzen) Danach sollte man bis 15 cm vom Anschlagrand weiterstricken. Wenn ich die 17 mal 2 Reihen stricke, komme ich aber schon auf eine Länge von 17cm. Also länger als vorgeschlagen. Die Maschenprobe stimmt aber. Vielen Dank für eine Antwort!
26.10.2024 - 17:57Odpověď DROPS Design :
Liebe Claudia, mit 28 Reihen glatt rechts sollten die 34 Reihen Raglan (17 Mal in jeder 2. Runde) ca 12 cm messen; wenn Ihre Maschenprobe in der Höhe nicht stimmt und Passe zu lang ist, können Sie dann weniger oft zunehmen (dh in jeder Runde regelmäßig verteilt anstatt in jeder 2. Runde) damit die Passe die richtige Länge hat. Viel Spaß beim Stricken!
28.10.2024 - 08:26
![]() Ewa Stjernqvist napsala:
Ewa Stjernqvist napsala:
Ang fram o bakstycke undrar jag om det bara ska stickas rakt ner ingen utökning förutom kantmaskan på första varvet? Är det så borde man väl kunna sticka ihop både fram o bak på rundsticka?
28.04.2024 - 18:16Odpověď DROPS Design :
Hei Ewa. Det er ingen økninger/fellinger, men på forstykket strikkes det mønster. For å ikke få lange trådsprang, strikkes forstykket frem og tilbake med 3 nøster. Les forklaringen under MØNSTER. mvh DROPS Design
29.04.2024 - 11:50
![]() Mirella Curcio napsala:
Mirella Curcio napsala:
Buon giorno , ho fatto i calcoli con carta e matita , non mi trovo conil numero di maglie da voi descritte sopra , perchè arrivando a 66 maglie per il dav. e diet. le maniche del reglan sono 45 . grazie per una vs risposta
20.11.2022 - 09:42Odpověď DROPS Design :
Buonasera Mirella, se sta lavorando 3/4 anni arriva alla divisione con 230 maglie: 66 per il davanti e dietro e 49 per ogni manica. Buon lavoro!
24.11.2022 - 22:12
![]() Mirella Curcio napsala:
Mirella Curcio napsala:
Buongiorno , sto eseguendo questo maglioncino per mio nipotino , ora arrivata alla suddivisione delle varie parti : e cioè dietro davanti maniche, non mi trovo con le maglie da voi scritte per la suddivisione, sono sempre 230 maglie ma non come da voi suggerito , però mi trovo con 68 m per il davanti e il dietro ,e di 47 m per le maniche, e non49 per le maniche e 66 per il davanti e il dietro .Come mai ?
19.11.2022 - 08:20Odpověď DROPS Design :
Buonasera Mirella, deve procedere con la divisione come riportato. Buon lavoro!
28.12.2022 - 19:45
![]() De Man napsala:
De Man napsala:
Volgens mij klopt het niet met die raglans 275 steken
14.07.2022 - 20:38Odpověď DROPS Design :
Dag De Man,
Als je klaar bent met de raglan heb je, afhankelijk van de maat die je breit, 218-230-242-254-266-278 steken. Geen 275 steken.
17.07.2022 - 11:33
|
|||||||||||||
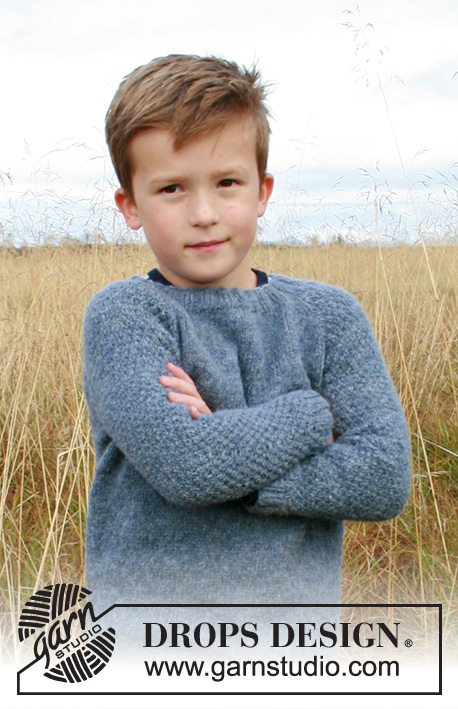
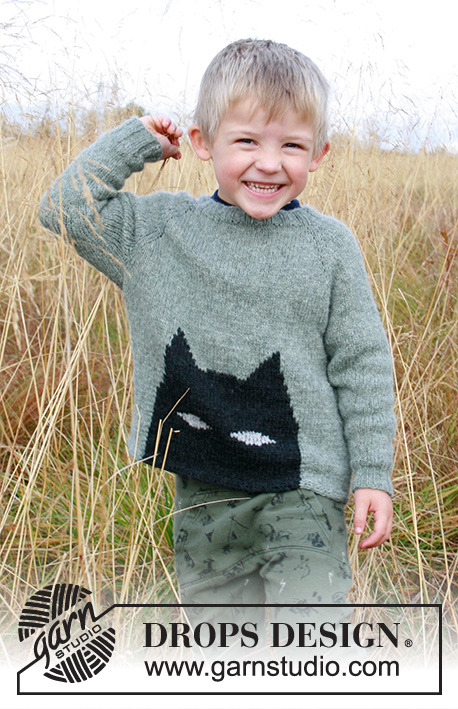
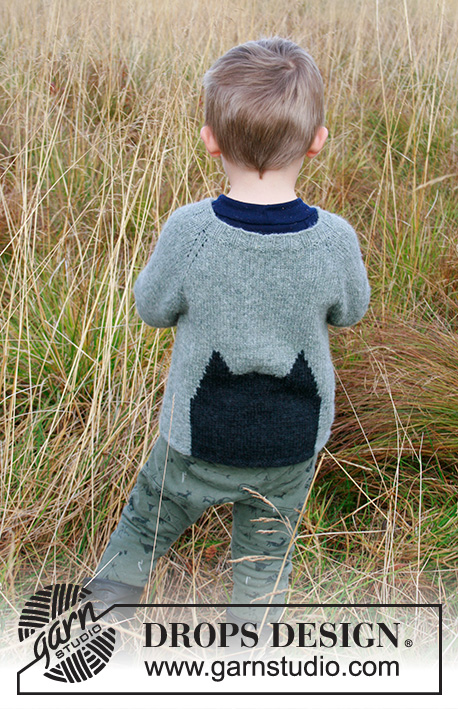
To the Rescue!#totherescuesweater |
|||||||||||||
 |
 |
||||||||||||
Dětský raglánový pulovr s netopýrem pletený shora dolů z příze DROPS Sky. Velikost 2-12 let.
DROPS Children 34-16 |
|||||||||||||
|
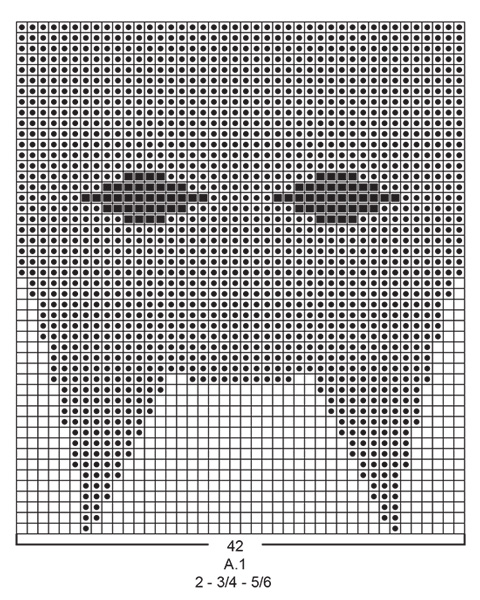
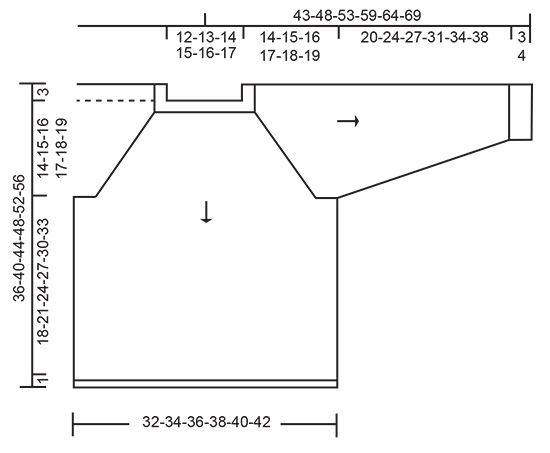
------------------------------------------------------- VYSVĚTLIVKY: ------------------------------------------------------ VROUBKOVÝ VZOR: Pleteme stále hladce, lícové i rubové řady. 1 vroubek = 2 řady hladce. TIP - PŘIDÁVÁNÍ: Abychom vypočítali, v jakých rozestupech máme přidávat, vydělíme celkový počet ok na jehlici (např. 76 ok) počtem ok, která potřebujeme přidat (tj. 14), takže 76 : 14 = 5,4. V tomto případě tedy přidáme střídavě za každým 5. a 6. okem. Přidáváme nahozením a v následující kruhové řadě pleteme nahození za zadní nit, aby se v pletenině netvořily dírky. VZOR: Viz schéma A.1. Zvolte si schéma pro požadovanou velikost. Celý vzor pleteme lícovým žerzejem. Abychom neměli při vyplétání vzoru na rubové straně dlouhá tažená vlákna volné příze, pracujeme se 3 klubíčky; tj. na každé straně dílu budeme plést s 1 klubíčkem světlé šedozelené příze a vzor uprostřed budeme plést 1 klubíčkem černé příze. POZN.: Aby nám při střídání barev nevznikaly v pletenině nehezké dírky, vlákna obou barev při střídání protočíme. RAGLÁNOVÉ ZKOSENÍ: Přidáváme na obou stranách každého raglánového “švu”, tj. ve všech místech, kde se stýkají rukávy s trupem. Přidáváme nahozením, takto: ZA značkou: 1 oko upleteme hladce, 1x nahodíme. PŘED značkou: pleteme až po poslední 1 oko před značkou, 1x nahodíme, 1 oko upleteme hladce. U každé značky tedy přidáme 2 oka, tj. celkem v jedné kruhové řadě přidáme vždy 8 ok. V následující kruhové řadě pleteme nahození za zadní nit, aby se v pletenině netvořily dírky. Nová oka pak pleteme lícovým žerzejem. TIP - UJÍMÁNÍ (rukávy, podpaží): Ujímáme 1 oko na každé straně značky, takto – začínáme 3 oka před značkou: 1 oko sejmeme hladce, 1 upleteme hladce a sejmuté přes ně přetáhneme, 2 oka upleteme hladce (značka leží mezi nimi), 2 oka spleteme hladce (= ujmuli jsme 2 oka). ------------------------------------------------------- POPIS PRÁCE: ---------------------------------------------------------- PULOVR - JAK BUDEME POSTUPOVAT: Pleteme v kruhových řadách shora dolů. Po dokončení sedla pleteninu rozdělíme na rukávy a trup. Trup pak ještě rozdělíme na přední a zadní díl, které pleteme v řadách odděleně. Rukávy pleteme v kruhových řadách na ponožkových jehlicích, také shora dolů. LEM PRŮKRČNÍKU: Na krátkou kruhovou jehlici č.3 nahodíme světlou šedozelenou přízí 76-80-84-88-92-96 ok a upleteme 1 kruhovou řadu hladce. Pokračujeme v kruhových řadách pružným vzorem 2/2 (tj. střídáme 2 oka hladce, 2 obrace). Ve výši 3 cm upleteme 1 kruhovou řadu hladce a SOUČASNĚ přidáme rovnoměrně 14 ok (platí pro všechny velikosti) – viz TIP - PŘIDÁVÁNÍ = 90-94-98-102-106-110 ok. Pak pleteme sedlo podle popisu níže. SEDLO: Pleteninu převedeme na kruhovou jehlici č.4. Označíme si raglánové “švy” - do pleteniny vložíme 4 značky, takto – oka nepleteme, jen vkládáme značky: První značkou označíme začátek kruhové řady, napočítáme 13 ok (= rukáv), před následující oko vložíme značku, napočítáme 32-34-36-38-40-42 ok (= přední díl), vložíme značku, napočítáme 13 ok (= rukáv) a vložíme poslední značku. Za touto poslední značkou leží 32-34-36-38-40-42 ok zadního dílu. Pleteme lícovým žerzejem v kruhových řadách a současně přidáme pro RAGLÁN na obou stranách všech 4 značek – viz výše. Pokračujeme lícovým žerzejem a SOUČASNĚ přidáváme pro raglán v každé 2. kruhové řadě, celkem 16-17-18-19-20-21x na obou stranách všech 4 značek (včetně prvního přidání, které je popsáno výše) = 218-230-242-254-266-278 ok. Dál pokračujeme lícovým žerzejem, ale už nepřidáváme, a to až do výše 14-15-16-17-18-19 cm (od počáteční, nahozené řady). V následující kruhové řadě rozdělíme pleteninu na jednotlivé díly, takto – začínáme 1 oko před značkou na začátku kruhové řady (tj. první oko sejmeme z pravé jehlice na levou jehlici): prvních 47-49-51-53-55-57 ok odložíme na pomocnou jehlici (= rukáv), nahodíme 6 nových ok (= podpaží), 62-66-70-74-78-82 ok upleteme lícovým žerzejem (= přední díl), dalších 47-49-51-53-55-57 ok odložíme na pomocnou jehlici (= rukáv), nahodíme 6 nových ok (= podpaží), poslední 3 z těchto 6 ok odložíme na pomocnou jehlici pro zadní díl, přidáme k nim dalších 62-66-70-74-78-82 ok a první 3 oka z následujících 6 ok (v podpaží; = zadní díl). Přední díl, zadní díl a rukávy dokončíme odděleně. NYNÍ MĚŘÍME DÍL OD TOHOTO MÍSTA! PŘEDNÍ DÍL: = 68-72-76-80-84-88 ok. Pleteme v řadách lícovým žerzejem světlou šedozelenou přízí. SOUČASNĚ nahodíme v 1. řadě 1 oko na obou stranách dílu (= krajová oka – pleteme je VROUBKOVÝM VZOREM – viz výše) = v řadě máme 70-74-78-82-86-90 ok. Ve výši 1-2-3-3-4-5 cm od podpaží pleteme následující lícovou řadu takto: 1 krajové oko vroubkovým vzorem, 13-15-17-16-18-20 ok lícovým žerzejem, vzor A.1 (= 42-42-42-48-48-48 ok – viz VZOR), 13-15-17-16-18-20 ok lícovým žerzejem a končíme 1 krajovým okem vroubkovým vzorem. V tomto rozvržení pokračujeme. Po dokončení celé sekvence vzoru A.1 (na výšku) měří díl asi 18-19-20-23-24-25 cm. Pleteme dál v řadách lícovým žerzejem s 1 krajovým okem vroubkovým vzorem na každé straně, prostředních 42-42-42-48-48-48 ok černou přízí, na obou bocích dílu pleteme světlou šedozelenou přízí, a to až do výše 18-21-24-27-30-33 cm (ppř. do libovolné výšky; do ukončení práce zbývá doplést 1 cm výšky). Pleteninu převedeme na kruhovou jehlici č. 3 a upleteme v řadách 2 vroubky (rozvržení barev zůstává stále stejné). V následující lícové řadě všechna oka volně hladce uzavřeme (oka uzavíráme příslušnými barvami příze). Přední díl měří asi 36-40-44-48-52-56 cm (měřeno od ramene). ZADNÍ DÍL: Odložených 68-72-76-80-84-88 ok zadního dílu vrátíme z pomocné jehlice zpět na kruhovou jehlici č.4 a pleteme v řadách lícovým žerzejem světle šedozelenou přízí. SOUČASNĚ nahodíme v 1. řadě 1 oko na obou stranách dílu (= krajová oka – pleteme je vroubkovým vzorem) = na jehlici máme 70-74-78-82-86-90 ok. Ve výši 1-2-3-3-4-5 cm od podpaží pleteme následující lícovou řadu takto: 1 krajové oko vroubkovým vzorem, 13-15-17-16-18-20 ok lícovým žerzejem, vzor A.1 (= 42-42-42-48-48-48 ok – viz VZOR), 13-15-17-16-18-20 ok lícovým žerzejem a končíme 1 krajovým okem vroubkovým vzorem. V tomto rozvržení pokračujeme. Po dokončení celé sekvence vzoru A.1 (na výšku) měří díl asi 18-19-20-23-24-25 cm. Pleteme dál v řadách lícovým žerzejem s 1 krajovým okem vroubkovým vzorem na každé straně, prostředních 42-42-42-48-48-48 ok černou přízí, na obou bocích dílu pleteme světlou šedozelenou přízí, a to až do výše 18-21-24-27-30-33 cm (ppř. do libovolné výšky; do ukončení práce zbývá doplést 1 cm výšky). Pleteninu převedeme na kruhovou jehlici č. 3 a upleteme v řadách 2 vroubky (rozvržení barev zůstává stále stejné). V následující lícové řadě všechna oka volně hladce uzavřeme (oka uzavíráme příslušnými barvami příze). Zadní díl měří asi 36-40-44-48-52-56 cm (měřeno od ramene). DOKONČENÍ: Na přední díl vyšijeme perlově šedou přízí pletacím stehem oči – viz schéma A.1. Sešijeme postranní švy. RUKÁV: Odložených 47-49-51-53-55-57 ok jednoho rukávu vrátíme z pomocné jehlice zpět na ponožkové jehlice č.4 a navíc k nim nabereme po 1 oku z každého ze 6 nových ok v podpaží = 53-55-57-59-61-63 ok. Doprostřed 6 ok v podpaží vložíme značku – kruhová řada začíná zde. Pleteme v kruhových řadách lícovým žerzejem světle šedozelenou přízí. Ve výši 3 cm od podpaží ujmeme na každé straně značky 1 oko – viz TIP - UJÍMÁNÍ. Takto ujímáme vždy po 2-2,5-3-3,5-4-4,5 cm výšky, celkem 8x (platí pro všechny velikosti) = 37-39-41-43-45-47 ok. Pokračujeme až do výše 20-24-27-31-34-38 cm od podpaží (ppř. do jiné, libovolné výšky; do ukončení práce nám zbývá doplést asi 3-3-3-4-4-4 cm výšky). Upleteme 1 kruhovou řadu hladce a SOUČASNĚ přidáme rovnoměrně 3-5-3-5-3-5 ok = 40-44-44-48-48-52 ok. Pleteninu převedeme na ponožkové jehlice č.3 a pleteme v kruhových řadách lem pružným vzorem 2/2. Když je lem vysoký 3-3-3-4-4-4 cm, všechna oka volně dle vzoru uzavřeme. Rukáv měří asi 23-27-30-35-38-42 cm (od podpaží). Stejným způsobem upleteme i druhý rukáv. |
|||||||||||||
Vysvětlivky ke schématu |
|||||||||||||
|
|||||||||||||
|
|||||||||||||

|
|||||||||||||
|
|||||||||||||
Dokončili jste tento model?Pak označte své fotky tagem #dropspattern #totherescuesweater nebo je pošlete do galerie #dropsfan. Potřebujete s tímto návodem poradit?Otevřete-li si návod na stránce garnstudio.com, najdete tam 30 výukových video-ukázek, Komentáře/Dotazy a další užitečné informace. © 1982-2025 DROPS Design A/S. Vyhrazujeme si veškerá práva. Tento dokument, včetně všech jeho dílčích částí, podléhá autorským právům. Podrobnější komentář k možnostem užití našich návodů najdete dole pod každým návodem na našich stránkách. |
|||||||||||||


V oblasti pletené a háčkované módy působí DROPS Design více než 40 let. Díky tomu vám můžeme nabídnout jednu z nejrozsáhlejších kolekcí modelů s bezplatnými návody dostupnými na internetu - navíc v 17 jazycích. K dnešnímu dni máme na 314 katalogů a 11821 návodů celkem - z nich je už 7047 dostupných v [češtině].
Přidejte komentář k návodu DROPS Children 34-16
Rádi bychom věděli, co si o tomto modelu myslíte!
Pokud se chcete na něco zeptat, dbejte prosím na to, abyste ve formuláři níže vybrali správnou kategorii - díky tomu se dříve dozvíte, co potřebujete vědět. Povinná pole jsou označena *.