
Popular categories
Looking for a yarn?


Comments / Questions (49)
![]() Terena wrote:
Terena wrote:
In the yoke, why is there 56 stitches for the front but only 2 x 24 per half back? That makes 48 for the back piece?? Should there be a difference of 8 stitches please?\r\nRegards\r\nTerena
18.01.2025 - 02:43DROPS Design answered:
Dear Terena, at the beginning of the yoke you still don't have a fully separated body; you have 18 stitches in each sleeve that are increased according to A.2 and then you will work A.3 and A.4 over all stitches. After all of the yoke increases, you will truly divide the front piece and back pieces and the sleeves and the back pieces will have the same number of stitches (54x2) as the front piece (108). Happy knitting!
19.01.2025 - 19:26
![]() Anne wrote:
Anne wrote:
Combien de pelotes faut il pour chaque taille? Je ne le trouve nulle part... Merci
22.11.2023 - 23:30DROPS Design answered:
Bonjour Anne, vous trouverez la quantité pour chaque taille dans l'en-tête, autrement dit, en taille S il vous faudra 600 g DROPS Muskat / 50 g la pelote = 12 pelotes. Bon crochet!
23.11.2023 - 08:39
![]() Decimale De Man wrote:
Decimale De Man wrote:
Ik heb de grooste maat ik heb 300 lossen ik gemeerderd en ik heb 24 steken ik heb een toer van a1 hoe verdergaan de patronen niet wat eenvoudige geschreven worden
10.05.2022 - 09:48DROPS Design answered:
Dag Decimale,
Waar loop je precies tegenaan? Voor de grootste maat zet je 133 lossen op, niet 300. Na de tweede toer van vasten waarbij je steken verdeeld over de toer meerdert, heb je 144 vasten op de toer. Daarna haak je A.1 en A.2 zoals beschreven in het patroon.
11.05.2022 - 09:16
![]() Dina De Man wrote:
Dina De Man wrote:
Ik begrijp het patroon niet ik ben met a1 begonnen moet ik die vier keer herhalen
09.05.2022 - 13:13DROPS Design answered:
Dag Dina,
Als je maat S breit moet je A.1 inderdaad 4 keer herhalen in de breedte. Daarna haak je 2 herhalingen van A.2, dan weer A.1 over 36 steken (dus 9 herhalingen), dan A.2, dan A.1 over 12 steken, A.2 over 2 steken en tot slot Nog eens A.1
10.05.2022 - 08:33
![]() Béatrice wrote:
Béatrice wrote:
Bonjour voila je suis arrivé au niveau taille L motif 5 il est marquer augmentation au rang 2 taille L 6 augmentations et au finale avoir 294 brides mais ces pas possible Car au rang précédent pour une taille L on a 279 brides merci de votre réponse Béatrice
21.02.2022 - 14:40DROPS Design answered:
Bonjour Béatrice, vous devez ici augmenter 15 mailles, dans ce paragraphe, la taille L est la 2ème taille, vous aviez 279 mailles + 15 augmentations = 294 mailles. Bon crochet!
21.02.2022 - 15:14
![]() Béatrice wrote:
Béatrice wrote:
Bonjour Je commence le modèle on doit fermer pour crochèter en rond mes les rangs une fois envers et une fois endroit donc on doit tourner a la fin du rang ? Merci de votre respose Béatrice
11.02.2022 - 16:03DROPS Design answered:
Bonjour Béatrice, on va crocheter en rond, en "fermant" chaque rang par 1 maille coulée dans la 1ère/3ème maille en l'air du début du tour et alternativement sur l'endroit et sur l'envers, vous devez donc bien tourner à chaque fois. Bon crochet!
11.02.2022 - 17:07
![]() Andreea wrote:
Andreea wrote:
Can i have som tips for making not so obvious the slip stitch part when joining the begining and the end of the rows?
01.02.2022 - 09:05DROPS Design answered:
Dear Andrea, I can only suggest you to check this video showing how to crochet treble crochets (UK-English) in the round (ie not exactly as in the pattern). Your yarn store might have even more tips for you, don't hesitate to ask them. Happy crocheting!
01.02.2022 - 09:15
![]() Lola García wrote:
Lola García wrote:
Estoy intentando seguir el patrón escrito pero no soy capaz, llevo poco tiempo haciendo crochet y me cuesta mucho trabajo seguirlo,si me puedes ayudar te lo agradecería, muchas gracias.
06.09.2021 - 00:41
![]() Alexandra wrote:
Alexandra wrote:
Ik heb 28 cm gehaakt en moet nu de steken verdelen. 54 stokjes achterpand, draad afhechten?, 69 steken overslaan, in de 70ste steek 12 lossen, je maakt een lus? Of moet je ook 12 steken overslaan? 108 stokjes vp, afhechten? Dan 69 steken overslaan en weer die 12 lossen, lus of steken overslaan? Rest stokjes achterpand haken. Ik neem aan dat je steeds afhecht en opnieuw begint, de lossen snap ik niet. Alvast bedankt voor alle hulp.
16.06.2021 - 15:54DROPS Design answered:
Dag Alexandra
Nee, het is niet de bedoeling om af te hechten. Je slaat het aantal aangegeven steken over en haakt gewoon verder in de volgende steek. De gaten die ontstaan vormen de armsgaten. De 12 lossen die er tussen komen zitten a.h.w. onder de oksel.
16.06.2021 - 16:28
![]() Alexandra wrote:
Alexandra wrote:
Voor de pas haak ik A3 schema aan de goede kant van mijn haakwerk en A4 schema aan de achterkant. Heb ik dit goed begrepen? En haak ik vanaf MAAT M-L-XL-XXL-XXXL gedeelte verder op de goede kant? Het is mij niet helemaal duidelijk. Alvast bedankt voor de hulp.
14.06.2021 - 18:56DROPS Design answered:
Dag Alexandra,
Voor de goede en de verkeerde kant gebruik je geen verschillende telpatroon, maar hetzelfde telpatroon. Je haakt iedere toer samen, dan keer je het werk en haak je weer terug, waarbij je dan met de volgende rij in het telpatroon verder gaat. Als A.3 één keer in de hoogte is gehaakt ga je verder met A.4.
Bij veel gestelde vragen kun je ook meer informatie vinden over hoe je volgens een telpatroon haakt.
16.06.2021 - 16:26
|
||||||||||||||||||||||||||||||||||
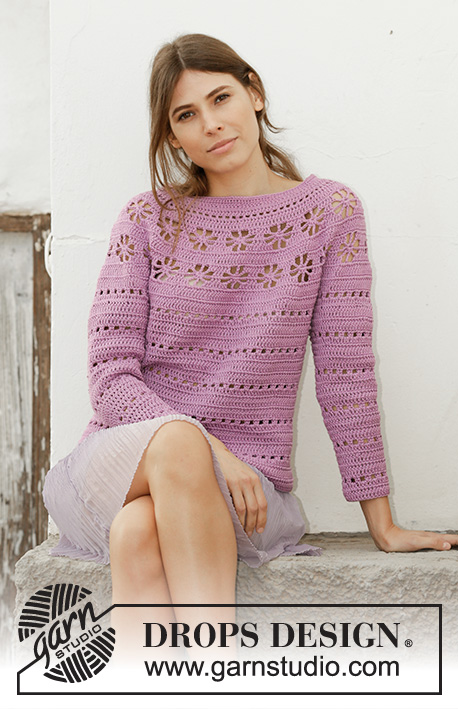
Daisy Chain#daisychainsweater |
||||||||||||||||||||||||||||||||||
 |
 |
|||||||||||||||||||||||||||||||||
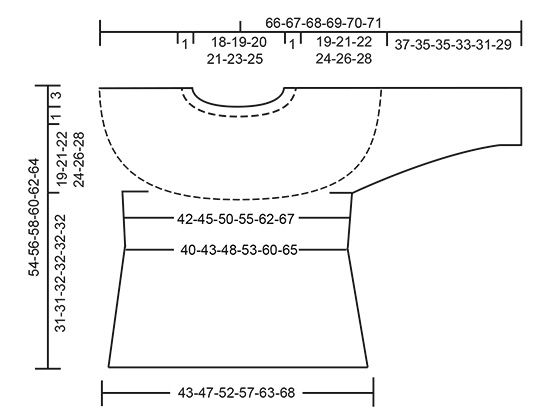
Crocheted jumper with round yoke in DROPS Muskat. Piece is crocheted top down with lace pattern. Size: S - XXXL
DROPS 201-5 |
||||||||||||||||||||||||||||||||||
|
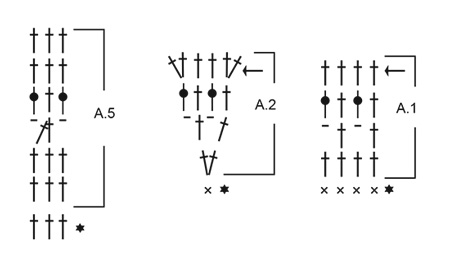
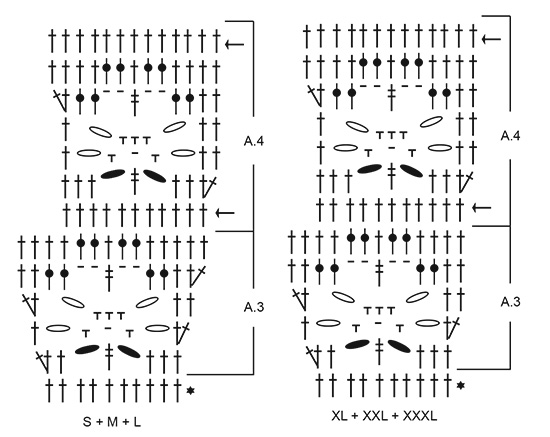
EXPLANATION FOR THE PATTERN: ---------------------------------------------------------- CROCHET INFORMATION: Work every row back and forth and work together at the end/beginning of every row as follows: Beginning every row with treble crochets with 3 chain stitches (= first treble crochet) and finish with 1 slip stitch in 3rd chain stitch at beginning of row, turn piece. Begin every row with double crochets with 1 chain stitch (does not replace first double crochet) and finish with 1 slip stitch in first double crochet, turn piece. INCREASE/DECREASE TIP: To calculate how to increase/decrease evenly, use the total number of stitches (e.g. 93 stitches) and divide stitches by number of increases/decreases to be done (e.g. 7) = 13.3. I.e. in this example increase by working 2 double crochets in same stitch in approx. every 13th stitch. To decrease evenly in this example work every 12th and 13th stitch together, i.e. work 2 treble crochets together as follows: * Make 1 yarn over, insert hook in next stitch, get yarn, make 1 yarn over and pull yarn through the 2 first loops on hook *, repeat from *-* 1 more time, make 1 yarn over and pull yarn through all 3 loops on hook (= 1 treble crochet decreased). PATTERN: See diagrams A.1 to A.5. Choose diagram for your size (applies to A.3 and A.4). ---------------------------------------------------------- START THE PIECE HERE: ---------------------------------------------------------- JUMPER - SHORT OVERVIEW OF THE PIECE: Work yoke and body back and forth (i.e. alternately from right and wrong side) and work together at the end of every row, top down. Work sleeves back and forth but work piece together at the end of every row, top down. YOKE: Work 109-114-118-123-129-133 chain stitches on hook size 4 mm with Muskat and form a ring with 1 slip stitch in first chain stitch. Work 1 chain stitch - read CROCHET INFORMATION, work 1 double crochet in each of the next 3-1-5-3-2-6 chain stitches, * skip 1 chain stitch, 1 double crochet in each of the next 6 chain stitches *, work from *-* = 93-97-101-105-110-114 double crochets. Work first row from wrong side as follows: Work 1 double crochet in each double crochet and increase 7-15-23-23-30-30 stitches evenly – read INCREASE/DECREASE TIP = 100-112-124-128-140-144 double crochets. REMEMBER THE CROCHET TENSION! Work next row as follows from right side: Work A.1 over 16-20-24-24-24-24 stitches (= 4-5-6-6-6-6 repetitions of 4 stitches) (= half back piece), work A.2 over 2-2-2-3-3-4 stitches (= 2-2-2-3-3-4 repetitions of 1 stitch), A.1 over 12 stitches (= 3 repetitions), A.2 over 2-2-2-3-3-4 stitches (= 2-2-2-3-3-4 repetitions) (= sleeve), A.1 over 36-40-44-44-56-56 stitches (= 9-10-11-11-14-14 repetitions) (= front piece), A.2 over 2-2-2-3-3-4 stitches (= 2-2-2-3-3-4 repetitions), A.1 over 12 stitches (= 3 repetitions), A.2 over 2-2-2-3-3-4 stitches (= 2-2-2-3-3-4 repetitions) (= sleeve), A.1 over 16-20-24-24-24-24 stitches (= 4-5-6-6-6-6 repetitions = half back piece). Continue to work until A.1 and A.2 have been worked vertically (= 140-152-164-188-200-224 stitches) – AT THE SAME TIME on row marked with arrow adjust number of stitches by increasing/decreasing to 140-150-160-190-200-220 stitches. Piece measures approx. 6 cm. Work next row as follows from right side: Work A.3 over all stitches (= 14-15-16-19-20-22 repetitions over 10 stitches). Continue to work until A.3 has been worked vertically = 196-210-224-247-260-286 stitches. Piece measures approx. 11 cm. Work next row as follows from wrong side: Work A.4 over all stitches (= 18-19-20-22-24-26 repetitions over 11 stitches) – AT THE SAME TIME on first row adjust number of stitches by increasing/decreasing to 198-209-220-242-264-286 stitches so that repetitions fit. Continue to work until A.4 has been worked vertically (= 234-247-260-286-312-338 stitches), but on last row increase 0-11-19-8-6-10 stitches evenly = 234-258-279-294-318-348 stitches. Piece measures approx. 19 cm. SIZE S: If measurements are not correct, work A.5 over all stitches (= 78 repetitions of 3 stitches) until piece measures 19 cm – adjust so that next row is only with treble crochets. SIZE M-L-XL-XXL-XXXL: Then work A.5 over all stitches (= 86-93-98-106-116 repetitions of 3 stitches) until piece measures 21-22-24-26-28 cm – AT THE SAME TIME on 1st-2nd-2nd-4th-4th row increase 6-15-6-6-6 stitches evenly = 264-294-300-324-354 stitches. Continue until piece measures 21-22-24-26-28 cm, adjust so that next row is a row with only treble crochets. ALL SIZES: = 234-264-294-300-324-354 stitches. Now divide body and sleeves as follows (repeat A.5 vertically until finished measurements): Work as before over the first 35-38-42-44-50-54 stitches (= half back piece), skip the next 48-57-63-63-63-69 stitches (= sleeve), work 6-6-6-12-12-12 chain stitches (= mid under sleeve), work as before over the next 68-74-84-86-98-108 stitches (= front piece), skip the next 48-57-63-63-63-69 stitches (= sleeve), work 6-6-6-12-12-12 chain stitches (= mid under sleeve) and work as before over the remaining 35-38-42-44-50-54 stitches (= half back piece). Finish body and sleeves separately. NOW MEASURE THE PIECE FROM HERE! BODY: = 150-162-180-198-222-240 stitches. Continue pattern as before over all stitches (= 50-54-60-66-74-80 repetitions A.5 of 3 stitches). When piece measures 4 cm from division, decrease 3 treble crochets evenly on next row (adjust to decrease on a row with only treble crochets). Decrease like this every 4 cm 2 times in total = 144-156-174-192-216-234 stitches. For every decrease work 1 repetition less of A.5 in width. When piece measures 14 cm from division, increase 3 treble crochets evenly (adjust to increase on a row with only treble crochets). Increase like this every 4 cm 4 times in total = 156-168-186-204-228-246 stitches. For every increase work 1 repetition more of A.5 in width. Continue until piece measures 31-31-32-32-32-32 cm from division (50-52-54-56-58-60 cm from neck in the middle of front piece), finish after 1 row with treble crochets. Cut and fasten the yarn. SLEEVE: Work piece back and forth (i.e. alternately from right and wrong side) and work together with 1 slip stitch on every row. Begin by working in the 4th-4th-4th-7th-7th-7th chain stitch of the 6-6-6-12-12-12 chain stitches worked in armhole on body as follows: Work 1 slip stitch, 3 chain stitches (= 1 treble crochet), 1 treble crochet in each of the next 2-2-2-6-6-6 chain stitches, A.5 over the next 48-57-63-63-63-69 treble crochets (= 16-19-21-21-21-23 times in width) and finish with 1 treble crochet in each of the last 3-3-3-6-6-6 chain stitches under sleeve = 54-63-69-75-75-81 stitches. Insert 1 marker thread at the beginning of row. Continue pattern as before over all stitches (= 18-21-23-25-25-27 repetitions of 3 stitches). When piece measures 3 cm from division, decrease 3 treble crochets evenly on next row (adjust to decrease on a row with only treble crochets). Decrease like this every 5½-3½-3-2-2-2 cm 5-8-9-11-10-11 times in total = 39-39-42-42-45-48 stitches. For every decrease work 1 repetition less of A.5 in width. Continue until piece measures 37-35-35-33-31-29 cm from division (shorter measurements in the larger sizes because of longer yoke), finish after 1 row with only treble crochets. Cut and fasten the yarn. Work the other sleeve the same way. NECK EDGE: Work back and forth over chain stitch row in neck as follows: ROW 1 (= from right side): Begin mid back, fasten yarn to piece with 1 slip stitch in a double crochet, work 2 chain stitches (= 1 half treble crochet), work 1 half treble crochet in every double crochet the entire row = 93-97-101-105-110-114 half treble crochets. ROW 2 (= from wrong side): Work 1 double crochet in every half treble crochet = 93-97-101-105-110-114 double crochets. Cut and fasten the yarn. |
||||||||||||||||||||||||||||||||||
Diagram explanations |
||||||||||||||||||||||||||||||||||
|
||||||||||||||||||||||||||||||||||
|
||||||||||||||||||||||||||||||||||
|
||||||||||||||||||||||||||||||||||
|
||||||||||||||||||||||||||||||||||
Have you finished this pattern?Tag your pictures with #dropspattern #daisychainsweater or submit them to the #dropsfan gallery. Do you need help with this pattern?You'll find 12 tutorial videos, a Comments/Questions area and more by visiting the pattern on garnstudio.com. © 1982-2025 DROPS Design A/S. We reserve all rights. This document, including all its sub-sections, has copyrights. Read more about what you can do with our patterns at the bottom of each pattern on our site. |
||||||||||||||||||||||||||||||||||


With over 40 years in knitting and crochet design, DROPS Design offers one of the most extensive collections of free patterns on the internet - translated to 17 languages. As of today we count 314 catalogues and 11822 patterns translated into English (UK/cm).
We work hard to bring you the best knitting and crochet have to offer, inspiration and advice as well as great quality yarns at incredible prices! Would you like to use our patterns for other than personal use? You can read what you are allowed to do in the Copyright text at the bottom of all our patterns. Happy crafting!
Post a comment to pattern DROPS 201-5
We would love to hear what you have to say about this pattern!
If you want to leave a question, please make sure you select the correct category in the form below, to speed up the answering process. Required fields are marked *.