DROPS Muskat
DROPS Muskat
100% Cotton
from 1.85 £ /50g
Get the yarn to make this pattern from 22.20£.

The yarn cost is calculated from the pattern’s smallest size and the yarn’s cheapest product type. Looking for an even better price? You might find it on the DROPS Deals!

DROPS SS24

Daisy Chain

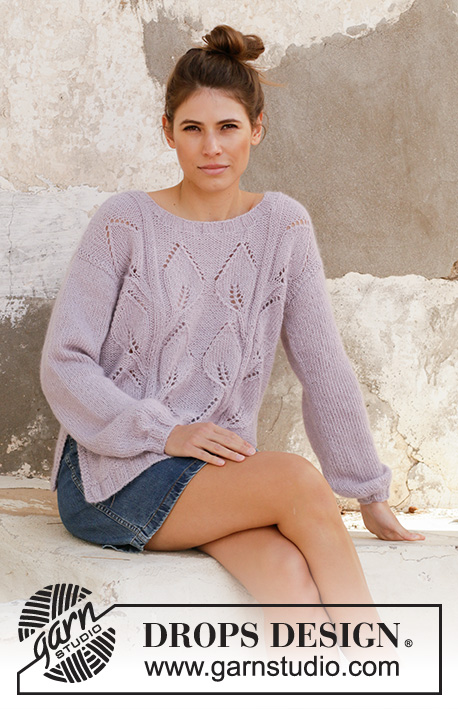
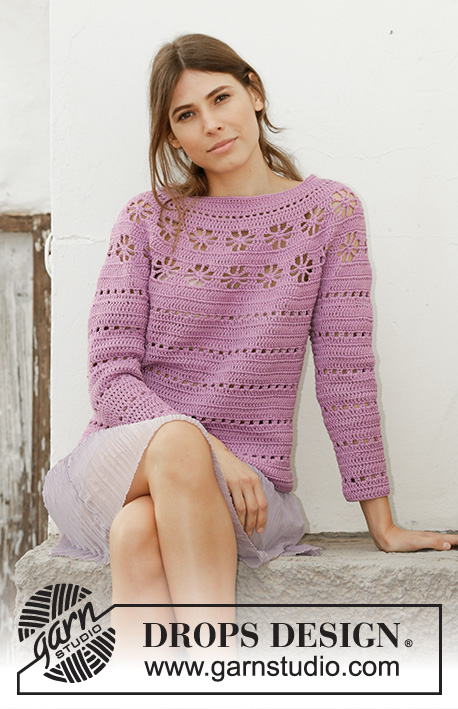
Crocheted jumper with round yoke in DROPS Muskat. Piece is crocheted top down with lace pattern. Size: S - XXXL

DROPS 201-5
DROPS design: Pattern r-749
Yarn group B
----------------------------------------------------------

SIZE:
S - M - L - XL - XXL - XXXL

MATERIALS:
DROPS MUSKAT from Garnstudio (belongs to yarn group B)
600-650-750-800-900-950 g colour 04, lilac

CROCHET TENSION:
18 treble crochets in width and 9 rows vertically = 10 x 10 cm.

CROCHET HOOK:
DROPS CROCHET HOOK SIZE 4 mm
Hook size is only a suggestion! If you have too many stitches on 10 cm switch to larger hook. If you have too few stitches on 10 cm switch to smaller hook.

----------------------------------------------------------

-------------------------------------------------------

Alternative Yarn – See how to change yarns here
Yarn Groups A to F – Use the same pattern and change the yarn here
Yarn usage using an alternative yarn – Use our yarn converter here

-------------------------------------------------------

DROPS Muskat
DROPS Muskat
100% Cotton
from 1.85 £ /50g
Get the yarn to make this pattern from 22.20£.

The yarn cost is calculated from the pattern’s smallest size and the yarn’s cheapest product type. Looking for an even better price? You might find it on the DROPS Deals!

Pattern instructions

NOTE: This pattern is written in British English. All measurements in charts are in cm. For conversion from cm to inches - click here. There are different terms for crocheting in British and American English. If this pattern includes crochet, click for "crochet terms" here. For this pattern in American English, please click here.
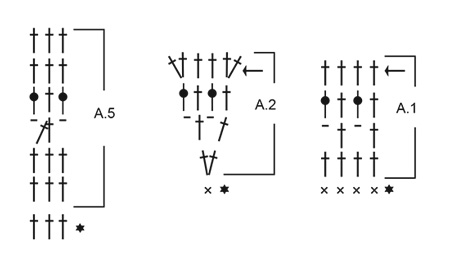
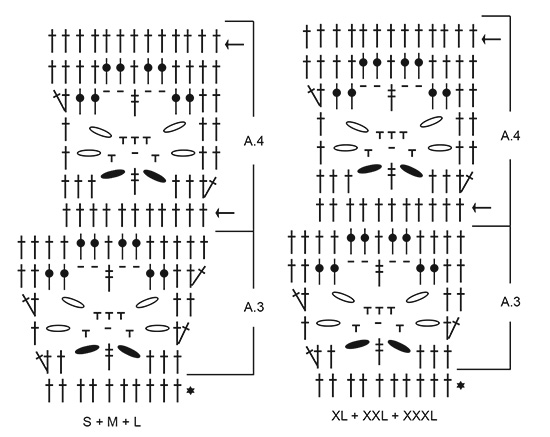
EXPLANATION FOR THE PATTERN:

----------------------------------------------------------

CROCHET INFORMATION:
Work every row back and forth and work together at the end/beginning of every row as follows:
Beginning every row with treble crochets with 3 chain stitches (= first treble crochet) and finish with 1 slip stitch in 3rd chain stitch at beginning of row, turn piece.
Begin every row with double crochets with 1 chain stitch (does not replace first double crochet) and finish with 1 slip stitch in first double crochet, turn piece.

INCREASE/DECREASE TIP:
To calculate how to increase/decrease evenly, use the total number of stitches (e.g. 93 stitches) and divide stitches by number of increases/decreases to be done (e.g. 7) = 13.3. I.e. in this example increase by working 2 double crochets in same stitch in approx. every 13th stitch.
To decrease evenly in this example work every 12th and 13th stitch together, i.e. work 2 treble crochets together as follows: * Make 1 yarn over, insert hook in next stitch, get yarn, make 1 yarn over and pull yarn through the 2 first loops on hook *, repeat from *-* 1 more time, make 1 yarn over and pull yarn through all 3 loops on hook (= 1 treble crochet decreased).

PATTERN: 
See diagrams A.1 to A.5. Choose diagram for your size (applies to A.3 and A.4).

----------------------------------------------------------

START THE PIECE HERE:

----------------------------------------------------------

JUMPER - SHORT OVERVIEW OF THE PIECE:
Work yoke and body back and forth (i.e. alternately from right and wrong side) and work together at the end of every row, top down. Work sleeves back and forth but work piece together at the end of every row, top down.

YOKE:
Work 109-114-118-123-129-133 chain stitches on hook size 4 mm with Muskat and form a ring with 1 slip stitch in first chain stitch. Work 1 chain stitch - read CROCHET INFORMATION, work 1 double crochet in each of the next 3-1-5-3-2-6 chain stitches, * skip 1 chain stitch, 1 double crochet in each of the next 6 chain stitches *, work from *-* = 93-97-101-105-110-114 double crochets.
Work first row from wrong side as follows:
Work 1 double crochet in each double crochet and increase 7-15-23-23-30-30 stitches evenly – read INCREASE/DECREASE TIP = 100-112-124-128-140-144 double crochets. REMEMBER THE CROCHET TENSION!
Work next row as follows from right side:
Work A.1 over 16-20-24-24-24-24 stitches (= 4-5-6-6-6-6 repetitions of 4 stitches) (= half back piece), work A.2 over 2-2-2-3-3-4 stitches (= 2-2-2-3-3-4 repetitions of 1 stitch), A.1 over 12 stitches (= 3 repetitions), A.2 over 2-2-2-3-3-4 stitches (= 2-2-2-3-3-4 repetitions) (= sleeve), A.1 over 36-40-44-44-56-56 stitches (= 9-10-11-11-14-14 repetitions) (= front piece), A.2 over 2-2-2-3-3-4 stitches (= 2-2-2-3-3-4 repetitions), A.1 over 12 stitches (= 3 repetitions), A.2 over 2-2-2-3-3-4 stitches (= 2-2-2-3-3-4 repetitions) (= sleeve), A.1 over 16-20-24-24-24-24 stitches (= 4-5-6-6-6-6 repetitions = half back piece).
Continue to work until A.1 and A.2 have been worked vertically (= 140-152-164-188-200-224 stitches) – AT THE SAME TIME on row marked with arrow adjust number of stitches by increasing/decreasing to 140-150-160-190-200-220 stitches. Piece measures approx. 6 cm.
Work next row as follows from right side:
Work A.3 over all stitches (= 14-15-16-19-20-22 repetitions over 10 stitches).
Continue to work until A.3 has been worked vertically = 196-210-224-247-260-286 stitches. Piece measures approx. 11 cm.
Work next row as follows from wrong side:
Work A.4 over all stitches (= 18-19-20-22-24-26 repetitions over 11 stitches) – AT THE SAME TIME on first row adjust number of stitches by increasing/decreasing to 198-209-220-242-264-286 stitches so that repetitions fit.
Continue to work until A.4 has been worked vertically (= 234-247-260-286-312-338 stitches), but on last row increase 0-11-19-8-6-10 stitches evenly = 234-258-279-294-318-348 stitches. Piece measures approx. 19 cm.

SIZE S:
If measurements are not correct, work A.5 over all stitches (= 78 repetitions of 3 stitches) until piece measures 19 cm – adjust so that next row is only with treble crochets.

SIZE M-L-XL-XXL-XXXL:
Then work A.5 over all stitches (= 86-93-98-106-116 repetitions of 3 stitches) until piece measures 21-22-24-26-28 cm – AT THE SAME TIME on 1st-2nd-2nd-4th-4th row increase 6-15-6-6-6 stitches evenly = 264-294-300-324-354 stitches. Continue until piece measures 21-22-24-26-28 cm, adjust so that next row is a row with only treble crochets.

ALL SIZES:
= 234-264-294-300-324-354 stitches. Now divide body and sleeves as follows (repeat A.5 vertically until finished measurements):
Work as before over the first 35-38-42-44-50-54 stitches (= half back piece), skip the next 48-57-63-63-63-69 stitches (= sleeve), work 6-6-6-12-12-12 chain stitches (= mid under sleeve), work as before over the next 68-74-84-86-98-108 stitches (= front piece), skip the next 48-57-63-63-63-69 stitches (= sleeve), work 6-6-6-12-12-12 chain stitches (= mid under sleeve) and work as before over the remaining 35-38-42-44-50-54 stitches (= half back piece). Finish body and sleeves separately. NOW MEASURE THE PIECE FROM HERE!

BODY:
= 150-162-180-198-222-240 stitches. Continue pattern as before over all stitches (= 50-54-60-66-74-80 repetitions A.5 of 3 stitches). When piece measures 4 cm from division, decrease 3 treble crochets evenly on next row (adjust to decrease on a row with only treble crochets). Decrease like this every 4 cm 2 times in total = 144-156-174-192-216-234 stitches. For every decrease work 1 repetition less of A.5 in width.
When piece measures 14 cm from division, increase 3 treble crochets evenly (adjust to increase on a row with only treble crochets). Increase like this every 4 cm 4 times in total = 156-168-186-204-228-246 stitches. For every increase work 1 repetition more of A.5 in width. Continue until piece measures 31-31-32-32-32-32 cm from division (50-52-54-56-58-60 cm from neck in the middle of front piece), finish after 1 row with treble crochets. Cut and fasten the yarn.

SLEEVE:
Work piece back and forth (i.e. alternately from right and wrong side) and work together with 1 slip stitch on every row.
Begin by working in the 4th-4th-4th-7th-7th-7th chain stitch of the 6-6-6-12-12-12 chain stitches worked in armhole on body as follows: Work 1 slip stitch, 3 chain stitches (= 1 treble crochet), 1 treble crochet in each of the next 2-2-2-6-6-6 chain stitches, A.5 over the next 48-57-63-63-63-69 treble crochets (= 16-19-21-21-21-23 times in width) and finish with 1 treble crochet in each of the last 3-3-3-6-6-6 chain stitches under sleeve = 54-63-69-75-75-81 stitches. Insert 1 marker thread at the beginning of row.
Continue pattern as before over all stitches (= 18-21-23-25-25-27 repetitions of 3 stitches). When piece measures 3 cm from division, decrease 3 treble crochets evenly on next row (adjust to decrease on a row with only treble crochets). Decrease like this every 5½-3½-3-2-2-2 cm 5-8-9-11-10-11 times in total = 39-39-42-42-45-48 stitches. For every decrease work 1 repetition less of A.5 in width. Continue until piece measures 37-35-35-33-31-29 cm from division (shorter measurements in the larger sizes because of longer yoke), finish after 1 row with only treble crochets. Cut and fasten the yarn. Work the other sleeve the same way.

NECK EDGE:
Work back and forth over chain stitch row in neck as follows:
ROW 1 (= from right side): Begin mid back, fasten yarn to piece with 1 slip stitch in a double crochet, work 2 chain stitches (= 1 half treble crochet), work 1 half treble crochet in every double crochet the entire row = 93-97-101-105-110-114 half treble crochets
ROW 2 (= from wrong side): Work 1 double crochet in every half treble crochet = 93-97-101-105-110-114 double crochets. Cut and fasten the yarn.

This pattern has been corrected.

Updated online: 25.03.2019
Correction - BODY: Continue pattern as before over all stitches (= 50-54-60-66-74-80 repetitions A.5 of 3 stitches).

Diagram

symbols = row has already been worked, begin on next row
symbols = 1 chain stitch
symbols = 3 chain stitches
symbols = 4 chain stitches
symbols = double crochet in stitch
symbols = double crochet around chain stitch/chain space
symbols = treble crochet in stitch
symbols = treble around chain stitch/chain space
symbols = WORK 2 TREBLE CROCHETS TOGETHER AS FOLLOWS: Work 1 treble crochet in first stitch, but wait with last pull through, work 1 treble crochet in next stitch, pull yarn through all 3 loops on hook.
symbols = double treble crochet in stitch
symbols = row with increase or decrease
diagram
diagram
diagram
Do you have a question? See a list of frequently asked questions (FAQ)

Knitting tension is what determines the final measurements of your work, and is usually measured per 10 x 10 cm. It is provided like so: number of stitches in width x number of rows in height - eg: 19 stitches x 26 rows = 10 x 10 cm.

The knitting tension is very individual; some people knit/crochet loosely while others work tightly. You adjust the knitting tension with the needle size, which is why the suggested needle size is only meant as a guide! You need to adjust this (up or down) to ensure that YOUR knitting tension matches the knitting tension provided in the pattern. If you work with a different knitting tension than provided you will have a different yarn consumption, and your work will have different measurements than what the pattern suggests.

The knitting tension also determines which yarns can replace each other. As long as you achieve the same knitting tension you can replace one yarn with another.

See DROPS lesson: How to measure your tension/gauge

See DROPS video: How to make a gauge tension swatch

The required amount of yarn is provided in grams, eg: 450 g. To calculate how many balls you’ll need you first need to know how many grams are in 1 ball (25g, 50g or 100g). This information is available if you click on the individual yarn quality on our pages. Divide the amount required with the amount of each ball. For example, if each ball is 50g (the most common amount), the calculation will be as follows: 450 / 50 = 9 balls.

The important thing when changing from one yarn to another is that the knitting/crochet tension remains the same. This is so that the measurements of the finished piece will be the same as on the sketch provided. It is easier to achieve the same knitting tension using yarns from the same yarn group. It is also possible to work with multiple strands of a thinner yarn to achieve the knitting tension of a thicker one. Please try our yarn converter. We recommend you to always work a test swatch.

Please NOTE: when changing yarn the garment might have a different look and feel to the garment in the photo, due to individual properties and qualities of each yarn.

See DROPS lesson: Can I use a different yarn than the one mentioned in the pattern?

All our yarns are categorised into yarn groups (from A to F) according to thickness and knitting tension – group A contains the thinnest yarns and group F the thickest. This makes it easier for you to find alternative yarns to our patterns, should you wish to switch yarn. All yarns within the same group have a similar knitting tension and can easily replace each other. However, different yarn qualities have different structures and properties which will give the finished work a unique look and feel.

Click here for an overview of the yarns in each yarn group

At the top of all our patterns you’ll find a link to our yarn calculator, which is a helpful tool should you wish to use a different yarn than suggested. By filling in the yarn quality you wish to replace, the amount (in your size) and number of strands, the calculator will present good alternative yarns with the same knitting tension. Additionally it will tell you how much you’ll require in the new qualities and whether you’ll need to work with multiple strands. Most skeins are 50g (some are 25g or 100g).

If the pattern is worked with multiple colours, every colour will have to be calculated separately. Similarly, if the pattern is worked with several strands of different yarns (for example 1 strand Alpaca and 1 strand Kid-Silk) you will have to find alternatives for each, individually.

Click here to see our yarn calculator

Since different yarns have different qualities and textures we have chosen to keep the original yarn in our patterns. However, you can easily find options among our available qualities by using our yarn calculator, or simply pick a yarn from the same yarn group.

It is possible that some retailers still have discontinued yarns in stock, or that someone has a few skeins at home that they would like to find patterns for.

The yarn calculator will provide both alternative yarn as well as required amount in the new quality.

If you think it's hard to decide what size to make, it can be a good idea to measure a garment you own already and like the size of. Then you can pick the size by comparing those measures with the ones available in the pattern's size chart.

You'll find the size chart at the bottom of the pattern.

See DROPS lesson: How to read size chart

The needle size provided in the pattern serves only as a guide, the important thing is to follow the knitting tension. And since knitting tension is very individual, you will have to adjust the needle size to ensure that YOUR tension is the same as in the pattern – maybe you’ll have to adjust 1, or even 2 needle sizes, up or down to achieve the correct tension. For this, we recommend that you work test swatches.

Should you work with a different knitting tension than the one provided, the measurements of the finished garment might deviate from the measurement sketch.

See DROPS lesson: How to measure your tension/gauge

See DROPS video: How to make a tension/gauge swatch

Working a garment top-down provides more flexibility and room for personal adjustment. For example it is easier to try the garment on while working, as well as making adjustments to length of yoke and shoulder caps.

The instructions are carefully explaining every step, in the correct order. Diagrams are adjusted to the knitting direction and are worked as usual.

The diagram depicts all rows/rounds, and every stitch seen from the right side. It is read from bottom to top, from right to left. 1 square = 1 stitch.

When working back and forth, every other row is worked from the right side and every other row is worked from the wrong side. When working from the wrong side, the diagram will have to be worked reversed: from left to right, knit stitches are purled, purl stitches are knit etc.

When working in the round every round is worked from the right side and the diagram are worked from right to left on all rounds.

See DROPS lesson: How to read knitting diagrams

The diagram depicts all rows/rounds, and every stitch seen from the right side. It is worked from bottom to top, from right to left.

When working back and forth every other row is worked from the right side: from right to left and every other row is worked from the wrong side: from left to right.

When working in the round, every row in the diagram are worked from the right side, from right to left.

When working a circular diagram you start in the middle and work your way outwards, counter clockwise, row by row.

The rows usually start with a given number of chain stitches (equivalent to the height of the following stitch), this will either be depicted in the diagram or explained in the pattern.

See DROPS lesson: How to read crochet diagrams

Instructions for working several diagrams after each other on the same row/round, will often be written like so: “work A.1, A.2, A.3 a total of 0-0-2-3-4 times". This means you work A.1 once, then A.2 is worked once, and A.3 is repeated (in width) the number of times provided for your size – in this case like so: S = 0 times, M = 0 times, L=2 times, XL= 3 times and XXL = 4 times.

The diagrams are worked as usual: begin with the first row in A.1, then work the first row in A.2 etc.

See DROPS lesson: How to read knitting diagrams

See DROPS lesson: How to read crochet diagrams

The total width of the garment (from wrist-to-wrist) will be larger in the larger sizes, despite the actual sleeves being shorter. The larger sizes have longer sleeve caps and wider shoulders, so there will be a good fit in all sizes.

The measurement sketch/schematic drawing provides information regarding the full length of the garment. If it’s a jumper or a jacket the length is measured from the highest point on the shoulder closest to the neckline, and straight down to the bottom of the garment. It is NOT measured from the tip of shoulder. Similarly, the length of yoke is measured from the highest point on the shoulder and down to where yoke is split into body and sleeves.

On a jacket measures are never taken along bands, unless specifically stated. Always measure inside band stitches when measuring the length.

See DROPS lesson: How to read a schematic drawing

Diagrams are often repeated on the round or in height. 1 repeat is the diagram the way it appears in the pattern. If it says to work 5 repeats of A.1 in the round, then you work A.1 a total of 5 times after/next to each other in the round. If it says to work 2 repeats of A.1 vertically/in height you work the entire diagram once, then begin again at the start and work the entire diagram one more time.

Chain stitches are slightly narrower than other stitches and to avoid working the cast-on edge too tight, we simply chain more stitches to begin with. The stitch count will be adjusted on the following row to fit the pattern and measurement sketch.

The rib edge is more elastic and will contract slightly compared to, for example, stocking stitch. By increasing before the rib edge, you avoid a visible difference in width between the rib edge and the rest of the body.

It’s very easy to cast off too tightly, and by making yarn overs while casting off (and simultaneously casting these off) you avoid a too tight cast off edge.

See DROPS video: How to bind off with yarn overs (yo)

To achieve an even increase (or decrease) you can increase on, for example: every 3rd and 4th row alternately, like so: work 2 rows and increase on the 3rd row, work 3 rows and increase on the 4th. Repeat this until the increase is complete.

See DROPS lesson: Increase or decrease 1 st on every 3rd and 4th row alternately

Should you prefer to work in the round instead of back and forth, you may of course adjust the pattern. You’ll need to add steeks mid-front (usually 5 stitches), and follow the instructions. When you would normally turn and work from the wrong side, simply work across the steek and continue in the round. At the end you’ll cut the piece open, pick up stitches to work bands, and cover the cut edges.

See DROPS video: How to knit steeks and cut open

Should you prefer to work back and forth instead of in the round, you may of course adjust the pattern so you work the pieces separately and then assemble them at the end. Divide the stitches for the body in 2, add 1 edge stitch in each side (for sewing) and work the front and back pieces separately.

See DROPS lesson: Can I adapt a pattern for circular needles into straight needles?

Pattern repeats can vary slightly in the different sizes, in order to get the correct proportions. If you’re not working the exact same size as the garment in the photo, yours might deviate slightly. This has been carefully developed and adjusted so that the complete impression of the garment is the same in all sizes.

Make sure to follow instructions and diagrams for your size!

If you have found a pattern you like which is available in women’s size it’s not very difficult to convert it to men’s size. The biggest difference will be the length of sleeves and body. Start working on the women size that you think would fit across the chest. The additional length will be worked right before you cast off for the armhole/sleeve cap. If the pattern is worked top-down you can add the length right after the armhole or before the first decrease on sleeve.

Regarding additional yarn amount, this will depend on how much length you add, but it is better with a skein too many than too few.

All yarns will have excess fibres (from production) that might come off as lint or shedding. Brushed yarns (ie hairier yarns) have more of these loose, excess fibres, causing more shedding.

Shedding also depends on what is worn under or over the garment, and whether this pulls at the yarn fibres. It’s therefore not possible to guarantee that there will be no shedding

Below are some tips on how to get the best result when working with hairier yarns:

1. When the garment is finished (before you wash it) shake it vigorously so the looser hairs come off. NOTE: do NOT use a lint roller, brush or any method that pulls at the yarn.

2. Place the garment in a plastic bag and put it in your freezer - the temperature will cause the fibres to become less attached to each other, and excess fibres will come off easier.

3. Leave in the freezer for a few hours before taking it out and shaking it again.

4. Wash the garment according to the instructions on the yarn label.

Pilling is a natural process that happens to even the most exclusive of fibers. It's a natural sign of wear and tear that is hard to avoid, and that is most visible in high friction areas of your garment like a sweater's arms and cuffs.

You can make your garment look as new by removing the pilling, using a fabric comb or a pill/lint remover.

Still can't find the answer you need? Then scroll down and leave your question so one of our experts can try to help you. This will be done normally within 5 to 10 working days.
In the meantime, you can read the questions and answers that others have left to this pattern or join the DROPS Workshop on Facebook to get help from fellow knitters/crocheters!

You might also like...

Daisy Di

Paulina, United Kingdom

Daisy Chain

Nikki Nothstein, United States

Post a comment to pattern DROPS 201-5

We would love to hear what you have to say about this pattern!

If you want to leave a question, please make sure you select the correct category in the form below, to speed up the answering process. Required fields are marked *.

Comments / Questions (48)

country flag Giovanna Profilio wrote:

Chiedo scusa, magari la mia è una domanda stupida. Che cosa significa (600-650-750-800-900-950 g colore 04)? Non riesco a capire quale sia la quantità esatta di filato necessaria per la realizzazione

31.03.2020 - 12:38

DROPS Design answered:

Buongiorno Giovanna. I numeri indicano la quantità in grammi necessaria a seconda della taglia. Quindi p.es per la taglia S occorrono 600 g, per la taglia M 650 g e via di seguito. Buon lavoro!

01.04.2020 - 08:29

country flag Jan Shearing wrote:

I\'m having trouble getting the tension - it should be 18 treble crochets in width 10 10 cm, but mine only measures 9 cm, but the vertical, instead of 9 treble rows for 10 cm, I already have 9 cm when I\'ve only done 5 treble rows. It\'s a long time since I have crocheted but think I must be doing something wrong. Please help.

01.03.2020 - 15:57

DROPS Design answered:

Dear Mrs Shearing, the crochet tension is quite individual, make sure to adjust hook size to get the correct tension in width and try to make your stitches somewhat less high to get the right tension in height. read more about tension here. Happy crocheting!

02.03.2020 - 11:37

country flag Rocchina wrote:

Vorrei sapere se esiste un filato adatto al periodo estivo più leggero del cotone,

26.02.2020 - 11:37

DROPS Design answered:

Buongiorno Rocchina. Può provare con il filato Bomull lin, un misto cotone lino. Appartiene ad un altro gruppo di filati rispetto al Muskat. Verifichi se riesce ad ottenere lo stesso campione indicato nel modello. Per ulteriori consigli, può rivolgersi anche al suo rivenditore Drops di fiducia. Buon lavoro!

26.02.2020 - 13:33

country flag Robby wrote:

Hoe begin ik met regel 3 van patroon A.5 ? Eerst 3 losse als eerste stokje maar hoe dan verder?? Met de losse en minderen?

19.08.2019 - 17:31

DROPS Design answered:

Dag Robby,

Op toer 3 begin je met 1 losse, dan sla je 1 stokje van de vorige toer over en haak je 2 stokjes samen, dan haak je nog een losse. Vervolgens begin je weer met 1 losse. Het komt er dus op neer dat je steeds 2 lossen haakt, 1 stokje van de vorige toer over slaat en dan 2 stokjes samen haakt.

01.09.2019 - 12:47

country flag Katanya Mardones Cortes wrote:

I've never followed a pattern like this before and I'm getting very confused. I'm up to the 4th row of the Yoke and can't figure out how to follow the pattern any further. Please help, I don't want to give up.

10.08.2019 - 10:41

DROPS Design answered:

Dear Mrs Mardones Cortes, see how to read crochet diagrams here - ie work A.1 and A.2 reading from the right towards the left from RS and from the left towards the right from WS. Happy crocheting!

12.08.2019 - 07:24

country flag Elin wrote:

Jeg skjønner ikke hvordan jeg skal få 164 m før siste omg av mønster A1 og A2. Siste omg skal jo brukes til å justere ned til 160 m. Hvis jeg har skjønt mønsteret riktig økes det tilsammen 8 m på første omg og 16 m på andre omg. Tilsammen 148 m. Etter dette ingen øking før justering på siste omg. Hva er det jeg gjør feil

07.08.2019 - 12:40

DROPS Design answered:

Hei Elin. Hekle 4.rad/siste rad av A.1 og A.2 slik: Hekle A.1 over 24 masker (halve bakstykket), hekle A.2 2 ganger (12 masker), hekle A.1 over 12 masker, hekle A.2 2 ganger (12 masker), hekle A.1 over 44 masker (forstykket), hekle A.2 2 ganger (12 masker), hekle A.1 over 12 masker, hekle A.2 2 ganger (12 masker), og hekle A.1 over 12 masker (andre halvdel av bakstykket). (24+12+12+12+44+12+12+12+24 = 164 masker). Etter siste rad i diagram A.1 og A.2 er det 164 masker MEN samtidig på siste rad skal maskeantallet justeres til 160 masker. Det kan du f.eks gjør ved å ikke hekle 2 staver i 1 stav i 4 av de 8 gangene du hekler A.2 på siste rad. God Fornøyelse!

09.09.2019 - 13:56

country flag Ingrid wrote:

Me parece genial lo que haces pero seria muy genial siincluyeras un video y pienso es más fácil seguir las instrucciones con gráficos un pasoa paso ayudaría mucho en general me gusta mucho lo que haces.

20.07.2019 - 07:16

country flag Alyce wrote:

This is a lovely pattern. Do you have it in children's sizes? I can't wait to make it using various yarns for different weather. Instead of two rows of daisies, I would like to just make one row so my bra doesn't show. Awesome pattern! One of the best I've seen from Drops. Thanks so much!

05.06.2019 - 16:02

DROPS Design answered:

Dear Alyce, this pattern is not available in children size but you can find a similar jacket to inspire you. Happy crocheting!

05.06.2019 - 16:09

country flag Kalina wrote:

Hello, I have a question regarding the transition between A.4 and A.5. It is written that we have to work A.5 over all stitches and "at the same time on 1st-2nd-2nd-4th-4th row increase 6-15-6-6-6 stitches evenly" = 294 stitches for M size. Firstly, why are the 2nd and the 4th row repeated twice? Secondly, an increase of 6+15+6+6+6 would end up in 297 stitches for size M instead of 294. Can you clarify what that means? Thank you!

27.05.2019 - 16:53

DROPS Design answered:

Dear Kalina, each number refers to the size in the same order as given under header, ie in size M (= 2nd size) you increase 15 stitches (= 2nd number) evenly on 2nd row (= 2nd number). Happy crocheting!

28.05.2019 - 09:02

country flag Barbara wrote:

Salve perché sono scomparsi lo schema 5 e l'immagine del maglioncino indossato dalla modella grazie

14.05.2019 - 17:25

DROPS Design answered:

Buongiorno Barbara, il diagramma A.5 è presente, così come l'immagine del maglione: ha provato con un altro browser o a svuotare la cache? Buon lavoro!

14.05.2019 - 17:51