
Popular categories
Looking for a yarn?


|
|||||||
Truly Wooly |
|||||||
 |
 |
||||||
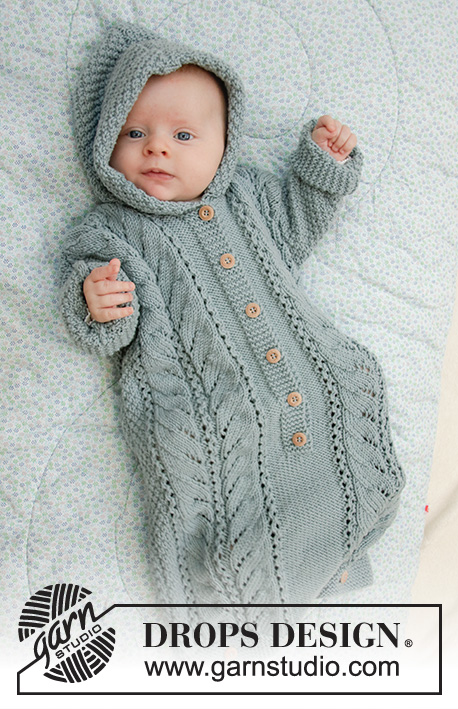
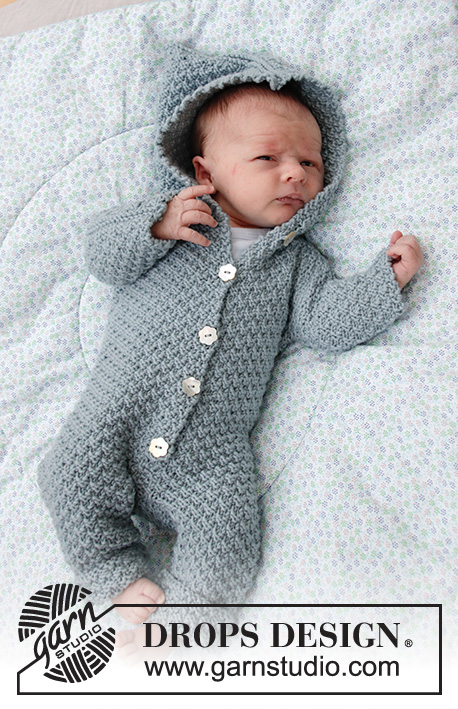
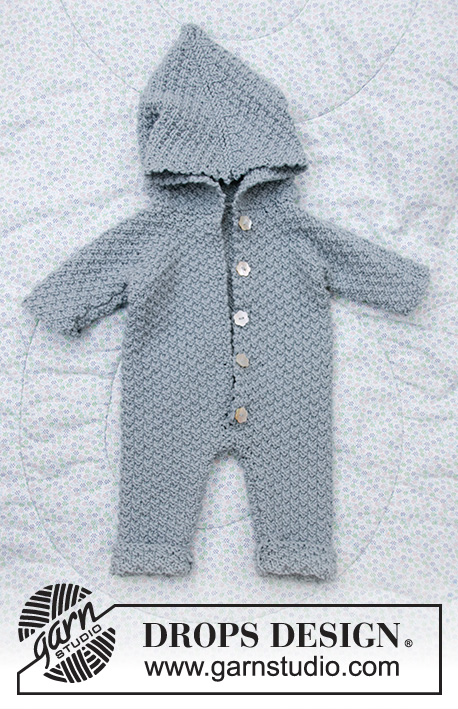
Knitted suit for baby in DROPS Merino Extra Fine. Piece is knitted with textured pattern and hood. Size premature - 4 years
DROPS Baby 33-8 |
|||||||
|
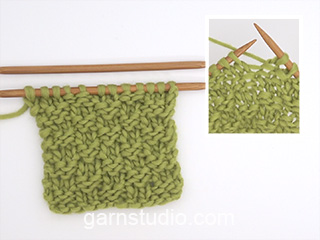
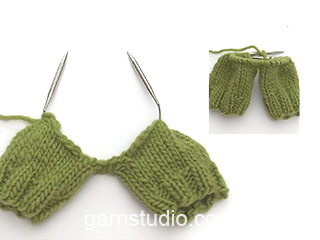
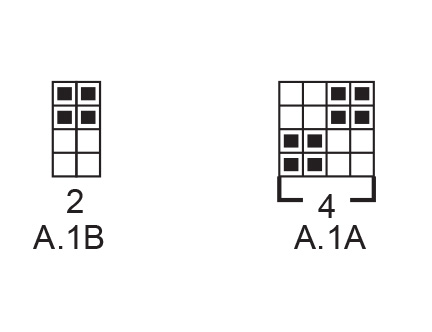
---------------------------------------------------------- EXPLANATION FOR THE PATTERN: ---------------------------------------------------------- GARTER STITCH (back and forth): 1 ridge = knit 2 rows. 1 edge stitch in garter stitch = knit stitch from right side and knit stitch from wrong side. PATTERN: See diagram A.1. Diagrams show all rows in pattern seen from the right side. INCREASE TIP-1 (applies to legs in size 3/4 years): Increase 1 stitch inside 1 edge stitch in garter stitch by making 1 yarn over. On next row work yarn overs twisted to avoid holes. Work the increased stitches in A.1. INCREASE TIP-2 (evenly): To calculate how to increase evenly, use the total number of stitches on row (e.g. 44 stitches) and divide stitches by number of increases to be done (e.g. 14) = 3.1. In this example increase by making 1 yarn over after approx. every 3rd stitch. On next row knit yarn overs twisted to avoid holes. BUTTONHOLES (bottom up): Decrease for buttonholes on right band. 1 BUTTONHOLE = knit third and fourth stitch from edge together and make 1 yarn over. On next row purl or knit yarn over (depending on where in the diagram you are) to make holes. Decrease for buttonholes when piece measures (measured from where legs where put together): (<0): 5, 10, 15 and 20 cm = 2", 4", 6" and 8" 0/1 months: 6, 11, 16, 21 and 26 cm = 2⅜",4⅜", 8¼" and 10¼" 1/3 months: 5, 10, 15, 20, 25 and 30 cm = 2", 4", 6", 8", 9¾" and 11¾" . 6/9 months: 6, 12, 17, 22, 27 and 32 cm = 2⅜", 4¾", 6¾", 8¾", 10⅝" and 12½". 12/18 months: 6, 12, 17, 23, 28 and 34 cm = 2⅜", 4¾", 6¾", 9", 13⅜". 2 years: 9, 15, 21, 27, 33 and 39 cm = 3½", 6", 8¼", 9½", 10⅝" and 15¼". 3/4 years: 7, 13, 19, 25, 31, 37 and 43 cm = 2¾", 5⅛", 7½", 9¾", 12¼", 14½" and 17" ---------------------------------------------------------- START THE PIECE HERE: ---------------------------------------------------------- SUIT - SHORT OVERVIEW OF THE PIECE: Work each leg back and forth on circular needle, bottom up. Place legs together and work back and forth on circular needle from mid front up to sleeves. Then cast on new stitches for sleeves in each side and finish front pieces and back piece separately. Sew piece together on the shoulder. Finish by picking up stitches around the neck and work a hood. RIGHT LEG (when suit is worn): Cast on (32) 36-40-40-44 (44-48) stitches on circular needle size 4 mm = US 6 with Merino Extra Fine. Work first row as follows from right side: 1 edge stitch in GARTER STITCH – read explanation above, work A.1A until 3 stitches remain on row (= 7-8-9-9-10 (10-11) repetitions of 4 stitches), work A.1B (= 2 stitches) and finish with 1 edge stitch in garter stitch. Continue pattern like this. REMEMBER THE KNITTING GAUGE! When piece measures 4 cm = 1½", insert 1 marker in piece (marks fold). When piece measures 14 cm = 5½" (only applies to size 3/4 years) increase 1 stitch in each side – read INCREASE TIP-1 (do not increase in the other sizes). Repeat increase in size 3/4 years when piece measures 24 cm = 9½" = (32) 36-40-40-44 (44-52) stitches on needle. Work until piece measures (12) 12-16-23-31 (32-35) cm = (4¾") 4¾"-6¼"-9"-12¼" (12½"-12¾") from cast-on edge, adjust so that next row is worked from right side. Bind off 1 stitch at beginning of the next 2 rows (i.e. bind off edge stitches) = (30) 34-38-38-42 (42-50) stitches. Then work the next 2 rows as follows, begin from right side: Work as before over all stitches and cast on (3) 3-3-5-5 (7-7) new stitches at the end of row (= mid back). Turn piece, work A.1 as before over all stitches, but make sure to continue pattern correctly, then cast on (4) 4-4-6-6 (8-8) stitches at the end of row from wrong side (= mid front). There are now (37) 41-45-49-53 (57-65) stitches on needle and piece measures approx. (13) 13-17-24-32 (33-36) cm = (5⅛") 5⅛"-6¾"-9½"-12½" (13"-14¼") from cast-on edge. Put piece aside and work left leg as explained below. LEFT LEG (when suit is worn): Cast on (32) 36-40-40-44 (44-48) stitches on circular needle size 4 mm = US 6 and work first row as follows from right side: 1 edge stitch in garter stitch, work A.1A until 3 stitches remain on row (= 7-8-9-9-10 (10-11) repetitions of 4 stitches), work A.1B (= 2 stitches) and finish with 1 edge stitch in garter stitch. Continue pattern like this. When piece measures 4 cm = 1½", insert 1 marker in piece (marks fold). When piece measures 14 cm = 5½" (only applies to size 3/4 years) increase 1 stitch in each side – remember INCREASE TIP-1 (do not increase in the other sizes). Repeat increase in size 3/4 years when piece measures 24 cm = 9½" = (32) 36-40-40-44 (44-52) stitches on needle. Work until piece measures (12) 12-16-23-31 (32-35) cm = (4¾") 4¾"-6¼"-9"-12¼" (12½"-12¾") from cast-on edge, adjust so that next row is worked from right side. Bind off 1 stitch at beginning of the next 2 rows (i.e. bind off edge stitches) = (30) 34-38-38-42 (42-50) stitches. Then work the next 2 rows as follows, begin from right side: Work as before over all stitches and cast on (4) 4-4-6-6 (8-8) new stitches at the end of row (= mid front). Turn piece, work A.1 as before over all stitches, but make sure to continue pattern correctly, then cast on (3) 3-3-5-5 (7-7) stitches at the end of row from wrong side (= mid back). There are now (37) 41-45-49-53 (57-65) stitches on needle and piece measures approx. (13) 13-17-24-32 (33-36) cm = (5⅛") 5⅛"-6¾"-9½"-12½" (13"-14¼") from cast-on edge. Cut the yarn. Now place the parts together as explained below. BODY: Place right leg and left leg on same circular needle with right leg first. Begin from right side on right leg, work 1 edge stitch in garter stitch, continue A.1 as before over the remaining stitches on right leg (make sure to continue pattern correct according to finish on leg), then continue pattern over the first (36) 40-44-48-52 (56-64) stitches on left leg (make sure to continue pattern correct) and finish with 1 edge stitch in garter stitch = (74) 82-90-98-106 (114-130) stitches on needle. Insert another marker in piece! NOW MEASURE PIECE FROM THIS MARKER! Continue A.1 back and forth with 1 edge stitch in garter stitch in each side towards mid front. When piece measures (3) 3-3-3-4 (5-5) cm = (1⅛") 1⅛"-1⅛"-1⅛"-1½" (2"-2") from marker (adjust to work next row from right side) bind off 1 stitch at beginning of the next 2 rows (i.e. bind off edge stitches). Then work the next 2 rows as follows, begin from right side: Work as before over all stitches and cast on 3 new stitches at the end of row (= left band at the front). Turn piece, work A.1 as before over all stitches (make sure to continue pattern correctly) and cast on 3 new stitches at the end of row from wrong side (= right band at the front). There are now (78) 86-94-102-110 (118-134) stitches on needle. Continue A.1 back and forth over all stitches (i.e. do not work edge stitches in garter stitch). Remember BUTTONHOLES on right band - read explanation above. When piece measures (15) 20-24-27-28 (32-36) cm = (6") 8"-9½"-10⅝"-11" (12½"-12¼") from the new marker, i.e. (28) 33-41-51-60 (65-72) cm = (11") 12"-16⅛"-20"-23⅝" (25½"-28¾") from cast-on edge, divide the piece in each side. Finish front pieces and back piece separately as explained below. RIGHT FRONT PIECE: Begin from right side and work as before over the first (21) 23-25-27-29 (31-35) stitches, then cast on (9) 13-13-17-17 (21-25) new stitches for sleeve. Slip the remaining stitches on 1 stitch holder for back piece and left front piece. Continue A.1 back and forth as before but make sure that pattern fits over all stitches. AT THE SAME TIME cast on (8) 10-14-14-16 (20-22) new stitches for sleeve at the end of the next 2 rows from right side = (46) 56-66-72-78 (92-104) stitches on needle. Continue pattern back and forth over all stitches until piece measures (22) 28-32-35-36 (41-45) cm = (8¾") 11"-12½"-12¾"-14¼" (16⅛"-17¾") from marker, i.e. (35) 41-49-59-68 (74-81) cm = (13¾") 16⅛"-19¼"-23¼" (29⅛"-32" from cast-on edge. At the beginning of next row from right side slip the first (8) 8-9-11-11 (12-12) stitches on 1 stitch holder for neck but to avoid cutting the yarn work them before slipping them on the stitch holder. Continue pattern back and forth as before and bind off for neck at the beginning of every row from mid front as follows: Bind off 2 stitches 1 time and 1 stitch (1) 1-2-2-2 (3-3) times = (35) 45-53-57-63 (75-87) stitches remain on needle. Then work until the entire suit measures approx. (24) 30-34-37-39 (44-49) cm = (9½") 11⅜"-13⅜"-14½"-15¼" (17¼"-19¼") from marker, i.e. (37) 43-51-61-71 (77-85) cm = (14½") 17"-20"-24"-28" (30⅜"-33½") from cast-on edge, but adjust so that next row is worked from right side. Work 1 ridge back and forth over all stitches. Then bind off by knitting from the right side. The entire suit measures approx. (38) 44-52-62-72 (78-86) cm = (15") 17¼"-20½"-24⅜"-28⅜" (30¾"-33⅞") from cast-on edge. Now work back piece as explained below. BACK PIECE: Slip the first (36) 40-44-48-52 (56-64) stitches on stitch holder (seen from right side) on circular needle size 4 mm = US 6 and continue A.1 back and forth over these stitches as before. AT THE SAME TIME cast on new stitches for sleeves at the end of every row in each side as follows: Cast on (9) 13-13-17-17 (21-25) stitches 1 time in each side and then (8) 10-14-14-16 (20-22) stitches 2 times in each side = (86) 106-126-138-150 (178-202) stitches on needle. Continue pattern back and forth over all stitches until piece measures (23) 29-33-36-38 (43-48) cm = (9") 11⅜"-13"-14¼"-15" (17"-19") from marker). On next row bind off the middle (12) 12-16-20-20 (24-24) stitches for neck and finish each shoulder/sleeve separately. Then bind off 2 stitches on next row from neck = (35) 45-53-57-63 (75-87) stitches remain on needle for shoulder/sleeve. Then work until the entire suit measures approx. (24) 30-34-37-39 (44-49) cm = (9½") 11¾"-13⅜"-14½"-15¼" (17¼"-19¼") from marker, but adjust according to front piece and make sure that next row is from right side. Work 1 ridge back and forth over all stitches. Then bind off by knitting from the right side. Work the other shoulder/sleeve the same way. Then work left front piece as explained below. LEFT FRONT PIECE: Slip the remaining (21) 23-25-27-29 (31-35) stitches on stitch holder back on needle size 4 mm = US 6. Begin from right side and continue A.1 back and forth as before. AT THE SAME TIME cast on new stitches for sleeve at the end of the next 3 rows from wrong side as follows: Cast on (9) 13-13-17-17 (21-25) stitches 1 time and then (8) 10-14-14-16 (20-22) stitches 2 times = (46) 56-66-72-78 (92-104) stitches on needle. Continue pattern back and forth over all stitches until piece measures the same as right front piece. At the beginning of next row from wrong side slip the first (8) 8-9-11-11 (12-12) stitches on 1 stitch holder for neck but to avoid cutting the yarn work them before slipping them on the stitch holder. Continue pattern back and forth as before and bind off for neck at the beginning of every row from mid front as follows: Bind off 2 stitches 1 time and 1 stitch (1) 1-2-2-2 (3-3) times = (35) 45-53-57-63 (75-87) stitches remain on needle. Then work until the entire suit measures approx. (24) 30-34-37-39 (44-49) cm = (9½") 11¾"-13⅜"-14½"-15¼" (17¼"-19¼") from marker, i.e. (37) 43-51-61-71 (77-85) cm = (14½") 17"-20"-24"-28" (30⅜"-33½") from cast-on edge, but measure so that next row is worked from right side. Work 1 ridge back and forth over all stitches. Then bind off by knitting from the right side. The entire suit measures approx. (38) 44-52-62-72 (78-86) cm = (15") 17¼"-20½"-24⅜"-28⅜" (30¾"-33⅞") from cast-on edge. ASSEMBLY: Sew shoulder seams inside bind-off edges. Sew the seams under the sleeve. Sew seam on inside of both legs inside 1 edge stitch in each side. Sew seam mid front from bottom of band and down inside 1 edge stitch in each side. Sew together the opening between the legs. Fold the end of legs at the marker. Sew the buttons on to the left band. HOOD: Pick up from right side approx. 44 to 70 stitches around the neck (including stitches on stitch holders at the front). Knit 1 row from wrong side while increasing evenly to (58) 70-74-74-78 (86-86) stitches – read INCREASE TIP-2. Knit 1 row from right side and knit 1 row from wrong side. Work next row as follows from right side: Work A.1A until 2 stitches remain on needle and finish with A.1B (= 2 stitches). Continue pattern like this until piece measures (17) 18-19-20-21 (22-23) cm = (6¾") 7"-7½"-8"-8¼" (8¼"-9") from ridge in the neck, but adjust so that next row is from right side. Work 1 ridge back and forth over all stitches. Then bind off by knitting from the right side. Place the hood double and sew seam at the top inside bind-off edge. |
|||||||
Diagram explanations |
|||||||
|
|||||||
|
|||||||

|
|||||||
|
Have you made this or any other of our designs? Tag your pictures in social media with #dropsdesign so we can see them! Do you need help with this pattern?You'll find tutorial videos, a Comments/Questions area and more by visiting the pattern on garnstudio.com. © 1982-2024 DROPS Design A/S. We reserve all rights. This document, including all its sub-sections, has copyrights. Read more about what you can do with our patterns at the bottom of each pattern on our site. |
|||||||


With over 40 years in knitting and crochet design, DROPS Design offers one of the most extensive collections of free patterns on the internet - translated to 17 languages. As of today we count 304 catalogs and 11422 patterns - 11417 of which are translated into English (US/in).
We work hard to bring you the best knitting and crochet have to offer, inspiration and advice as well as great quality yarns at incredible prices! Would you like to use our patterns for other than personal use? You can read what you are allowed to do in the Copyright text at the bottom of all our patterns. Happy crafting!
Comments / Questions (170)
Hallo kann man die Beine nicht mit dem Nadelspiel ohne Naht stricken?
19.02.2021 - 13:25Ich bin gerade dabei das linke und rechte Bein zu stricken. Wenn ich in Reihen Muster A1A und A1B stricken, habe ich immer vier "gleiche"Maschen hintereinander, d.h. entweder 4 rechte oder vier linke (je nachdem ob Hin- oder Rückreihe). wenn ich nun rechtes und linkes abein zusammenfüge, sind beim rechten Bein diese vier gleichen Maschen an der inneren Mitte, beim linken Bein an der hinteren Mitte. Ist dies so gewollt?
19.02.2021 - 09:17DROPS Design answered:
Liebe Katharina, Muster sollte die ganze Reihe stimmen, es sind jetzt in der Mitte von Rückenteil 6 neuen Masche, die sollten Sie 2 re, 2 li, 2 re stricken oder 2 li, 2 re, 2 li stricken, je nach der letzten Maschen von rechten Bein (letze Maschen in A.1B) und der ersten Masche von linken Bein. Viel Spaß beim stricken!
19.02.2021 - 10:14Har købt 250 g som der står man skal bruge på str 1/3 mdr af forhandler på nettet. Der er ikke nok garn. Kan nu se flere skriver de også mangler. Det er godt nok ærgerligt i ikke har rettet i opskriften. Jeg har nu en dragt jeg ikke kan strikke færdig.
11.02.2021 - 19:08Hallo, ich benötige Hilfe zum rechten Vorderteil. Ich bin an der folgenden Stelle: Im Muster hin und zurück wie zuvor weiterstricken und dabei für den Halsausschnitt am Anfang jeder Reihe, die am Halsrand beginnt, wie folgt abketten. Muss ich danach nur einmal 3 Maschen (0/1 M.) abketten, oder kette ich tatsächlich bei jeder Hinreihe jeweils 3 M ab? Wie viele M sind dann noch auf der Nadel, bevor ich die restlichen M abkette, oder ist das irrelevant und nur von der Gesamtlänge abhängig? VG
31.01.2021 - 15:16I'm currently knitting size 1/3 months and just had to order more yarn because 250g is not enough to finish the hood. I'm lucky that the shop still has the same dyelot. So better buy 300g.
12.01.2021 - 20:52Hej, sliter lite med att förså hur jag skal gå till väga med benen. Då det ökas 6 maskor på ena sidan och 5 på andra (storlek 6-9mnd) så får arbetet ett udda tal. 1. Skal kantmaskorna fortfarande gälla? 2. Mönstret kräver ett jämnt antall maskor för att bli komplett, skal de då vara "ett halvt mönster" med bara en maska på ena sidan? Eller kan man göra två kantmaskor på den ojämna sidan?
29.12.2020 - 17:34DROPS Design answered:
Hej Emmy, jo om du lägger upp nya maskor i varje sida och sätter det andra benet på stickan, så har du nu 1 kantm i varje sida av mitt fram. Du fortsätter mönstret över det tidigare mönster och fortsätter med de nya maskor. Det bör stämma, men gör inget om du avslutar med 1 maska från mönstret. Lycka till :)
14.01.2021 - 12:32Ich bin am Fertigstellen, verstehe aber nicht was gemeint ist mit Naht an den Innenseiten der Beine innerhalb einer Randmasche schließen. Ebenso wie die Naht ab der Blende nach unten innerhalb 1 Randmasche schließen. Was ist in dem Bezug eine Randmasche. Wird dies nicht einfach zwischen den Beinen zusammengenäht? Vielen Dank
28.12.2020 - 21:20DROPS Design answered:
Liebe Bärbel, ja genau, zuerst nähen Sie jedes Bein zusammen (innerhalb die Randmasche, die beidseitig angeschlagen waren), dann nähen Sie Vorder/Rückenteil zwischen Beinen zusammen. Viel Spaß beim stricken!
04.01.2021 - 11:26Hei, jeg strikker dress 0-1 mnd. Skal nå sette sammen beina, men får ikke mønsteret til å gå opp med tanke på de 3 maskene på slutten av høyre ben og begynnelsen av venstre ben. Hvordan gjør jeg dette for at mønsteret skal stemme?
20.12.2020 - 21:00Ik ben met de beentjes gestart. Kloot het dat het rechterpijpje aan de middenachter kant eindigt met A2 waardoor hier het patroon niet doorloopt En bij de linkerpijp is dit aan de middenvoorkant?
19.12.2020 - 20:16Har strikket og sydd sammen hele dressen,men forstår ikke hvordan hetten skal strikkes. Størrelsen jeg strikker har 9 masker på en tråd ved halsen på hver side. Skal man da ta de 9 maskene på pinnen og legge opp 35 nye masker i tillegg på pinnen slik at det blir 44, strikke ferdig og sy på hetten til slutt? Virker litt spesielt å strikke den delvis på. Hvis ikke det er tilfellet, skal man hente ut masker av de som er felt av? Og hva menes med ca 44-70 masker?
30.11.2020 - 18:39DROPS Design answered:
Hei Victoria, Du skal ha totalt 44-70 masker avhengig av størrelsen du strikker og hvor stor hette du vil ha. Disse maskene inkluderer alle maskene på trådene, pluss å strikke opp resten langs bakstykket. God fornøyelse!
01.12.2020 - 07:41